Guide to working with your own cloud video surveillance service Xeoma Pro Your Cloud
Xeoma Pro Your Cloud is Xeoma’s special mode of work powered by Xeoma Pro licenses. Designed to enable easy and quick work with subscribers, it automatizes the work to the maximum.
Read here to understand what Xeoma Pro Your Cloud is and why you need it
How to start:
– Download and launch Xeoma in the special Cloud mode;
– Buy and activate Xeoma Pro licenses;
– Setup and configure your Cloud video surveillance service.
Xeoma Pro Your Cloud Manual
Work with Xeoma Pro Your Cloud can be carried out in 2 ways – through the web interface or through configuration files.
1. Work through the web interface.
Launch Xeoma. Go to the Main Menu – Install – Install Cloud server to auto start:

Specify necessary path to install Xeoma and press OK. Note that Xeoma Pro Your Cloud will be installed on the local computer. After installation you’ll see a warning that the installation will take some time. You can also get a system message about permission to install the service. Click Allow or OK.
As soon as the program is installed, the admin page will be opened in a browser by default (or you can enter the web admin page in a browser manually – http://localhost:10090/ (or replace ‘localhost’ with your server’s IP address)). Default credentials for the browser access are admin/admin. We recommend changing these credentials to the stronger ones. You can do that in “Global settings”.

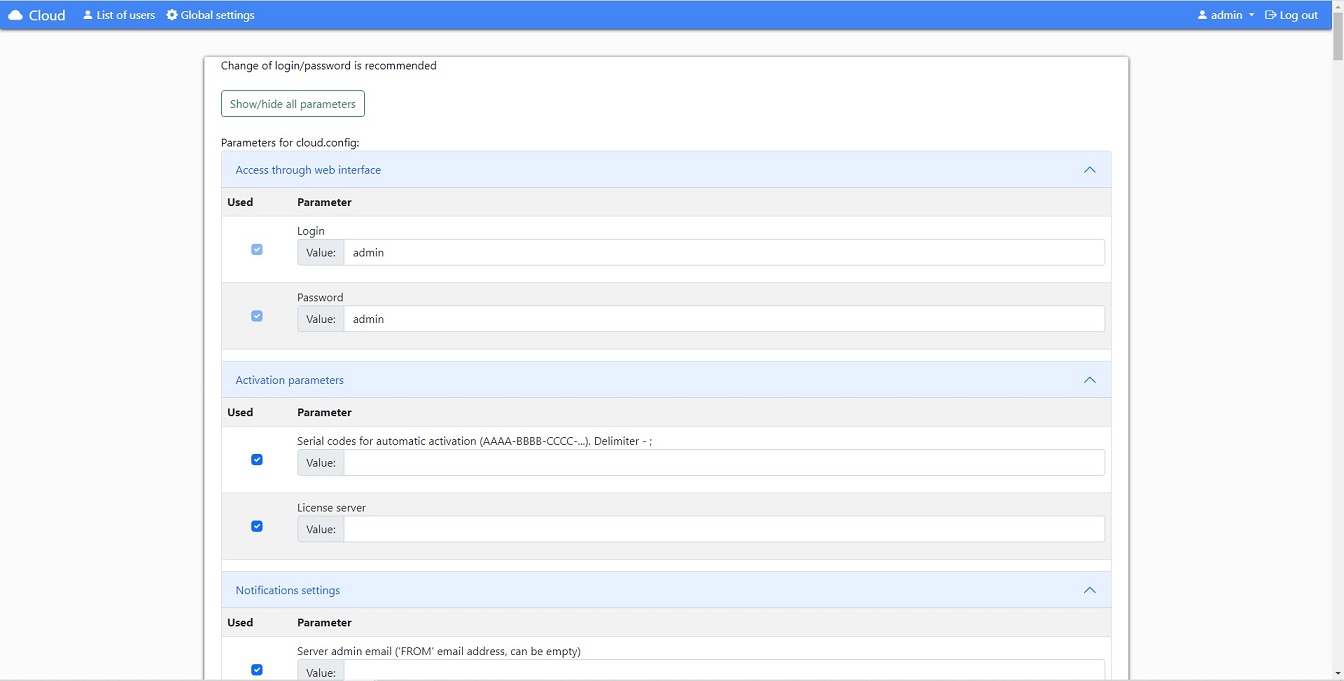
The upper panel contains the following options:
Xeoma Cloud will take you back to the Main page.
List of users is a window where you can view and change current users and their permissions.
Global settings is the menu where you can activate licenses and set up general rules for the Cloud service.
Logged-in User will always let you know as what user you are logged in. Click on it to change the access data.
Log out is a button to exit and/or re-login as a different user.
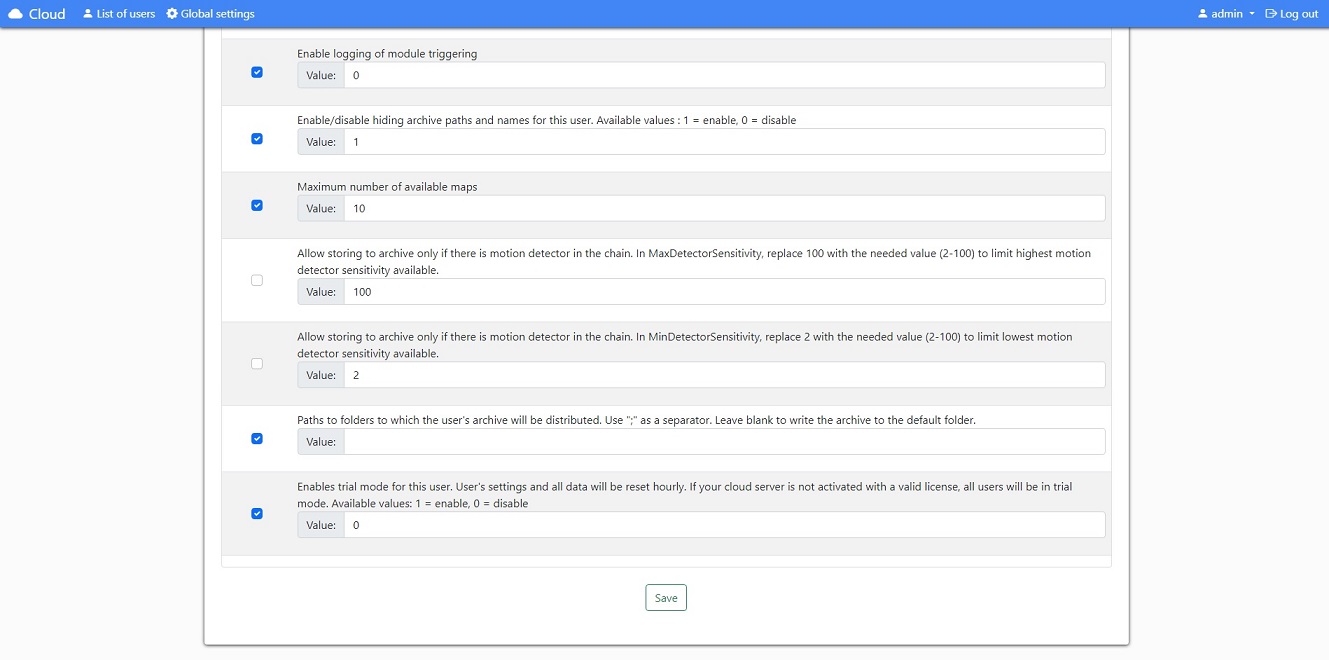
General settings for your Cloud can be set in the Global settings tab. Attention: in order to save changes you made don’t forget to click the Save button in the bottom of the page.
List of users has a list of all current users, their connection data, number of available sources, etc. Also, you’ll see the “Preferences” icon on the upper panel that allows deleting or adding new users.

Next to the username in the List of users you’ll see these icons: Box (for bulk actions), Pen (to edit settings of the account), Trash bin (to delete the account), and Camera (to add cameras).
Press the Pen button to edit the user’s account data, including login information, number of available sources, disk space, etc. Take a look at the registration data here as it will be used for connection under this user.
Enter your subscriber’s email in the Registration info: user email. This email will become the web page login for this user. Please mind that for login the @ sign and point and other symbols will be replaced with “_”. For example, “Test_User@mail.com” will be turned into “test_user_mail_com” as a login.
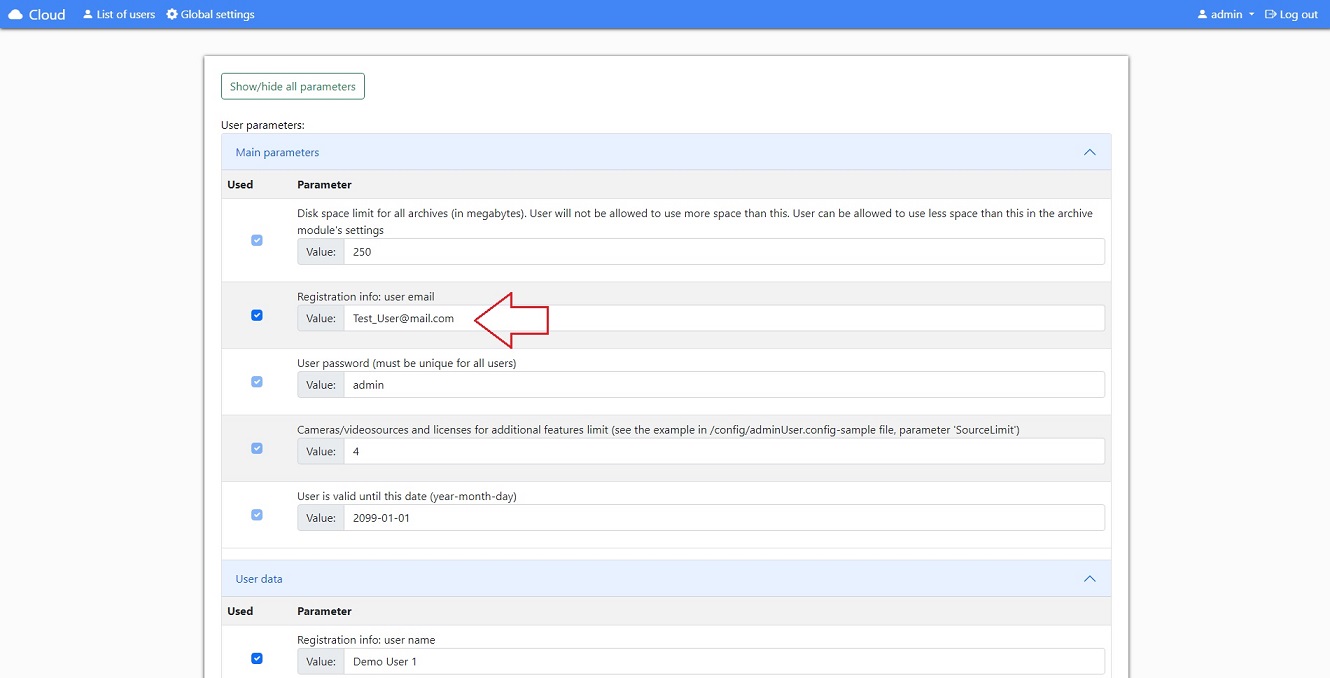
You can set the name for the user account in the List of users – Edit (pen) – User data – Registration info: user name. This username will be shown in Xeoma.
To view cameras of a particular user, you will need to log in using this user’s login/password. In order to do that, click the Exit button – and enter the user’s access data in the authorization prompt:

Web interface differs slightly for a user. Read more about user web interface in Xeoma here.

2. Work through the configuration files.
Launch Xeoma with the -cloud key:
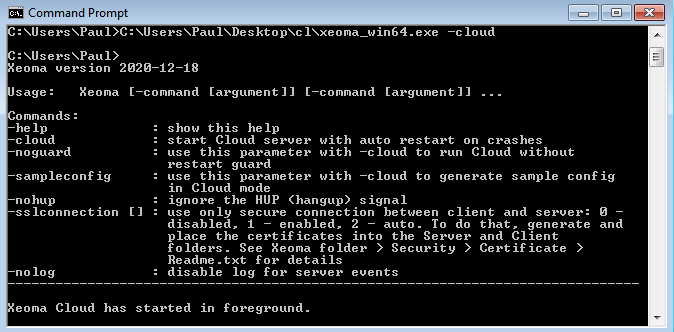
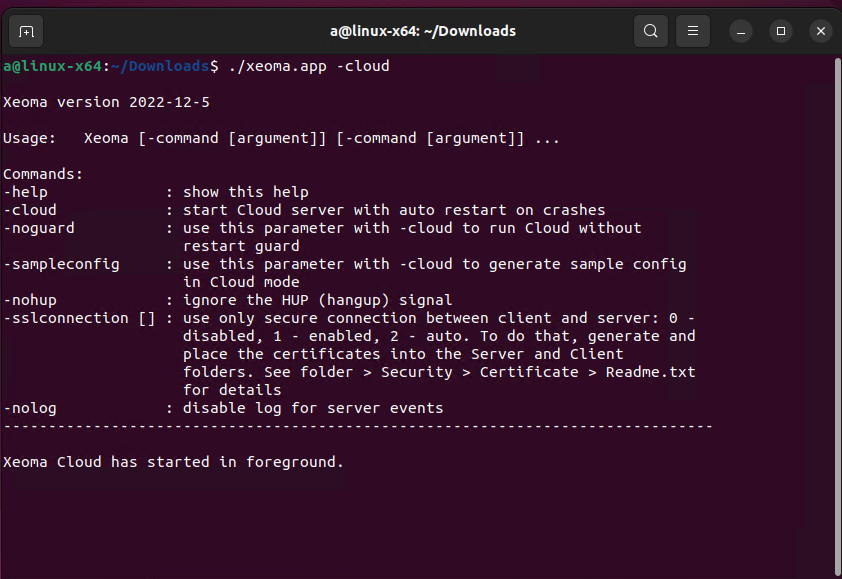
In the console you will see all available commands. Please take time to read them thoroughly.
Also, all console commands are listed here.

|
For example, these commands can be used with the -cloud command: -nohup is for ignoring the HUP (hangup) signal; -noguard is for disabling the process that restarts cloud server if it is stopped; -sampleconfig is for generation of a sample config; etc. |
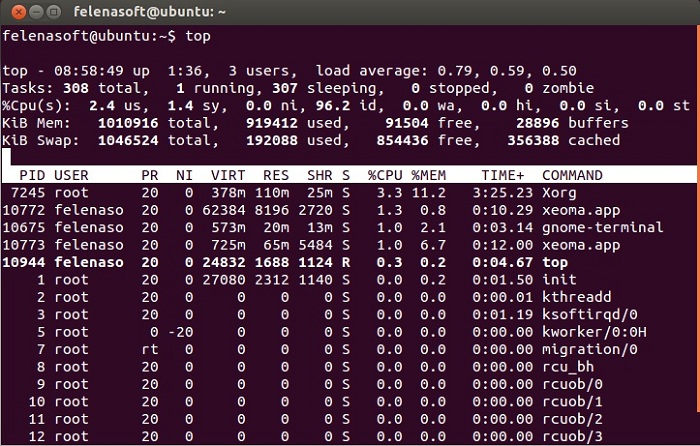
For Linux machines: if you run top in the same Terminal, or close the Terminal, Xeoma Pro Your Cloud will be stopped. If you want to check that Xeoma is launched, open another Terminal and check Xeoma there:
For Windows machines: if you launched Xeoma using the -cloud command via command prompt, then Xeoma Pro Your Cloud server will be working in the foreground until your “kill” the process in the Task manager or use the -stopservice command.
When you first launch Xeoma with the -cloud key, it creates sample configuration and is ready to work with these demo settings from the start:

The Config folder has only default users so far – adminUser and demoUser. Both are just for example, you can remove them whenever you need. You can create new user configs based on the sample ones there.
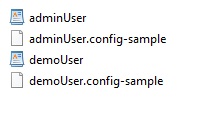
You can use any editing tool to open .config files e.g. Notepad++, WordPad etc.
Available settings for user configs are reviewed in details below. Here’s how a user config looks like:
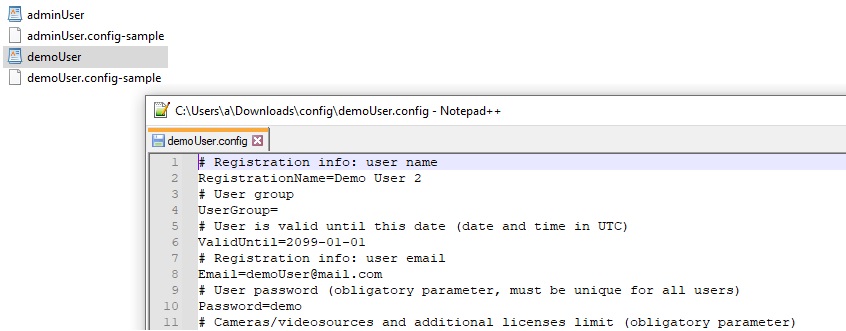
Other sample configuration files are the following:
Additional folder that contains “ffmpeg” file (the utility for Xeoma’s internal purposes to process videos and streams from cameras).
The globalUser.config allows editing general options for your Cloud, i.e. “global” settings for all users that lack in the users .config files. E.g. if you specify CameraSettingsEnabled=1 parameter in the globalUser.config, then it will be applied from the globalUser.config to all users that don’t have this parameter in their config files. If a particular user has this parameter (e.g. CameraSettingsEnabled=0) in their .config file with another variable, then this user will use the parameter from their .config file, but not from the globalUser.config.

The global.config is reminiscent of the cloud.config. Parameters are the same there, but global.config is the main configuration file, so the parameters are taken into account from this config in the first instance. The only difference that you can edit global.config only from server.

The cloudBackup.config is used to specify backup servers if you’re using failover functionality. The same backup functionality as in the desktop version of Xeoma. More here.

The cloud.config allows you to set general settings such as ports, storage time of invalid users’ data, activate licenses etc. It has the same parameters as the global.config, but global.config is the main configuration file, so the parameters are taken into account from the global.config config in the first instance and the cloud.config on a second-priority basis.

The Xeoma_cloud.log shows logs of events, users and changes made to the Cloud files.

The Xeoma_guard.log is a log file of Xeoma’s restarts.

Activation of Xeoma Pro Your Cloud licenses:
Via cloud.config file:
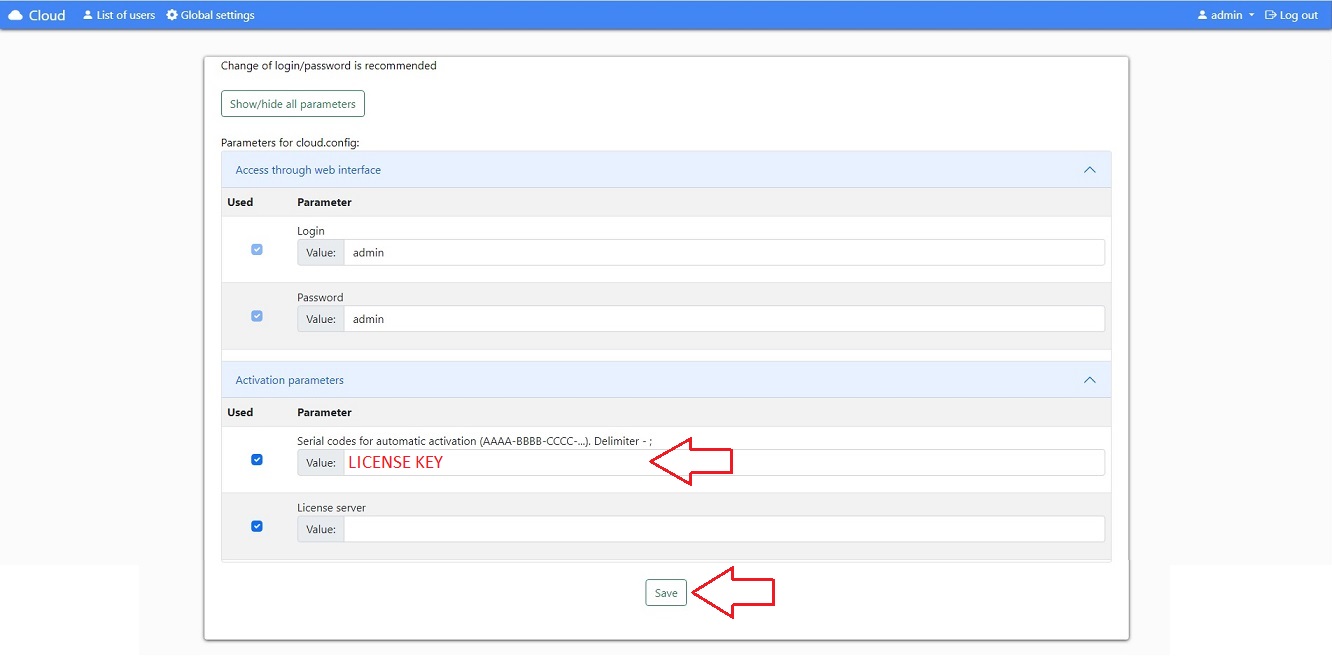
Open the cloud.config file. Paste the license keys you want to activate in the “ActivationKeys=LICENSE1;LICENSE2;LICENSE3…” line in the “Serial codes for automatic activation…” field and save the file:

Via web interface:
Go to the admin page in a browser (http://localhost:10090 (or replace ‘localhost’ with your server’s IP address if you’re not in the local network with the Cloud server)) – Global settings – Activation parameters – Serial codes for automatic activation – paste your license key (or multiple licenses separated with “;” – e.g. LICENSE1;LICENSE2;LICENSE3…) – Save (button at the bottom of a page)
Commands in user configs:
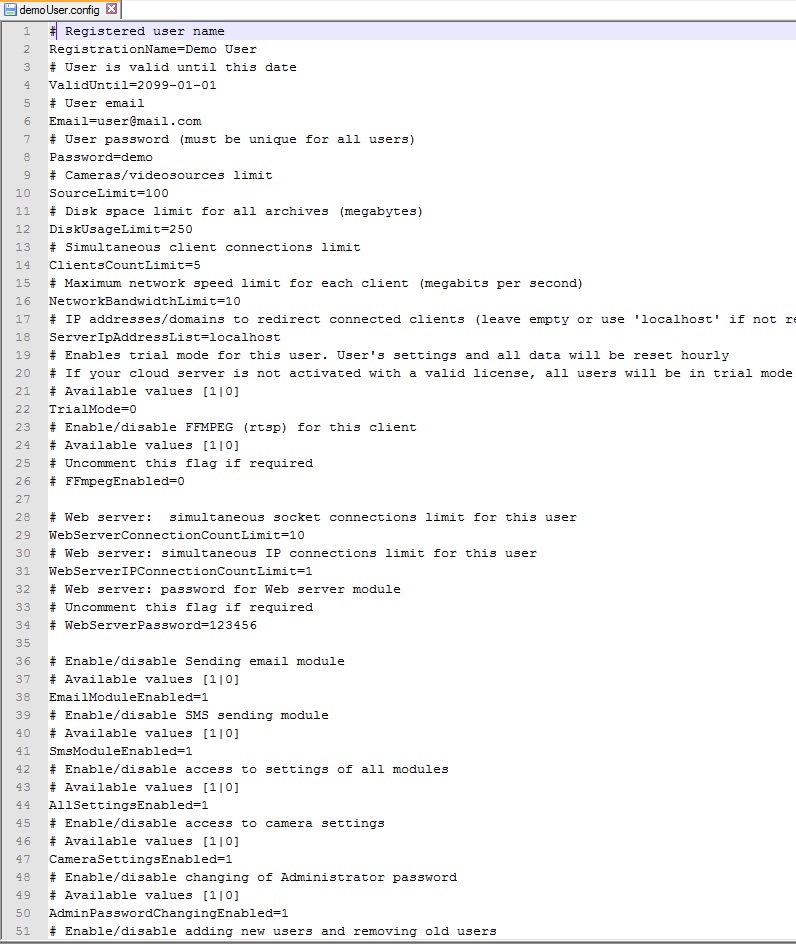
Registered user name and User email are registration info that you get when licenses are bought.
User is valid until this date: set the time when user subscription expires. If automatic prolongation is required, use scripts to set this parameter to a later time.
User password: the password that the user will use to connect to Xeoma Cloud. The password cannot be the same as for another user.
Cameras/videosources limit: how many cameras the user is allowed to connect.
Disk space limit: how much of the disk space the user is allowed to take with their recordings. In megabytes. For 1 Gygabyte type 1000, etc.
Maximum network speed limit: with this option you can set how much of the bandwidth the user is allowed to take.
IP addresses/domains to redirect connected clients: works like browser redirect. If you need to have this user processed by another server, specify here its address.
TrialMode=0: if set to 1, trial mode will be activated for this user. You will have 1 hour to test Xeoma Pro Your Cloud for this user before the default settings will be restored thus resetting the specified settings. Please note that if you haven’t yet activated any Xeoma Pro licenses in the main config, your Xeoma Pro Your Cloud for all users will be in the trial version anyway.
Enable/disable FFMPEG (rtsp) for this client (FFmpegEnabled=0): means enabling or disabling for this user possibility to connect RTSP streams from the camera. The thing is that RTSP streams usually give much greater load than MJPEG streams, you might want to restrict using RTSP streams to keep processor load low and thus connect more cameras to a single server. If required, uncomment this parameter and set to 1.
Following is the block dedicated to the settings of a Web server module. You can restrict how many clients can be connected under this user account at the same time, from how many various IP addresses, and set password to protect access to the stream.
Next is the block allowing to restrict certain modules (Email, SMS), schemes or features (like possibility to change settings, access to the Users menu) from the list. Here are some comments:
Disable client add and remove buttons: if set to 1, ‘Add’ (‘+’) and ‘Remove’ (‘X’) buttons will not be available for this user.
Allow storing to archive only if there is motion detector in the chain: if uncommented, motion detector will be required to record to the archive. The thing is that some users would want continuous recording, without motion detection which can be disk space consuming. With this option archive won;t work at all unless the users adds a motion detector to the chain. The minimum sensitivity threshold value will not be able to be less than the specified value in the MinDetectorSensitivity parameter.
The ListOfEnabledModules parameter introduced in the 22.3.16 version can be used to list modules that are allowed to be used by a subscriber or subscribers. (See name of modules here)
The EditArchivePaths parameter introduced in the 22.3.16 version can be used to allow subscribers to input the path to save recordings to. Use the parameter for a subscriber or subscribers, and they will see a corresponding field in the ‘Preview and Archive’ module settings.
The next block is the chains settings configuration. If you uncomment the ConfigSerial=1 parameter, all chains set up via client connection will be disabled. Instead the chains set up in this file (below) will be used.
Here’s the instruction how to work with these configs:
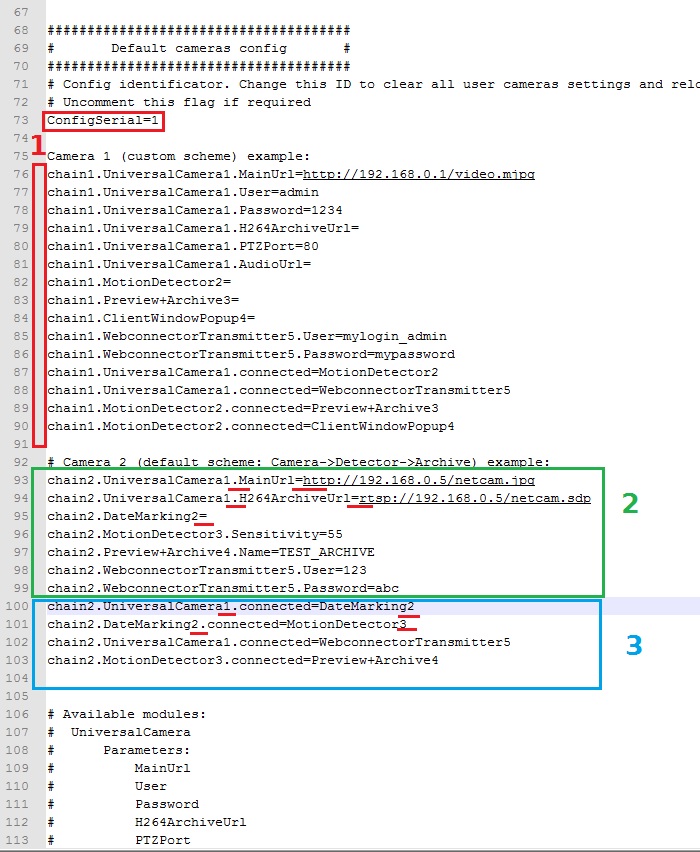
Uncomment the needed lines (red 1).
All the following settings can be divided into 2 groups. These are modules’ settings (green 2) and module connections (blue 3).
Correct syntax for the group #2 would be: Name of the module(point)Parameter name(equals)Parameter value. One line – one parameter (see the sample chain). Available modules, their names and the names of available parameters are listed below. If parameter goes without a value, the = sign should be the last in the line.
Correct syntax for the group #3 would be: Name of the module on the left(point)connected(equals)Name of the module to the right. Another connection – next line. One module can be connected to several others (for example, in the default sample the Universal camera module is connected to the Marking and Web Server modules). Follow the example.
Take a special note of the numbers of modules. If you have several motion detectors, the numbers should be different – that will help Xeoma Pro Your Cloud to connect the right modules to where you’d like to.
You can also “lock” some connections – make certain modules impossible to delete from the scheme. To do that, add .locked to a module name before “=” or to a connection description after .connected and before “=” (the latter will make both modules in connection undeletable).
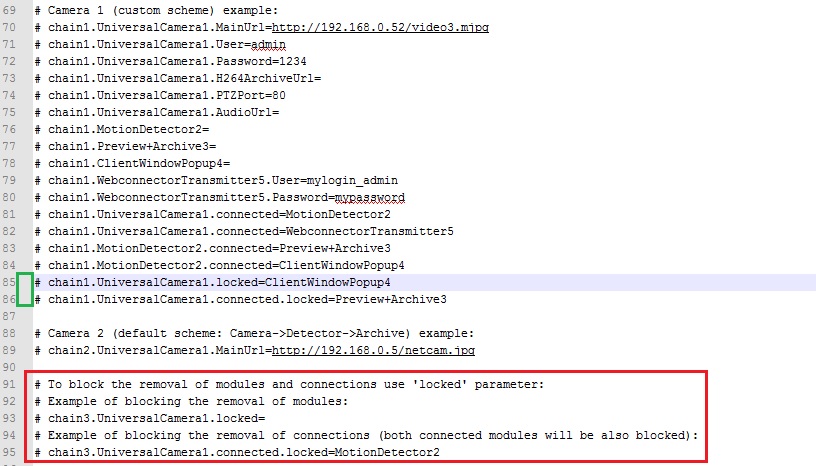
Settings of Universal Camera, Preview and Archive and Motion Detector modules can be made read-only. Just list their names after ListOfLimitedModules.

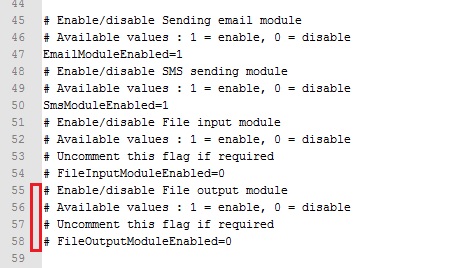
You can save your recording to a file at your machine. Just enable File output module.
Integration with billing
There is a subscription script template for your convenience. You can find it in the created folder.
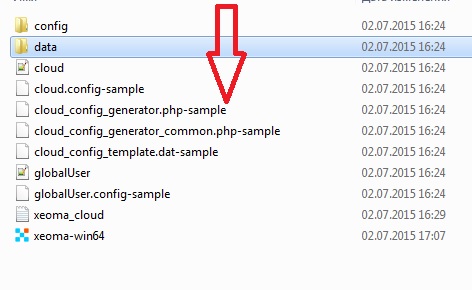
It can be used for integration with your billing to add, delete or extend users’ subscriptions automatically. You can also use your own utility to replace value to the lines like ValidUntil, SourceLimit or the like changeable parameters.

You can use these parameters for integration with billing:
1) Generate user config by template:
xeoma_cloud.php -a username useremail password days months sources storageGB clients bandwidthMbits templatePath
Example: ./xeoma_cloud.php -a “User Name” “some@email” “123456” 0 1 4 50 5 10 “/home/xeomacloud/cloud_config_template.dat”
2) Change user config
xeoma_cloud.php -c username useremail password days months sources storageGB clients bandwidthMbits templatePath
Example: ./xeoma_cloud.php -c “User Name” “some@email” “123456” 0 1 4 50 5 10 “/home/xeomacloud/cloud_config_template.dat”
3) Block user account
xeoma_cloud.php -b useremail
Example: ./xeoma_cloud.php -b “some@email”
4) Delete user config and data
xeoma_cloud.php -d useremail
Example: ./xeoma_cloud.php -d “some@email”
User email is used for defining a user. When a new user is added (1), if such email already exists, the existing user’s config will be changed.
Syntax explanation using command #1 as an example:
Send command to the script xeoma_cloud.php for creation of a user (-a) with username User Name, email myEmail@email and password 123456 whose subscription time will be 1 month (‘0’ for days and ‘1’ for months). This user will have 3 cameras available (number ‘3’), 50 GB disk space (number ’50’), recordings kept for the last 5 days (older recordings are overwritten with newer ones), up to 10 simultaneous user connections (number ’10’). A default chain of modules for the user will be taken from the cloud_config_template.dat file that is to be found in the /home/xeomacloud/ folder.
(here you an find more parameters for the command)
How do you run the script remotely:
To run a script you need to send a HTTP request to the WEB port of Your Cloud (default is 10090) with administrator’s username and password.
Besides, two addtional parameters should be stated:
scriptname (script’s name)
scriptparams (parameters to run the script with)
Example:
The HTTP request to run the “test.php” script with “-a username useremail password days months sources storageGB storageDays clients bandwidthMbits path_to_cloud_config_template.dat” parameters when the administrator’s login and password are “admin/admin” will look like this:
http://cloud.server.address:10090/?login=admin&password=admin&scriptname=test.php&scriptparams=-a+username+useremail+password+days+months+sources+storageGB+storageDays+clients+bandwidthMbits+”path_to_cloud_config_template.dat”
Free rebranding
Xeoma OEM/ODM, customization and rebranding is easy with our free of charge utility. This utility can be used for rebranding of Xeoma to have a different name, customization to have your company’s address, support business hours, links to your site, etc.
Useful:
You can create client-only-version that can connect to one specific Server (your Cloud). You’ll need to use the following parameters in customization file oem_info.xml:
<RunOnlyClient>true</RunOnlyClient>
<ServerAddress>Cloud_address:Cloud_port</ServerAddress> (e.g.: <ServerAddress>mycloud.xeoma.com:8090</ServerAddress>)
Also you can disable icons in the bottom panel, for example, switching to the window of detailed settings or adding new cameras:
<DisableBottomPanelButtons>Graph, Add</DisableBottomPanelButtons>
You can disable necessary options in the Main menu (e.g. Remote access):
<MainMenuRemoteAccessItemEnabled>false</MainMenuRemoteAccessItemEnabled>
You can even disable left panel:
<LeftPanelEnabled>false</LeftPanelEnabled>
Also some options can be disabled in Users’ .config files.
For instance, disable setting changing:
AllSettingsEnabled=0
Disable possibility to change camera’s setting:
CameraSettingsEnabled=0
Disable adding or deleting cameras and other sources:
DisallowAddAndRemoveSources=1
Enable forced decoding on Client’s side:
PreviewDecodingOnClientEnabled=1
How to move Cloud to another Server:
1) stop Xeoma on your older server
2) reset your license here
3) delete licenses from cloud.config file on your older server
4) run Xeoma on your new server in Cloud mode: sudo ./xeoma.app -cloud
5) indicate both licenses using “;” semicolon in ActivationKeys field in cloud.config file in the main Xeoma’s directory
6) stop Xeoma (you can simply close the console that was used for step 4)
7) move config folder from your older server to the same folder on your new server
8) move everything from data folder from your older server to the same folder on your new server
9) install Xeoma on your new server in Cloud mode: sudo ./xeoma.app -install -cloudauto
This way all users and cameras should become available on the new server.
FAQ:
Q: I’m interested in creating my own Cloud service. How much will it cost?
A: You need to purchase and use Xeoma Pro licenses to create your own Xeoma Pro Your Cloud, for as many cameras as you’d like to start with, even for just one camera. Licenses are for lifetime, they are self-repaid in about half a year. Volume discounts are applied to licenses for bigger number of cameras. Rent of Xeoma Pro licenses is also available. See prices here
Q: What equipment will I need for Xeoma Pro Your Cloud?
A: Xeoma is flexible so the choice of equipment will depend on the number of cameras connected to the server, their parameters (stream format, resolution, etc.) and features that will be used there. Please use our online calculator to get more precise information.
Q: What operating system should I choose for my Xeoma Pro Your Cloud? Any recommendations?
A: Regularly, Xeoma works in Windows, Linux, Mac OSX, Linux/ARM, and Android machines, so the same goes for Xeoma Pro Your Cloud. However, since the Cloud system will require long uptimes and good management abilities, we recommend you to choose from 2 families: Windows or Linux (either with or without graphical shell). Among them choose the operating system that you are more familiar with. See list of officially supported OSes
Q: How will my clients connect to my Cloud? Are there any mobile apps available?
A: Your customers will be able to connect to your Cloud server using Xeoma software for desktop machines (free rebranding is available) or Xeoma mobile app (paid rebranding is available). Search for desktop version in our Download page, search for Xeoma in Google Play for Android devices, in AppStore for iOS devices, in Huawei AppGallery for Huawei devices. Client connection is the main connection method. Alternatively, customers can connect through a web browser to view camera live streams or archive recordings.
Q: Can different subscription plans and limitations be set in Xeoma Pro Your Cloud?
A: Sure, various templates can be set up to be used upon receiving a payment, with their own permissions and limitations.
Q: How can I create integration with billing system?
A: You can use special scripts for integration with billing. For more information about scripts please see here or contact us.
Q: I’m trying to add camera to the user’s account but I’m receiving a message that I need more licenses/subscriptions. What is wrong?
A: You need to check if you’re logged in under necessary User and not Administrator, because Administrator doesn’t have possibility to use cameras. Also, please check SourceLimit parameter in configuration files for all users.
Q: How is Xeoma Pro Your Cloud licensed? Can we buy an unlimited license for an unlimited number of cameras?
A: You need to purchase and use Xeoma Pro licenses to create your own Xeoma Pro Your Cloud, for as many cameras as you’d like to start with, even for just one camera. Licenses are for lifetime, they are self-repaid in about half a year. There is no unlimited license but you can buy and add licenses for as many cameras as needed “as you go” – for example, combining several licenses for 1024 cameras. There is a convenient admin page for quick licenses generation. Volume discounts are applied to licenses for bigger number of cameras. Rent of Xeoma Pro licenses is also available. See prices here
Q: Can we add links to purchase into Xeoma Pro Your Cloud?
A: For desktop Xeoma versions: purchase link can be added with free rebranding tool.
For web interface: you can modify the web interface of your Xeoma Pro Your Cloud, including adding links or scripts.
For smartphone apps: only with paid development
Q: Created a user but can’t log in, why?
A: Please check that you’re using correct login. Login is created according to the email that you indicated when you created the user. Email address’ symbols (@, – etc.) should be transformed into underscore “_” , e.g. test-user@test.com should be transformed into this login: test_user_test_com
Q: Why can’t I add more cameras?
A: You need to check SourceLimit parameter for all users. This parameter shows how many cameras you can add.
Q: Is video analytics available in Xeoma Pro Your Cloud?
A: Yes, Xeoma Pro Your Cloud can boast all video analytics included into Xeoma Pro. More about Xeoma Pro features
Q: All Users’ settings got reset. What is wrong here? (License got lost. What should I do?)
A: Please check if licenses still have renewal period for this version of Xeoma that is being used on the server (that it’s not over yet). Also, if you have Xeoma files on a mounted disk or RAID, please do check if it is working and available.
Q: How can I move my Cloud to another Server?
A: Find detailed instruction here
Q: What ports do I need to open in my server?
A: 8090 is the port for client-to-server connection in Xeoma so a port for users to connect to your server from a client;
10090 is the port for connection through web page.
Q: Can I use Xeoma Standard licenses instead of Xeoma Pro licenses to create a Xeoma Pro Your Cloud service? Or at least for a part of the cameras?
A: No. Xeoma Pro Your Cloud, with all its automation and optimization, is powered only by Xeoma Pro licenses that cannot be combined or substituted by Xeoma Standard licenses. Only with Xeoma Pro licenses you can run the Your Cloud mode and sell access to it.
The Standard mode doesn’t have the automated work with accounts (prolongation or auto removal of accounts based on billing information on payments), web portal for administration. If you go with Standard, you will have to manage user accounts, their expiration, their extension, manually. Besides, your service will lack the Xeoma Pro’s professional modules. In other words, Xeoma Standard-based video surveillance system is not so good for selling accounts/access but can be a good one for usual video surveillance system where you create user accounts once and for lifetime.
For quick start with low budget we’d recommend rent of Xeoma Pro licenses, and for true economy we recommend to buy bigger Xeoma Pro licenses where there’s a volume discount.
Xeoma Pro Your Cloud Presentation
Download Xeoma Pro presentation in the PDF format here.
