Archives and recordings in Xeoma: troubleshooting and advice
Tip: to read about setup of recording, please visit Archive section in Xeoma User Manual

Saving recordings is an essential feature for nearly any video surveillance system. Video footage can be used as forensic evidence, or be utilized for post-incident investigations.
Xeoma video surveillance software offers a variety of ways for perpetual storage of video recordings, the main of which being with the “Preview and Archive” module.
Here are some answers to questions that some users might have while using the archive recording feature.
![]() Possible issue: Recordings are not saved
Possible issue: Recordings are not saved
1. Check that the module “Preview and Archive” is connected into the chain, turned on, and check the logic of the chain lest there be any preceding modules that you don’t need.
2. Check that there are no filter modules that are filtering out the video excessively. Remember that the recording module should get the signal from the preceding modules. For example, when Motion Detector is used with very strict settings, it often doesn’t let video further on to the following modules, one of which can be the “Preview and Archive” module.
3. Check that the camera stream is working and accessible (if direct saving is used, you need to check the archive stream rather than the preview stream). If the archive stream fails, Xeoma will start writing the stream to the archive for viewing. Also, an error notification will appear in the camera window. See more about direct saving to the archive here
4. Check that your storage path is valid. Open settings of the “Preview and Archive” module and check if the path entered is valid and has the writing permissions. In Linux, you can execute chmod for Xeoma to make sure there are writing rights – or try another path where you know for sure that recording is available to.
5. Check that your disk is available (especially for mounted disks). If the mounted disk was working for some time and then got disconnected, naturally Xeoma will not have the required place to store recordings to. Usually, in such case you get a warning message displayed over the preview box.
6. HDDs can stop recording due to failure. You can check the status of your drive with SMART.
7. The disk may have been overloaded. If a large number of cameras are being written to the same disk, it may not be able to handle simultaneous recording and/or deleting.
8. If there are only parts of recordings missing, check if connection to the camera is stable. If it is intermittent, recordings might be absent for the time without connection. We have a synchronization with camera memory card method in Xeoma for when the connection is known to be intermittent. Read more here.

|
Also check that the computer with server part of Xeoma is not freezing due to high CPU load and/or does not get into the Sleep mode. |
![]() Failed to enter my path to save archives to
Failed to enter my path to save archives to
Part 1. Network disk, RAID
If the network path you’re entering in ‘Preview and Archive’ module settings is not accepted, you are advised to check the following:
a) make sure that the needed disk is seen in the system;
b) make sure that there are sufficient write and read rights for this path;
If you are positive that the above mentioned two factors are in order, you are advised to unmount the disk from the system and then use Xeoma tool to mount it. Open Xeoma and go to Main menu – Install – Autostart settings, and enter the net use command there. You will see the syntax hint for the command in the same dialog. That should help.
See also: Mounting and connecting network disks to Xeoma
Part 2. Local drive in Mac OS
The actual internal path to a folder that software use might differ from what is shown to a user in Mac OSX systems. That’s why it is important to double check that the ‘user’ path coincides with the ‘software’ path. You can check that in Finder: open the folder you’d like Xeoma to store the files to and click View -> Show Path Bar (or press the combination of Option + Command + P). Enter the corresponding path in Xeoma’s ‘Preview and Archive’ module settings.
![]() Possible issue: Insufficient archive recordings (e.g. when records need to be retained for 30 days, and you see only 1 day)
Possible issue: Insufficient archive recordings (e.g. when records need to be retained for 30 days, and you see only 1 day)
1. Open settings of the “Preview and Archive” module. Check the setting for the amount of disk space that recordings from this camera are allowed to take (“Maximum size of this archive”). If this setting allows the program to use less disk space than is required for recording the duration you need (there is statistical information on the average recording volume per dayat the bottom of the module dialog, you can use it to estimate the needed volume of disk space), you need to increase the limit.
2. Open settings of the “Preview and Archive” module. Check the setting for the retention time allowed for records from this camera (“Maximum total storage time of this archive”). If a storage limit of, for example, 2 calendar weeks is set here, then a higher value must be set for longer storage.
Please note that the “Maximum total storage time of this archive” and “Maximum size of this archive” settings have equal priority, and the stricter one is applied if they contradict each other. Example: if the “Maximum size of this archive” allows writing more records than the “Maximum total storage time of this archive”, the limitation of the “Maximum total storage time of this archive” will be applied. And vice versa – when “Maximum total storage time of this archive” allows writing more records than “Maximum size of this archive”, Xeoma will not be able to write more than specified in “Maximum size of this archive”.
3. Another probable reason for this is that network disks or RAID arrays are no longer available, so now Xeoma has less space left and has to delete records in order to save new ones. Please check availability of the disks if that is the case.
![]() Possible issue: No marking / video resize / video crop seen in archive recordings
Possible issue: No marking / video resize / video crop seen in archive recordings
To reduce CPU and network load as well as HDD space requirements, Xeoma utilizes the so called dual streaming capabilities of the camera for direct saving to the archive. If direct saving to archive is used, no filters are applied to archive recordings (with a few exceptions like Motion Detector and some cases of Marking).
Untick the direct saving to archive options in the “Universal Camera” module settings to see if that helps – but be ready for a surge in CPU load. Contact us for free help in re-configuring your system.
![]() Possible issue: Out-of-time mal-synchronization of archive recordings compared to the camera time or real time
Possible issue: Out-of-time mal-synchronization of archive recordings compared to the camera time or real time
1. Please see if you’re using the latest version of Xeoma. Many time issues have been fixed in the latest version of Xeoma.
2. When time is asynchronous by a matter of round hours, this can also be fixed by choosing the same timezone in Main menu – Remote Access – Users as you have in your machine where Xeoma’s server part is running (not available in the Free edition; available in Starter* and Lite editions since version 22.8.16).
3. Time synchronization issues where time is off by some minutes can be fixed by using a new option in “Universal Camera” settings – a checkbox called “Use the server’s system time to generate timestamps for frames (use in case of archive mistiming issues)”.
It will help if the camera stream is sending misleading timestamps that result in:
– Weird time of archive recordings
– Video distortions caused by frames getting to the wrong part of archive and thus ruining finalization of compressed files
– Missing parts of archives

|
For Linux: If the time disparity in your system is by some minutes, not round hours – like in pt. 3 – you can check what your server think the time is with this command:
timedatectl Compare this time to any of your devices connected to the Internet (smartphone, tablet, smartwatch, etc.). If the time is different, fix the time in your server’s settings. If NTP sync is used, you are also advised to check if the correct address for it is stated in timesyncd.conf. In case the time is the same, before you contact our support team, please run the command given below and send us the results: timedatectl timesync-status | grep Server |
![]() Possible issue: Archive recordings are not erased, archive is overfilled, no new records are getting saved
Possible issue: Archive recordings are not erased, archive is overfilled, no new records are getting saved
Loop recording is working all the time, there is no special settings enabling it.
1. Please see if you’re using the latest version of Xeoma. Download it here
2. Check the preferences in disk space that Xeoma should leave free in the “Preview and Archive” settings. Sometimes there is so little space allocated to Xeoma that it has to remove recordings right after they are saved which feels like it cannot save any recordings.

|
If the “Database” directory is the one being overfilled and you do not use archive search (e.g., by motion), you can add the following to the autostart script, the “ExecStart” line:
space -noarchivedb Save your changes and reboot the server. |
![]() Possible issue: Archive recordings are erased although they shouldn’t
Possible issue: Archive recordings are erased although they shouldn’t
Check the settings of preferences in disk space that Xeoma should leave free in the “Preview and Archive” settings. One probable reason is that one of the RAID disks is not available anymore and the total disk space is reduced, so less space is now available for Xeoma and it has to remove recordings to be able to store new ones.
Also try the latest version of Xeoma. Download it here
![]() How do I make a backup of recordings in Xeoma
How do I make a backup of recordings in Xeoma
1. Failover: a backup server is always in touch with the main server (or several main servers) and is ready to substitute it if the main server is not working. Archive recordings can be saved to a network drive or RAID array of drives so that they are available in the main server’s built-in Archive viewer when it is back to function.
2. By connecting several “Preview and Archive” modules to the same chain, you can set one of them to save recordings to another place where they will be not susceptible to Xeoma’s erasure mechanisms. Also, copying Xeoma recordings to backups can be made with the computer system’s tools, outside of Xeoma, or with the FTP Upload module.
Transferring records with a database
To transfer databases correctly, please follow this procedure on the new server:
1. sudo path_to_xeoma.app -core – this will create directory /usr/local/Xeoma/
2. activate licenses
3. kill the process: sudo kill [PID]
4. put to /usr/local/Xeoma/ file settings.dat taken from original server (replacing the existing one)
5. if your server has GUI, then double click on xeoma.app; if not, repeat step 1, then connect as client
6. change the settings of “Preview and Archive” modules and record archive storage path to the ones you need (by default they are the same as in Windows)
7. repeat step 3
8. in /usr/local/Xeoma/XeomaArchive/ we put all Database folder from original server (replacing the existing one)
9. sudo path_to_xeoma.app -install -coreauto
See also:
How-to: Moving Xeoma video surveillance program records
Transferring Xeoma video surveillance system with all settings
![]() How do I use the camera’s embedded memory space when connection to Xeoma server is lost, and then import those recordings to Xeoma when the connection is reinstated?
How do I use the camera’s embedded memory space when connection to Xeoma server is lost, and then import those recordings to Xeoma when the connection is reinstated?
You can do that for ONVIF cameras with the “Synchronize with SD card” option in Xeoma Standard/Xeoma Pro. See more in this article
![]() Failed to export an extract from the archive
Failed to export an extract from the archive
If there is an error message displayed during or after the export process, please read it to know the reason for the failure.
– Error downloading the exported file: no access to the file on server.
(former name: «Permission denied»)
If you are getting this error at an attempt to export, the first thing that we advise to check is if Xeoma has enough access rights to create a new file on your server. Usually, when Xeoma is installed with administrator / root rights, you won’t have this error message. However, if you moved the temp folder needed for export to a custom folder, you’d need to do chmod 777 for it (or its equivalent in other operating systems).
Please also try to use Xeoma client and Xeoma server of the same version (for example, the latest version available from the Download page).
– Error downloading the exported file: cannot save the file. Possible reason: not enough disk space or incorrect path.
(former name: “Insufficient free space on server for execution of export”)
If you are getting this error message at your export attempts, please make sure that the saving path that you selected to save recordings to is valid and available and allows saving files into it.
Next, you are advised to check if there is enough disk space for the exported file either on the server side (in Xeoma’s ‘temp’ folder that the file is buffered in) or on the client machine – in the target location of the exported file.
More about the ‘temp’ folder: When Xeoma performs export from archive, the resulting video file is first temporarily created in Xeoma’s main directory, in the ‘temp’ folder. If the exported file is quite large, it may not fit on that drive, and you will get this error warning. Another possible cause might be that the drive with the ‘temp’ folder is overloaded with other processes, which might result in the same error since it would be impossible to put the temporary file on that disk if it’s at its 100% capacity.
Ways to resolve:
1) If it’s the excessive drive load that is to blame, the workaround would be to to reduce the load, temporarily or permanently. For example, if there is an ongoing copying process, you might consider cancelling it or waiting till it’s finished, and trying the export again afterwards.
2) If the issue is caused by actually insufficient drive space in the directory with Xeoma ‘temp’ folder, you can either:
a) delete large or unneeded files to free up some disk space,
b) export a smaller extract of recordings – for example, a 1-minute piece – instead of a large one,
c) change settings for the partition that Xeoma ‘temp’ folder is on to give it more disk space.
3) In both cases if the previous advice didn’t help or cannot be applied, you can change the directory for Xeoma’s ‘temp’ folder.
To do that, you can either use a symbolic link like the one below leading to another drive:
ln -s /usr/local/Xeoma/temp /dev/video1/
– or, alternatively, the “temp” folder directory can be changed with Xeoma’s free rebranding tool.
– Error downloading the exported file: file transfer from server aborted.
Usually it’s either an intermittent Internet connection for exports done remotely or too little free space in drive or memory to do export of a big piece. Try exporting in smaller pieces in either case.
Tip: see other archive and export related troubleshooting and advice in the ‘Messages in Xeoma’ article
![]() How do I start recording in Xeoma?
How do I start recording in Xeoma?
Xeoma has several ways to save videos in one form or another (see the section “Recording format” on this page). By default, the chains contain the “Preview and Archive” module, which, upon receiving a video signal from the previous modules, saves the records to archives. Such archives can be viewed through the built-in Xeoma video player. That is, by default, the module is already added for most chains and is waiting for the video stream to arrive from the preceding filter modules. If the filter modules do not pass the signal (for example, there is no motion in the frame that meets the requirements of the “Motion detector” or there is currently “non-working” time set in the “Schedule”, etc.), the recording is not performed. If a recording is required but not successful, see “Possible issue: Recordings are not saved“ above.
![]() Why are folders created in local time, while files themselves are written in UTC time?
Why are folders created in local time, while files themselves are written in UTC time?
Use the command -uselocaltime to make the program name files and folders using time zone of the server.
However, please note that these files are intended solely for internal use – the operation of the “Preview and Archive” module. You can view / administer the recordings directly through a built-in archive viewer Xeoma where recordings will be placed in time line in accordance to the server time.
See also:
Customer care notes: The Archive folders seemed to be named according to GMT dates (rather than local date).
![]() How do I know that recording is working OK?
How do I know that recording is working OK?
There are several ways to check if your recording is going as planned:
1. See if there are actual recording files in the disk (you can check the path for a certain camera’s path to store recordings to in the “Preview and Archive” module settings):
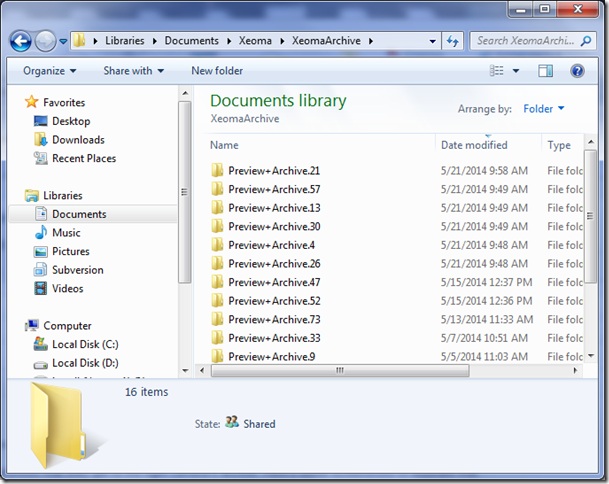
2. See that the camera preview has a “Rec” sign (signalizing that the recording is in progress) or a time stamp of the last recording event (stating the time when the last recording event ended):
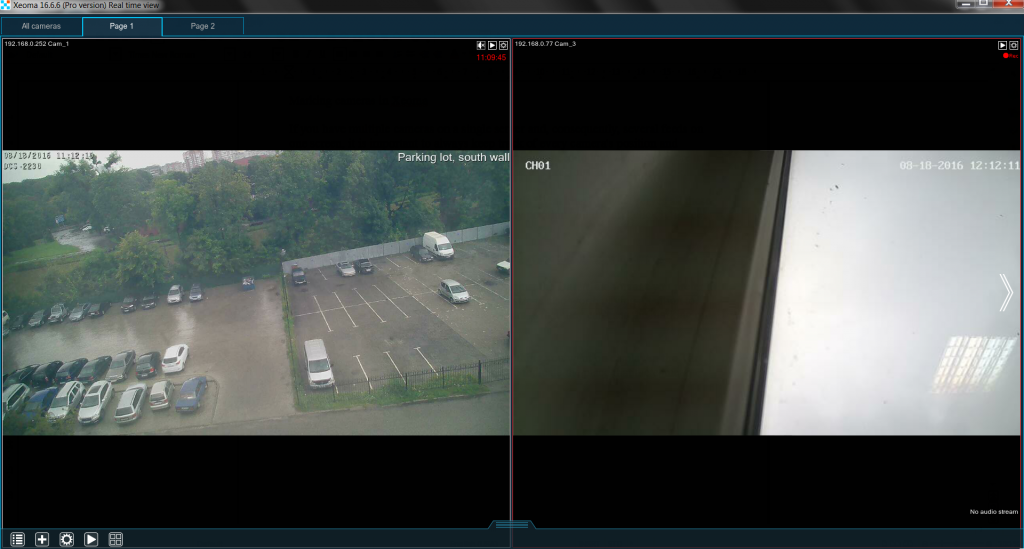
3. See that there are archive recordings in the embedded archive viewer (opened with the “Play” button):
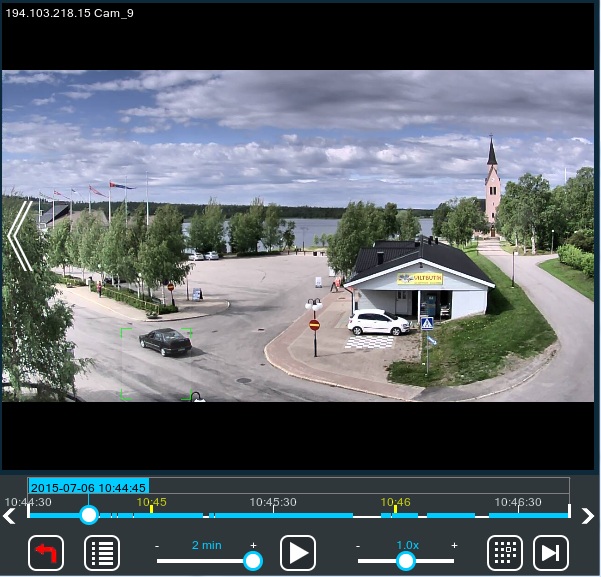
4. See that the Statistics in the “Preview and Archive” module settings show increase of space usage for archive:
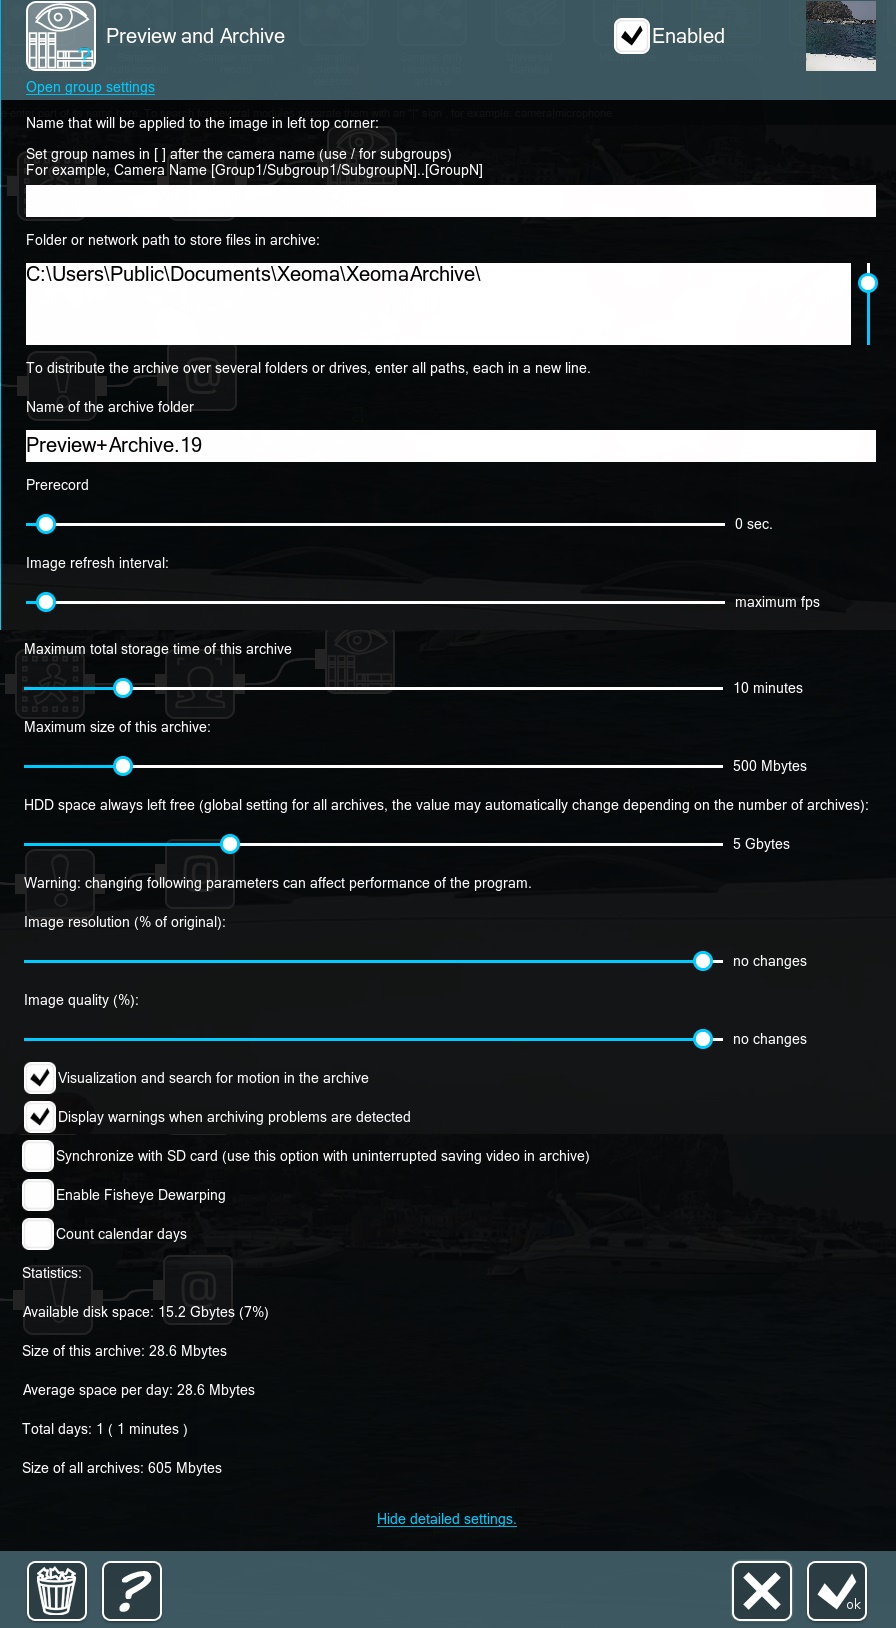
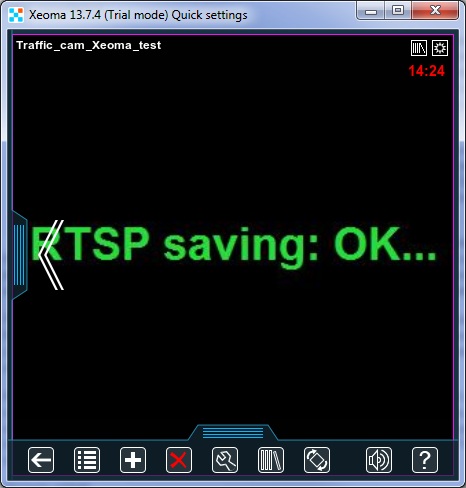
5. If the no-preview installation is used, check that you see a “RTSP Saving: OK” message in preview:
To be on the safe side, you are advised to use a combination of several of these advice.
![]() How do I limit space Xeoma is allowed to take with its recordings?
How do I limit space Xeoma is allowed to take with its recordings?
Xeoma video surveillance software has various ways to fine tune the process of recording, including in terms of the disk space requirements and limitations. The desired storage period or the amount of allowed space can be set in the settings of the “Preview and Archive” module. Records overwriting will start as soon as the limit is reached, which means that the oldest recordings will be evenly deleted to make room for new recordings.
There are three main settings in “Preview and Archive” that affect disk space requirements and the recording itself:
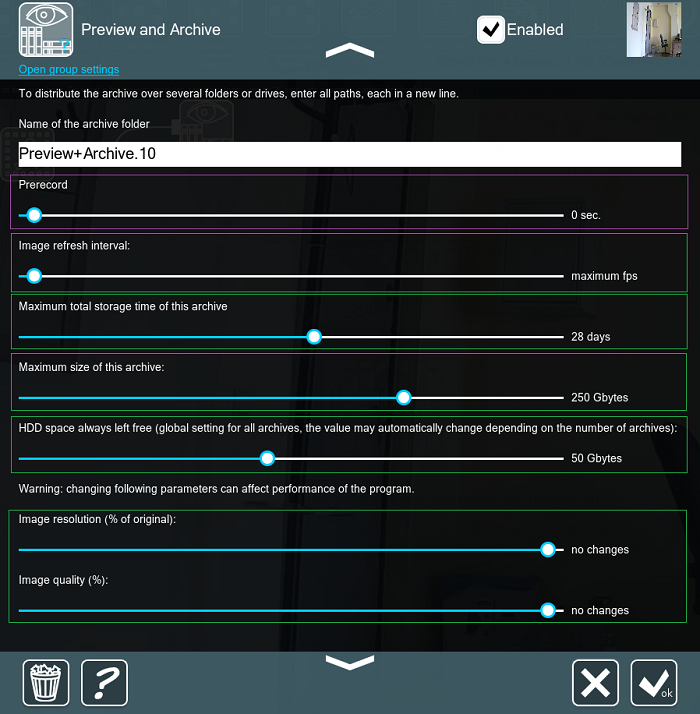
Maximum total storage time of this archive is for how long the records should be kept. You can specify the desired time with the slider or put the slider in the extreme right position for the “unlimited” value so that the system does not limit the recording by this parameter and records are stored as long as it is possible (but, of course, with taking other restricting parameters into account).
Maximum size of this archive: the space that the archive will occupy on the disk. Counting by calendar days or by factual content is available. You can specify the limit for the size in MB, GB or leave it in the “unlimited” value so that the system does not limit recording by this parameter and as much disk space is used for recording as is available in the system (but, of course, with taking other restricting parameters into account).
If both of these parameters are set to “unlimited”, the amount of occupied disk space will be controlled only by the following settings:
HDD space always left free (global setting) is a setting applied to all cameras on the server (or, rather, to all archives) that regulates not the occupied but the remaining disk space. The system always frees the specified amount of space from the records according to this obligatory setting so that older records are deleted to make space for newer records. This parameter cannot be set to “unlimited” because it is better to leave some reserve for the functioning of the disk. However, please note: if this global setting does not leave Xeoma no space for storing archives at all, recording will stop.
Read below which of these parameters has priority.
The following parameters have a slighter affect on requirements for available disk space as they are applicable in rare cases:
Prerecord is a setting for recording also a few seconds or minutes preceding the triggering event. It has an indirect effect on the required / occupied disk space: a few seconds or even minutes of recording will get into the archive with each detected event. Until the prerecord video gets into the archive, they dwell in RAM of the machine.
Image refresh interval allows you to reduce the frame refresh rate (fps) of the stream and thereby reduce the occupied disk space (since it is set to the maximum by default). Works only if a MJPEG stream is used for recording.
Image resolution and Image quality options allow to reduce the image size and quality of the saved image to save space. Both options work only if a MJPEG stream is used for recording.

|
For recordings created by the “Save to file” module, overwriting is set by macros. For more information, see the article on macros and the module description. |
![]() What limiters – space or time of storage – are prioritized in Xeoma?
What limiters – space or time of storage – are prioritized in Xeoma?
Space and time of storage limiters have equal priority and the software focuses on the satisfaction of all of them, and if this is not possible then Xeoma prioritizes satisfaction of the lowest of them. It might be a good idea to think of these limiters as of a prohibitation to exceed the specified retention time or allowed space limit. Basically, you specify the biggest possible storage time and the biggest possible archive size the software is ever allowed to take, and if several options contradict each other, the actual used storage time or archive size will be adjusted to satisfy the most stringent condition of them.
Example 1:
Specified maximum storage time: 30 days
Specified maximum available disk space: 30 GB
Global leave disk space setting set to: 100 GB. (total disk space 1 TB.)
Result: The system is prohibited from storing recordings for longer than 30 days and using more than 30 GB of disk space for Xeoma recordings from this camera.
If storing recordings for 30 days from such a camera requires more space than 30 GB, then the recordings will begin to be overwritten earlier than after 30 days.
Example 2:
Specified maximum storage time: 2 days
Specified maximum available disk space: 500 GB
Global leave disk space setting set to: 100 GB. (total disk space 1 TB.)
Result: Despite the sufficient amount of free space, the recordings will be overwritten after 2 days as the system is prohibited from storing records for more than 2 days (and using more than 500 GB of space).
Example 3:
Specified maximum storage time: 14 days
Specified maximum available disk space: 750 GB
Global leave disk space setting set to: 500 GB. (total disk space 1 TB.)
Result: Even if there is enough space allowed to store 14 days of recordings from the camera, the global setting “takes away” part of the allowed disk space, so it is possible that there will not be enough space for storing 14 days, especially if there are several cameras. As a result, recordings might become overwritten before the 14 days limit is reached.

|
Starting with Xeoma beta 23.12.7 a noise reduction option ‘Enable noise reduction’ has been added to the settings of the ‘Preview and Archive’ module. The option works with any audio types in Xeoma, and delivers clean sound even when the direct saving to the archive is used. |
|
|
Starting with October 2025 Xeoma Starter licenses may be purchased only in bulk (quantity 100 or above). If you’d like to make this purchase, please contact us. |
See also:
How to analyze video footage from video surveillance effectively: A step-by-step guide
Customer care notes:
How much drive space will I need per day?
Recordings and archive questions (set time limits, remove a former user’s recordings, breaks in recordings, etc.)
In the trial edition you only get 1 hour storage. Do you get more with the free edition?
Archive decoding warning for same-day recordings
I have Xeoma running for less than 7 days and the drive is already full. Did I do something wrong?
10 February, 2021