Face ID. Instruction.
Modules’ chain
Module’s settings
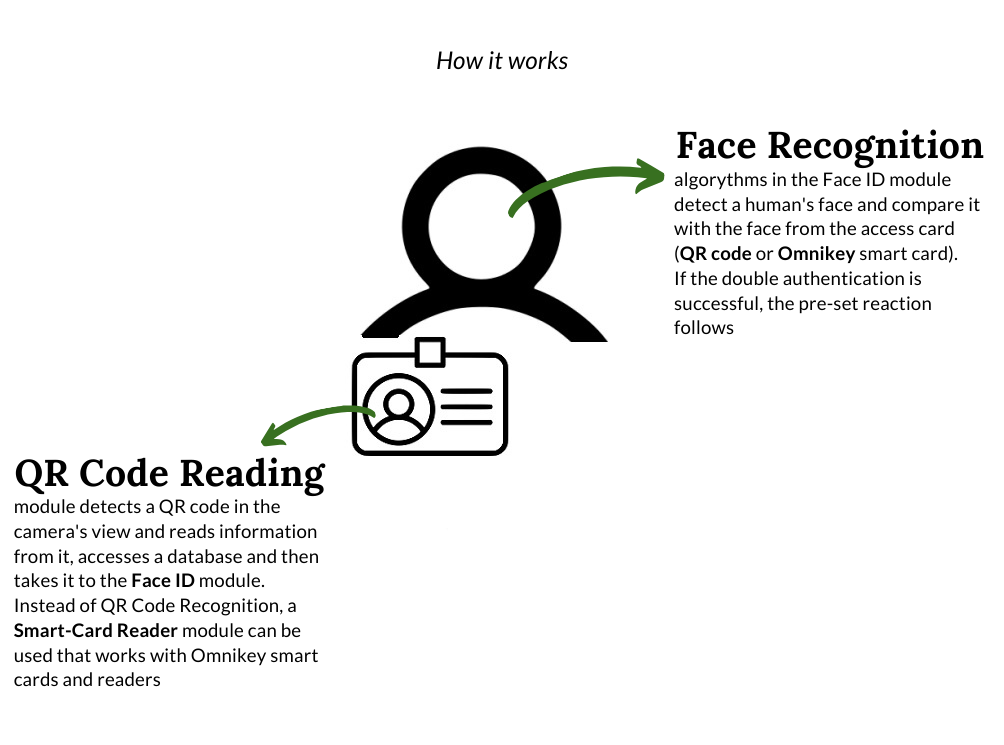
“Face ID” is an additional module in Xeoma used for double authentication for sites with strict access control, where simple access card reading does not provide the necessary level of access control accuracy. This Xeoma’s module can detect face in camera’s field of view and compare it with the photo from database received from access card.
This module works in conjunction with “Smart-card reader” or “QR-code recognition”. These modules can ‘read’ ID and send personal account information to “Face ID” module.

“Face ID” module’s operating procedure can be described this way:
1. The following chain is used when working with access cards for identification “Smart-card reader” + “Face ID”:

Or “QR-code recognition” + “Face ID”:

2. “ Smart-card reader” module will be synchronized with available card readers. Necessary devices can be chosen in module’s settings.
3. Necessary parameters for recognition can be configured in “Face ID” module’s settings. For example, “Source of known faces data”: you can choose between Local database or LDAP database.
4. Then a person uses his/her access card with card reader (or QR-code reader) at the entrance, card reader receives card holder’s information (ID), this ID is sent to “Smart card reader” module or “QR-code recognition”, and after that one of the modules sends information to “Face ID” module. “Face ID” starts detecting faces in camera’s field of view and compare detected face to the face from ID (photo from database (local or LDAP)).
5. Depending on the modules connected to “Face ID” and necessary reactions to triggering, “Face ID” module will send signal to the next modules in chain. For example, it’s possible to send notifications by means of “Sending email” module, if a person’s face in camera’s field of view doesn’t match to photo from access card’s ID. Or it’s possible to turn on alarm, start recording etc.
Let’s take a closer look at “Face ID” module’s settings:

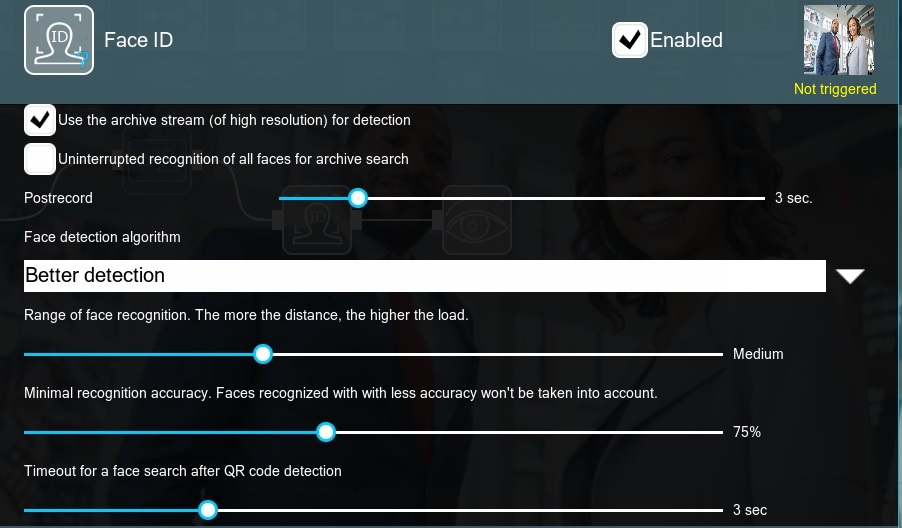
You can choose «Use the high resolution stream from archive» in module’s setting, this way higher resolution stream will be used for detection (it can be checked in “Universal camera” module’s settings). It might slightly increase CPU load.
If you choose «Uninterrupted recognition of all faces for archive search» in module’s settings, then everybody using access card/QR-code will be detected. And you’ll be able to use search by faces in the archive. Also, if you use this option in “Face ID” module, and the module is connected straight to “Universal camera” module bypassing “Smart card reader” or “QR-code recognition”, then all faces that got into camera’s field of view will be recognized. This way you can use “Face ID” to detect people that used access card/QR-code if you don’t have database with photos or simply don’t need it.
Postrecord allows recording additional segment of video some time after the detected event. This might be suitable for recording what happened after the actual event.
«Face detections algorithm» option allows configuring «Better detection» (recognition speed is lower and accuracy is higher) or «Faster detection» (recognition speed is higher and accuracy is lower).
«Range of face recognition» allows setting up necessary distance that will be used for face detection. The more the distance (the farther away is the face in camera’s field of view), the higher the load during recognition.
«Minimal recognition accuracy» allows choosing percentage depending on which faces in camera’s field of view will be detected, i.e. if you choose 90%, then “Face ID” module will detect the faces that module is sure are 90% correct to the IDs. Faces recognized with less accuracy won’t be taken into account.
«Timeout for a face search after QR code detection» option allows setting up time that module will use to detect faces in camera’s field of view after receiving ID from QR code. The shorter the specified time (e.g. 1 second), the lower the probability of recognition and vice versa, the more the time, the higher the probability of recognition.

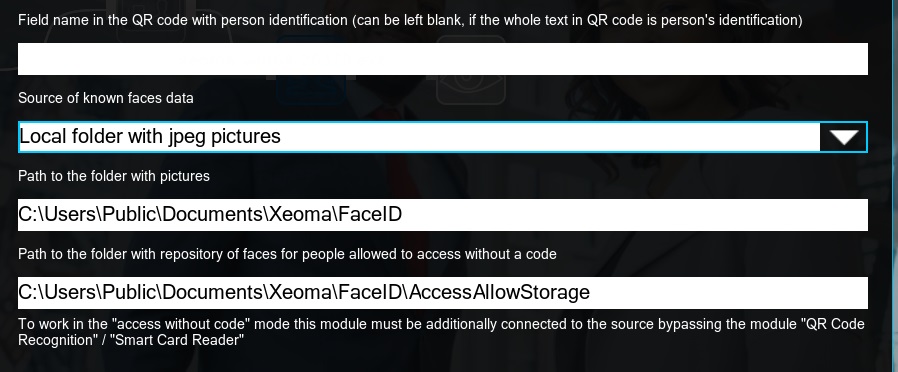
There’s also «Field name in the QR code with person identification (can be left blank, if the whole text in QR code is person’s identification)» option that allows specifying necessary data for detecting information from QR code. QR code can contain different lines with information, and ID can be presented only as one line there, and this ID information can be specified in the above mentioned field in “Face ID” module’s setting. This way only necessary line with ID will be detected, so information will be received faster.
«Source of known faces data» field can be used to choose necessary database that “Face ID” will apply to compare faces from camera’s field of view with ID’s photos:
1) Local folder with jpeg pictures – this is a folder on server where Xeoma is launched. You can put there necessary photos yourself, they should be in .jpg format and can be of any size; name them according to the IDs.
2) LDAP-server – database of LDAP system
«Path to the folder with pictures» allows specifying path to database with photos on your server when you choose “Local folder with jpeg pictures” as a source. For “LDAP-server” you should specify its own parameters in “Face ID” module’s settings.
«Path to the folder with repository of faces for people allowed to access without a code» can be used to specify path to database with photos of persons that are allowed to enter without codes (to work in the “access without code” mode “Face ID” module must be additionally connected to the “Universal camera” module bypassing “QR code recognition” and “Smart card reader”).

Also, this field works in conjunction with “Permission to access without code” option when you choose «LDAP-server» as a «Source of known faces data». It works the following way: a person uses access card/QR-code, he/she is recognized as usual for the first time, and then he/she will be allowed to access without code (it’s specified in «LDAP-server» configuration when it’s used as a source for database), then his/her face is registered in the database that allows access without code, and next time this person will be able to access using face recognition, i.e. he/she will not need to use access card or QR-code.
|
You can also mark necessary monitored area that will be used to detect faces. As well as you can choose to «Save data in CSV report» (you can export .csv into excel) about all detection events, «Save logs to a file» (path to the log file can be specified after the field is ticked) or «Save pictures with recognized faces» (path can be specified after the field is ticked, detected faces will be stored in .jpg format).
If recognition is successful, signal from “Face ID” module will be sent/passed to the next modules in chain. This way e.g. notification can be sent (“Sending SMS/Email”), door/tourniquet can be opened/closed (“HTTP-request sender”), archive recording can be turned on (“Preview and archive”) and other schemes can be implemented using flexible modular system of Xeoma.
“Face ID” typical usage scenarios:
• Access gate at facility (factory, plant etc.)
• Entrance at the university, school or other educational institutions
• Access to the gym, fitness center etc.
• Access to special rooms for airport staff
• Private territory entrance (private residence, villa’s territory and so on)
• Checkpoint in prisons
• Bank entrance
• Police station access
• Access to the court
• Access gate to special premises in medical institutions (for example, when there is access to drugs)
• Access to laboratories (e.g., when there are dangerous chemicals)
• Checkpoint in military units
• Any territory where increased security and access card holder’s identification is required
Additional module “Face ID” is purchased separately and activated over the Xeoma Standard or Xeoma Pro licenses. It’s available for testing in a trial version of Xeoma for 1 hour, after that settings will be reset and 1 more hour will be available for testing.
July, 5 2019
Read also:
Additional modules in Xeoma
Object recognizer in Xeoma
Rent of the license is the best way to launch a new project
GPIO module in Xeoma
Object recognition in private life