Which program to choose for home video surveillance: Xeoma or ZoneMinder?
In one of our previous articles we compared two popular video surveillance programs — Xeoma (our own development) and ZoneMinder (a free opensource VMS). We concluded that these programs can only compete in the context of home video surveillance, as ZoneMinder’s functionality is simply not sufficient for professional use in enterprises in most cases. In this publication we will focus specifically on the use of both programs for simple home video surveillance.
Requirements for a home video surveillance system
As a rule, the average household camera setup consists of 1-8 devices: 1-4 cameras for a flat and 5-8 cameras for a house. Archive recording is usually unnecessary, as homeowners prefer to view cameras online, but even when recording is enabled, it is triggered by a motion detector in 99% of cases. Arguably, the most in-demand features are remote access and notifications: homeowners prefer to check if everything is okay at home while they are at work or on vacation, and notifications ensure that important events are not missed. Another important requirement is that the program must be easy to use, as 80% of users don’t have advanced technical skills.
Only Free version of Xeoma, as well as the budget editions Xeoma Starter* and Xeoma Lite will be included into the comparison, since these modes are chosen by most regular users, and their capabilities are very similar to ZoneMinder’s. The hardware components of the system (cameras, PC, networking equipment) are also chosen based on the average equipment used for home video surveillance:
• 4 IP cameras with 1080p resolution;
• A Windows-based PC (Intel Core i3-7350K, 4 GB RAM, 500 GB storage);
• A Wi-Fi router.
We will not describe the process of physically connecting the cameras and configuring the router, as it is the same for both programs.
Installation and initial configuration
Xeoma
The program can be downloaded from the official website, and you can run it right away — no installation is required.
Before adding cameras, you need to switch the program to the desired mode:
• If you decided to use the Free version, go to the “Main Menu” -> “Registration” -> “Switch edition” and select “Switch to Free Version.”
• If you have already purchased a license, go to the “Main Menu” -> “Registration” -> “Activate” and activate your license. The program will automatically switch to the corresponding mode.
Once the camera is added, optimal settings (image size, bitrate, fps, etc.) will be applied automatically. The “Motion Detector” module will be added automatically as well and the archive recording will be configured by default.
ZoneMinder
Since ZoneMinder only supports Linux, you will either have to give up using Windows and switch to Linux or set up a virtual machine on your PC. Let’s consider the second option.
First, you will need to download any free virtualization program — VMWare, VirtualBox, Hyper-V, or others as well as a Linux distribution of your choice — Ubuntu, Debian, Mint, etc. Then you’ll need to create a virtual machine with sufficient amount of memory and install Linux on it. If everything goes according to the plan, the entire process will take you 15-30 minutes.
After setting up the virtual machine, go to the developer’s website and open the installation guide for your Linux distribution. Follow the instructions by entering the necessary commands in the Terminal. If errors occur (and they most likely will), search for solutions on forums or YouTube. Once the installation is complete, open your browser and go to http://localhost/zm.
Adding cameras
Once the router is configured according to the manufacturer’s instructions and the cameras and PC are connected to it, all devices will be in the same local network. Then you can proceed to add the cameras to your video surveillance program.
Xeoma
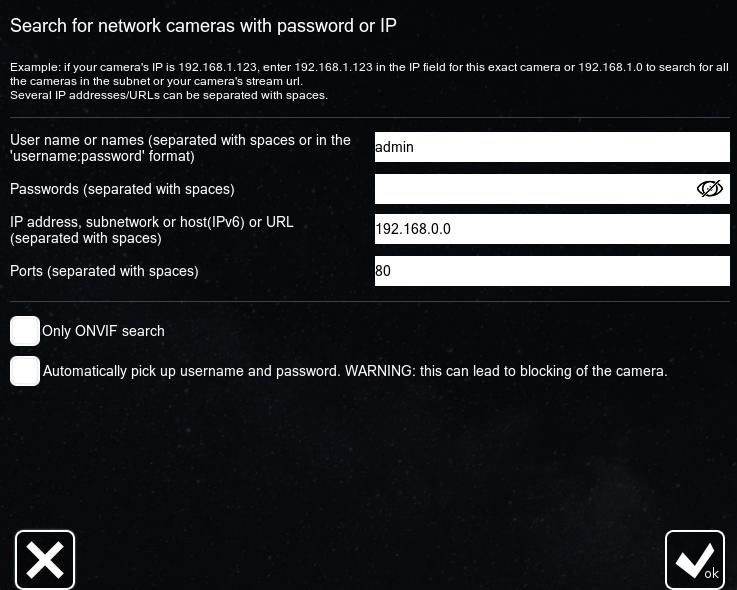
Click the “+” icon on the bottom panel and select the “Simple search for local cameras” option. Xeoma will automatically scan the local network and add any cameras it finds. If for some reason a camera is not found, you can use alternative options:
• Search by IP/password – simply enter the camera’s IP address, password, and port, and Xeoma will add the camera if it is available. You can search by an unlimited number of addresses simultaneously.
• Add new camera manually – copy the RTSP link for the camera’s video stream (you can find this link online) and paste it into the corresponding field in the “Universal Camera” module’s settings.
ZoneMinder
Before adding cameras to ZoneMinder, you need to specify the path to the disk where the archive will be stored. To do this, go to the Options tab -> Storage -> Add new storage. Fill in the required fields (storage name, path, and other parameters) and click “Save.”
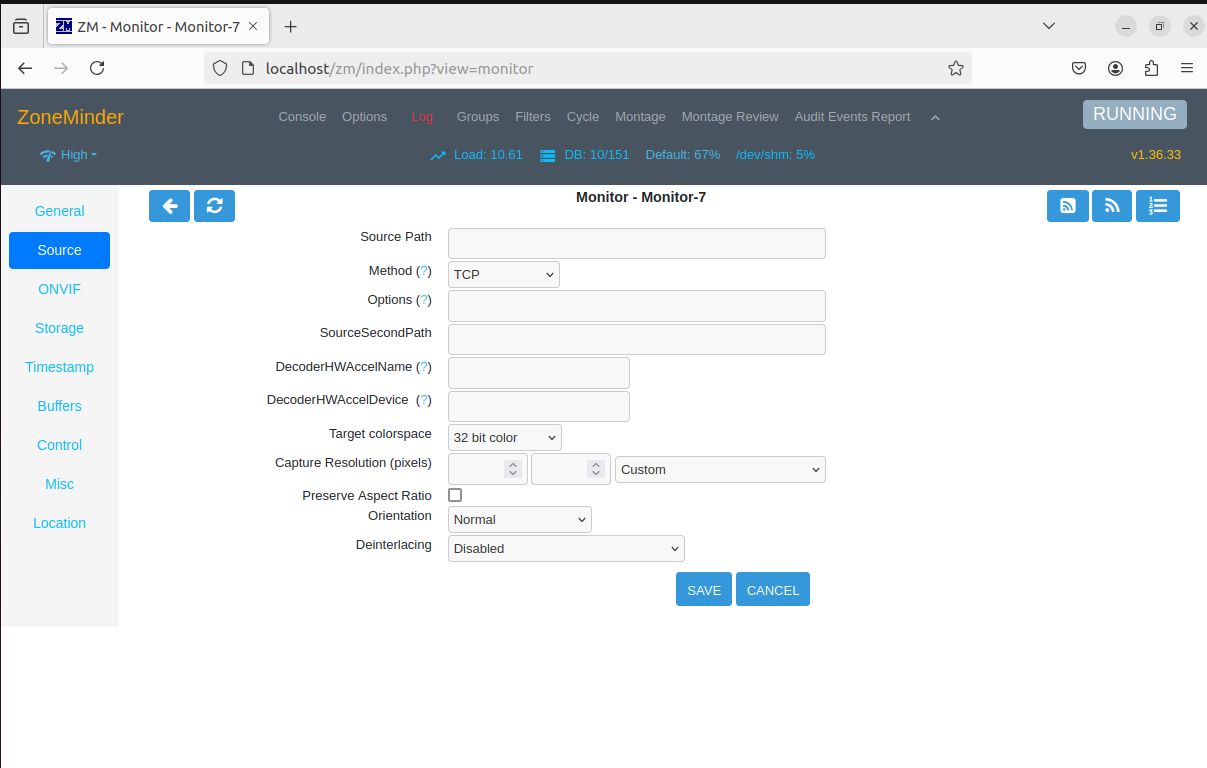
Go to the “Console” tab and click on “Add Monitor.” Assign a name to the camera, select “Mocord” in the “Function” field, check the box next to “Analysis Enabled,” and then go to the “Source” section. Paste the RTSP link for the camera’s video stream into the “Source Path” field. After that, go to the Storage tab, select the previously added storage in the “Storage Area” field, and click “Save.”
Setting up motion detection, archive recording, and notifications
Xeoma
Click the “gear” icon on the bottom panel to open the module chain settings window. The default module chain already includes the “Motion Detector” module, so you only need to configure it.
Click on the “Motion Detector” module to open its settings. Scroll down and click “Show detailed settings”. First, pay attention to the detection zone selection window — mark the areas of the frame where you want to detect motion. There can be multiple detection areas, but the same setting will be applied to all of them:
• Post-recording – the amount of time the archive will continue recording after the moving object disappears from the frame.
• Ignore movements shorter than – allows the module to ignore too brief movements, such as light flashes, etc. The recommended value is 500 milliseconds.
• Sensitivity threshold – how intense the movement must be for the module to be triggered and start recording the archive. If you plan to track the movement of people or cars, the recommended value is 35 or higher.
• Detection method – the module’s algorithm of motion detection. “Compare adjacent frames” is the standard detection method, “Compare to the accumulated background” ignores constantly moving objects in the frame (clouds, trees, waves, etc.), “Ignore shadows” prevents triggers from shadows cast by objects, and “Camera-embedded motion detector” uses data from the camera’s built-in motion detector.
• Detect only the absence of movement during – this allows the motion detector to trigger after a period of movement absence in the frame.
• Save data to CSV report – Xeoma will create an entry in a CSV file each time the Motion Detector module is triggered.
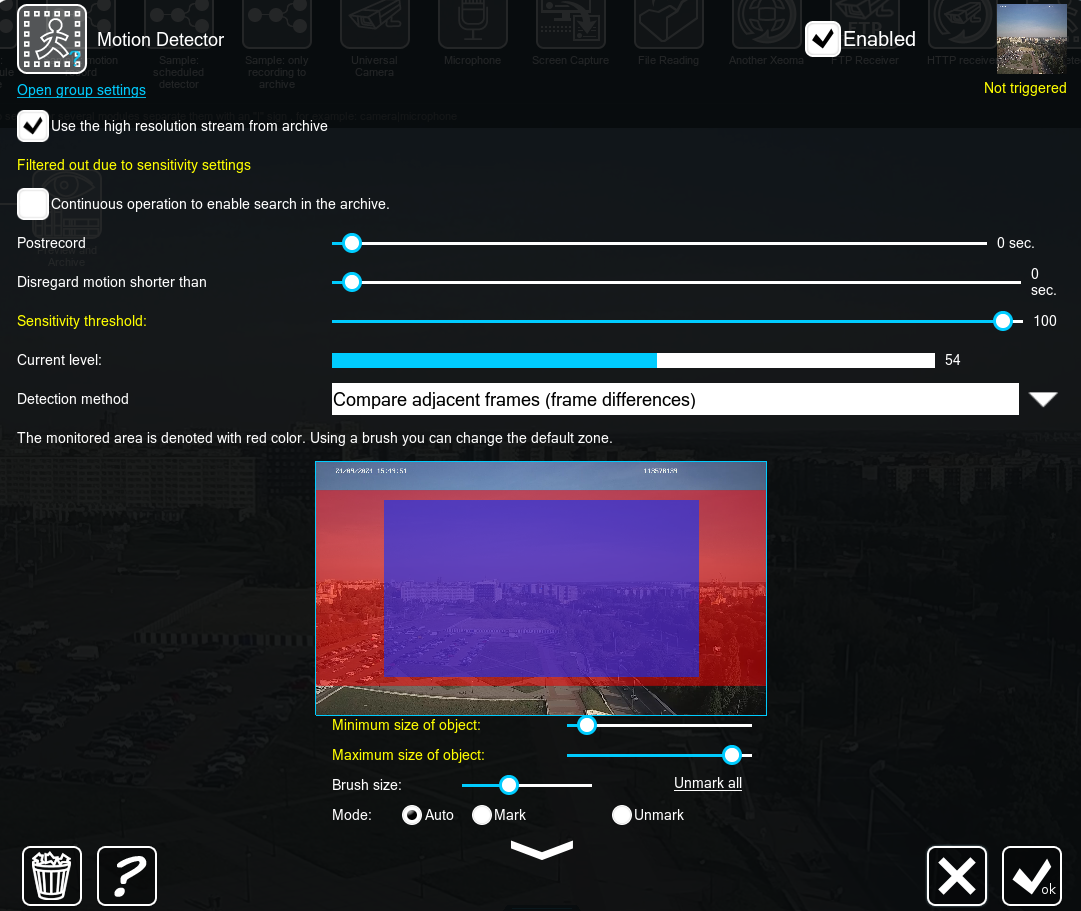
Once all parameters are configured, click “OK.” Test the motion detector by causing movement in the frame, and adjust the settings if necessary. The red “REC” icon in the upper right corner of the screen indicates that the module has been triggered, and the archive is currently being recorded.
To add an additional detection zone with individual settings, you need to add another Motion Detector module to the chain. In the Free version of Xeoma, as well as Xeoma Starter* edition, this capability is not available due to a limit of maximum three modules in a chain. Fortunately, in our practice, there has never been a case where a homeowner required multiple detection zones with individual settings for one camera.
ZoneMinder
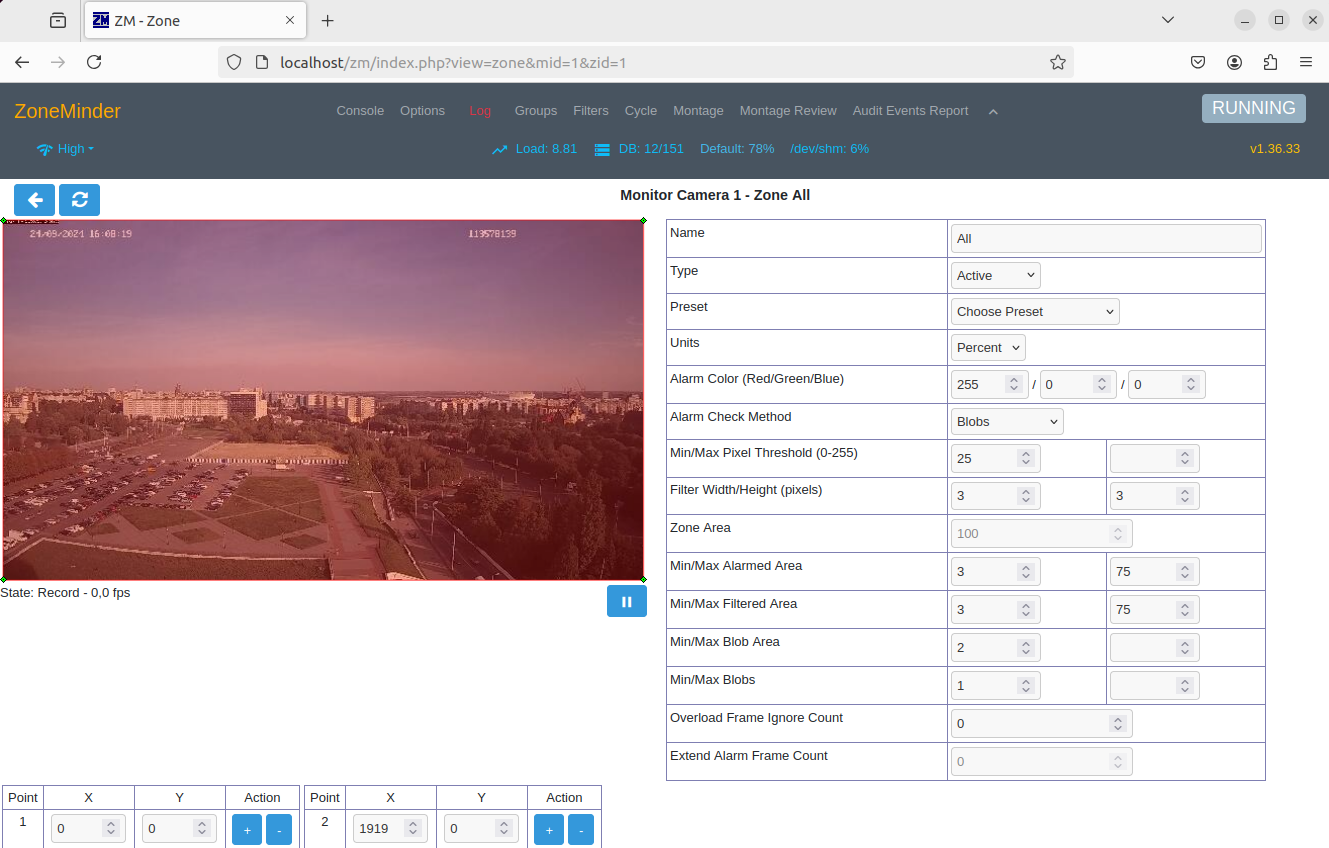
As well as in Xeoma motion detection in ZoneMinder was activated during the camera setup stage (“Mocord” function), so now you simply need to configure it. To do this, go to the “Server” tab, find the necessary camera in the list, and click on “1” in the “Zone” column, which will open the motion detection configuration page. Click on the image from the camera highlighted in red to configure detection zone 1.
By default, the detection zone covers the entire frame, but you can change its shape by dragging the points located at each corner of the red rectangle.
The next step is to configure the trigger mode and detector sensitivity. The program offers numerous parameters for fine-tuning, but adjusting the detector purely by intuition won’t work: the parameter names don’t fully explain their purpose. The corresponding article in the official guide doesn’t provide comprehensive information, so you may need to seek additional explanations on forums or YouTube.
If necessary, you can configure an unlimited number of detection zones with individual sensitivity settings. To add a new zone, click “Add” on the motion detection configuration page and repeat the steps mentioned above.
Email notification setup
Xeoma
Due to the limit of three modules per chain in the Free version and Xeoma Starter*, it’s impossible to record the archive and get notifications at the same time. You’ll either have to give up archive recording or make a choice in favor of Xeoma Lite license or higher.
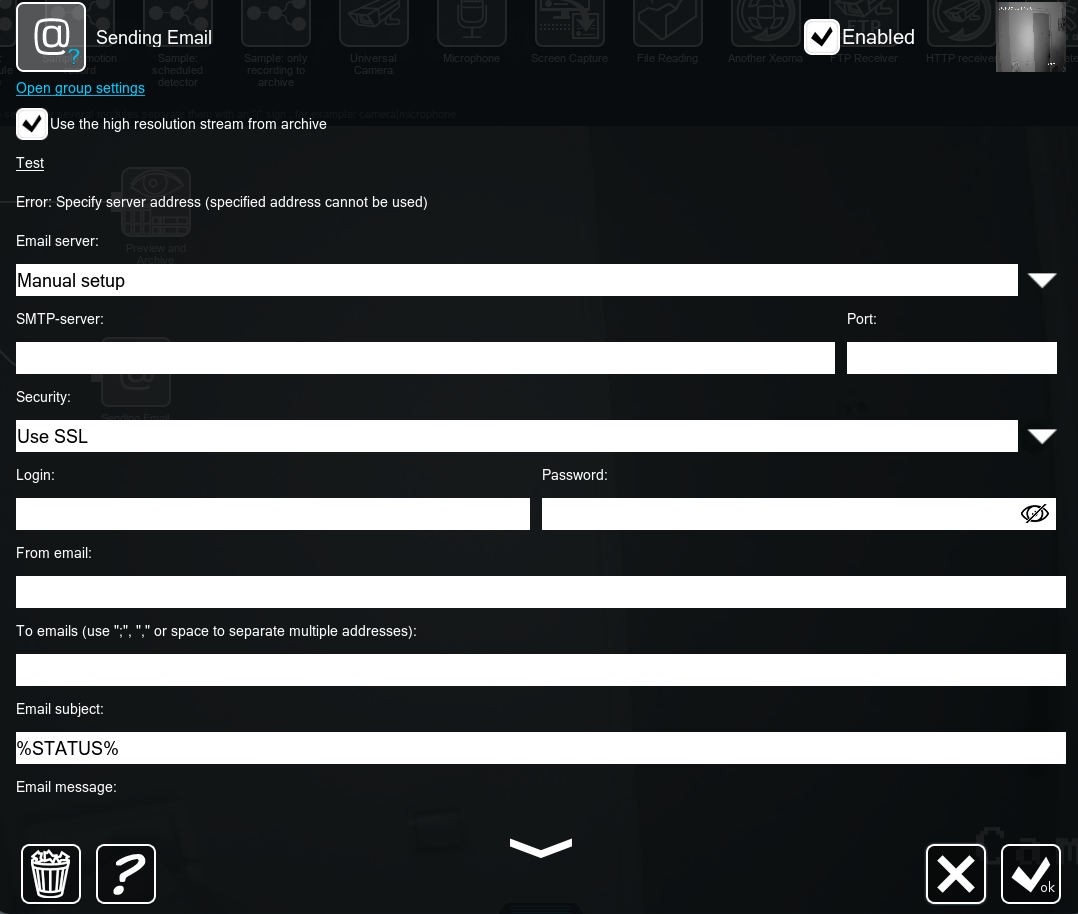
To set up email notifications, drag the “Email Sending” module from the top panel and connect it directly to the “Motion Detector” module. The easiest way to configure the module is by following our detailed guide. In short: specify the mail server, email login/password, set the email sending interval, configure macros and attachments if needed. All domains are supported, including gmail.com, yahoo.com, etc.
ZoneMinder
The setup of email notifications in ZoneMinder is best described in the official guide and consists of the following steps:
• Install SSMTP on Linux
• Configure SSMTP through the ssmtp.conf configuration file
• Set up email notifications in ZoneMinder
As well as in Xeoma emails in ZoneMinder can be sent from all domains.
Viewing cameras and archive
Xeoma
Xeoma’s modern tile-based interface allows you to view multiple cameras simultaneously or expand a single camera to full screen. In our case, the screen is evenly divided into four preview windows, large enough for comfortable monitoring. Any camera can be expanded to full screen by simply clicking on the corresponding preview window. Interface elements disappear when inactive, allowing the image to occupy the entire screen.
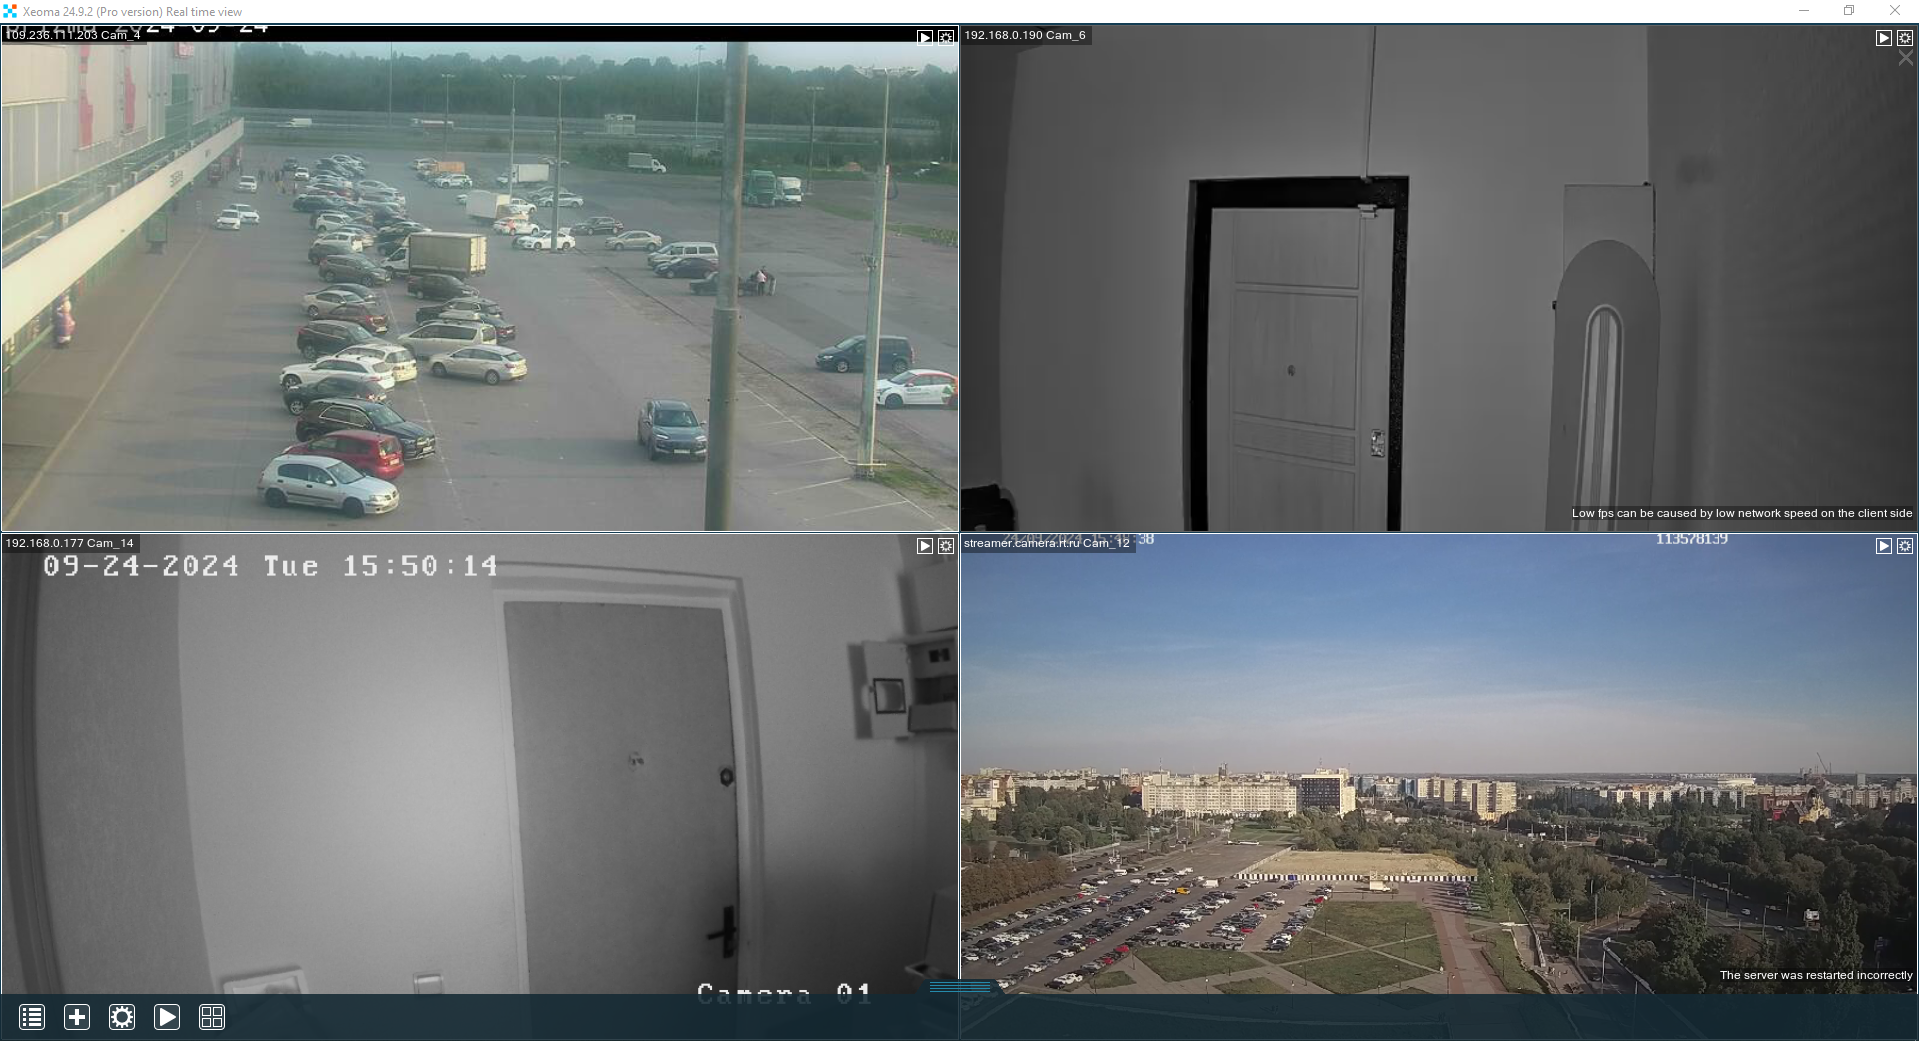
You can open Xeoma’s archive player by clicking the “Play” button on the bottom panel. The archive can be accessed both in “all cameras” view and when previewing a camera in full screen mode. The minimalistic interface of the player will help you stay concentrated on monitoring. More details about the archive features can be found in the user manual.
ZoneMinder
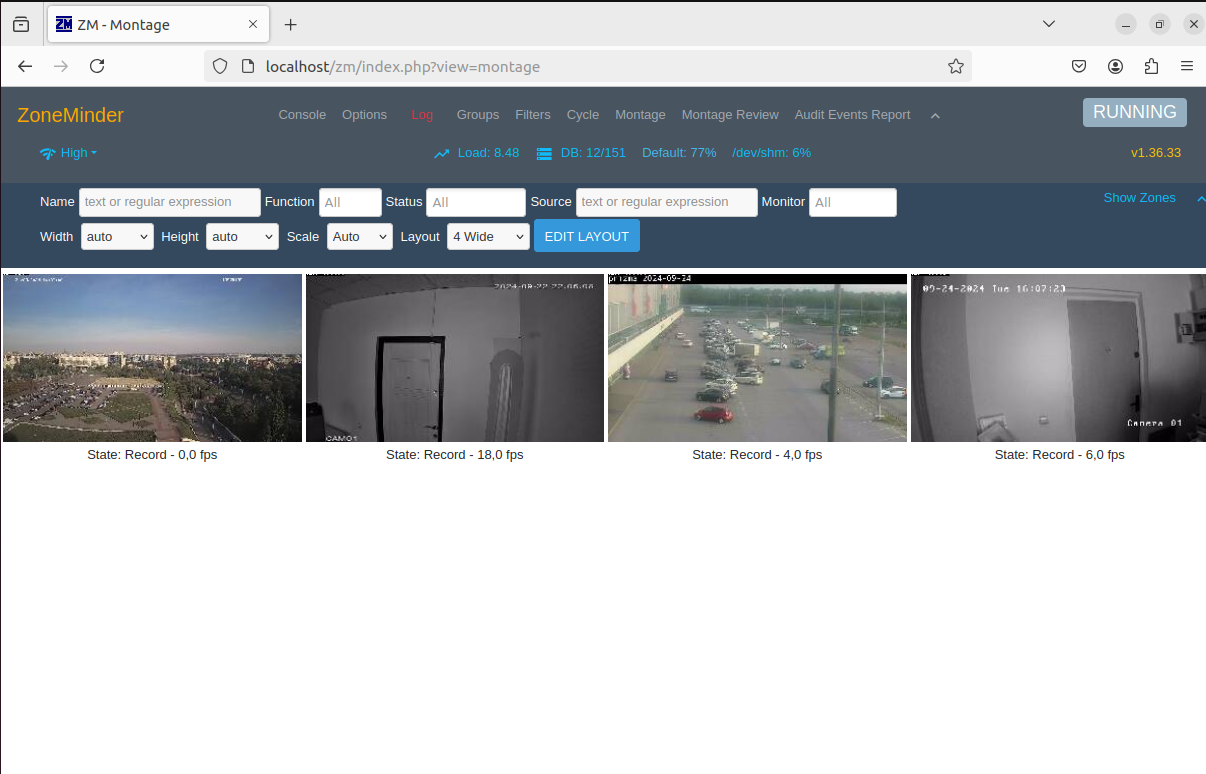
All cameras added to ZoneMinder can be viewed by navigating to the Monitor tab. By default, images are stretched to fit the entire screen, so initially, you’ll need to manually adjust their size. Try different width, height, and zoom parameters to achieve the optimal camera size. The camera grid can be selected from the dropdown menu “Layout”. Unfortunately, it’s not possible to fit more than 10 cameras on the screen at once; to view additional cameras, you’ll need to scroll down the page.
Remote Access
Xeoma
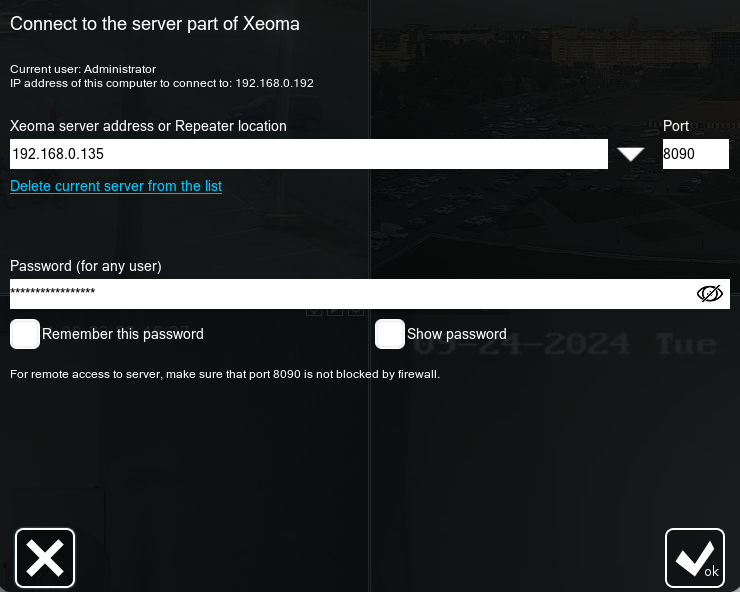
Remote access is included in all editions of Xeoma except the Free version. You can use both local and public static IP address to connect to the server from another device running Xeoma. If you don’t want to purchase a public static address for your server to connect from outside of local network, Xeoma offers a free alternative – P2P connection: simply enable P2P in the remote access settings of the server and use the program-generated code instead of the IP address to connect to Xeoma. You can connect to the server remotely from another PC with Xeoma on board, or from Xeoma mobile app for Android and iOS. There is also a paid alternative – the “Repeater” service.
ZoneMinder
Since ZoneMinder only supports web interface, to access the server you’ll need to go to a specific address via web browser. By default, the address looks like http://localhost/zm, but this will only give you access to the program from the same computer where it is running. If you need to connect from the local network, replace “localhost” with the IP address of the computer running the program (you can find it using the console command: hostname -I). For external network access, you’ll need to replace “localhost” with the server’s public static IP address. The developers also offer a paid remote access option – connection via private VPN tunnel.
Technical support
You may encounter unpredictable difficulties while using any program, but in case of video surveillance systems issues may occur not only on software’s side, but also on network’s, cameras’ or server’s side. It is often hard to diagnose such issues by yourself, and in this case it’s worth contacting specialists – the technical support service.
Xeoma
Technical support in Xeoma is completely free during the whole program usage period even if you use the Free version of Xeoma. Technical specialists will diagnose the issue and offer the most optimal solution – as a rule, a clear step-by-step guide on how to fix the issue. In case you require remote program or hardware configuration, the specialists will help you on paid basis.
ZoneMinder
ZoneMinder doesn’t offer a free tech support service. The project is non commercial, so the developer doesn’t have the ability to hire technical specialists. Paid tech support is available, but it’s price is more than twice as high as Xeoma’s. This way, if you encounter a difficulty while using ZoneMinder, you have two options: pay $200/hour for tech support or solve the issue by yourself with the help of the Internet.
Limits
Xeoma
The free version of Xeoma and other editions differ in their limits:
• Free version allows to add an unlimited number of cameras for preview and record 4 cameras. The archive retention period is limited to 5 days, but size of the archive is not limited. You can add up to 3 modules in a chain. Email notifications are available for 4 cameras. Remote access is unavailable (all free options).
• Xeoma Starter* allows to add an unlimited number of cameras for preview and record 2 cameras. The archive retention period is limited to 5 days, but size of the archive is not limited. You can add up to 3 modules in a chain. Email notifications are available for 2 cameras. Remote access is included (all free options).
• Xeoma Lite is purchased per camera. The maximum number of cameras is 4 (preview + recording). Archive retention period and size are unlimited, up to 6 modules can be added to a chain. Email notifications are available for all cameras. Remote access is included (all free options).
ZoneMinder
ZoneMinder allows to add an unlimited number of cameras for preview and archive recording, and has no archive retention period and size limits. The number of motion detection zones is also unlimited.
Conclusion
Both programs have their pros and cons, which are important to consider when choosing software for home video surveillance. Let’s summarize them:
Xeoma
Advantages:
• The program can be easily downloaded and is ready to be used immediately (portable mode)
• Cameras can be connected in 3 clicks
• Simple setup of Motion Detection and notification sending
• Clear and user-friendly interface
• More free remote access options than in ZoneMinder
• Free version is available
• Free technical support
Disadvantages:
• Remote access is available only in paid versions
• There are limits on the maximum number of cameras and archive retention period
ZoneMinder
Advantages:
• Unlimited number of cameras for preview and archive recording
• Unlimited archive retention period and size
• Unlimited number of motion detection zones
• The program is completely free
Disadvantages:
• Complicated download and installation process
• Many unnecessary (for home surveillance) settings when adding cameras
• Complex setup of Motion Detection and notification sending
• Outdated interface
• Only paid technical support
Summing up everything said above, both programs accomplish their main task – allow users to monitor their cameras. ZoneMinder is an excellent choice if you are determined not to spend a single dollar on video surveillance software and have the time to delve into technical details. In this case, you will get a good free program without camera limits, allowing you to set up a large-scale home surveillance system. Xeoma offers the same capabilities but in a much simpler and faster way, making it suitable for most users, even those without special PC skills. Xeoma will save your time and provide a pleasant user experience throughout the whole usage period, even if you have to purchase one of the budget licenses.
|
|
Starting with October 2025 Xeoma Starter licenses may be purchased only in bulk (quantity 100 or above). If you’d like to make this purchase, please contact us. |