Reducing CPU load: full guide
There are several ways to reduce the CPU load on your computer (or other device) depending on your configuration.
You can try the following options to reduce the CPU load:
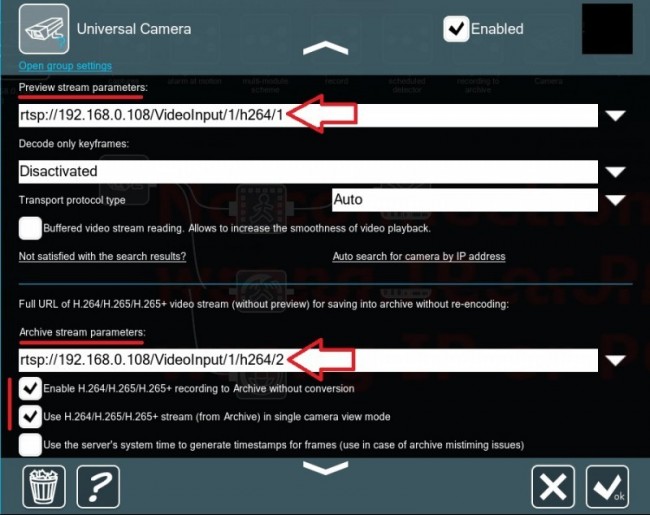
1. Try dual-streaming.
You can use lower resolution URL/stream for preview of all cameras (1st URL in the ‘Universal camera’ module’s settings) and higher resolution URL for single camera view mode and archive. This way you’ll see lower resolution stream on preview and higher in single camera view mode and archive in Xeoma. By means of dual-streaming you can lower CPU load significantly without losing image quality. More about this method can be checked in this article.
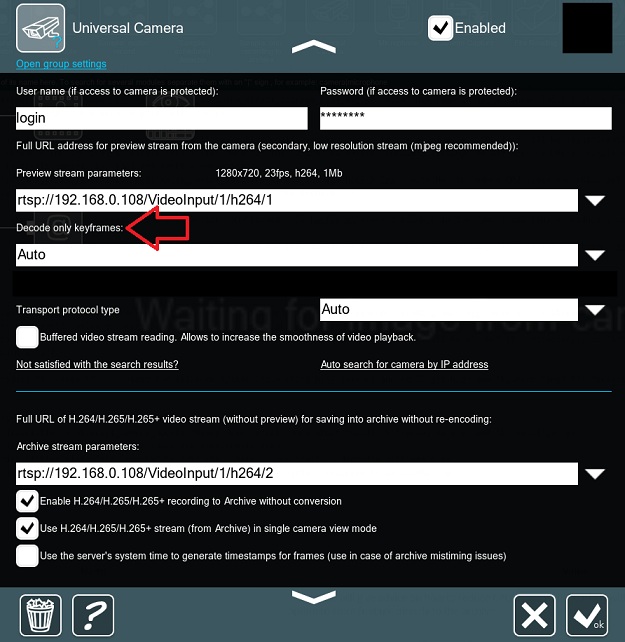
2. Turn on decoding of keyframes in the ‘Universal camera’ module’s settings.
Decode only keyframes option is only shown when an H264/H264+ stream is used in the ‘Full URL address for preview stream from the camera’ field (not available for MJPEG or H265 streams).
Turn on this option to decrease the processor load coming from decoding of compressed H264 streams by decoding only keyframes of the stream. The higher the resolution of the stream used “for preview”, the better this option helps to decrease the processor load. Might result in less smooth (more “jerky”) stream perception – depending on the key frames interval set in camera.
3. Change decoding parameters.
You can choose either decoding on the Client side or decoding on the Server side.
If H264/H265 streams are used in your system, Xeoma receives them in a compressed (“encoded”) form. In order to view such streams they need to first be decoded at some point. If H264/H265 streams are used for preview (the “URL for preview” field in the “Universal Camera” settings) they are decoded when they first arrive to Xeoma. If H264/H265 streams are used for archive saving, they are decoded when you view the archive recordings.
Decoding of H264/H265 streams (especially of those with high resolution and/or bitrate) can take a lot of system resources. In such case, high CPU load can cause the video stream to appear as jerky, or result in other system faults.
To mitigate the CPU load on your Xeoma server you can shift the decoding process to the client side – partly or wholly. If you do that, the server will be receiving and storing streams in an “untouched” (compressed) form, and the decoding will be launched only on the client’s device and only when the client requests to view the steam.
You can turn on the decoding on the client side via the “Layouts menu” – “Client decoding settings”. This option will also be of use if the network bandwidth between server and client is very low (e.g. in mobile networks). If decoding is done on the client side it will receive a compressed, ‘lighter’ stream.
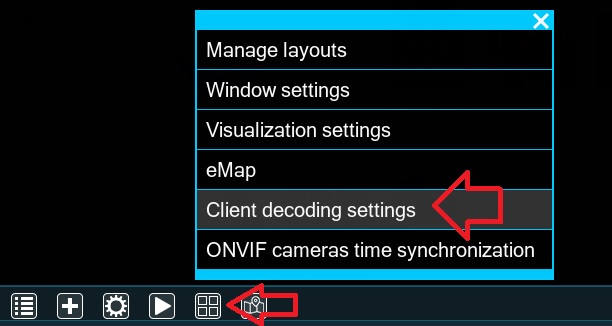
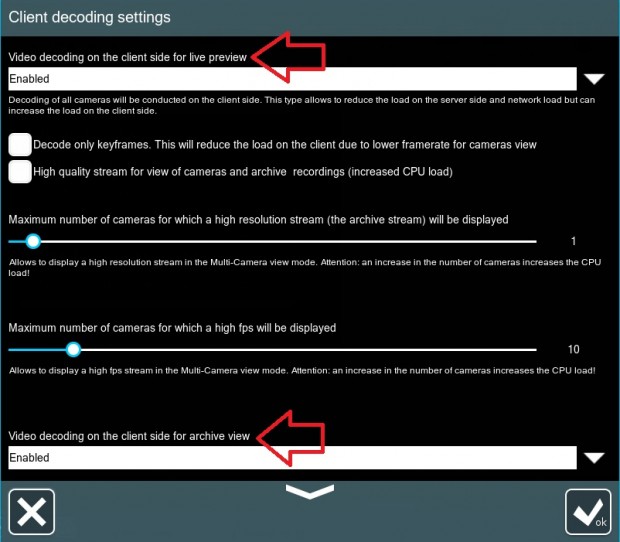
In the dialog you will have a flexible choice of what parts of decoding to shift to the client side – whether it’s just the preview steam for the Multiple Cameras View mode; the preview stream used for the Single Camera View mode; decoding of the archive view stream; all these options together, or a combination of them.
More information about decoding settings can be checked here.
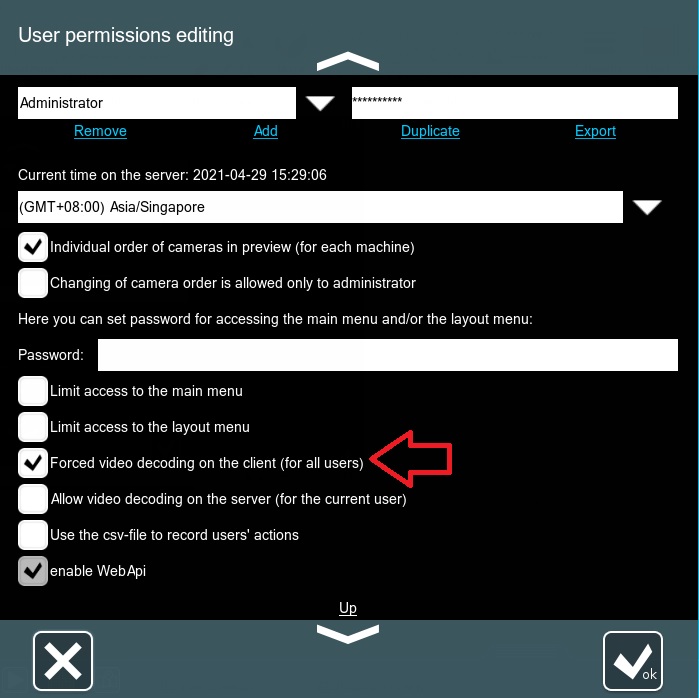
Also, note that you can turn on forced decoding on the Client side in Main menu – Remote access – Users
4. If your hardware allows, you can use hardware acceleration to reduce CPU load.
More about hardware acceleration here.
Server part
If a single server needs to handle a lot of cameras (e.g. 50), powerful CPUs are required to process the live streams. However, graphics cards (GPUs) can take at least part of this load by employing hardware acceleration of decoding. In particular, modern Nvidia cards support CUDA (Compute Unified Device Architecture, for Windows and Linux), while Intel’s integrated GPUs support Quick Sync (Windows only). Xeoma allows to take advantage of either of these methods.
To enable this option, access the “Universal camera” settings and tick the corresponding box:
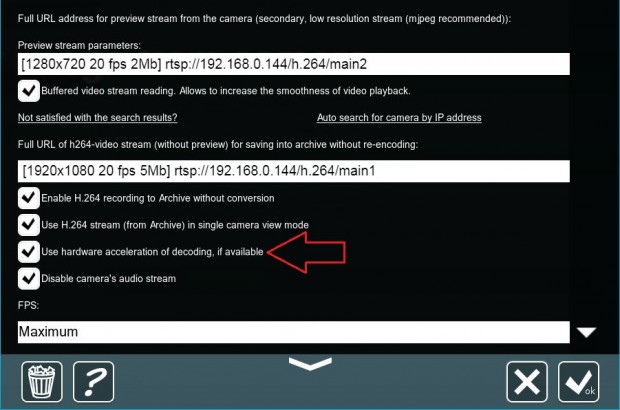
There are 2 conditions for hardware acceleration to work:
1. the preview stream (the first URL in the module) needs to be of at least HD quality (720p or 1280×720) – otherwise, acceleration is counter-productive;
2. the GPU itself should be at least Nvidia GeForce 400 series or higher (for Linux: GeForce GTX 750, GTX 900 or higher).
The GPU’s power corresponds with the number of cameras it needs to work with. For example, GeForce GT 730 can handle 4-6 cameras, while GTX 1060 can process tens of cameras.
Client part
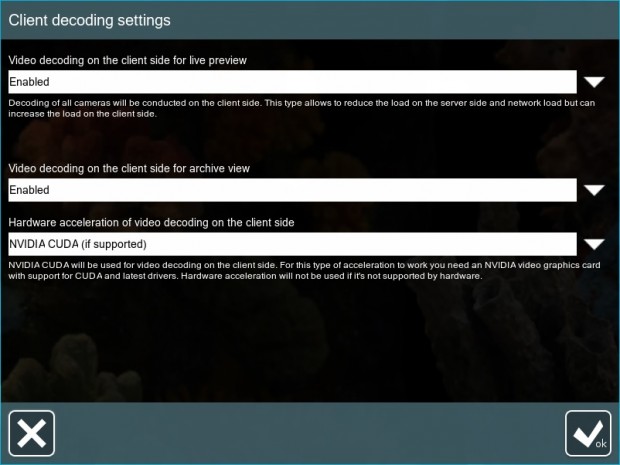
If the client machines have enough capacity to decode the streams, the server’s load can be reduced considerably. Hardware acceleration can be used in this situation as well – the server can be set to move the decoding to the client side (remote workstation). Go to Layouts menu → Client decoding settings and choose the necessary options in the drop-down menus:
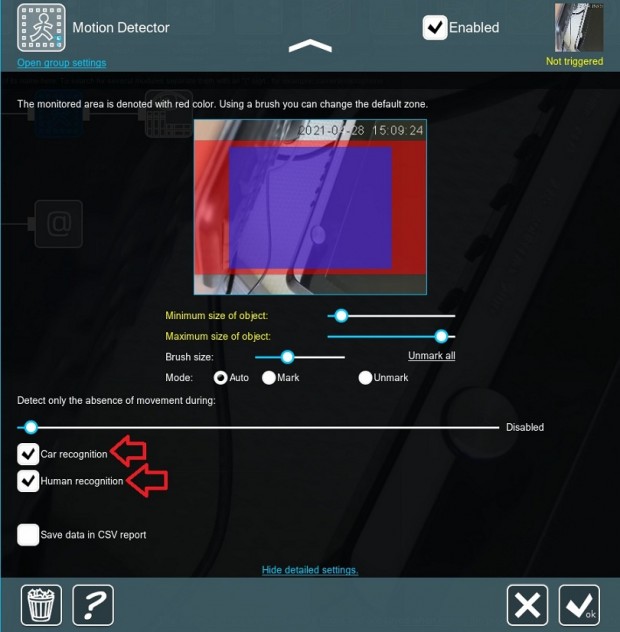
5. You can untick “Car recognition” and “Human recognition” in the “Motion detector” module’s settings to lower the CPU load.
Unlike Motion Detector’s usual movement tracking algorithms, these two options rely on artificial intelligence techniques to detect objects that look like people or vehicles in the scenery. Using them will add more CPU load, so if they are not needed, disable the options to reduce the CPU load.
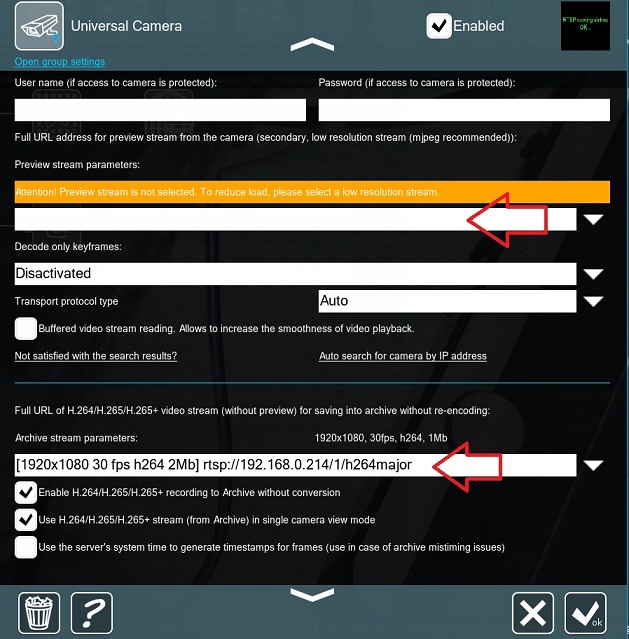
6. Disable preview stream in Xeoma.
If there’s no need to review all cameras, and you need to see only single camera view mode and archive, then you can erase preview URL from “Universal camera” module’s settings and leave only 2nd URL (for single camera view mode and archive):
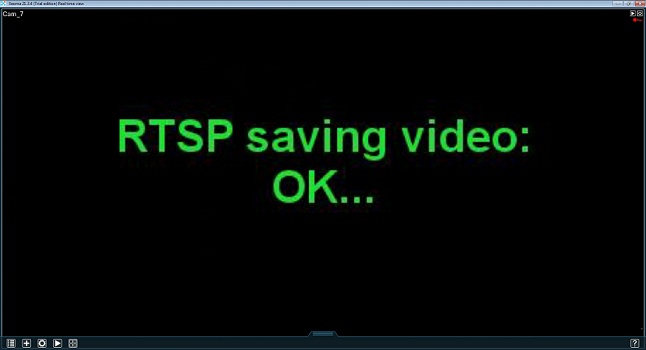
The result on preview of all cameras:
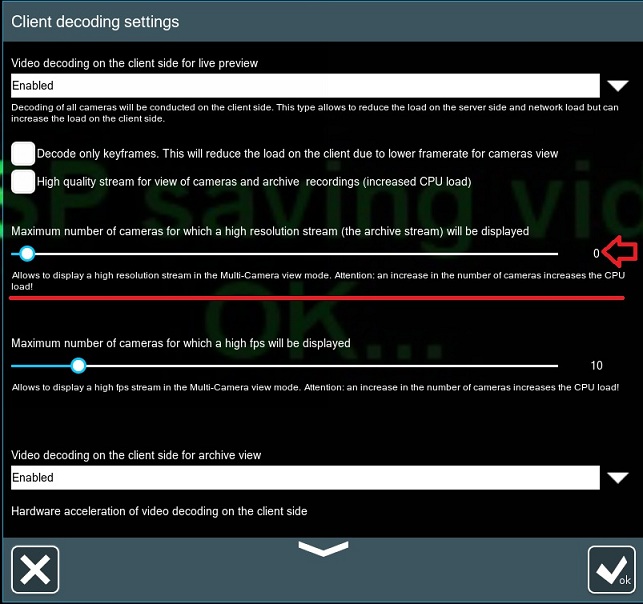
Also, please make sure to set “Maximum number of cameras for which a high resolution stream will be displayed” slider to 0 via Layouts menu (“squares” icon in the bottom panel) – Client decoding settings:
7. Use mjpeg URL for preview.
To reduce CPU load you can switch to mjpeg stream in the “Universal camera” view mode (use http://CAMERA’S_IP_ADDRESS… URL for preview). This way you’ll reduce CPU load, but note that network bandwidth utilization will be higher.
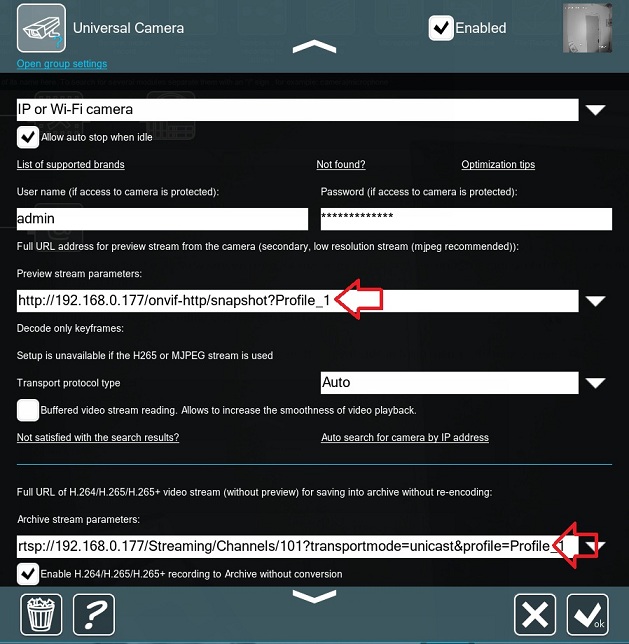
8. Lower camera’s parameters (bit rate).
Also, you can lower a camera’s parameters (bit rate) in the camera’s admin page in browser to reduce CPU load. Xeoma will pick up the changes.
9. You can delete all unnecessary modules from the modules chain.
By the way, if you’re using such modules as ‘Image rotate’, ‘Image crop’ or ‘Image resize’, you might consider using camera’s own zoom or rotate the camera itself and delete these modules from the modules chain since these modules might provide additional load.
10. Disable some cameras.
If there are too many cameras, the processor might just not be able to handle the load from all of them. So you can consider reducing the amount of cameras.
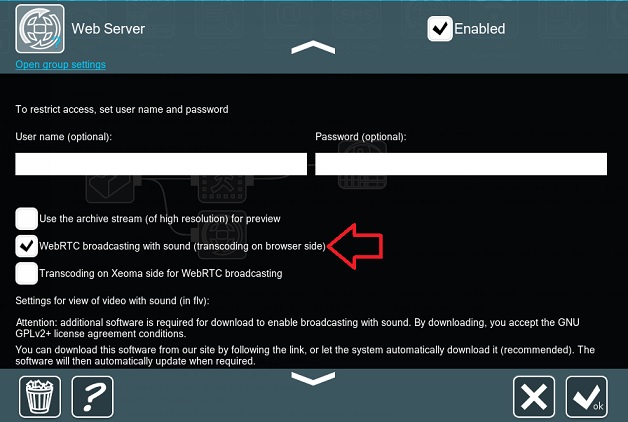
11. For the web interface: you can switch to the ‘WebRTC broadcasting with sound (transcoding on browser side)’ in the ‘Web server’ module’s settings to reduce the processor load.

|
And if you’d like to lower network bandwidth from Xeoma Server to Client, check out this note. |
12. To reduce the CPU load during the simultaneous view of recordings from several cameras (Xeoma Pro feature) you can use the newly introduced feature of saving recordings from two streams. The logic behind this is that when viewing several archives, you rarely have a screen big enough to display the main stream resolution from multiple cameras, so the resolution is reduced to fit the screen – yet on-the-fly decoding is still engaged for the main stream causing intensive CPU load. In this case, lower resolution recordings can be a better fit for the multiple-cameras recordings view.
See more about the feature and its use here
May, 5 2021, updated February, 21 2022
Read also:
Dual Streaming in Xeoma VSS
Xeoma User Manual: more about module ‘Universal Camera’ and its settings
Hardware acceleration
Layouts menu (grid, visualization, decoding settings)
Video surveillance minimum system requirements calculator