Smart Home Integration with Xeoma


|
curl utility is highly recommended for smart home integration. Most Linux and MacOS systems have it installed by default, Windows users need to download it manually. |
The desire to automate various processes that we deal with on a day-to-day basis is something many people have embraced in the recent years. Convenience and comfort are what we’ve learned to expect from technology and those are precisely the kinds of benefits that smart home solutions strive to provide. With this in mind, it’s easy to see how the bond between such automation and security grows stronger, IoT being one of the more prominent contributors to this sphere.
In this article we’ll have a look at several variations of smart home systems and how Xeoma can communicate with them to provide a more comprehensive automation.
Before we dive right into the topic of integration, you may want to take a quick dip in this handy glossary of terms you’ll encounter throughout the article with bite-sized descriptions relevant for this context.
Glossary ☟
- API – Application Programming Interface, a set of commands and rules that govern their use in the communication between devices.
- Header – part of an HTTP-request that has a name and value (usually written like this: “name-of-header: value-of-header”); a single request may have many headers; it helps the recipient to understand both the contents of the request and its purpose.
- IoT – Internet of Things, a combination of devices exchanging data via Internet.
- JSON – JavaScript Object Notation, a simple language that applications often use for HTTP communication.
- Parameter and value – a basic combination of a piece of functionality and its state; usually written like this:
"lock"="opened"– here the parameter “lock” is assigned the value “opened”. - Payload – part of an HTTP-request that lists all info that needs to be sent to the receiver; often written in JSON.
- Token – a combination of seemingly random symbols that proves to the system that its bearer is allowed to make that HTTP-request; think of it as an ID card.
Many Samsung devices are compatible with SmartThings API – it allows users to monitor and control them using JSON. Suppose at night we need to make the light on the porch brighter when a person is approaching it:
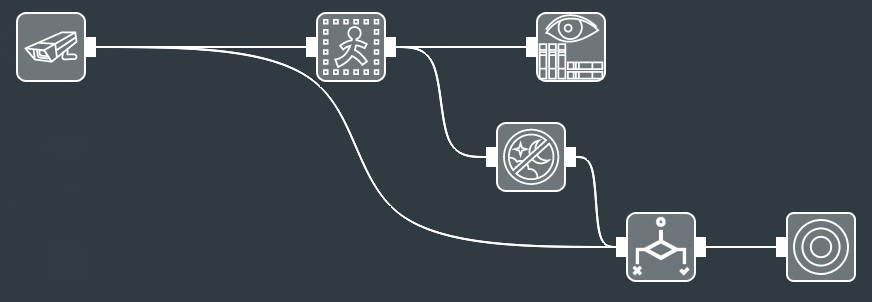
The simpler way of sending a set of JSON parameters and values is to have them in a separate text file, e.g. data.json. Here is an example of its contents for the light scenario:
{"commands":[{"component":"main","capability":"switchLevel","command": "setLevel","arguments":[90]}]}
The important part here is 90 – that’s the brightness on the scale of 0-100.
Application Runner will need 2 things: the name of the utility we need to run and the parameters to apply to that utility. The utility in this example is curl (for Windows you’ll need to indicate the full path for it, unless you cheat by playing with environment variables).
Here are the parameters:
-d @"/home/user1/data.json" -H "Authorization: token_goes_here" -H "Content-Type: application/json" -X POST https://api.smartthings.com/v1/devices/6f5ec124-4c02-baac-a222-cc129c1880c3/commands
Quick overview of what curl sees in those: ☟
- -d – what follows becomes the payload for the HTTP-request;
- @ – take the contents of the file, not the file itself;
- -H – use this header;
- -X – send this type of request;
- 6f5…0c3 – unique ID of that device (light bulb in this case).
Suppose we need to sound an alarm when there is an unrecognized face in front of the camera:
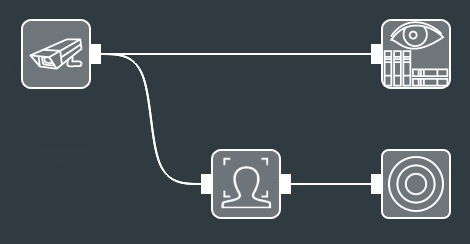
We make sure that Face Recognition is set to React to unknown or unselected faces. The settings for Application Runner remain largely the same (only device ID changes), however, the contents of the .json file are now different:
{"commands":[{"component":"main","capability":"alarm","command":"siren"}]}
Many IoT devices allow their users to monitor their state and allow remote control options, this is where Smappee API comes into play. Its main purpose is to monitor power consumption, gas and water usage, etc. Suppose we detect smoke and/or fire in the vicinity of the stove – we want to immediately cut power and/or gas supply for it. Here is one way to do it:
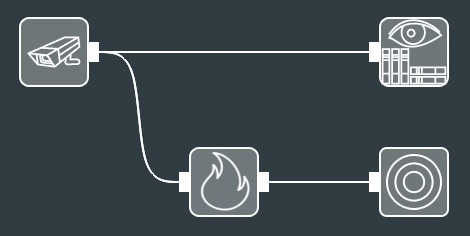
The utility for Application Runner is, once again, curl. The parameters for it are:
-d @"/home/user1/data.json" -H "Authorization: Bearer token_goes_here" -H "Content-Type: application/json" -X POST https://app1pub.smappee.net/dev/v1/servicelocation/113355/actuator/2/off
The contents of the .json file are modest this time:
{"duration":0}
0 here means that the switch will remain disabled until it receives a command to turn it on, as opposed to staying disabled only for X seconds and then turning itself on again.
The same API also works with such remotely controlled devices as garage doors. Suppose we need to automatically open the garage door when the camera notices the right car plate approaching it:
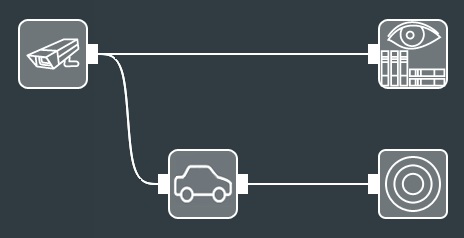
We make sure that ANPR is set to Detect white list cars. The parameters for curl will be:
-d @"/home/user1/data.json" -H "Authorization: Bearer token_goes_here" -H "Content-Type: application/json" -X PATCH https://app1pub.smappee.net/dev/v3/servicelocation/224466/smartdevices/MyGarageDoor
(note the command type here: PATCH, not POST)
The contents of the .json file are:
{"configurationProperties":[{"value":{"unit":"None","value": "Opened"},"spec":{"name":"etc.smart.device.type.door.state"}}]}
Another smart home integration system comes in the form of Wink API – it works with many brands of smart home solutions, be it alarms, cameras, doorbells, etc. Do you live alone and need to make sure that the door is always locked when you leave, even if you forget about it occasionally? You can allow the camera that watches the front door from the outside to control the lock:

We make sure that Face Recognition is set to React only to selected faces. The utility for Application Runner is curl. The parameters for it are:
-d @"/home/user1/data.json" -H "Authorization: Bearer token_goes_here" -H "Content-Type: application/json" -X PUT https://api.wink.com/lock/11810/desired_state
(note the command type here: PUT, not POST)
The contents of the .json file are:
{"desired_state":{"locked":true}}
Would you like to automatically open the blinds at daybreak and close them at sundown? An outside camera can do that as well:
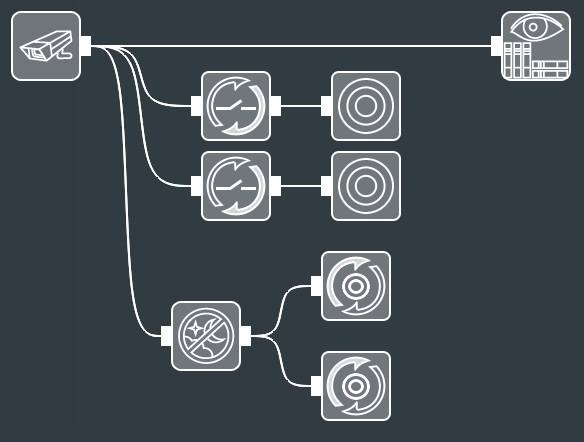
HTTP Request Senders control the HTTP Switchers: one by the event’s beginning (day starts), one by the event’s end (day ends).
Both Application Runners share the same parameters:
-d @"/home/user1/filename.json" -H "Authorization: Bearer token_goes_here" -H "Content-Type: application/json" -X PUT https://api.wink.com/blind/23214/desired_state
The payload in .json file will be slightly different, though:
opening blinds:
{"desired_state":{"position":1.0}}
closing blinds:
{"desired_state":{"position":0.0}}
Until this point we’ve only looked at ways for Xeoma to order other devices to do something based on Xeoma’s own detectors. This time, however, we’d like an external device to feed Xeoma some data. A weather station would be a good place to start – this way Xeoma can put an overlay on the camera’s image that will show us the relevant info. Netatmo Connect API does exactly that – we can get all weather and environment data we need with a single request.
HTTP Marking will handle the overlay, but we need someone else to send it the right command with parameters. Here’s an example of a simple shell-script (Linux) that will fetch the data from Netatmo and send the right parts to Xeoma: https://felenasoft.com/xeoma/downloads/other/smarthome_sample.sh
Here is what the results look like:

The same script can be run with any frequency to keep the data on screen fresh – when HTTP Marking receives a new command that has the same parameters but different values, it updates the values.
It is also worth mentioning that various voice-controlled smart home solutions (e.g. home assistants, like Amazon’s Alexa or Google Assistant) can be “taught” to make specific HTTP-requests on a voice command – this makes HTTP Switcher a versatile tool, since it can turn any module on and off on command.
This article is by no means comprehensive when it comes to available smart home integration APIs, those are numerous by now. However, it does outline the general ways those APIs work, so if you are using an API that you haven’t seen in this article – do not despair, chances are it can still work fine with Xeoma using the same principles.
Special thanks to ProgrammableWeb (https://www.programmableweb.com/) for keeping a truly comprehensive list of APIs.
Specifications for the APIs mentioned above:
SmartThings: https://smartthings.developer.samsung.com/docs/api-ref/st-api.html
Smappee: https://smappee.atlassian.net/wiki/spaces/DEVAPI/
Wink: https://winkapiv2.docs.apiary.io/
Netatmo Connect: https://dev.netatmo.com/apidocumentation/
4 June, 2021
Read also:
HTTP Marking
WebRTC API
Using video surveillance in smart home systems
Home automation with Xeoma (PDF)
“Modbus” controllers – smart home systems and traffic light automation