Option 1. Statistical analysis
Option 2. Artificial Intelligence
Integration with automation systems
How to install the camera to use Face recognition
Troubleshooting, increasing success rate
Search for faces in archives
Xeoma’s Face Detection And Face Recognition: Setup Instruction
|
|
Among other features Xeoma enables your camera to detect people’s faces and recognize specific faces. As Xeoma is unique in its flexibility, Face Recognition also offers several ways to recognize faces. Please note that both options are independent of each other and have separate databases.
Face Recognition can also store a full list of people within its range. This comes especially useful in monitoring staff activity or creating automatic security systems preventing trespassing. It can be set to ignore low numbers of people or stop recording when a certain number is exceeded. Don’t want the camera to detect people that simply pass by? Want to make sure that Xeoma doesn’t mistake one person for another? |
You can do it via the module “Face Recognition”. Put it in your chain so that it is connected to the “Preview and Archive” (this is essential to ensure its proper operation).

Click it to access the settings. If you want it to simply detect all the faces that enter the camera’s field of view, choose “React to any faces” within “Reaction type” block. You can also set the minimum amount of faces for triggering with a slider (set it higher if you want to make sure that a certain place is never crowded). In detailed settings you can choose which area within the camera’s field of view is supposed to contain faces (much like “Motion Detector”). Also the range of face recognition can be altered, for example, if your camera is set in a narrow place, where people’s faces are always close to the camera, it is better to set the range to “Short” or “Medium”. The longer the distance, the more CPU-intensive it gets because computer vision has many more objects that look similar to people’s faces to check.
Option 1. Face Recognition, option “Statistical analysis of the image”
This method is considered a simpler one with average recognition success rate at 75%. It shows best performance when used indoors with even lighting conditions and clear image of a person’s face – in boutiques, offices, halls, malls, etc.
This option is in Xeoma PRO edition, and doesn’t require any Additional licenses. With this option, you can have unlimited number of faces in your database so for big number of faces it is usually cheaper than Option 2.
If you need the camera to recognize a specific set of faces, Xeoma can be trained to do so. There are 2 ways to do it:
1) In “Face Recognition” settings enter the person’s name (or any other ID) and click on “Train person recognition” when the face you need to save is within the camera’s field of view. Xeoma will add this face to the database and attach the name (or ID) to it. You can add up to 100 different photos for the same face to make recognition even more reliable. Adding more will result in overriding the old ones.
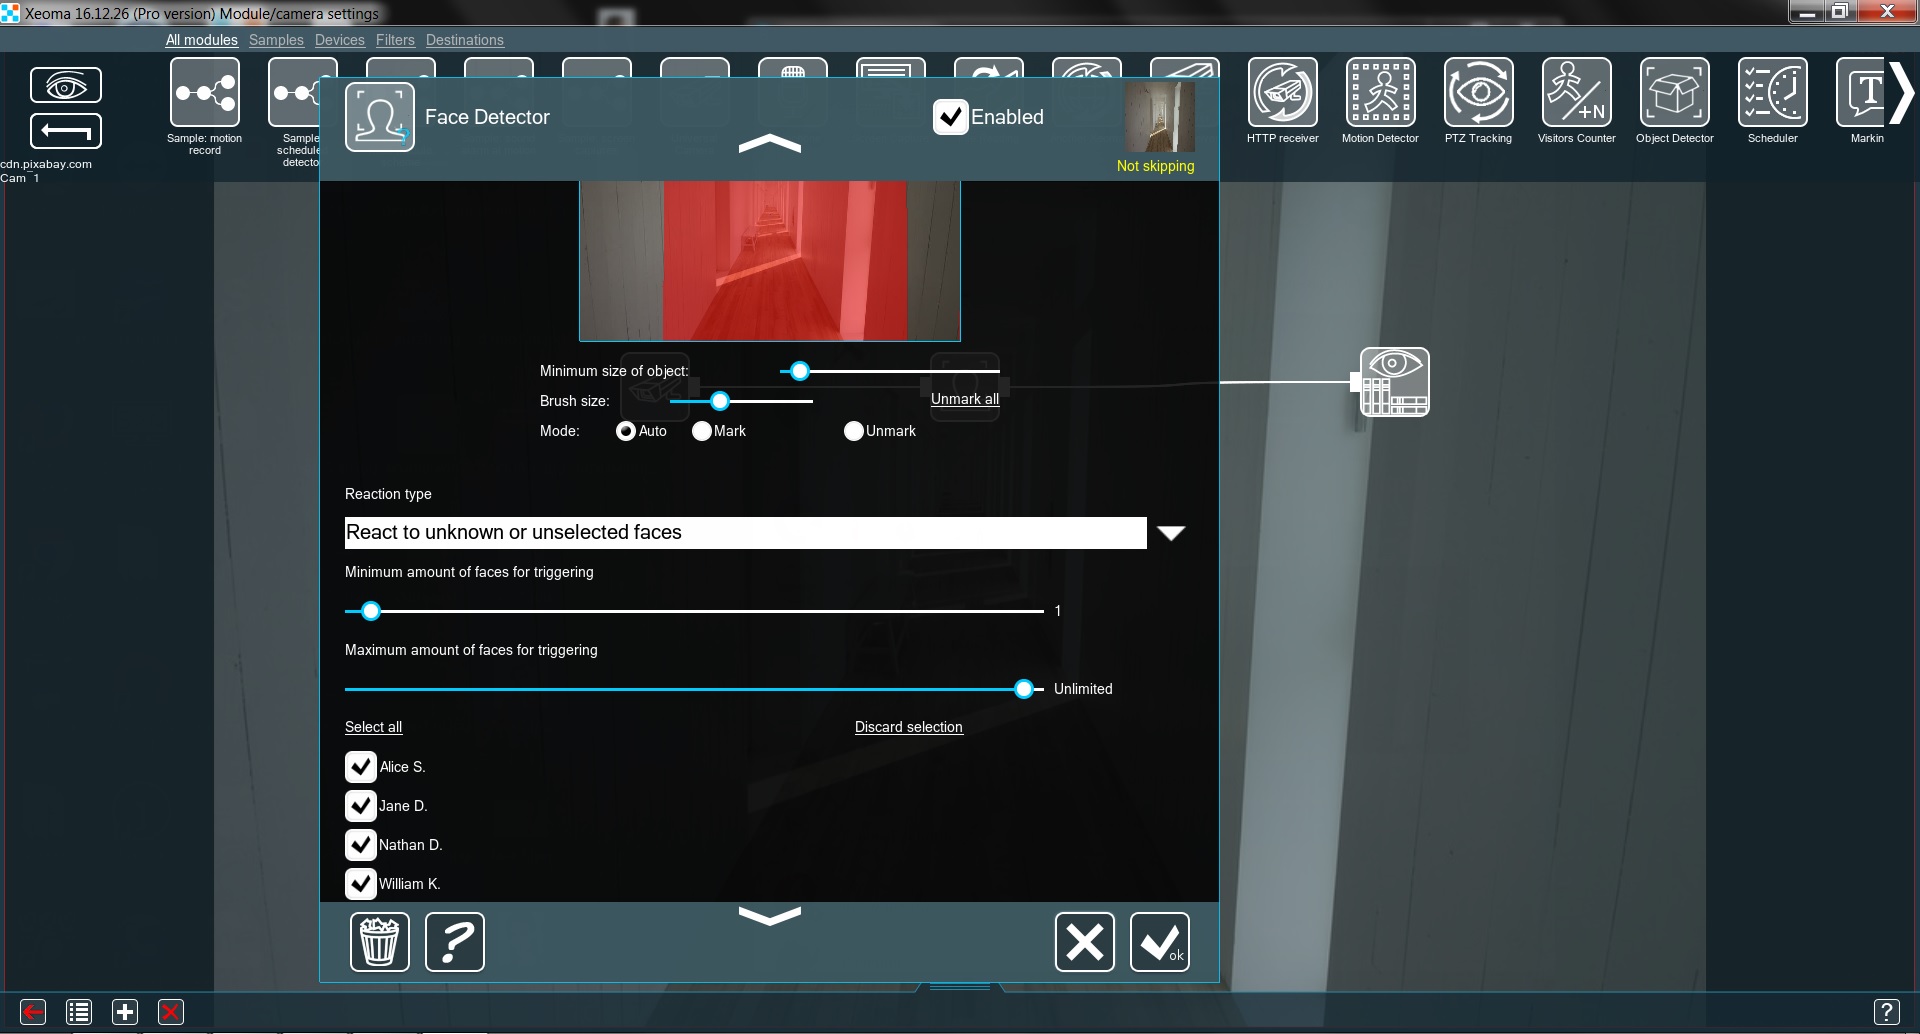
*In Xeoma version 20.10.13 and higher the green Skipping/yellow Not Skipping inscription is replaced with green Triggered/yellow Not triggered.
2) If the person you want to add has already been recorded, you can access the archive and pick the right face from there. Click on the Archive button for the right camera, find the frame that contains the face you need (the bigger – the better) and go “Archive Menu” -> “Select a face and add to the database”. Now just type in the name and draw a square around the face. The database has no limits – you can add as many people to it as you need. Done!
The mechanics behind this is that with multiple shots of a person, a generalized image of a person’s face is created and then sought in camera’s picture.
*An option to train recognition by using a photo is less recommended but also available. See here
With a database for several faces you can now set “Face Recognition” (“Statistical analysis” option) to either react only to selected faces or to unknown or unselected faces. The latter one is useful for monitoring any unauthorized personnel. When you select either of these options, you will see your whole database below as a list of names (or ID) with boxes you can check or uncheck as you see fit. With this you can make Xeoma recognize only specific people and ignore the others or pay attention only to unknown persons.
Don’t forget to use the “Minimal recognition accuracy” slider. It allows you to adjust how close to the original the detected face should be. If you notice that your camera sometimes, for example, mistakes an unknown person for a listed person, set the slider higher.
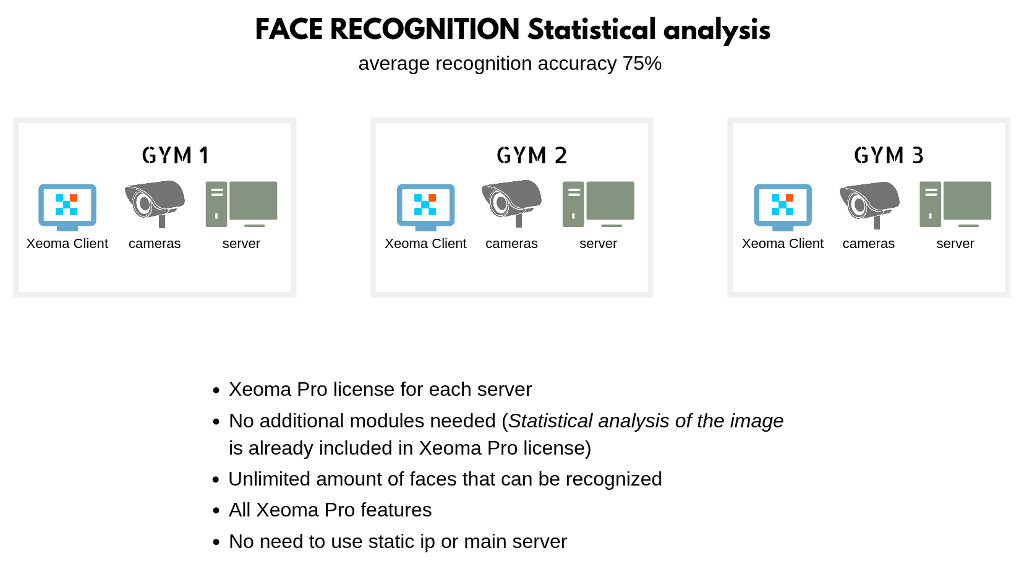
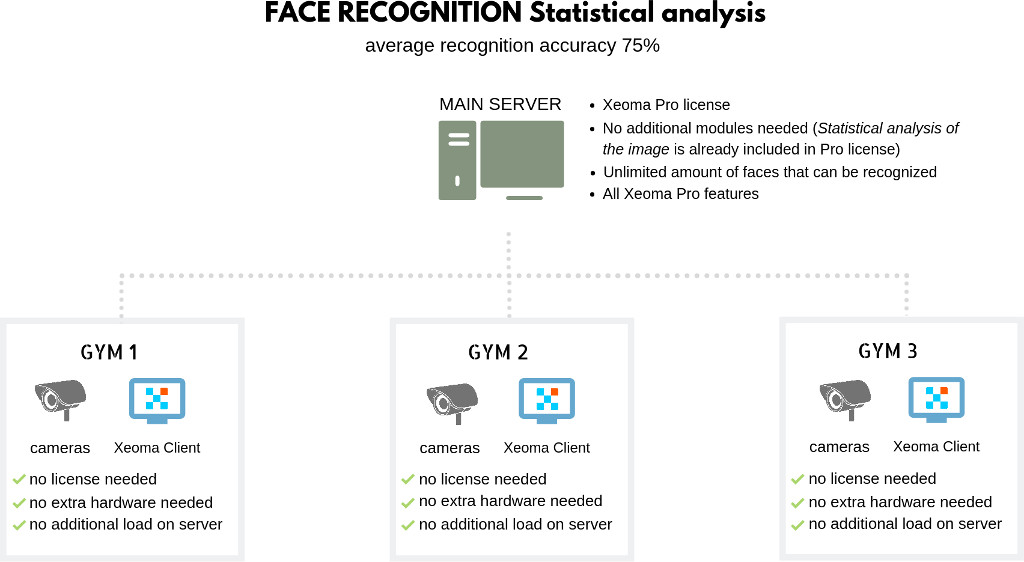
Case study: Face Recognition Statistical analysis of the image in gym franchise
Scenario 1: each gym has its own database and its own server.
Scenario 2: one shared database requires a main server, while gyms themselves can opt for client, and save on licenses:
Option 2. Face Recognition, option “Artificial Intelligence”

|
Starting from beta version 23.12.7, the “Artificial intelligence using CNN (ConvNet)” mode is available – it allows you to more accurately recognize the faces of people of Asian appearance. Generally, this is the 3rd method of facial recognition, but in fact, it is only an additional option in facial recognition using artificial intelligence algorithms. Training faces for recognition for this method is completely identical to training for Method 2. Face recognition, option “Artificial Intelligence”. |
This method is considered more advanced than Option 1 as it performs better in different conditions, has more sophisticated method of finding a human face (can ignore glasses, hats or wigs, and can work with different face angles), and only requires one shot of a person. Its average recognition success rate is 90%. It can be successfully used indoors and outdoors in different lighting and/or weather conditions and is usually used in Safe City programs, in entrances, in open-air territories and in access control systems.
The advanced search by photo through recorded videos works only with this option.
This option requires a special license for the Face Recognition Additional module (you can purchase it here)
This license is activated over Xeoma Standard or Xeoma PRO licenses. The special license is purchased per number of faces (so if you need recognition for 1024 people, you need to purchase the Additional module license for 1024 faces) for each of servers separately.
The bigger number of faces is in the package, the lower cost per face is. For small number of faces in your database this option can be even cheaper than Option 1, and for big number of faces it is usually more expensive.

|
Bonus: Each Xeoma Pro license activated on the server gives you the right to use 1 face free of charge. Example: if you have a Xeoma Pro license for 8 cameras on this server, you can use Face Recognition Artificial Intelligence option for 8 faces without additional license. |
Just like in Option 1, Xeoma needs to be trained to recognize people. There are 2 ways to do it:
1) In “Face Recognition” settings enter the person’s name (or any other ID) and click on “Train person recognition” when the face you need to save is within the camera’s field of view. Xeoma will add this face to the database and attach the name (or ID) to it. One shot is enough for 1 person – you can add several different shots for the same face but it is not necessary to make recognition even more reliable.

2) If the person you want to add has already been recorded, you can access the archive and pick the right face from there. Click on the Archive button for the right camera, find the frame that contains the face you need (the bigger – the better) and go “Archive Menu” -> “Select a face and add to the database”. Now just type in the name and draw a square around the face. Repeat it for as many people as you need to add and have license for. Done!
*An option to train recognition by using a photo is less recommended but also available. See here
This option utilizes the technology of artificial intelligence that has the advanced logic in analyzing faces and learns from the past experience. This is why when you enable this option, it requires download of additional resources.
With a database for several faces you can now set “Face Recognition” (“Artificial intelligence” option) to either react only to selected faces or to unknown or unselected faces. The latter one is useful for monitoring any unauthorized personnel. When you select either of these options, you will see your whole database below as a list of names (or ID) with boxes you can check or uncheck as you see fit. With this you can make Xeoma recognize only specific people and ignore the others or pay attention only to unknown persons.
Don’t forget to use the “Minimal recognition accuracy” slider. It allows you to adjust how close to the original the detected face should be. If you notice that your camera sometimes, for example, mistakes an unknown person for a listed person, set the slider higher.
User profile with more information fields
Starting with Xeoma 22.10.12 the ‘Face Recognition’ module offers an opportunity to create a more detailed profile for users that you train the recognition system for (available both for Artificial intelligence and Statistical analysis methods).
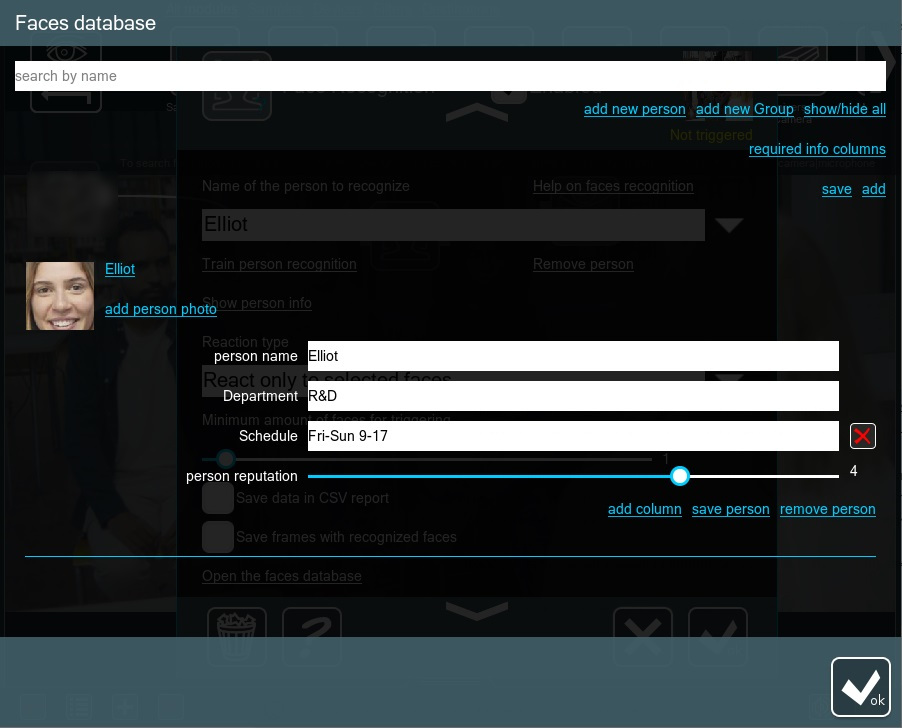
To create such detailed user profile, open the ‘Face Recognition’ module settings, make sure that Artificial Intelligence is selected as the algorithm of recognition, and then scroll the dialog down to the ‘Open the faces database’ text button and then press it.
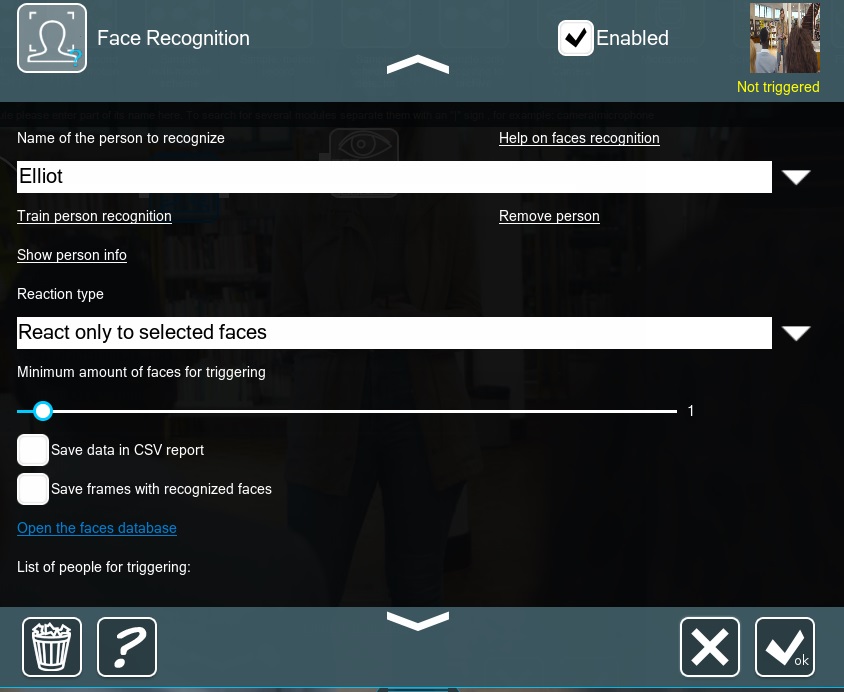
You will get into the Face Recognition’s user profiles overview where you can click the ‘Add new column’ text button to add an information field to a person’s profile. Once in the newly opened ‘Add new column’ dialog, enter a title for the new info field (‘column name’) and enter the value corresponding to this person in the ‘column value’ (this could be the person’s occupation, speciality, age or gender, contact data, social network link, permissions, schedule of visits, etc.).
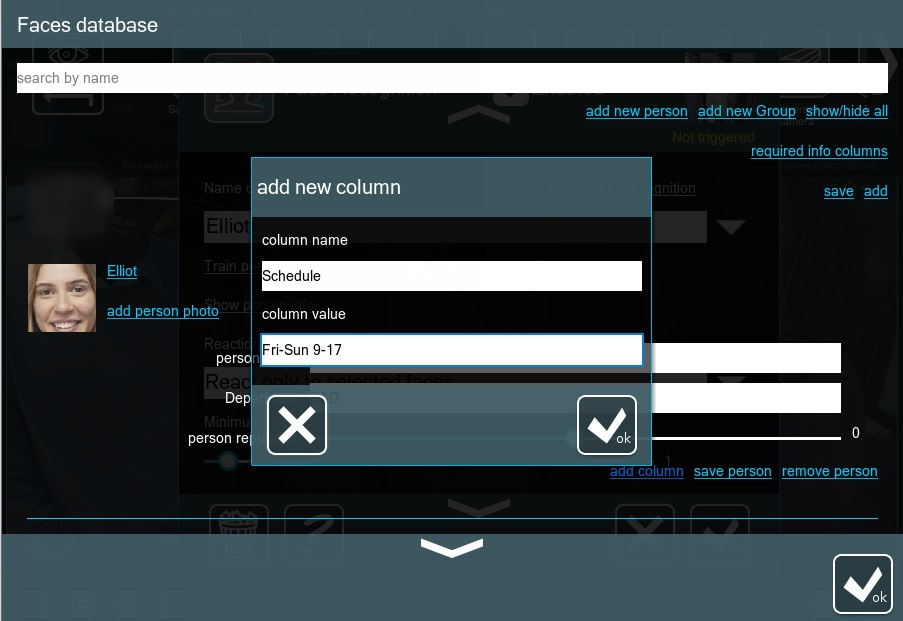
The info field can be deleted with the red cross to the right of each info field – for example, if the field is no longer needed, or misspelled.
There is a search field in the upper part of the extended database dialog. It can be used to search for a person by name.

|
Did you know that “Face recognition (Artificial intelligence)” module can be purchased cheaper than usual “Face recognition (Statistical analysis)” available in Pro version? Since additional modules can be used with Standard license, you can buy Standard + “Face recognition (AI)” additional module’s license, and it’ll be cheaper than purchasing Pro license separately.
Licenses can be purchased here |
You can compare prices to the options in the table below. Press here…
| Which option for Face Recognition is more economical* | ||||||
|---|---|---|---|---|---|---|
| 1 camera + 1 face |
2 cameras + 1 face |
1 camera + 2 faces |
2 cameras + 2 faces |
1024 cameras + 16 faces |
16 cameras + 1024 faces |
|
| Statistical analysis of the image (Xeoma Pro) | Xeoma Pro for 1 camera ($74.95) Option: Statistical analysis Unlimited number of faces (>=1) |
Xeoma Pro for 2 cameras ($139.95) Option Statistical analysis Unlimited number of faces (1, 2 or thousands) |
Xeoma Pro for 1 camera ($74.95) Option Statistical analysis Unlimited number of faces (>=1) |
Xeoma Pro for 2 cameras ($139.95) Option Statistical analysis Unlimited number of faces (1, 2 or thousands) |
Xeoma Pro for 1024 cameras ($24 499.95) Option Statistical analysis Unlimited number of faces (1, 2 or thousands) |
Xeoma Pro for 16 cameras ($1119.95) Option Statistical analysis Unlimited number of faces (1, 2 or thousands) |
| Artificial Intelligence (Xeoma Standard) | Xeoma Standard for 1 camera ($24.95) + Additional license for FR AI for 1 face ($29.95) Total: $54.9 Option Artificial Intelligence 1 face |
Xeoma Standard for 2 cameras ($46.95) + Additional license for FR AI for 1 face ($29.95) Total: $76.9 Option Artificial Intelligence 1 face |
Xeoma Standard for 1 camera ($24.95) + Additional license for FR AI for 2 faces ($44.95) Total: $69.9 Option Artificial Intelligence 2 faces |
Xeoma Standard for 2 cameras ($44.95) + Additional license for FR AI for 2 faces ($44.95) Total: $89.9 Option Artificial Intelligence 2 faces |
Xeoma Standard for 1024 cameras ($8 199.95) + Additional license for FR AI for 16 faces ($151.95) Total: $8 351.9 Option Artificial Intelligence 16 faces |
Xeoma Standard for 16 cameras ($375.95) + Additional license for FR AI for 1024 face ($1 729.95) Total: $2105.9 Option Artificial Intelligence 1024 faces |
| Artificial Intelligence (Pro and Standard) | Xeoma Pro for 1 camera ($74.95) Option Artificial Intelligence 1 face gratis |
Xeoma Pro for 2 cameras ($139.95) Option Artificial Intelligence 2 faces gratis |
Xeoma Pro for 1 camera ($74.95) Option Artificial Intelligence – 1 face gratis + Additional license for FR AI for 1 face ($29.95) Total: $104.9 |
Xeoma Pro for 2 cameras ($139.95) Option Artificial Intelligence 2 faces gratis or |
Xeoma Standard for 1024 cameras ($8 199.95)Xeoma Pro for 16 cameras ($1119.95) Option Artificial Intelligence – 16 faces gratis Total:$9319.9 |
Xeoma Pro for 16 cameras ($1119.95) Option Artificial Intelligence 16 faces gratis + Additional license for FR AI for 1024 faces ($1 729.95) Total: $2849.9 |
* Comments:
FR – Face Recognition
AI – Artificial Intelligence
Prices valid as of January 17, 2022
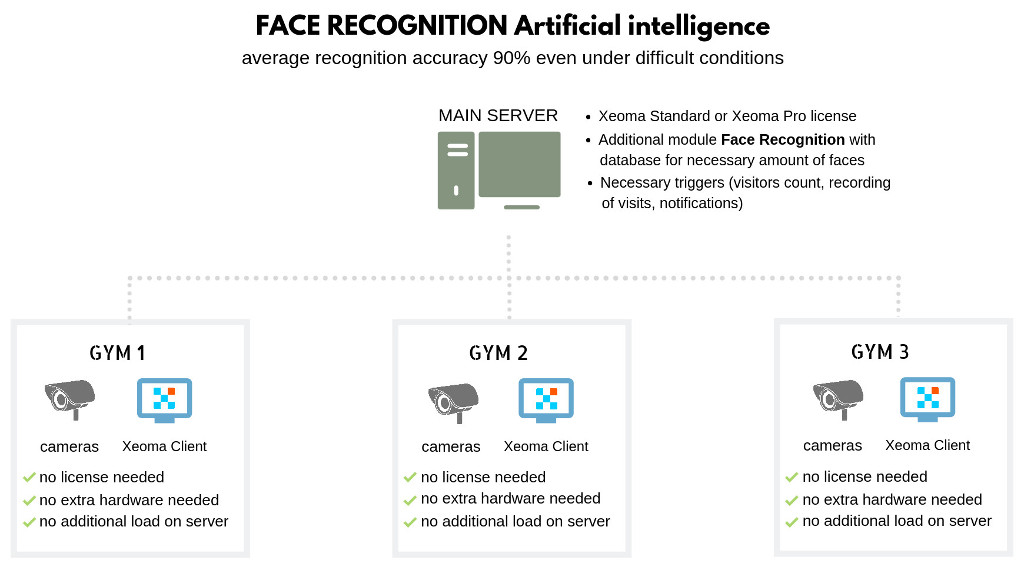
Case study: Face Recognition Artificial Intelligence in gyms
To save on licenses, a main server is recommended to host a shared database, while gym locations can opt for client-only variant:
Semi-automated training (training with photographs)
If you’d like to train the face recognition system by inputting just the photographs (no live or archive stream available for those people), you can do as follows:
0) make sure that all photos are in the JPEG format. Convert photos to the JPEG format if they aren’t in it initially.
1) in Xeoma, make such chain:

2) Go to the ‘File Reading’ module settings. Input path to the photograph file there and click OK. The photograph should come up as a live stream.
3) Go to the ‘Face Recognition’ module settings. Select the ‘Statistical analysis‘ or the ‘Artificial Intelligence‘ method of work. Choose wisely – the training will be for that method only. If you decide to switch recognition methods after training, you will need to train the “new” method separately.
4) In ‘Face Recognition’ input unique name in the Name box and click Train recognition.
5) Repeat steps 2 and 4 for all other people that you have photographs for and want to train the system for.
As said above this method can be used with either ‘Statistical analysis’ or ‘Artificial intelligence’ methods of recognition but the training for each is separate.
This method is less efficient in regards to quality of recognition than training from a live stream or archived live stream. Training should be conducted with the live stream or archived real video stream if highest accuracy is required.
The data base will stay even if you remove the module from the chain or the chain.
Bulk training (for extensive databases)
The following algorithm can be used to train the recognizer module for thousands of faces (available only for face recognition that uses the “Artificial Intelligence” method):
1) Through Xeoma, train the program to one person (see regular training options above). This is needed to create the Xeoma\FaceDetector\DNN folder (it appears automatically after the system has been trained for at least 1 person).
2) In the Xeoma\FaceDetector\DNN\ Recognition folder, create a folder with the person’s name in HEX format only (you can convert using online converters like https://codebeautify.org/string-hex-converter).
3) Put any JPEG image of the person you want to add into this HEX-name folder. This photo will be used for training, and the recognition accuracy will depend on the quality of this photo. The image should be of good quality, the face itself should be clearly visible (it is recommended that the face should be at least 160×160 pixels). This is a photo of the whole person, as if he were in the frame.
Format: JPEG (.jpg).
Tip: It is usually recommended to install cameras in such position that a person walks directly towards it so that their face is visible directly within a few seconds. The photo should depict the head/face in a position as similar to the one they will have in the live video (and not with the head tilted).
4) Copy the face of the same person into the Xeoma\FaceDetector\DNN\Person folder (you can cut it from the same photo that you used in pt.3 by cutting off all unnecessary). Here the quality is no longer important – it’s just for display purposes. This photo will be displayed on the preview when this person is recognized.
Format: bmp.
Important: the name of the photo file must be identical to the name of the employee from pt.2. (also HEX). For example 41a43043f44b448.bmp
5) Repeat the steps for other people from the database (for large databases it is worth creating a script for these actions).
6) Restart Xeoma. After restarting, Xeoma will auto train face recognition for all people added in this way.
Done! You have performed bulk automated training for thousands of faces.
Integration with automation systems
When a face is detected, Xeoma can send this information to automation systems with the “HTTP Request Sender” module. “PTZ Tracking” connected after the “Face Recognition” will make your PTZ camera follow the person, and “Sound Alarm” will trigger the alarm.
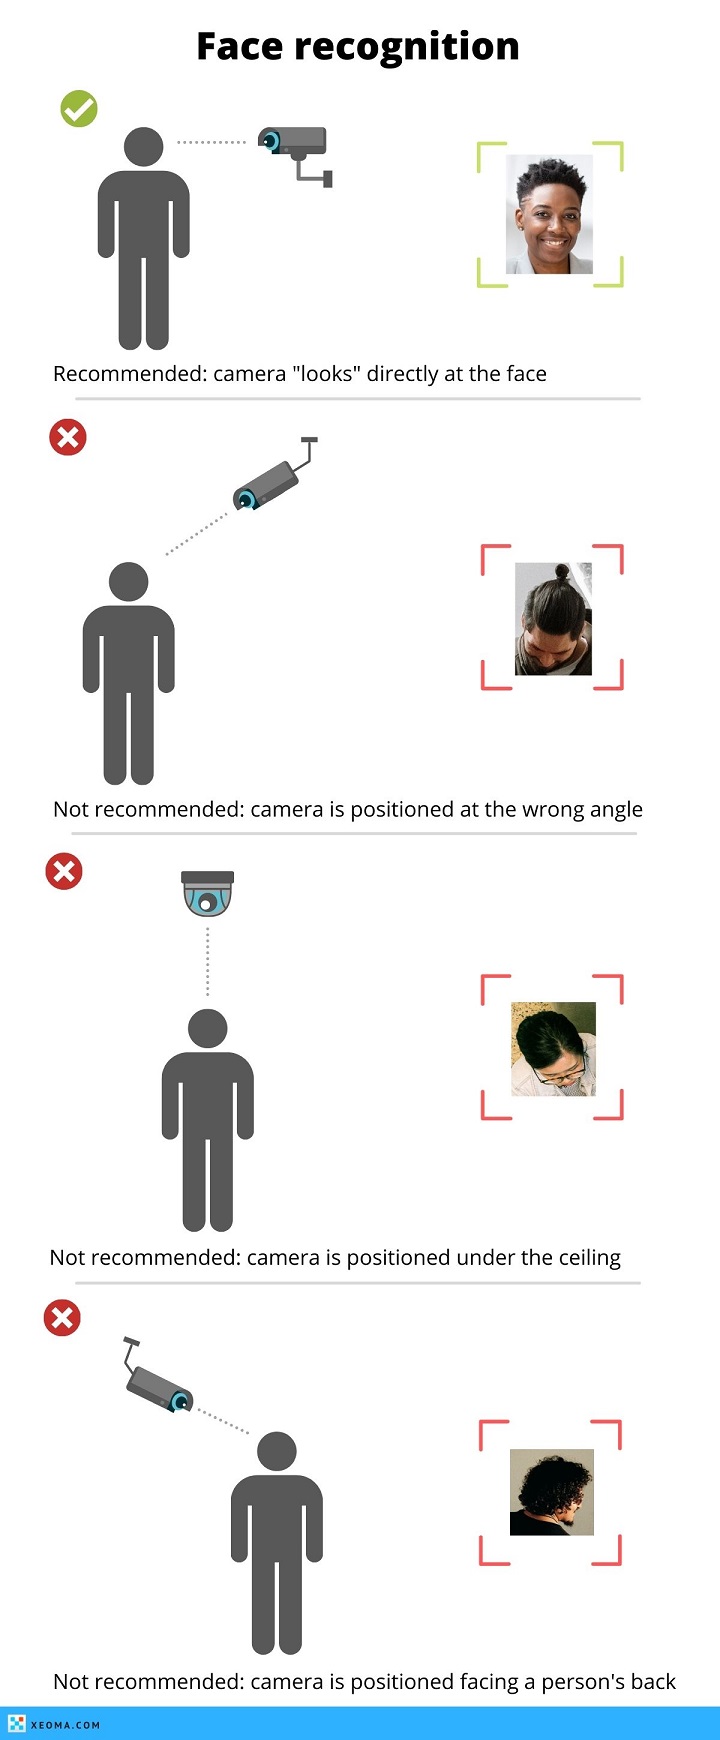
How to install the camera to use Face recognition
Troubleshooting and increasing recognition rate
Here are the ways to increase the successful recognition rate:
• You can place the camera as close as possible to the area where you need to detect faces in (preferably at right angle to the face)
• Place camera at right angle, face should occupy a large part of the frame
• Lighting should not be very dim or with a lot of flashes (you can use special HLC (High Light Compensation) cameras (often marked ‘For LPR/ANPR’))
• Use long-focus objective for a better view
• You can choose “Range of face recognition” in «Face recognition» module’s settings
• “Artificial intelligence” option in «Face recognition» module’s settings increases average recognition accuracy up to 90%.
You can test this option in Trial version and purchase it as an additional module.

|
Starting with Xeoma 21.3.4 the Face Recognition module settings has a new “Improved face detection thanks to human posture analysis” option. It will help distinguish a face on a person’s body more exactly thus avoiding false detection, and increasing recognition accuracy. This option is only available for a limited range of processors – Intel 64-bit processors of the following series:
-IntelCore processors starting from the 4th generation (including 10+ generations); Supported OS: Windows, Linux, Mac, Android and Linux ARM. |
Search for faces in archive
With both option 1 (“Statistical analysis”) and option 2 (“Artificial intelligence”) you can have the search for people by their names in archive recording made with the Face Recognition module.
Read detailed instruction here

|
Additionally: search person by photo. Enables option in the archive viewer to search through recordings made with the “Face Recognition” module for people by uploading their photo. 1 piece per server (for any number of cameras). Only works for episodes found with the Face Recognition’s Artificial Intelligence method. |
Auto training by found faces
Starting with Xeoma 19.11.26, the Face Recognition module that works with the “Artificial Intelligence” option offers the “Auto training by found faces” feature that adds people to certain groups based on how often they appear in camera’s field of view.

|
Read also: guide on using this feature for unique visitors counting |
Tick the “Allow auto training by found faces” box and three new fields will appear. When a face is detected the first time, it is given a unique ID, and the system memorizes its time of detection and puts in initially into the third group that we can call “New or rarely detected faces”.
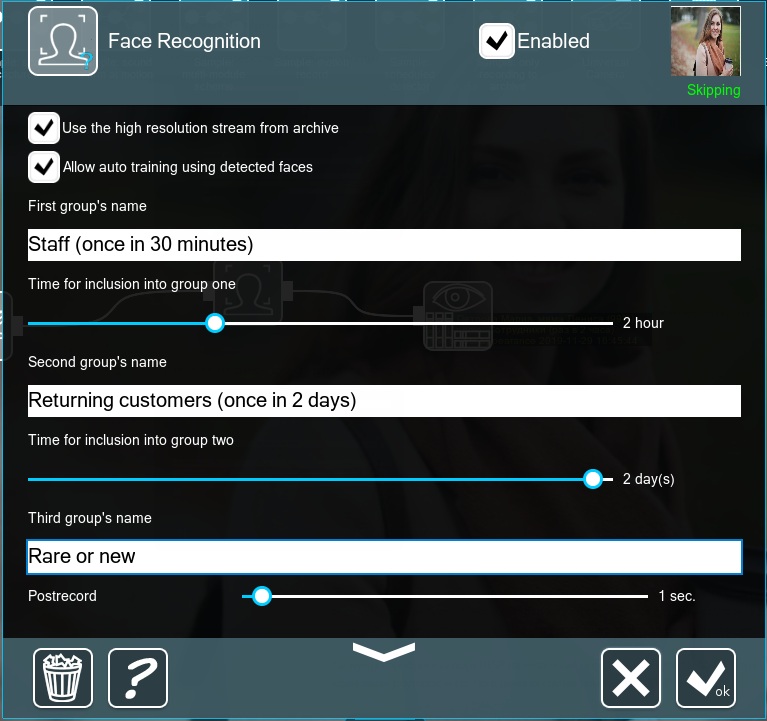
When the face is detected the next times, it will either get to group #1, group #2, or stay in the same group (group #3), depending on the time settings.
Example: let’s name our first group “Staff” and set the Time to be put into the group at 30 minutes. Let’s give the seconds group name “Returning customers” and set the time to 2 hours. If next time the same face is detected within 30 minutes, it will get into group #1 that covers 1-30 minutes of returning the face. A good example of someone who belongs to such a group is employees of the establishment that ought to be always in camera’s field of view and are detected a lot. If more than 30 minutes but less than 2 hours passes before the face is detected again, it will get into group #2 – for example, like returning customers or service workers that are detected from time to time.
In “Reaction type” you can select to detection from which group should the system react. For example, it can notify the security guards if unauthorized/new people are detected (group #3) or notify the kindergarden’s staff when a parent comes to pick their child.
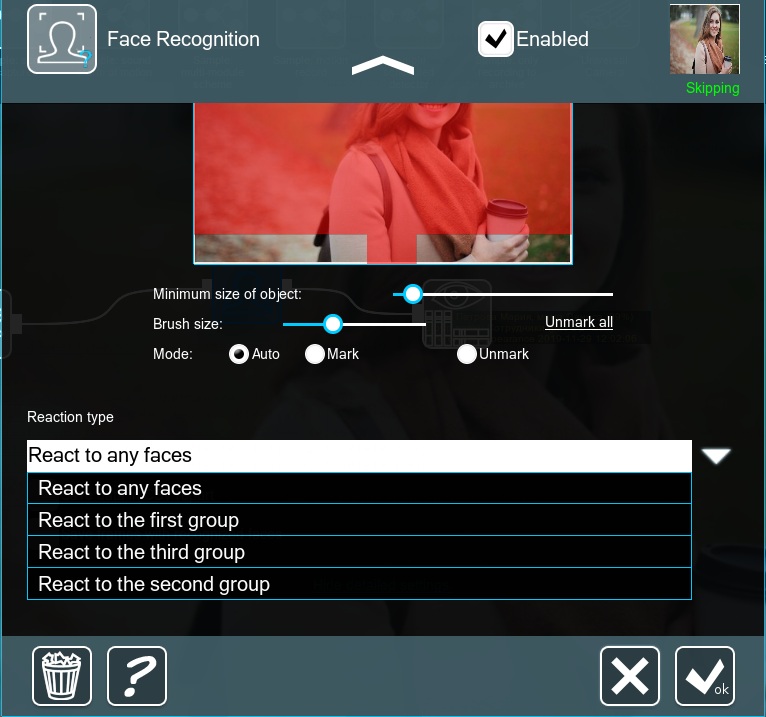

|
Starting from Xeoma 21.3.4 the face recognition visualization (frame around the recognized face with the person’s name) is applied to screenshots made with the Xeoma’s ‘Screenshot’ option. |
|
Face recognition in Xeoma
|
Face recognition in Xeoma: setup instructions
|
Updated 4 March 2021
Read also:
Frequently Asked Questions about Xeoma software
Complete Xeoma User Manual
