DIY home security system with video surveillance program Xeoma

So, you are interested in DIY (‘Do It Yourself’, or ‘made with your hands’) home security video surveillance. Whether it comes from bare interest or wish to avoid house break-ins and theft, or to prevent its recurrence – no matter what was the reason, you have made the right choice. According to official statistics, break-in peak is in July while August comes next. It’s the so called ‘vacation season’ that attracts burglars to someone else’s house. In this and many other cases deploying video surveillance system will be a perfect solution for DIY home security.
What do you need for an easy-to-manage DIY home security system? You need to take the following 7 steps.
STEP 1: If you are interested in making DIY home security system on your own, the first thing to do is to imagine what it will be like. Best way to do that is to set up the goals your home security system is to meet. As they say, goals determine requirements. So, will it be a deterrent monitoring system, or a keep-an-eye on children while you are away? Imagine what you will use the system for in details and then go to step 2.
STEP 2: These are a few more things to consider:
First of all you’d surely like your system to be as automated as it can be so that you didn’t have to run all the things by yourself and such.
Secondly, what type of reaction would you like your system to have? Will it be recording and storing data in archive, broadcasting video or screenshots with possibility to view it in the Internet, uploading to FTP server or various alarms and notifications?
And of course, you don’t want to pay for something you don’t need, including functionality you are not going to use. That’s why you will need software that allows to get only the desired functionality like Xeoma Monitoring Software.
STEP 3: As soon as you have drawn a picture of what you need your DIY home security system to do, you will also get an idea what cams should be used or where to put them. Additional questions you might want to consider while preparing to deploy your video surveillance: What is the most important thing to monitor and therefor where is the best place to put your cameras – inside and outside? Do you need an all-room view or just a certain part of the area? Do you want your cam to support PTZ feature for panoramic view? Do you need anti-vandal protection for the cam? Do you want your cam to remain unnoticed (for example, at home) or be placed in plain sight (as deterrent measure)? The answers will affect the choice of cams.
STEP 4: Choose the cam. IT is a rapidly developing industry, and what was up-to-date some years ago may not be the best solution today. What is the difference between analog, web and IP cameras? The main difference is the way the signal is transmitted and encrypted. All these types are successfully implemented nowadays and they all have their (dis)advantages. Any of them is good for certain objectives. We’ll help you work that through.
Comparison of analog, web cams and IP cameras

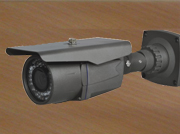
Analog cams and CCTV
Closed circuit television is the origin of video surveillance. Classic DVRs are based on analog cams. Analog video cameras are used with coaxial cable and video tape recorders. An analog surveillance camera has a CCD sensor and then digitizes the image for processing. Before transmitting the video it converts it back to analog for an analog device, such as a video monitor or recorder, to receive it.
Advantages: Analog CCD cameras manage motion and various lighting conditions very well. Analog have more hardware and software resources available to provide increased video quality and frame rate as they compress video in the DVR – they transmit the video image to the DVR uncompressed where it can be viewed live with no latency pre-compression. Analog cameras require no technical maintenance as they have no built-in web servers or encoders (these functions are conducted by the recording and/or control equipment).
Disadvantages: Progressive scanning (requires higher bandwidth and is not able to capture fast-moving objects while keeping quality of the image). Generally very low image quality (compared to IP and webcams) due to low resolution (limited by 640×480 / 720×576), requires regular tape changes and storage space for old tapes that tend to wear out over time. Cameras, monitors, and recorders must be physically close enough to each other to be connected by cables. Although there are wireless analog cams nowadays, you will still need to provide power supply to them. The cameras transmit a signal to a specific, limited set of monitors. This method does record but does not give alerts. So if you need high quality image and recognition of detail (e.g. license plate or someone’s face), analog cams won’t do. Basically, what makes analog cams competitive to IP cams is their prevalence due to IP cams existing for relatively short period of time.

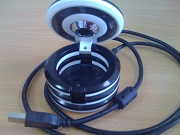
Web Cameras
A web camera connects to the PC, most often via a USB port, and uses the computer to make video available to other viewers.
Advantages: Much higher quality compared to analog cams. Pan, Tilt and Zoom feature is successfully introduced in web cameras. Webcams can be effectively used to monitor and record activity in small offices, shops and homes. Images from a web camera can be accessed over the Internet with the help of monitoring software like Xeoma, they can be uploaded to a web/FTP server, either continuously or at regular intervals.
Disadvantages: A web camera will only work if it is attached directly to the computer as they only support distance up to 3 m. You will need a special cable extension if you want to monitor something remote (up to 30 m) – then it will be more cost-effective and comfortable to get an IP cam instead. Web cameras can only be directly read and controlled by one host computer and cannot be shared across a network without special software (like Xeoma monitoring software).

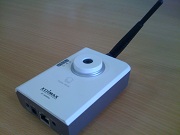
IP Cameras
IP camera digitizes and processes analog images, converts them internally, and then transmits the video digitally over an Ethernet connection to a PC or similar device (does not require a direct connection to a PC to operate, and can be placed anywhere within a network). IP cameras are stand-alone devices, usually equipped with a built-in web server and can be accessed and controlled via any IP network such as a LAN, WAN, Intranet, or Internet. IP camera’s video output can be viewed from any location (even remote) with the help of web browser or client software. Thanks to embedded codec CPU load is substantially reduced so more than 100 IP cams can be successfully connected to a single PC.
Advantages: Live remote monitoring, remote Pan, Tilt and Zoom (PTZ) control support. IP cams provide much better performance (up to 10 Mpix as in professional video cameras) that will help you recognize small details like face of intruder, etc. Perfect for long-range distances – 100+ meters. IP camera-based systems are believed to be the future of video surveillance as they have no real limitations for future growth in resolution or other capabilities, that’s why many tend to switch to using IP cams.
Disadvantages: Some believe it is more difficult to configure than analog cams. The main disadvantage of IP cams is their price which is substantially higher than for 2 other types of cams, however, with higher competition level it’s been reducing. The higher resolution, the more features and possibilities implemented, the more expensive is the cam. Practical researches show that 18 IP cams systems are equal in price to the same number analog cams systems, and outdo the latter in cost-effectiveness if there are more cams. Moreover, due to high quality of image, 1 IP cam can replace several analog ones.
STEP 5: Speaking of security and reliability, first of all you need to have a stable desktop or tablet computer. Since the DIY home security system will be meant to work without human supervision for quite a long time, you should provide its stability both in software and hardware, fire safety (sufficient cooling of the system), UPS (in case intruder will be as clever as to cut the power off).
STEP 6: Where would you like to store data? You can choose local, or ‘on-site’, storage (for example you set your system to record events to watch the archive later), in such case you will not need Internet access. But in this case you will not have remote access possibility of any kind. On the opposite, if you want data to be available from any place you might be in, you will need Internet connection. And it doesn’t matter if your PC will be inside firewall, local or mobile network – there’s Repeater service option at your disposal that will help you access your computer even if it is not available from the Internet. You may want to use automated FTP server upload, which helps you create backup storage on a remote server and free up space on HDD on local machine. As computers get increasingly portable and are often object of theft, FTP server backup will help identify the criminal. You don’t have your own FTP server? You can get free quite good hosting in the Internet, just do a search. Another good option for off-site storage is Cloud services (also known as VSaaS that stand for video surveillance as a service).
STEP 7: Choose the right software. Additional things you will need to keep in mind while selecting the monitoring software are CPU load and system requirements. If you have considered the whole variety of options, you have surely come to conclusion that Xeoma monitoring software is the best solution. No matter what type of cams you are more comfortable to use, Xeoma Monitoring Software will help you get the best of it. No matter what OS you use, Xeoma works on it, too. No matter what features you need to make your DIY home security system powerful and tailored to meet your requests, Xeoma has them. Alarms and notifications, motion detection, fully automated scheduled time of work or work triggered by saturation of light, FTP server upload, embedded web server, network clustering, remote access, and what is important simplicity and flexibility of configuration – Xeoma is there to help you without the need to pay for the functionality you are not going to use. Provided you will need an upgrade in some time, you can do it any time with Xeoma monitoring software. If you choose Xeoma, no further guidance will be necessary. Download it for free, launch the program and adjust it the way you need.
Read also: DIY video surveillance system (2021)
As you see, implementing DIY home security system is not as complicated as one’d think. You just need to make a couple of choices, and the most important one you have already made – you have decided for security and control. Xeoma will help you with the rest.
Don’t wait for too long. Set your video surveillance today for who knows, perhaps you will need it tomorrow.
2 May 2012
Read also:
6 Reasons To Prefer DIY Video Surveillance System To ‘Professional’ Installation
How to choose cameras
Buy plug-and-play kits and cameras
Frequently Asked Questions about Xeoma software
Complete Xeoma User Manual