Design of the Future — Xeoma’s new advanced interface
Since the day of its creation, Xeoma video surveillance software has remained an innovative technological solution, utilizing unique methods that often were ahead of their time. Accordingly, Xeoma’s design is now undergoing rapid change to make it even easier to use, optimize the system and refine the visuals to accommodate today’s trends and future concepts alike. “The Interface of the Future” is what we call Xeoma’s new design. Join us on a journey dedicated to showcasing every improvement and how it was made!
Launching Xeoma (Including the First Launch)
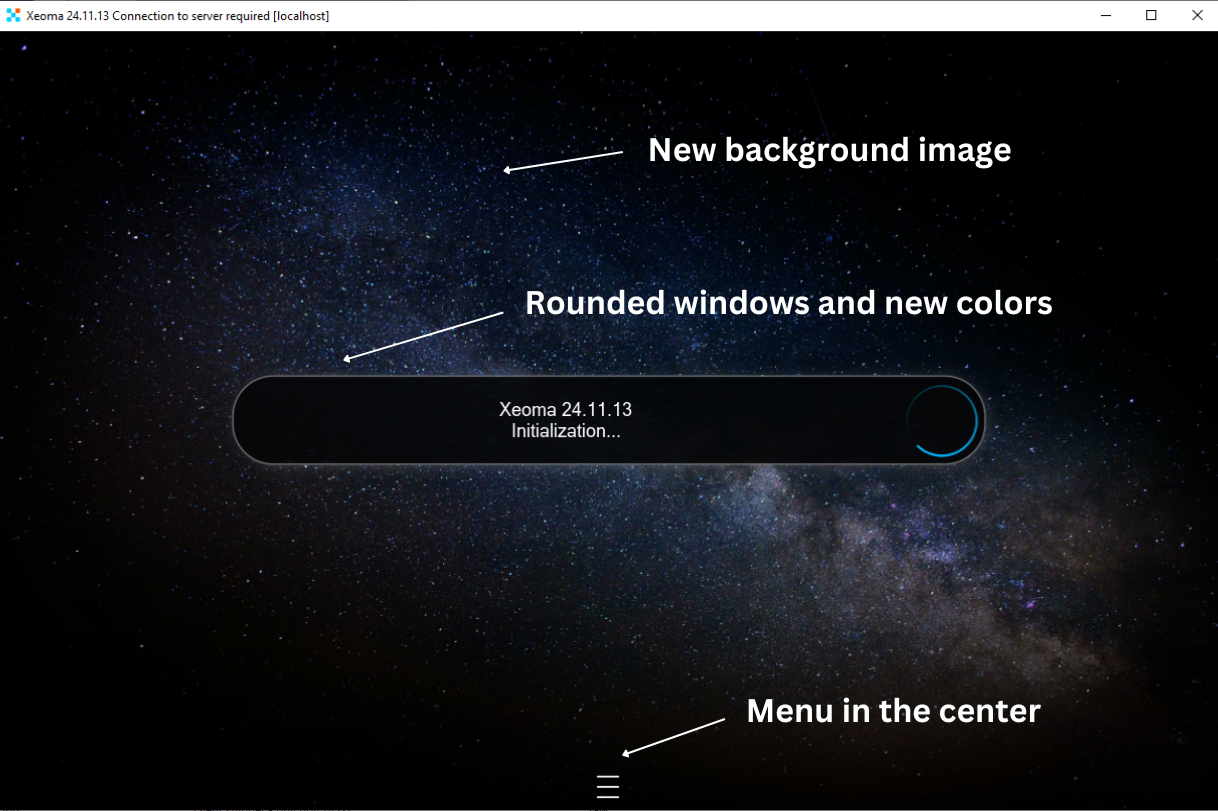
The first thing you see when you launch Xeoma video surveillance software is the background image and system messages. A completely new image will now be displayed when no camera is shown. We believe that a futuristic theme perfectly reflects our vision of the interface of the future. The image will not distract you from anything of importance, changing to video streams of the cameras you add.
Opening system messages already reveal the new appearance of Xeoma’s notifications and dialog boxes: sharp edges have been replaced with softer, rounded and elegant borders with a barely visible glow. The color scheme has been changed to colder, calmer hues that are more typical of modern interfaces.
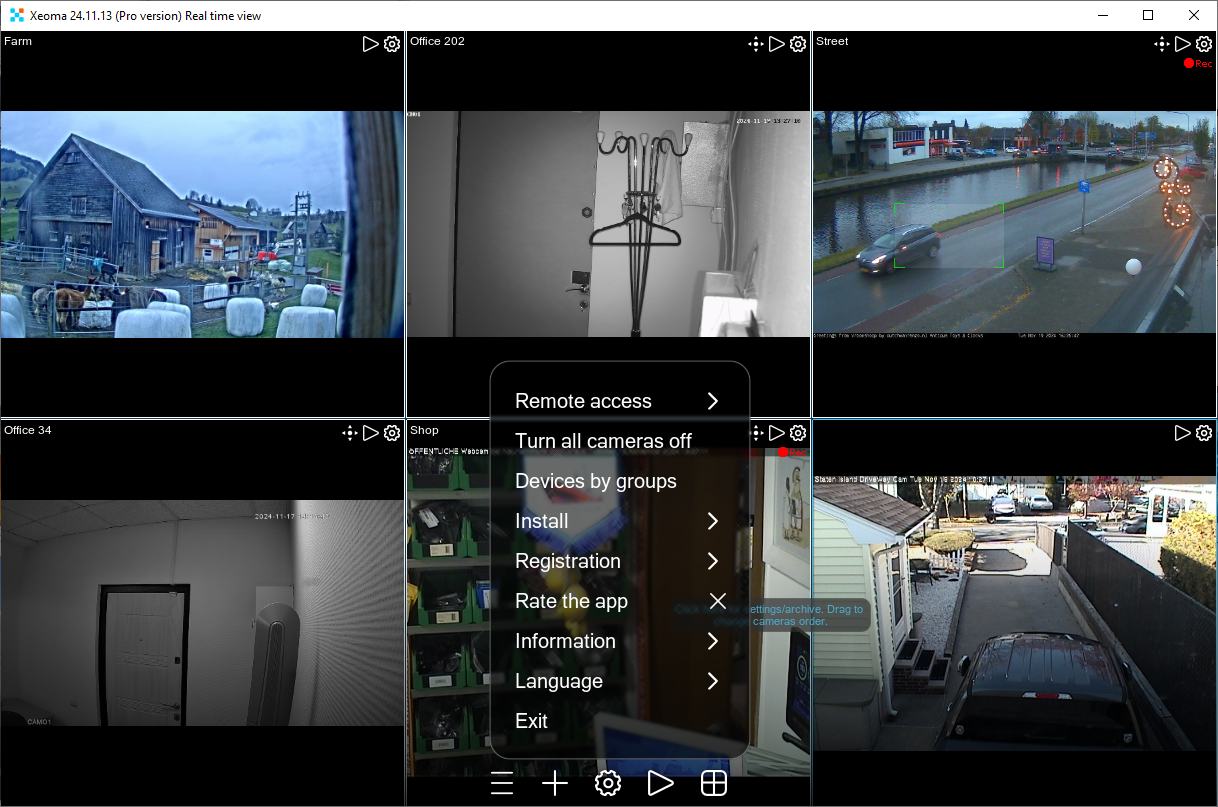
Other visible improvements include a new icon and a new location of Xeoma’s Main Menu. The menu is now ergonomically situated in the middle of the screen, so that users can quickly move the cursor to the menu icon from any position:

|
Did you know that about 90% of the world’s population are right-handed? They often have the cursor, as well as the mouse itself, located on the right side of the screen, so placing Xeoma’s menu in the middle will be more convenient than its previous position on the left. In this regard, Xeoma is a solution for every nuance of organizing your video surveillance, wouldn’t you agree? |
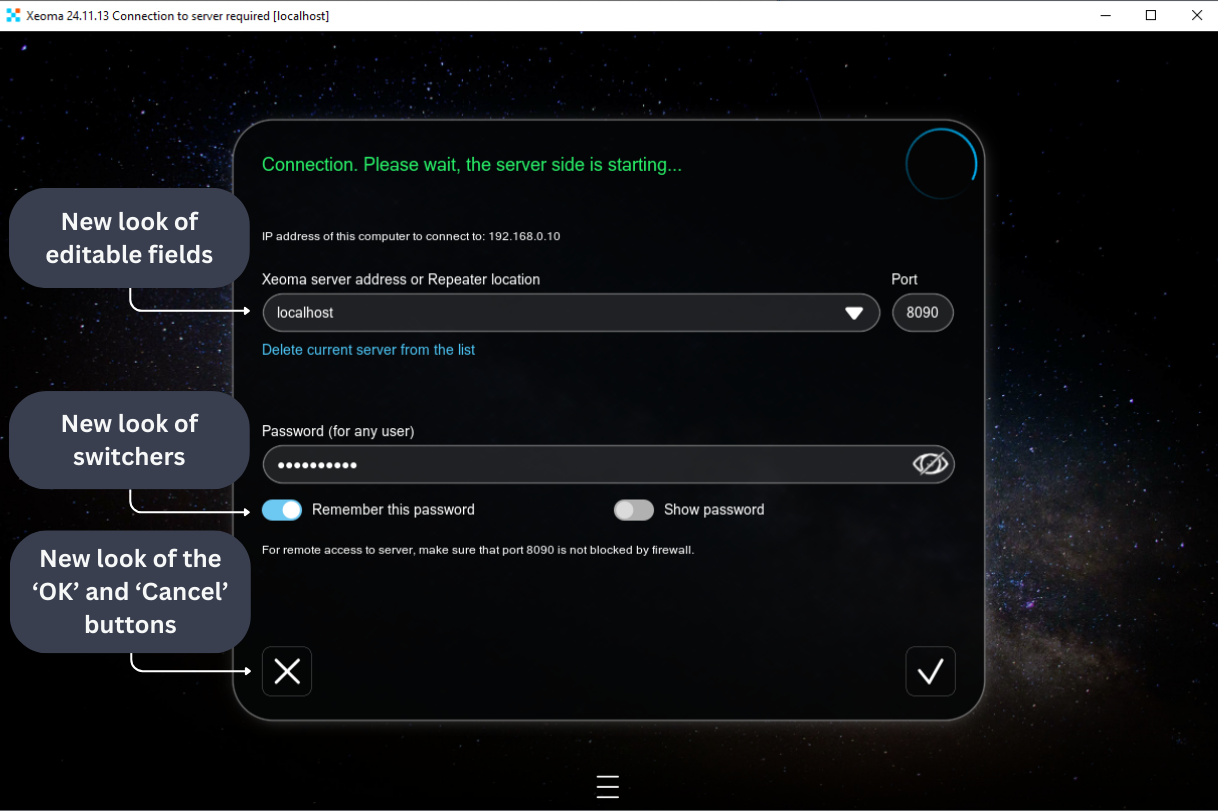
In most cases, Xeoma will also display a Connection Dialog after launch – for example, with a message that the server part is currently starting. This dialog illustrates all the new features of the updated Xeoma and its other graphical elements: a new type of editable fields (that we will examine in detail below), new switches similar to those in mobile interfaces (which replaced the outdated checkboxes), and new dialog management buttons (in this case, the button on the left will close the box without saving your changes, while the button on the right will close the box and save. However, the functions of these buttons may differ depending on the dialog – see here for more details).
Main Window Interface
In Xeoma’s upgraded interface, a newly added camera fits into a cell so that there are no black bars on both sides. Since Xeoma can work with various cameras, they can have different aspect ratios. Given that Xeoma allows you to resize the preview window as you please, some cameras inevitably end up with a black bar on each side to fit into its cell. As a result, while not an inch of the camera’s image is lost, useful space diminishes significantly: a good portion of the screen that could have had additional cameras is instead taken up by empty black space. Contrarily, now the image from your camera fills up its own slot by default, which means that 100% of the screen is allocated to cameras and nothing else:
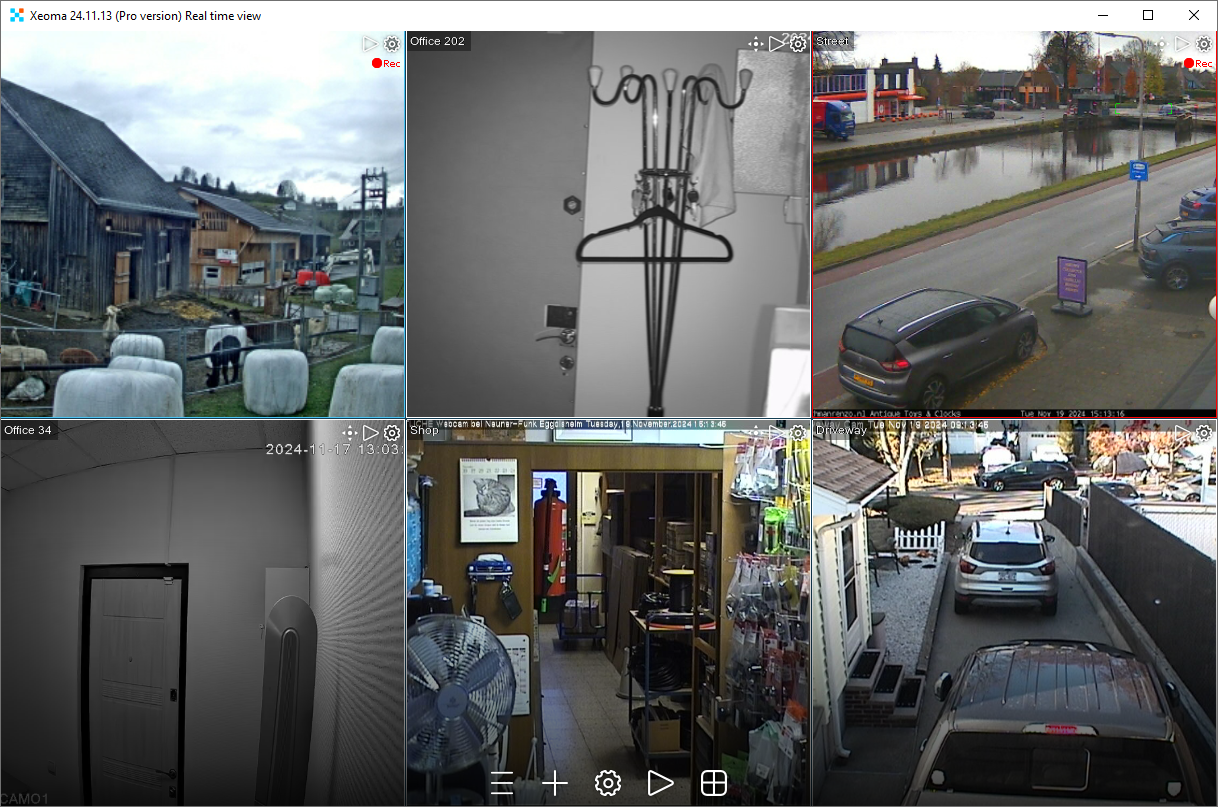
However, if this display cuts off an important part of camera image, this preview mode can be disabled for several or all cameras in the “Layouts Menu” (the window icon in the bottom panel) → “Manage Layouts” → “Stretch all cameras”. Once it’s disabled, camera image will be shown in full without cropping, but black bars may appear at the sides of the preview:
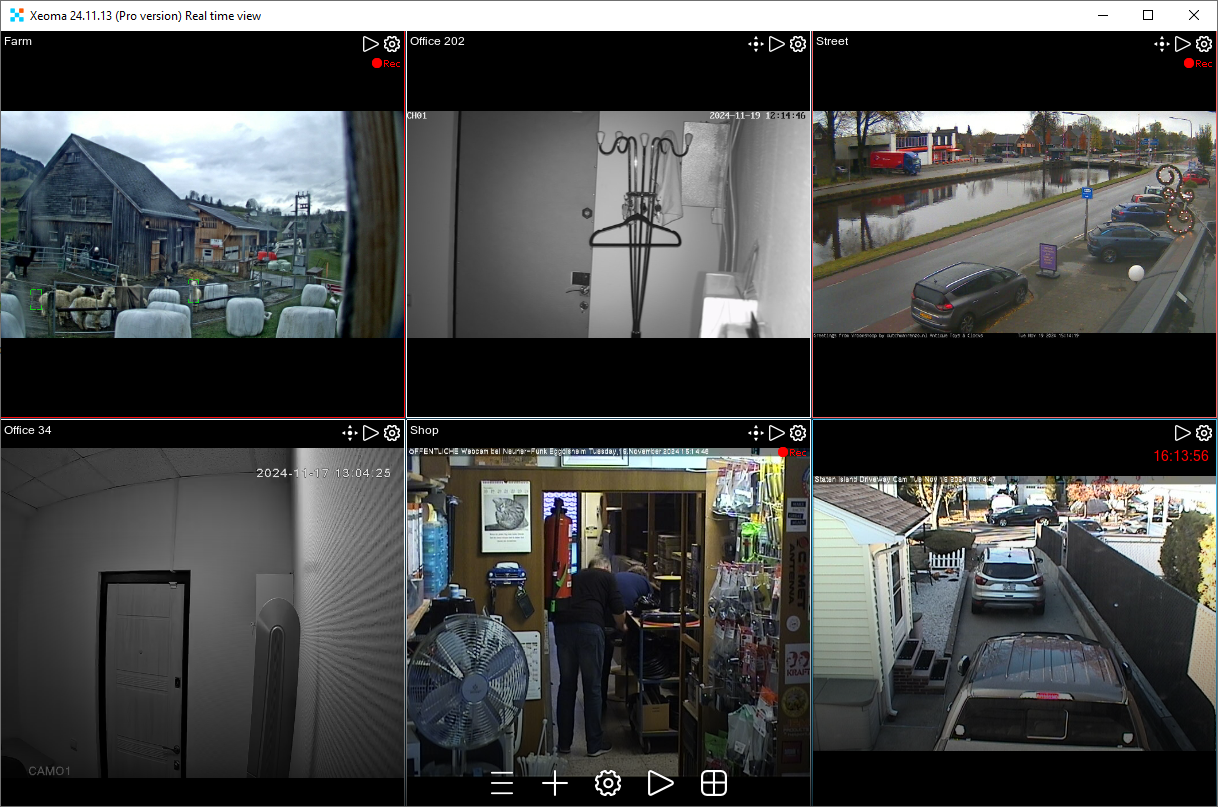
Please note that when idle – as in, when you do not move your mouse or click on the screen – the controls are not shown in the bottom panel and camera slots. To make them reappear, perform any action: move the mouse, press a key, click on the screen. The new icons are not just minimalistic and uniform in style, they can also be scaled without losing quality.
As we have mentioned earlier, the menu is now located in the middle of the screen. This feature doesn’t apply to the menu only, including the Main Menu on the Main page of Xeoma’s interface, it also pertains to the entire set of icons in the bottom panel and the dialog boxes you see when clicking these icons. Another curious adjustment is that the bottom panel lost its color filling, border, and the tag used to hide or extend it – now the panel is hidden automatically after a few seconds of inactivity! Thanks to their opaque, slightly dim design, the icons remain clearly visible against the brightest of camera images, as though “floating” above the camera and gradually “dissolving” when inactive.
Quick Settings
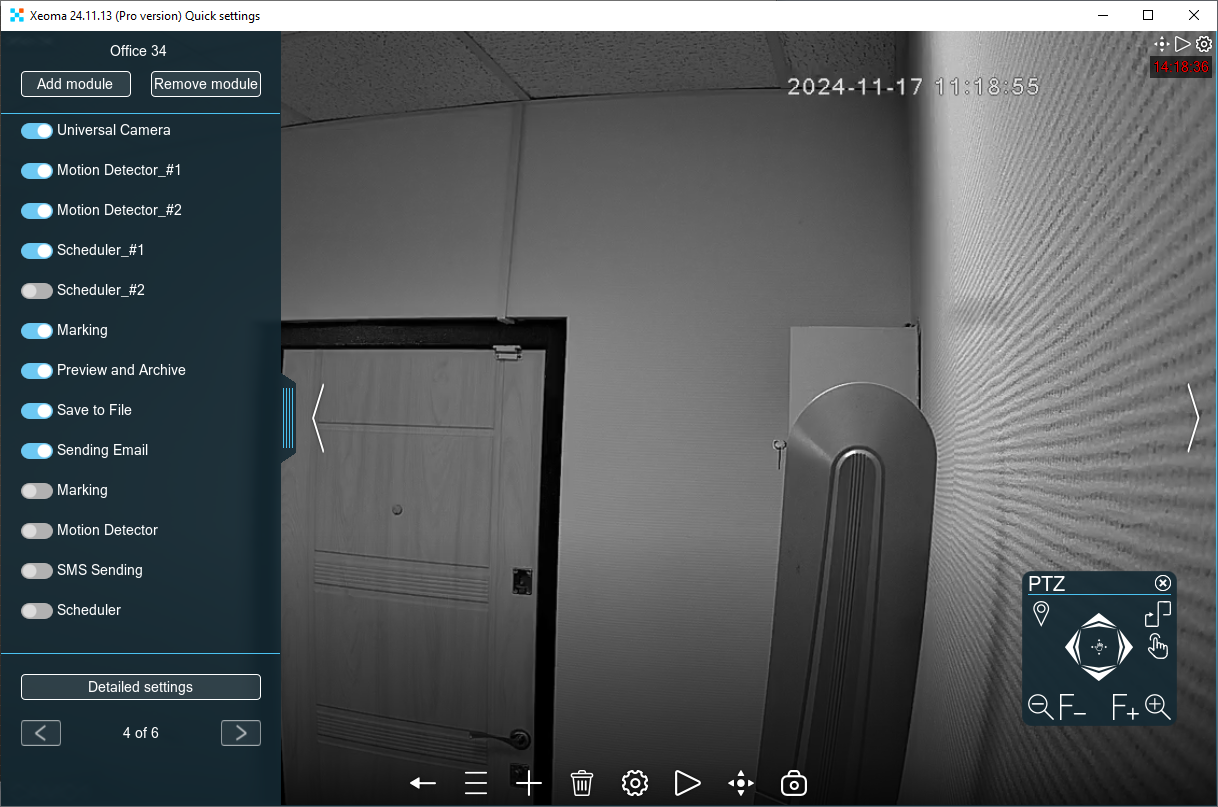
In addition to the aforementioned changes, the biggest new feature added to the “Quick Settings” is that Xeoma will now remember your settings for the cameras with PTZ control – namely showing or not showing the virtual joystick. Your choice may vary depending on a camera, and Xeoma will also memorize which cameras demand the PTZ control at hand.
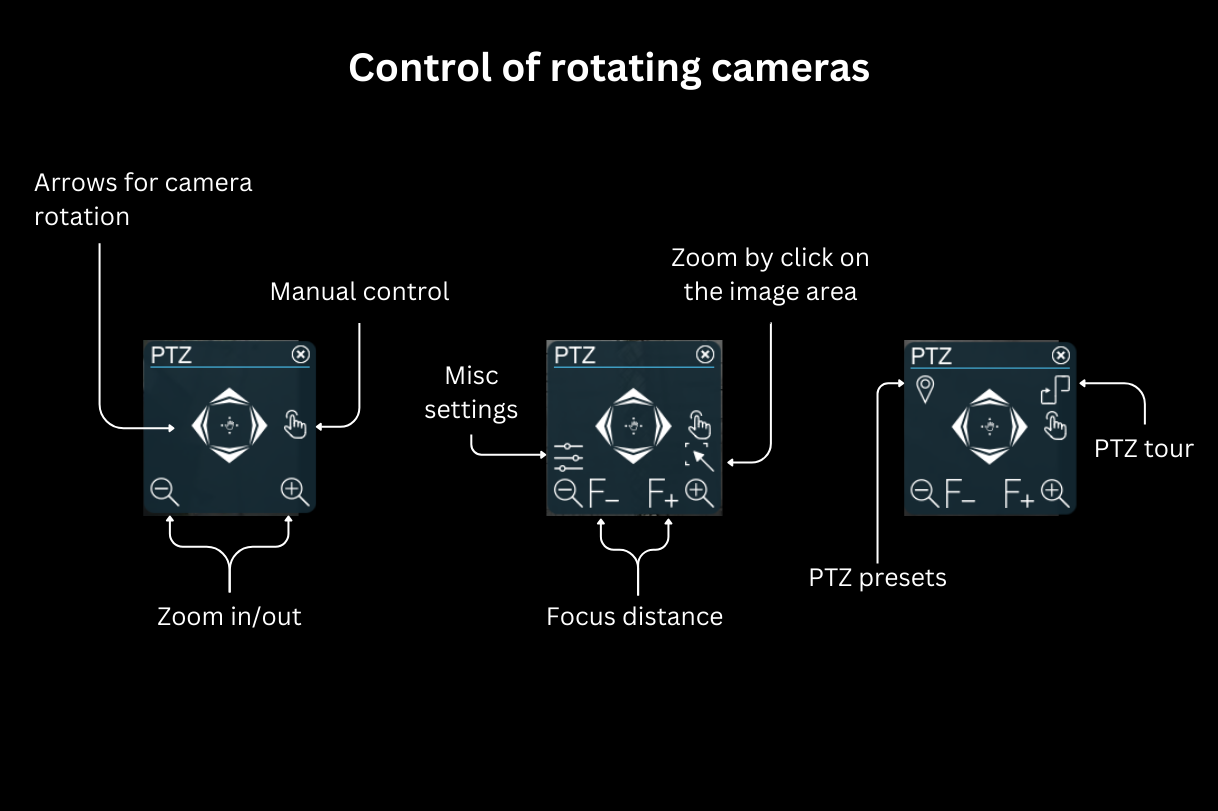
Just like before, the control will only show the options that the camera and your Xeoma license support (read more about the control elements here).
The left panel has retained most of its original design – only the switches have changed, replacing the initial checkboxes.
The bottom panel, as we have explained before, has only transformed visually: it is now centered and has a more stylish color scheme and a new, minimalistic icon design.
Operating your PTZ cameras in newer versions of Xeoma video surveillance software is done the same way as before, via a virtual joystick called “PTZ control”. The image below describes what each of the new icons in PTZ control can do:
Detailed settings
In addition to the centered menu, the Detailed Settings interface has undergone several important changes.
The main modification, in our opinion, is the frequently requested option to add annotations to the modules in a chain. And it’s not just the module names – now you can manage these annotations in every module’s settings. Create captions that will immediately remind you of the purpose of your setups: for instance, how similar modules are configured or where your archives are being saved to. Learn more about custom module names here.
Of course, it’s essential we mention the colossal work done to modernize module icons, as there are 80+ modules in the program at the moment. The new icons are free of borders and other unnecessary details, which makes them less visually heavy while keeping them intuitively recognizable.
Continuing with the aim to maximize useful space, we have removed the buttons to return to the Main Menu or the previous window (used prior to entering the Detailed Settings menu) from the top panel. These buttons used to be on the top left, but now you can exit Detailed Settings by clicking the first left button in the bottom panel.
Next, we would like to draw your attention to another adjustment: the modules listed in the top panel do not have captions until you hover the cursor over them, which is meant to avoid redundant information noise:
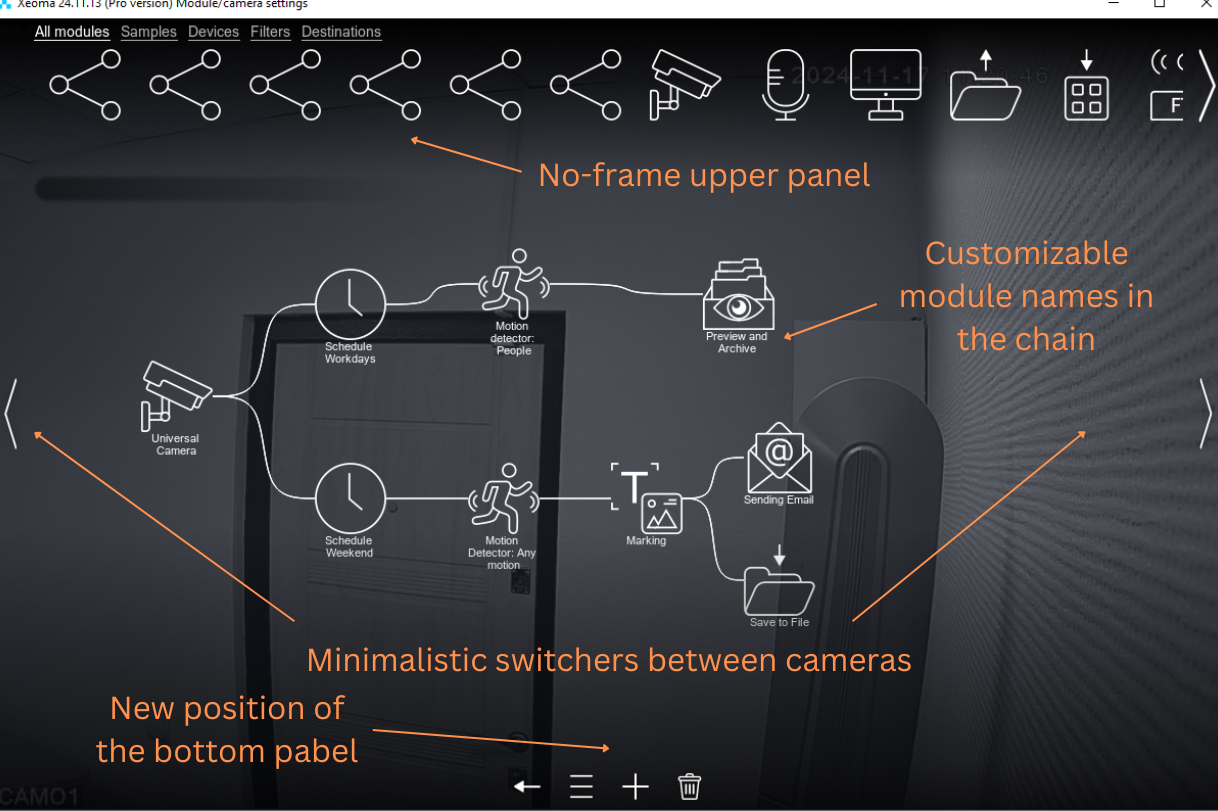
When you are ready to begin adding modules, you only need to place the cursor over the top panel to display both module names and the option to search by module names. Just a reminder: you can search for multiple modules at once by dividing them with the “|” sign.
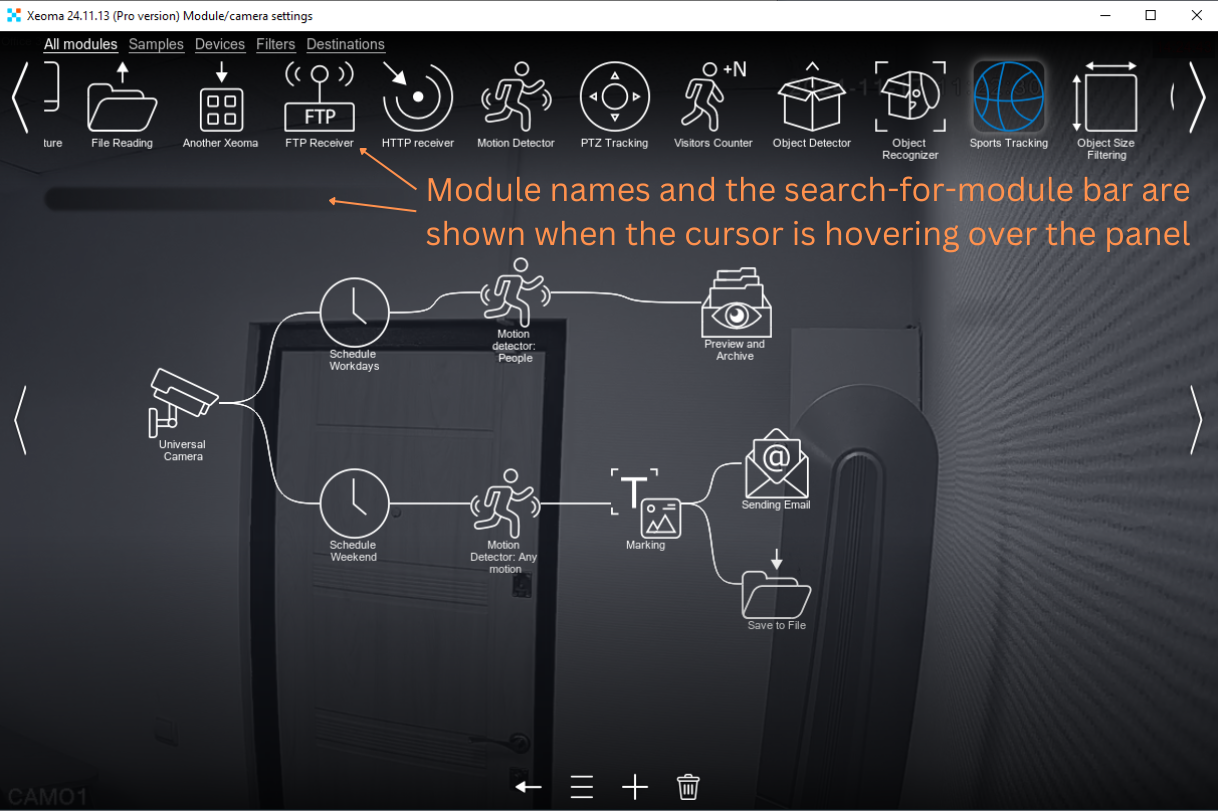
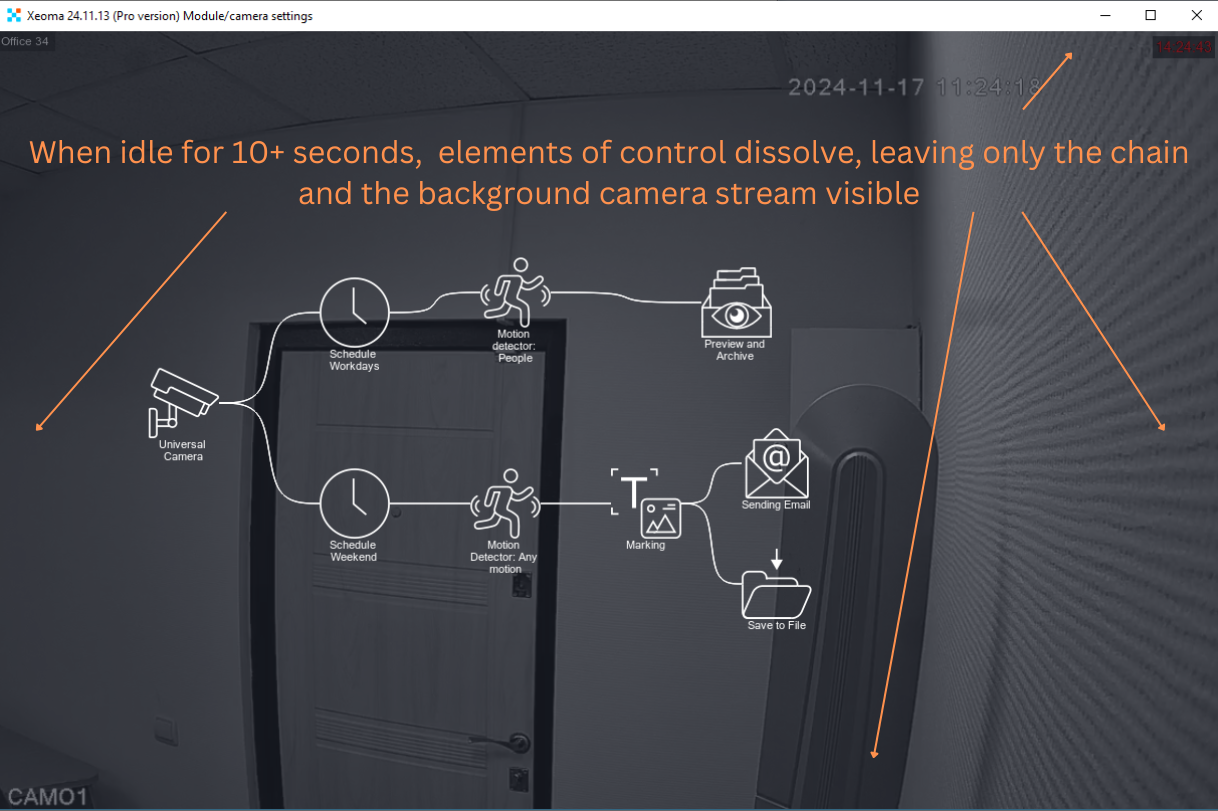
If you remain idle for some time and the program recognizes that no modules will be added any time soon, all the panels and control elements, save for the chain itself, will smoothly fade out to allow an unobstructed view of the chain and the background image from the camera. Video surveillance can now be performed via this window, too!
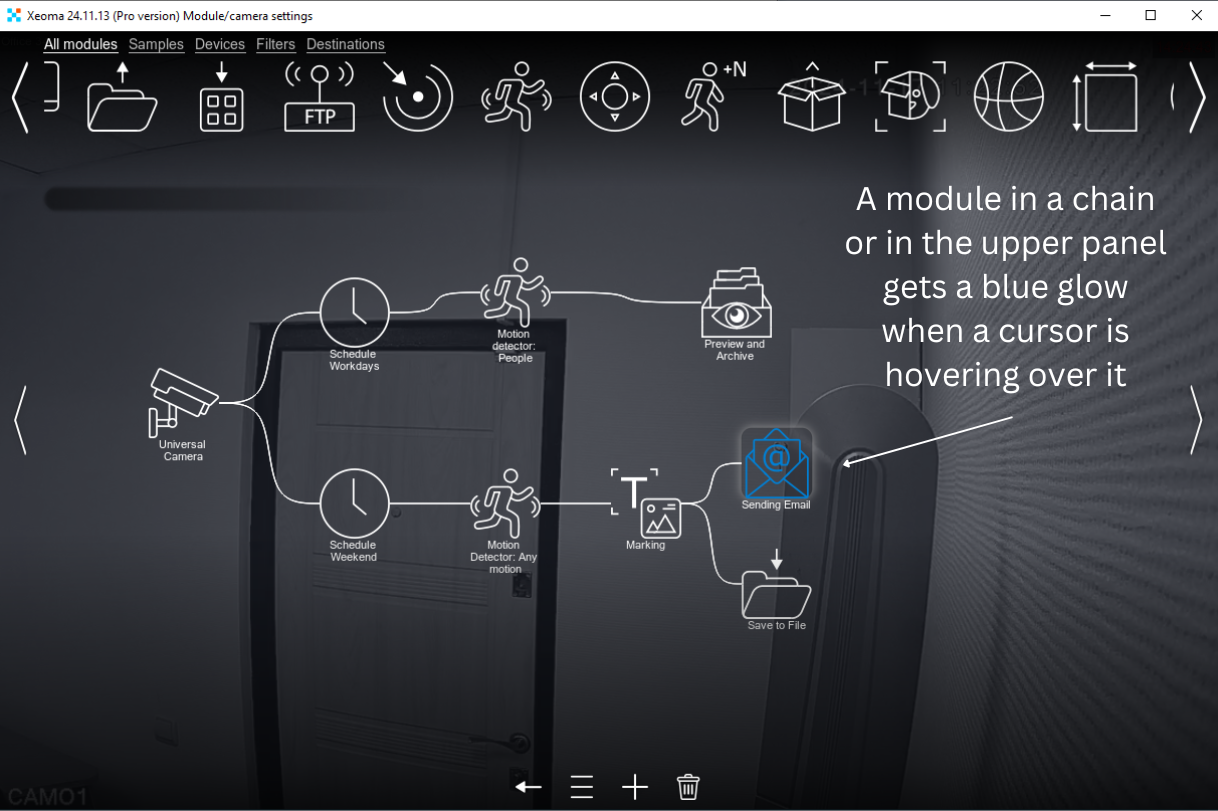
When you hover the cursor over the modules in a chain, they are highlighted in blue and their outline becomes visible:
Module Settings Dialog
We consider the option to set custom module names for each chain the most significant alteration of the module settings dialog. To rename any module, go to the Module settings dialog and click on the current name of the module. The name will be shown in a separate field that you can edit. Once the editing is complete, click anywhere inside the dialog and don’t forget to click the OK button at the very bottom of the window for your changes to apply.
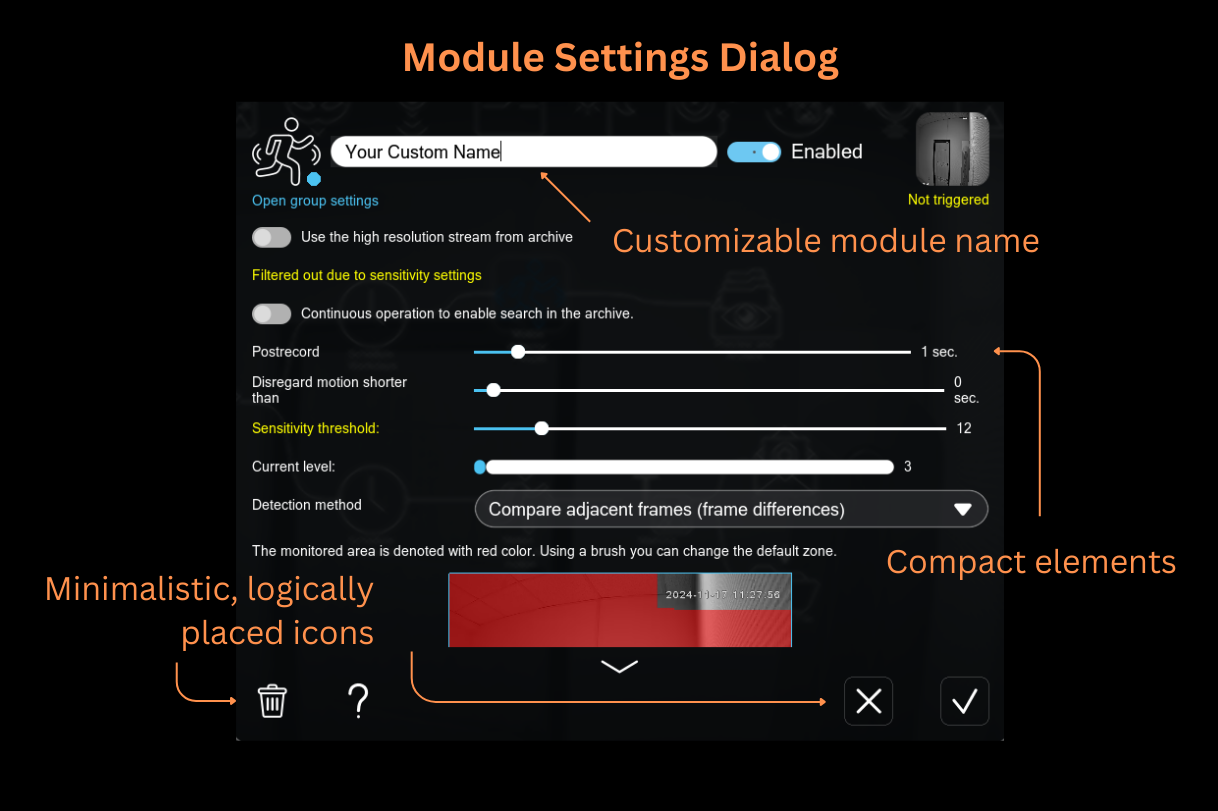
We would also like to point out the upgraded settings elements in the box and the new icons at the bottom of the window.
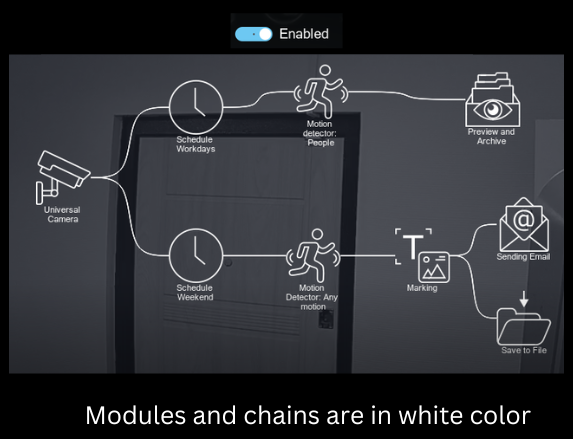
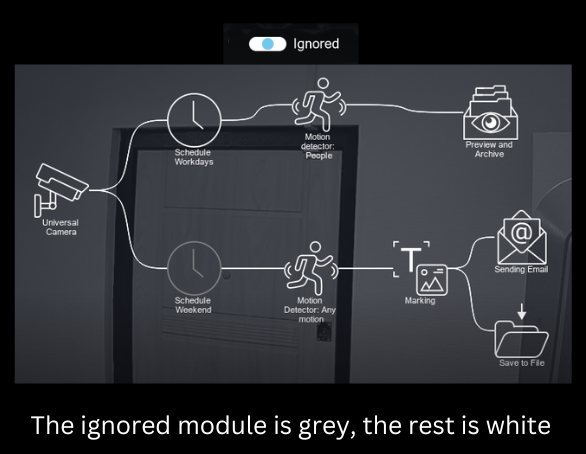
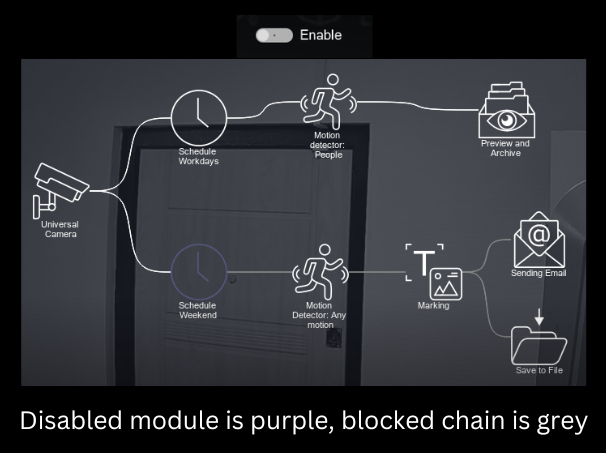
New module states deserve a separate mention. This is especially relevant for filter modules which have three, and not two, states in Xeoma: “Enabled”, “Ignored”, and “Enable”. As we said earlier, Xeoma’s checkboxes have been replaced by a switch. Usually, said switch only has two states, “on” and “off”, but the filter module switch is three-position, meaning that, in addition to the utmost left and the utmost right positions, it can also be positioned in the middle, signifying the “Ignored” state.
The utmost right position is “Enabled”:
The middle position is “Ignored”:
The utmost left position is “Enable” (the module is off):
Editable and Non-editable Fields
Another feature we would like to touch upon separately is new editable and non-editable information fields with their unique color scheme.
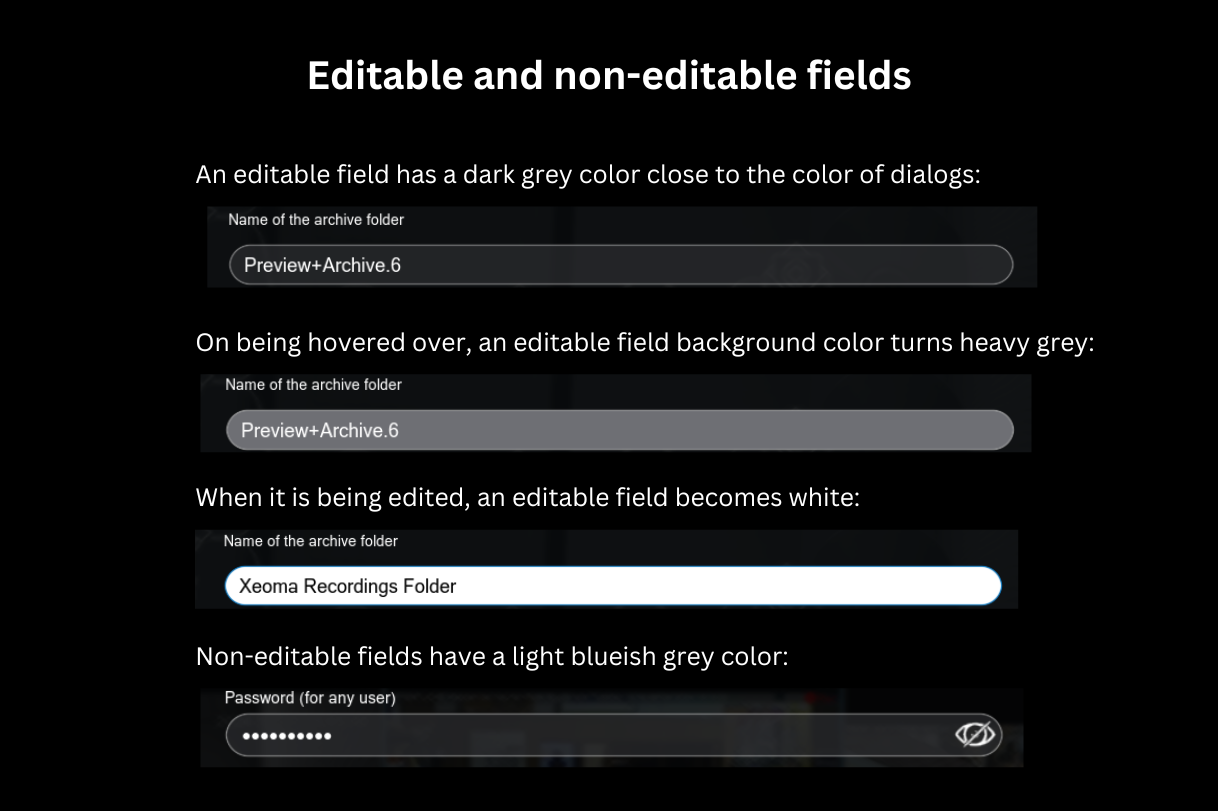
By default, an editable field is a calm dark color which nearly matches the background (the dialog color). This helps avoid visual overload, especially in dialog boxes with many fields.
When you hover the cursor over the editable field of interest, its color changes to a rich gray.
Should you also click inside the field, its color will turn white. It means that the contents of the field can now be altered.
A non-editable field in Xeoma’s new design is a gray color that does not change upon contact with the cursor. The contents of such a field cannot be changed, but can often be copied.
See an example of the three states of an editable field and an example of a non-editable field in the image below:
Archive Player
The new design of Xeoma’s built-in archive player is also meant to simplify and modernize the interface.
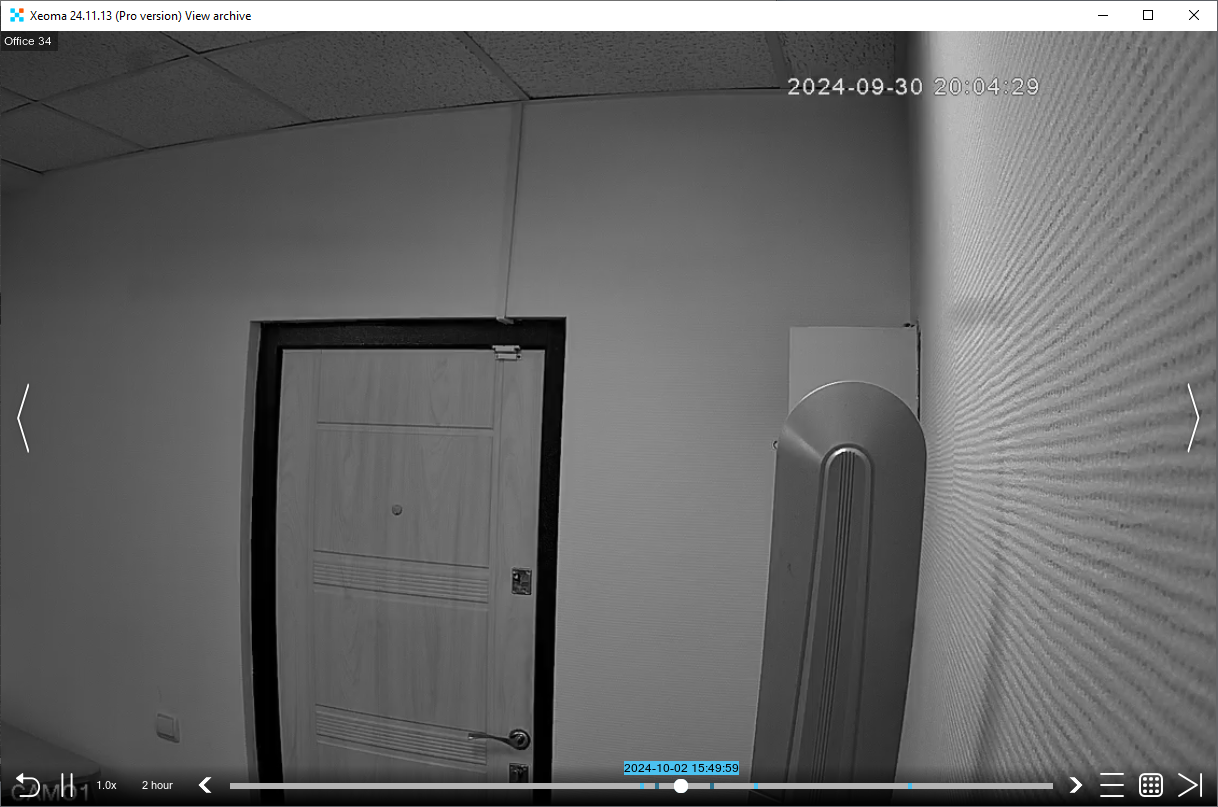
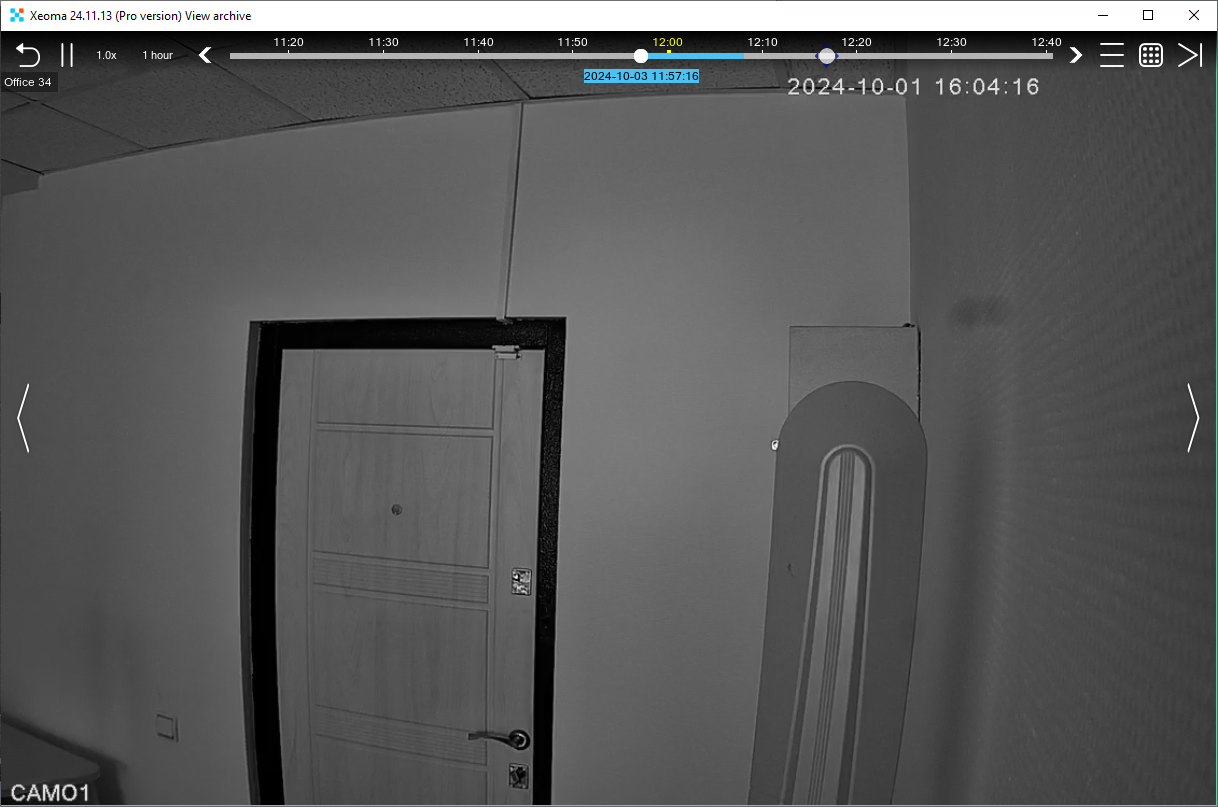
When you get to the Archive Player window, the first thing you might notice is that the timeline panel has become smaller and now only occupies one line. The pause/resume button has moved to the left, and the menu icon is now on the right. The scale and playback speed sliders are presented in collapsed form and will expand once you hover the cursor over them. Like the other panels in Xeoma’s new design, the bottom panel of this window also gradually “dissolves” when the user becomes inactive.
When idle, the playback timeline does not display any time marks, only showing the time of the current recorded segment:

|
This feature was implemented in Xeoma before the overall design change, but we would like to remind you that if a motion detector is recording, the color of timeline segments now indicates the intensity of the movement. For more information, please refer to the User Manual for Xeoma video surveillance software. |
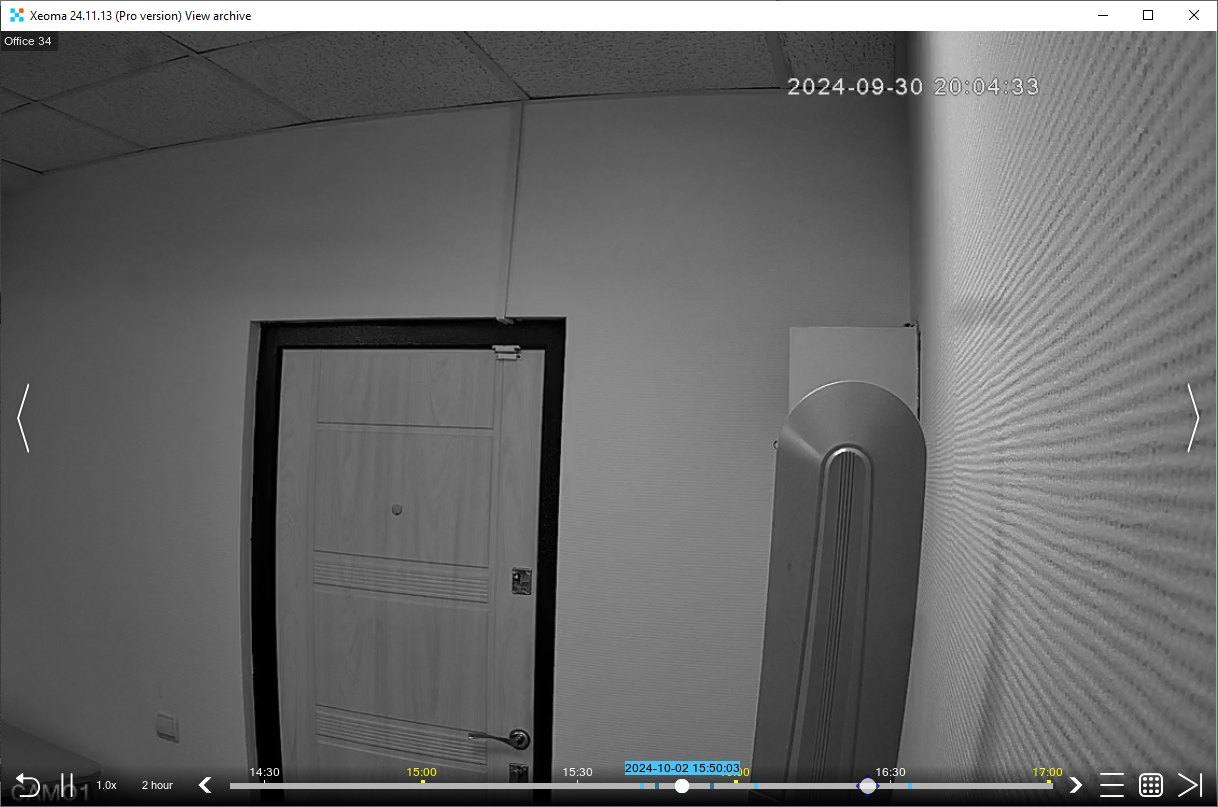
Once you place the cursor over the bottom panel, marks with the time and date will appear above the timeline. This will help you correlate recorded segments with specific time stamps, and also make it more convenient to move the slider to the desired mark:
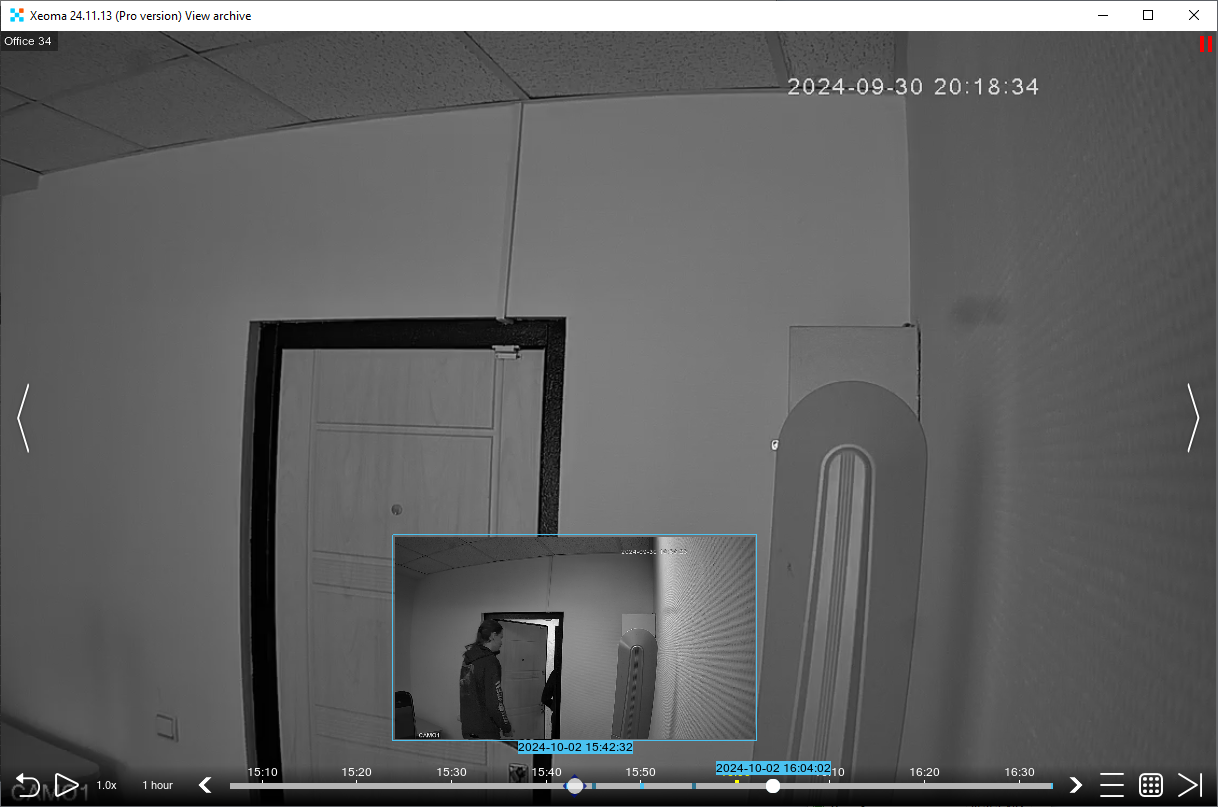
The mini previews remain as a feature of the Archive Player. They will appear when you hover the cursor over specific recording intervals:
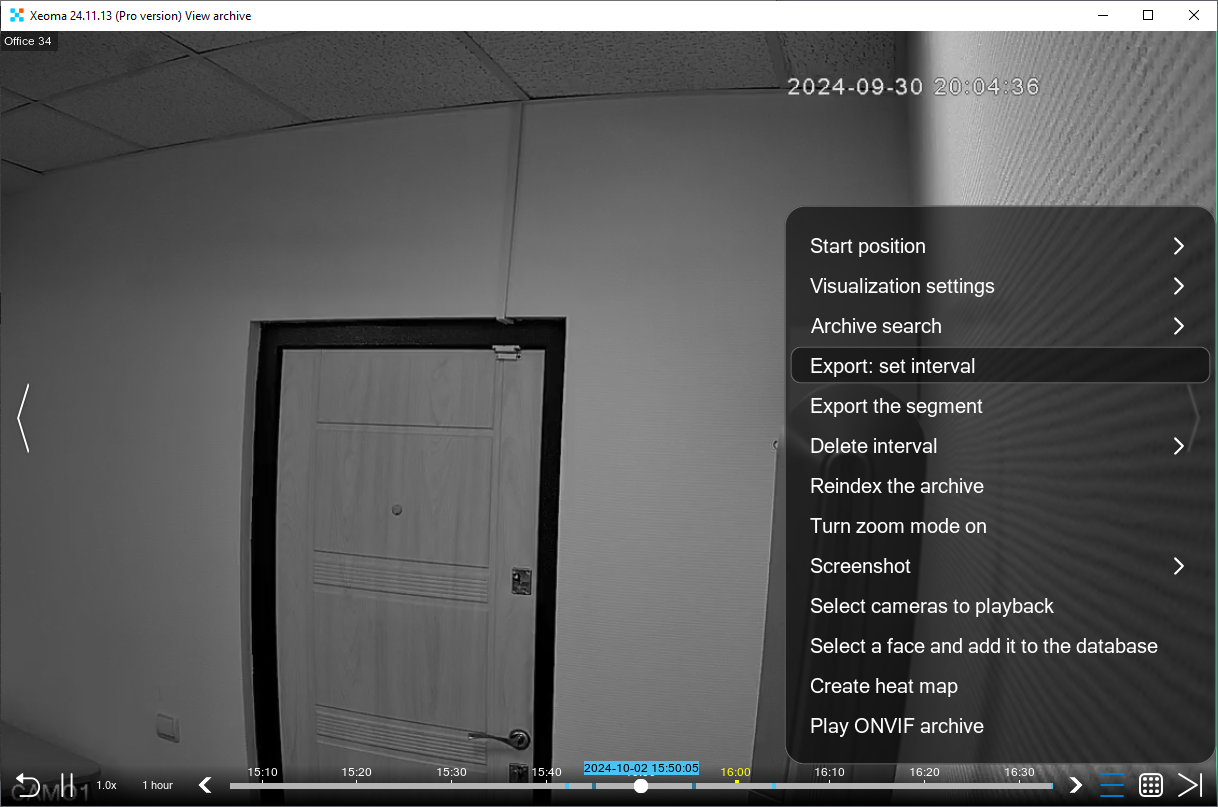
The Archive Player menu now opens on the right:
The new design also retains the option to move the bottom panel all the way up, to the top of the screen. In this case, the menu and the mini preview will appear under the panel.
In Conclusion
The “Interface of the Future” of the updated Xeoma video surveillance program serves several purposes:
* Optimization of used space (for example, the disappearance of panels when idle, a more compact arrangement of icons and their size, the absence of black borders in camera slots, etc.);
* Increased usability due to a modernized design that predicts your next steps (thoughtful and more convenient placement of icons, remembering the choice of hiding/displaying PTZ control, etc.);
* Increased usability due to calmer, specially selected colors (editable fields, general color scheme);
* Adding elegance and modernity (stylish icons and other controls, the absence of unnecessary borders, rounded dialog boxes);
* Intuitiveness of use due to user-friendly icons (minimalistic, recognizable pictograms that speak for themselves).
These interface modifications are available in Xeoma versions starting with the 24.11.13 beta.
The advanced design is available for all supported operating systems (including Android – as of now, only downloaded from the official website) with the exception of iOS.
Xeoma’s upgraded visuals aim to prove that a video surveillance system can be both functional and pleasing to the eye!
If you are looking for a video surveillance program that is modern both in function and appearance, give Xeoma a try!
November, 19 2024
Read also:
How to easily set up video surveillance using Xeoma software
Complete Xeoma User Manual
Xeoma manuals: learn how to configure the features you need with Xeoma video surveillance software
Xeoma download page