
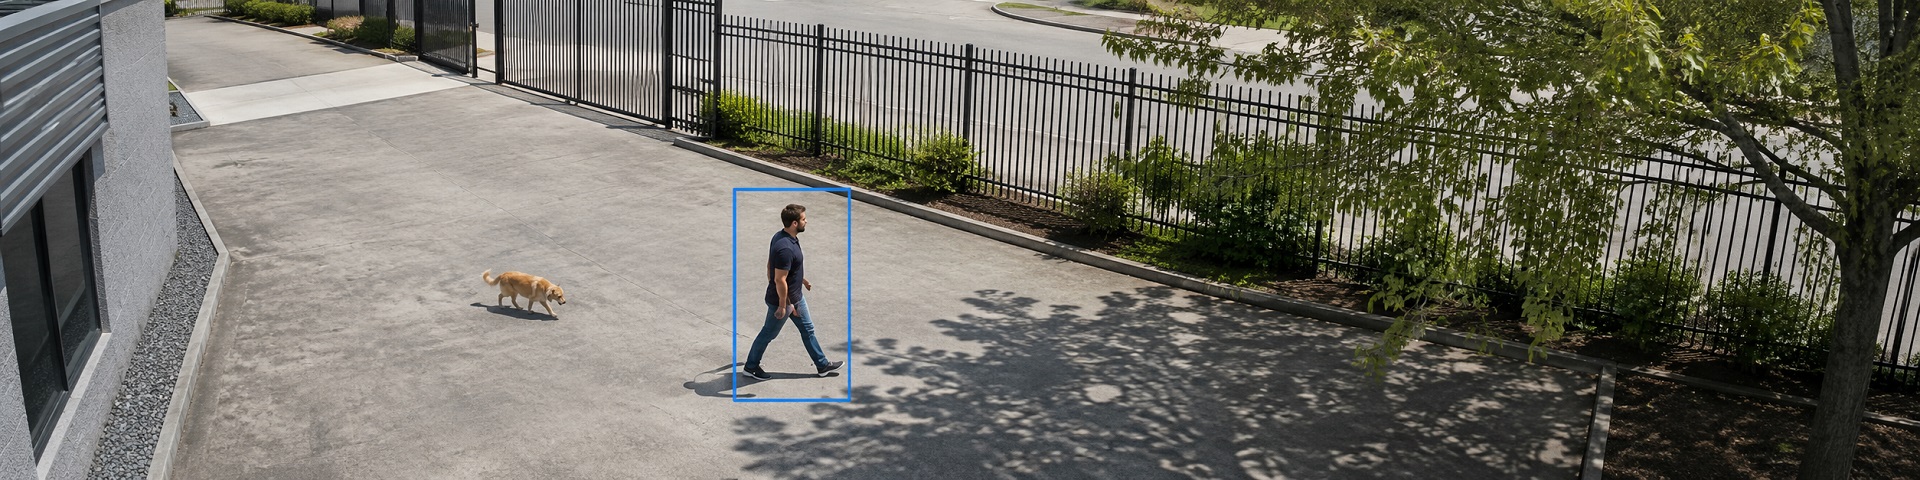
Setting up the Motion Detector
A complete guide to configuring the Motion Detector in Xeoma: where to find the module, how every parameter works, how to eliminate false alarms, and how to set up different responses for different zones. From the first launch to fine-tuning for your specific scene.
What the “Motion Detector” is and where to find it
 The Motion Detector is a filter module: it sits
in the chain between the source (the camera) and the actions (recording, notifications), processing the video stream and deciding whether to pass it along or not.
The Motion Detector is a filter module: it sits
in the chain between the source (the camera) and the actions (recording, notifications), processing the video stream and deciding whether to pass it along or not.
In the Xeoma interface, the “Motion Detector” module is found in the “Filters” category — among the modules that analyze and process the image. Add it to the chain after a camera or another filter.
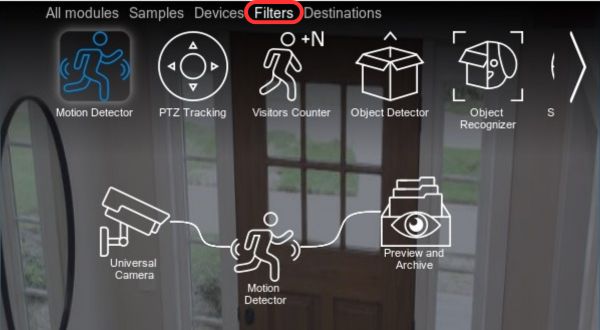
To find the module quickly, start typing its name in the search box above the module list — the list filters as you type.
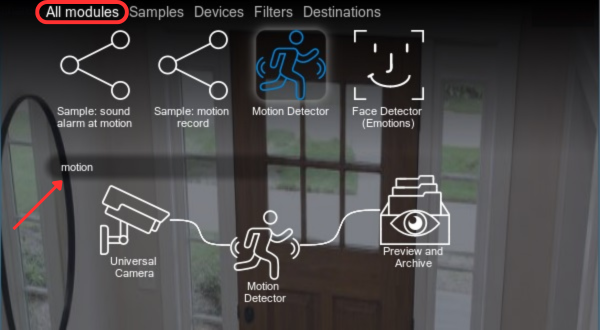
The Motion Detector in a module chain
The Motion Detector is used more often than most modules, so Xeoma already includes it in the standard chains created automatically on first launch — you don’t have to build everything from scratch.
These chains are a starting point. The Motion Detector is already included in them; all that’s left is to tune it to your scene (covered in the sections below) or extend the chain with your own actions.
What the module’s color in the chain means
A filter module added to a chain can be in one of several states: enabled, ignored, or disabled. The module’s color in the chain shows whether it is passing the video along at that moment or blocking it:
White — the video is passed along. The module is enabled and working normally. In the module’s status this is shown as “Enabled”.
Gray — the module is ignored. The module is added to the chain but not active – the whole chain runs as if it weren’t there. In the module’s status this is shown as “Ignored”. Use this state when the chain temporarily needs to run without the motion detector, but you don’t want to remove it and lose its settings.
Pale lilac — the module is disabled and blocks the modules that follow. The module is turned off in its settings (the toggle state reads as “Enable”), and the whole branch of the chain after it stops receiving the signal. Use this state when the motion detector and everything downstream of it aren’t needed right now but may be needed later.
These states let you quickly switch the motion detector on and off, with or without affecting the modules that follow it in the chain. And the color coding lets you see the module’s state at a glance — so you won’t forget, for instance, that the detector is temporarily disabled.
Motion Detector settings
Every parameter the detector uses to adapt to your scene — from the monitoring zone to fine filtering of false alarms.
To open the settings, click or tap the “Motion Detector” module in the chain.
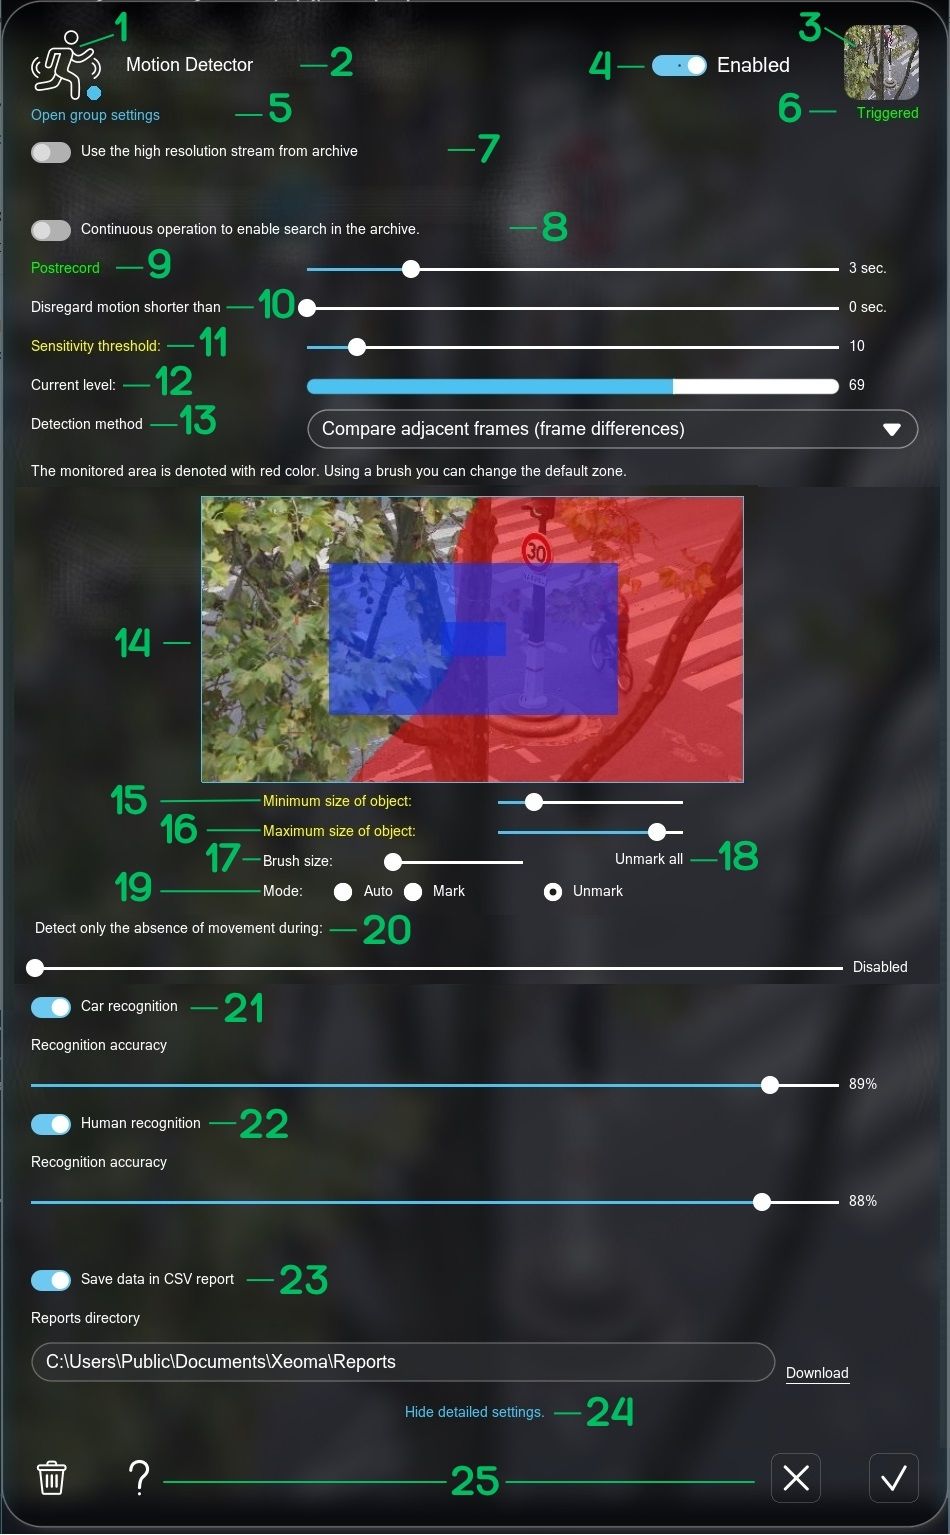
Module icon
You can always tell which module’s settings you’re currently in by looking at its icon.
Clicking the icon opens a pop-up help window for the module.
Module name
By default, the name “Motion Detector” is applied to every module of this type. You can change the name to keep your bearings among modules – for example, add specifics about the settings right into the module’s name. To do so, click the name (an editable field should appear) and type a new one. Be careful: once you start typing a new name, the action can’t be undone, but you can simply type the “old” name back in.
Camera preview
The upper box on the right shows the live image from the camera whose settings you’re currently in.
Module state switch
The state switch lets you temporarily deactivate the “Motion Detector”, either affecting or not affecting the modules that follow it in the chain.
The “Enabled” state – the module works normally.
The “Ignored” state – the module doesn’t work, but it doesn’t block the modules that follow: they keep receiving the video signal from the camera as if the “Motion Detector” weren’t in the chain.
The “Enable” state – the module doesn’t work and blocks the modules that follow: they receive no video signal from the camera. Use it when you need to urgently and temporarily switch off the entire branch of the chain after the “Motion Detector”.
Group settings
Click “Group settings” to edit the settings for several or all “Motion Detector” modules at once. This is handy when, for example, you need to remove the area with the timestamp embedded in the video stream from the detection zone across all cameras.
Read more in the “Group settings” section.
Trigger information
Below the preview (see 3) is the trigger indicator – information on whether all the requirements you’ve set are currently being met.
There are two possible states:
a yellow “Not triggered” label — no trigger: there is no motion or the motion characteristics do not match your settings,
a green “Triggered” label — there is a trigger, and the video stream is passed to the modules that follow.
The affected settings are marked in these same colors (see below). For example, if under “Not triggered” the sensitivity setting is highlighted in yellow, then the trigger is being blocked by that particular setting.
Use the high resolution stream from archive
Many video analytics modules require a fairly high image quality. The Motion Detector is a pleasant exception: it works perfectly well with the simpler stream used for live viewing, without putting extra load on the system. However, for greater accuracy — especially over long distances — you can switch the detector to the higher-quality “archive” stream. Read more about Xeoma’s dual streaming optimizations here.
Continuous operation to enable search in the archive
The “Continuous operation to enable search in the archive” checkbox puts the detector into a “Triggered” state — recording runs continuously. It’s needed when the detector isn’t required as a filter (you want constant recording), but you still want to use motion search in the archive. In this mode the detector simply gathers motion data for later search.
Postrecord
The length of time the signal keeps travelling down the chain even after the motion has ended. It lets you record a few extra seconds after an event, so it lands in the archive in full instead of cutting off the moment the motion stops.
Disregard motion shorter than
Set in seconds. Motion shorter than the specified interval isn’t detected and isn’t handed down the chain to the following modules — handy for filtering out fleeting spikes (a passing shadow, a brief glint) and responding only to sustained motion.
Sensitivity threshold
With the sensitivity slider you set which intensity of motion you would like the system to react to. 0 — maximum responsiveness: the system reacts to the motion of any object at any speed. 100 — the highest threshold: only large objects with clear, unmistakable motion trigger it. To set the sensitivity correctly, watch the sensitivity scale (12) while motion of the intensity you care about is happening in the frame.
Current level
This sensitivity scale shows the current level of motion intensity: use it to determine which speed and intensity of motion triggers detection at the chosen threshold, making it easier to dial in the right value for a specific scene.
Detection method
A drop-down menu with two options:
- “Compare adjacent frames” (frame difference) — detection is based on comparing several consecutive frames.
- “Compare to the accumulated background” (background substraction) — several frames are compared, and the unchanging background is gradually “accumulated”. This helps against false alarms when there is constant background motion in the frame — clouds, swaying trees, shadows, and the like.
- “Ignore shadows” — a modified version of the “Compare to the accumulated background” option, optimized to filter out shadowing, glare, headlights, and similar effects caused by changes in lighting.
- “Camera-embedded motion detector” — the option to use the camera’s built-in motion detection instead of Xeoma’s detector. Available only for cameras that work over the ONVIF protocol. With this option on, the detection zone and all motion detection settings are taken from the camera’s own settings (however, the human and/or car recognition options can still be applied, too). It is essentially a stripped-down version of the “Camera-embedded detector” module: the separate module lets you use the camera’s other detectors as well, whereas this option works only with the camera’s built-in motion detector.
Detection zone
Define an area of any size and shape in which the system will watch for motion. Paint the areas you want to monitor in red, and leave transparent the ones where motion can be ignored. A classic example — mark the walkway to your house but leave the road behind it untouched.
The size of the brush for painting and erasing is adjustable (see 17, 18, and 19).
Minimum object size
Limit the minimum size of object the detector responds to. This filters out false alarms on objects that are too small (birds, animals).
Maximum object size
Limit the maximum size of object the detector responds to. This filters out false alarms on objects that are too large — for example, when your goal is pet monitoring, it helps ignore humans in the camera view and only trigger when a pet is seen.
Brush size
Set the brush size for painting (“marking”) or erasing (“unmarking”) the detection zone. Move the slider to the position you want, where the far-left position is the smallest brush size, and the far-right position is the largest brush size.
Unmark all
If some areas are painted in the detection zone, click the “Unmark all” button to clear the entire detection zone in one click.
If there are no painted areas in the detection zone, the “Unmark all” button is replaced by a “Mark all” button – use it to paint the entire detection zone in one click.
Mode
The brush mode for working with the detection zone (see 14).
In “Auto” mode, the brush chooses the action itself — paint or erase — depending on what’s underneath it: if there’s a painted area under the brush, it acts as an eraser; if the area is unpainted, the brush paints.
In “Mark” mode, the brush always paints.
In “Unmark” mode, the brush always erases.
Detect only the absence of movement for
Lets you switch the “Motion Detector” from detecting motion to detecting the absence of motion. Drag the slider to the time you want: an absence of motion for that duration or longer will be treated as an alarm event.
Car recognition
Xeoma ProThe “Car recognition” option (available in the Xeoma Pro edition) makes the detector respond only to vehicles — all other motion is ignored. This sharply reduces the number of false alarms at the cost of a small increase in CPU load.
Human recognition
Xeoma ProThe “Human recognition” option (for Xeoma Pro licenses) makes the detector respond only to people — all other motion is ignored. This sharply reduces the number of false alarms (at the cost of a small increase in CPU load).
Save data in CSV report
The motion detector’s logs can be exported to a CSV report — for later analysis, import into spreadsheets, or transfer to other systems.
Hide detailed settings
This option lets you collapse the advanced settings, leaving only the most essential ones. When in collapsed view, this button is changed to “Show detailed settings”, which helps untoggle the extra settings.
System buttons
The buttons present in every Xeoma filter module: delete the module, get help on how the module works, close the settings without saving changes, and close the module’s settings while saving changes.
Useful Motion Detector optimizations
Motion indication on the preview
The preview of a camera that has detected a matching motion within the last 5 minutes gets a red frame in the all-cameras view that gradually fades from red to white (the lighter it is, the more time has passed since the last motion). If there’s been no motion for 5 minutes, the camera box frame gets back white, turning light blue on hover.
Zone and stream resolution
If a camera’s low- and high-resolution streams have different aspect ratios, the detection zone is built from whichever stream is selected for the job: by default the viewing stream, or — if the “Use the high resolution stream from archive” option is enabled — the recording stream. This eliminates the zone mismatch that different stream proportions would otherwise cause.
Troubleshooting
How to get rid of false alarms
A false alarm is when the detector responds to something you don’t care about. First we’ll look at what causes them, then at how to configure the detector to combat or avoid false alarms in a few steps.
-
Why Does the Motion Detector Trigger on Its Own?
-
Weather Conditions
- Wind → Swaying trees, leaves, or flags
- Rain/Snow → Droplets on the camera lens or falling precipitation
- Lightning/Thunderstorm → Light flashes and shadows
- Drifting Clouds → Rapid changes in lighting and shadows
- Fog or Smoke → Image blur and false contours
-
Animals and Insects
- Birds → Flying by or landing on the camera
- Pets (Dogs, Cats) → Running around the yard
- Wild Animals (Rats, Raccoons) → Nighttime movements
- Insects (Flies, Spiders) → Crawling on the lens or in the field of view
- Butterflies or Bats → Erratic flights at dusk
-
Lighting Changes
- Sun Glare → Reflections from windows, cars, or water
- Shadows from Objects → Moving shadows from trees or people
- Streetlights → Automatic on/off at night
- Car Headlights → Passing vehicles in the dark
- Indoor Changes → Lights or curtains being turned on/off
-
Technical and Environmental Factors
- Vibrations → From passing traffic or wind on mounts
- Plants → Growing or swaying bushes/flowers
- Reflections → From mirrors, puddles, or metal surfaces
- Background Passersby → People or bicycles outside the area of interest
- Mechanical Interference → Swaying signs or flags
-
Hardware Issues
- Image Noise → From low-quality cameras or weak signals
- Overheating/Cooling → Thermal noise in IR cameras
- Electromagnetic Interference → From nearby devices (Wi-Fi, motors)
- Dirt on Lens → Dust, cobwebs, or smudges causing artifacts
- Automatic Adjustments → Changes in focus or exposure
-
Weather Conditions
Getting false alarms? Try the following:
Narrow the detection zone
Paint only the area that truly matters to you, and remove the sky, trees, road, and neighboring property from the zone. This is the fastest way to eliminate most false alarms.
Set the object size
Limit the minimum size to filter out small things (insects, birds, leaves), and the maximum to avoid reacting to a complete change of the frame.
Dial in the sensitivity threshold
Using the “current level” scale, find the value at which the motion you want is still “Triggered” while background noise is already “Not triggered”.
Filter out short movements
Turn on “Disregard motion shorter than” for 1–2 seconds — this removes fleeting spikes from glints and shadows while keeping sustained motion.
Choose a detection method
For an outdoor scene with constant background motion (clouds, trees), switch to “Compare to the accumulated background” — it suppresses the steady background. To fight false reactions to shadows, use the “Ignore shadows” option. See the table below
Enable people/vehicle detection (Xeoma Pro)
If you only need to respond to people or vehicles, turn on AI detection, and animals, shadows, and branches will stop raising alarms altogether.
Try the camera’s detector instead (ONVIF cameras)
If Xeoma’s motion detector doesn’t seem to work for you and your camera is ONVIF-compliant, you can offload the motion detection task onto the camera side with the “Camera-embedded motion detector” in the “Detection method” list.
Which detection method to choose
| Method | How it works | When to choose it |
|---|---|---|
| Compare adjacent frames | Compares several consecutive frames and looks for the differences between them. | A stable scene with no constant background motion: indoors, an enclosed yard, or a corridor. |
| Compare to the accumulated background | Gradually “accumulates” the unchanging background and compares frames against it, ignoring regular background motion. | An outdoor scene with clouds, swaying trees, water, grass — where the background itself is always in motion. |
| Ignore shadows | The “Compare to the accumulated background” but optimized for lighting changes (shadows, glare, headlights, etc.). | An indoor or outdoor scene prone to get shadows, glare from bodies of water, rays of sun, or headlights at night. |
| Camera-embedded motion detector | Shifts motion detection to the camera side and gets triggers from it. | Any use or scene where Xeoma’s motion detection should be substituted with the camera’s. Available only for ONVIF cameras. |
Scenario
Multiple zones, different responses
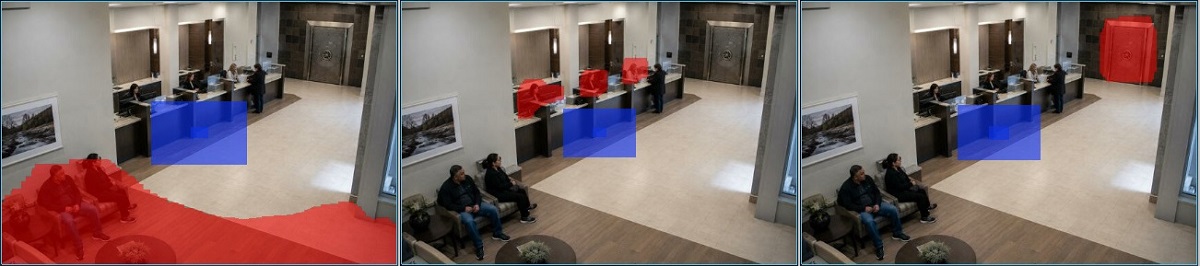
Many systems let you mark just one zone — or trigger on all zones the same way at once. Thanks to Xeoma’s modular architecture, you can watch several zones from a single camera and trigger your own response for each.
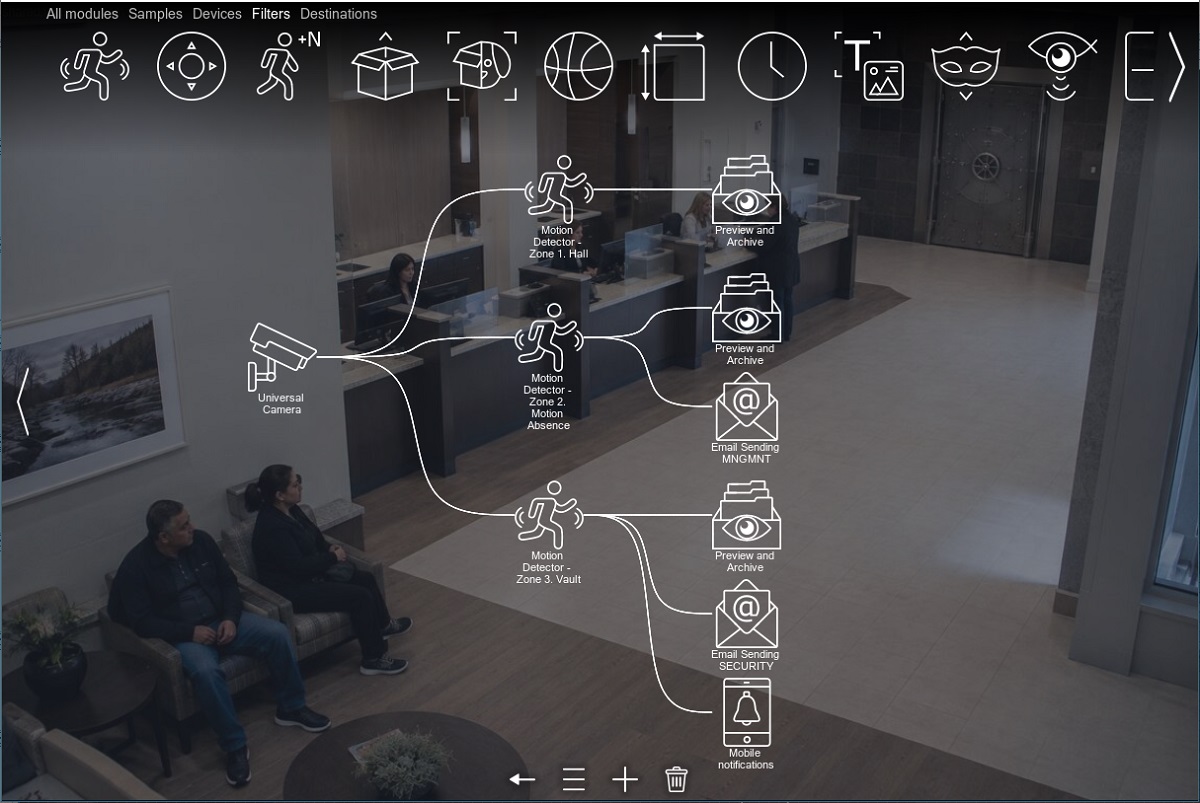
The trick is simple: place several motion detectors on a single camera — one per zone — and run a separate branch of the chain from each to the action you want. This way, motion in different parts of the frame triggers different responses rather than one shared alarm.
Example: monitoring a bank hall
A single camera covers three zones of differing importance. We’ll set up three motion detectors — one per zone — with different responses:
Now motion in the unimportant zone is merely recorded to the archive, while in the critical one it instantly raises the alarm across every channel. A single setting applied to the whole camera couldn’t do that.
Frequently asked questions about the “Motion Detector”
Why does the motion detector trigger on its own?
The detector reacts to wind and swaying trees — how do I fix it?
The camera doesn’t react to motion, or reacts to the wrong things — what do I do?
How do I set the sensitivity?
Can I watch several zones with different responses?
Is a camera’s built-in video analytics supported?
I no longer need motion detection. How do I switch the module off?
Ready to set up the detector?
Download Xeoma and apply these settings to your own cameras — the motion detector is included in the free edition.