How to use a video as a camera in Xeoma?
As a rule, users need a CCTV camera to work with Xeoma. However, sometimes customers want to test the program and its intelligent functions for some specific tasks. For example, to count visitors in a store where cameras are not yet installed. In this case you may not have a proper camera for that, but you could use an existing video file in Xeoma instead. In this article we’ve collected the most convenient and absolutely free ways to replace CCTV cameras.
Let’s look into this question in detail. Xeoma is built on so-called chains consisting of modules which users can add/remove according to their needs. The main modules without which the program will not work correctly are source modules. For example, “Universal Camera”, “Screen Capture”, “File Reading” and others. They are responsible for delivering the image from cameras to the program. While everything is more or less clear with the “Universal Camera” module, which is used to add cameras to the program, the modules that receive data from other sources require a more detailed review.
So how to add your video to the program? There are three basic and easy ways to do this.
1) The “File Reading” module;
2) The “Screen Capture” module;
3) VLC broadcasting.
Let’s have a look at each of them.
The “File Reading” module
You can use it to select MJPEG video files as a source. To connect this module, click on the “+” on the bottom panel, select “Add new camera manually”. The window with the settings of the module “Universal Camera” will open, remove the module by clicking on the trash can in the lower left corner. In the list of modules, find “File Reading” and add it to the chain by dragging it with your mouse.
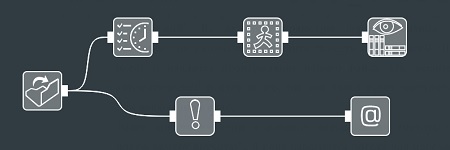
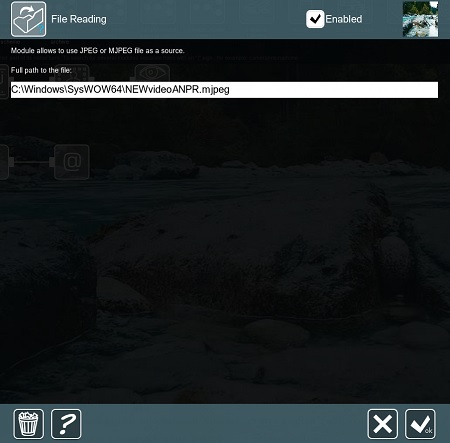
Go to the module settings by clicking on it. In the window that opens, specify the full path to the video file you want to select as the source. The image should appear. If you want to change the source name, you can do it in the “Preview and Archive module settings.

|
Please note that video files must be in MJPEG format, you can find instructions on how to convert files to MJPEG here. |
The “Screen Capture” module
If the file you want to add to Xeoma is recorded in a different format or broadcasted from a third-party program, you can use the “Screen Capture” module. It allows you to record everything happening on your computer screen, including video playback. With this module you can also use all filters and intelligence video analytics. All you have to do is to connect the module to the chain and run the necessary video for analysing in any player. Xeoma will capture and broadcast it.

VLC broadcasting
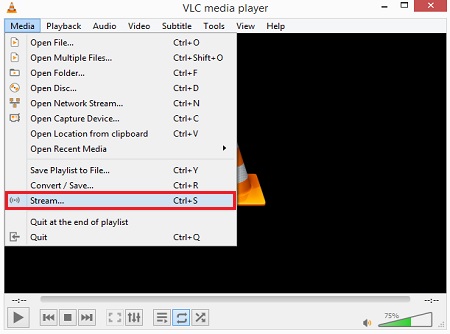
To configure the last method you need to have a VLC player installed on your computer. Launch VLC player, open the “Media” menu and select “Stream”.
In the window that opens, click on “Add” and select the file you want to upload to Xeoma. Then click “Stream”.
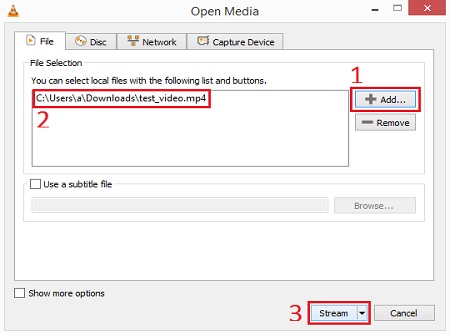
You will see the path to the source you selected, click “Next”.
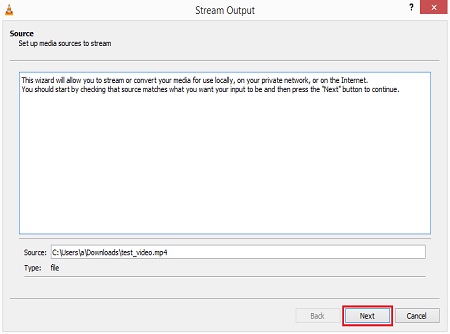
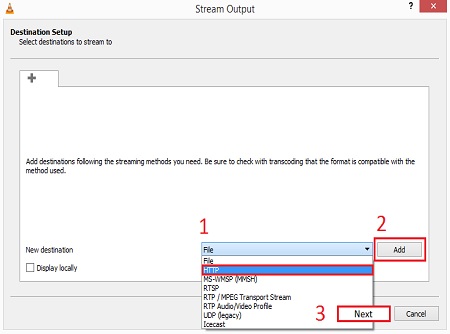
Next in the “Destination Setup” section select the type of stream you need, we recommend HTTP or RTSP. Click “Add” and after “Next”.
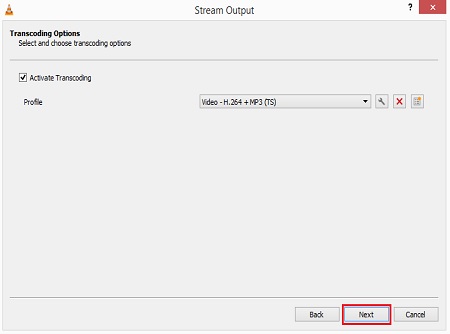
In the transcoding options you can leave the default settings. Click “Next” and then “Stream”.
The player will open and your file will start playing. We recommend enabling automatic video repeat, as the stream will be sent to Xeoma only when video is on.
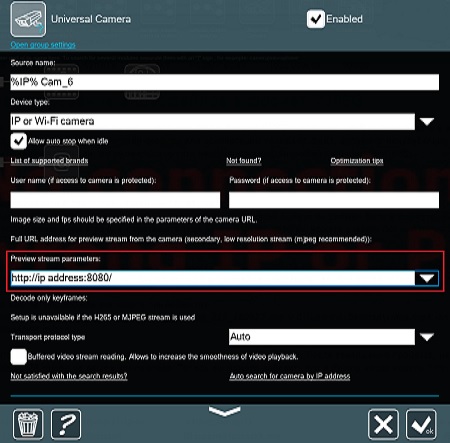
Then start Xeoma and add a new camera manually (“+” -> “Add new camera manually”). In the stream options for previewing enter the stream URL. If you selected HTTP, the link will look like this: http: // ip address of your device on which the VLC broadcast is conducted: 8080 /, where 8080 is the default port. Wait a while for the video to upload, after which it should appear in Xeoma.

|
Please note that such a broadcast can significantly increase the load on the processor, therefore, if your computer is not powerful enough, we recommend starting the broadcast from another device located in the local network, or using a video of a lower resolution. |
July, 28 2021