An Evaluation of Xeoma for Windows
by Terry L Sprout
Our user created a review on how to install Xeoma based on the personal experience. You can read the review below.
Introduction
I recently replaced my Q-See NVR (a hardware solution) with Xeoma. This article summarizes my evaluation of Xeoma.
Background
I installed a Network Video Recorder (NVR) at my house back in late 2014 because someone decided to vandalize my property one night. I did some research and settled on a Q-See brand NVR and four PoE cameras. Three cameras cover my front yard and one in the backyard. Everything worked great until I had a power surge in 2022. The power surge took out the hard drive in my NVR. I tried contacting Q-See to get a replacement, but they went out of business in early 2020. They were a casualty of the allusive COVID-19 pandemic. I assumed someone must have taken over since Q-See had a large customer base, but that search failed. I figured I will either have to replace my entire system, or simply do without security cameras.
One day it dawned on me that there must be software solutions. In fact, software solutions are more attractive to me, not because I’m a software engineer, but because hardware solutions become outdated rather quickly. I can install software on my computer and if the computer becomes outdated, I can replace the computer and still use the same software (theoretically speaking).
Seeking a software solution
I began searching for software-based NVRs for IP cameras. I found a few articles that reviewed what they called the best IP camera software in the market. Each article basically reviewed the same software. I downloaded a few Windows-based applications (I have Windows computers) to give them a try.
My second criteria was the software had to stream images from my IP cameras. This eliminated a few because the software was either very limited or designed for specific cameras.
My third criteria was they had to offer a free trial. I figured if they were proud of their software, they would want more people to test it, plus I didn’t have the money to spend on testing.
I found about eight I could test. I tested each one and only found one that came close to giving me what I needed. I searched some more and I kept coming up with the same list. I almost purchased the “one and only,” but I just wasn’t completely happy with its limitations. Let’s figure out what I actually need. Maybe I’ll find it.
My requirements
I want a software solution that can come close to providing some of the important features of my now
defunct NVR. That means I need the following capabilities:
• Stream at least four cameras simultaneously
• Configure each camera to detect motion
• Tile all four videos on the same screen
• Set the viewer to full screen, no menu bars, no toolbars, and no status bars
• Record streams to disk
-
o The recordings should be triggerable from motion detection
o The recorded streams should include at least 5 seconds pre-trigger and post-trigger
o The recording files need to be segregated by camera and by date
o There should be a mechanism that can link the streams from all cameras
o The recordings should overwrite old streams automatically before the disk is full
• Connect remotely from a mobile device
-
o The connection must be secure
o Connect via LAN, WiFi, or Internet
o The remote client should tile all cameras on one screen
The “one and only” application I found did not satisfy me. Its main weaknesses were with its recordings and remote access.
If you recorded without motion detection, it wrote everything in a single file (one file for each camera). I didn’t allow it record very long, so I don’t know how it handled files over 4GB. But that made it difficult to find anything. If you recorded with motion detection, it created a new file for each recording. But it placed all files in the same folder and could not overwrite old files as the drive got full. It appeared I would have to routinely move files around manually to make them easier to find. But I want an automated system.
The remote capability was very weak. It was not very secure for one (no password protection). They did not have a mobile app, you had to use a browser. You can only view one stream in a browser. You could open multiple browsers, but I just didn’t like what I saw.
Now I’m starting to think I will have to find another hardware solution. Or I could write my own application, but I don’t have the time nor the resources. I was getting frustrated. There has to be something out there. I searched some more and found an article I haven’t seen before. This article ranked one of the applications I did not like as the best for Windows. It ranked Xeoma is best for Apple. But then I noticed Xeoma has a Windows version. I read about it and thought I should give it a try. The following is my evaluation with Xeoma, my new favorite IP Camera application with NVR capabilities.
Xeoma exceeds
Visualization
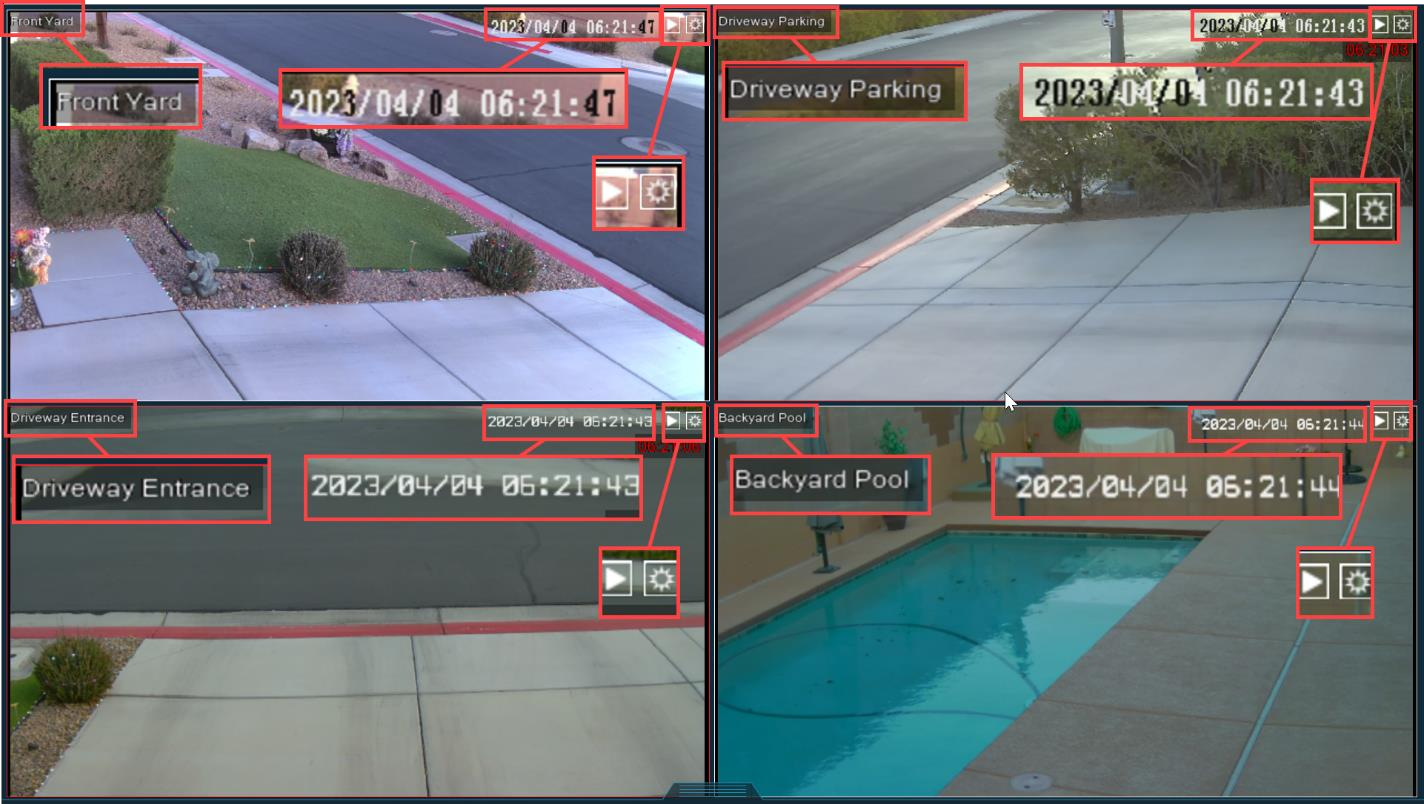
The screenshot below shows my configured Xeoma installation. It appears very simple and, as you can
see, it satisfies all my visualization requirements. All four camera videos are tiled into a single viewer and
the viewer is displayed in full screen with no menus, toolbars, nor status bars.
|
Figure 1: Fullscreen after configuration
|
Notice that each camera video has a title in their top-left corner. Each video also has the date and time in their top-right corner, that’s actually an overlay in the camera stream. The time displayed in each is the same.
Each camera video also contains two icons in their top-right corner, a triangle pointing to the right and a gearhead. The triangle looks like an icon used by video players for “Play” because it is used to “play” from the recorded streams. The gearhead icon is used for configuring that camera’s settings.
Server/client architecture
It’s probably worth mentioning that Xeoma actually comes in two entities, the server and the client. There can be more than one client and the client is what actually displays what we see on the screen. Each mobile device as well as other connected desktops are actually remote clients. The server does most of the work and is the entity that requires a license. Clients do not require a license.
Felenasoft’s note: there’s also 100% free version of Xeoma that doesn’t require licensing. It has no ads, no registration and its work period is unlimited. However, it doesn’t have remote access option. More here.
Pipeline streaming architecture
The server configures each camera with its own pipeline, or video path. Each pipeline can be configured with multiple operators depending on the features the user requires. Each license level offers a default set of operators. The user is able to purchase other operators in order to configure a security system that meets their needs. Felenasoft (the company) also offers contract services where they will develop custom operators to the users’ specifications. This is world class customer support.
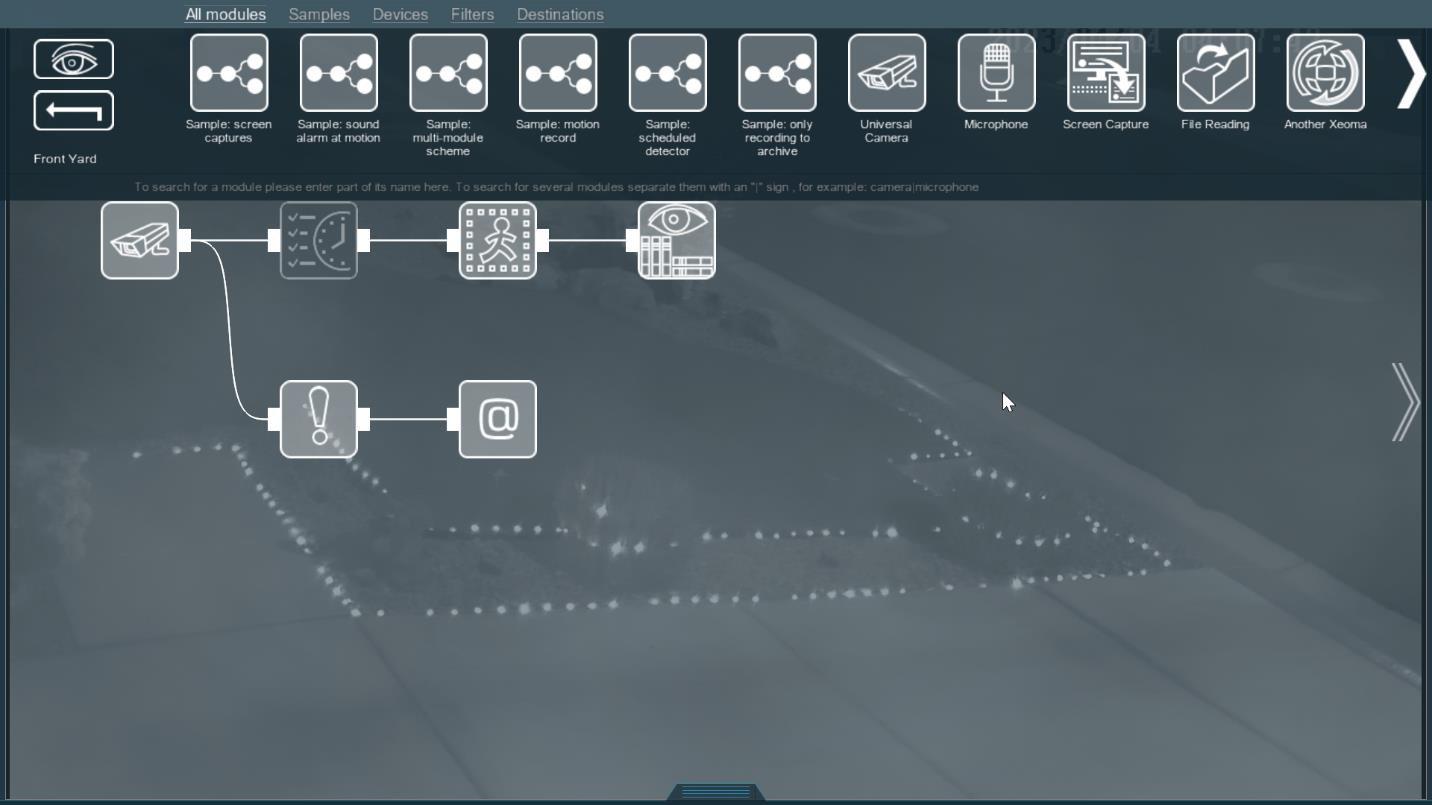
The screenshot below shows the pipeline, or video path, for one of my cameras. All cameras display the same information. The icons at the top of the display are the available operators. The area below the toolbar displays the path for this camera. The path starts at the left and moves right. The universal camera is the source and is the first operator. Notice its output actually splits into two paths. The top path is the default video path. The lower path is for configuring notifications. I currently don’t use the notification path, so I won’t be discussing these operators.
The next three operators are for (1) scheduling, (2) motion detection, and (3) preview and archive. Notice the scheduling operator is grayed. I currently don’t use the scheduler, so it is disabled. I want this system live all the times, no need for a schedule. I will cover the Universal Camera, the Motion Detector, and the Preview and Archive operators in the following sections.
|
Figure 2: Example of camera video path
|
Universal Camera configurations
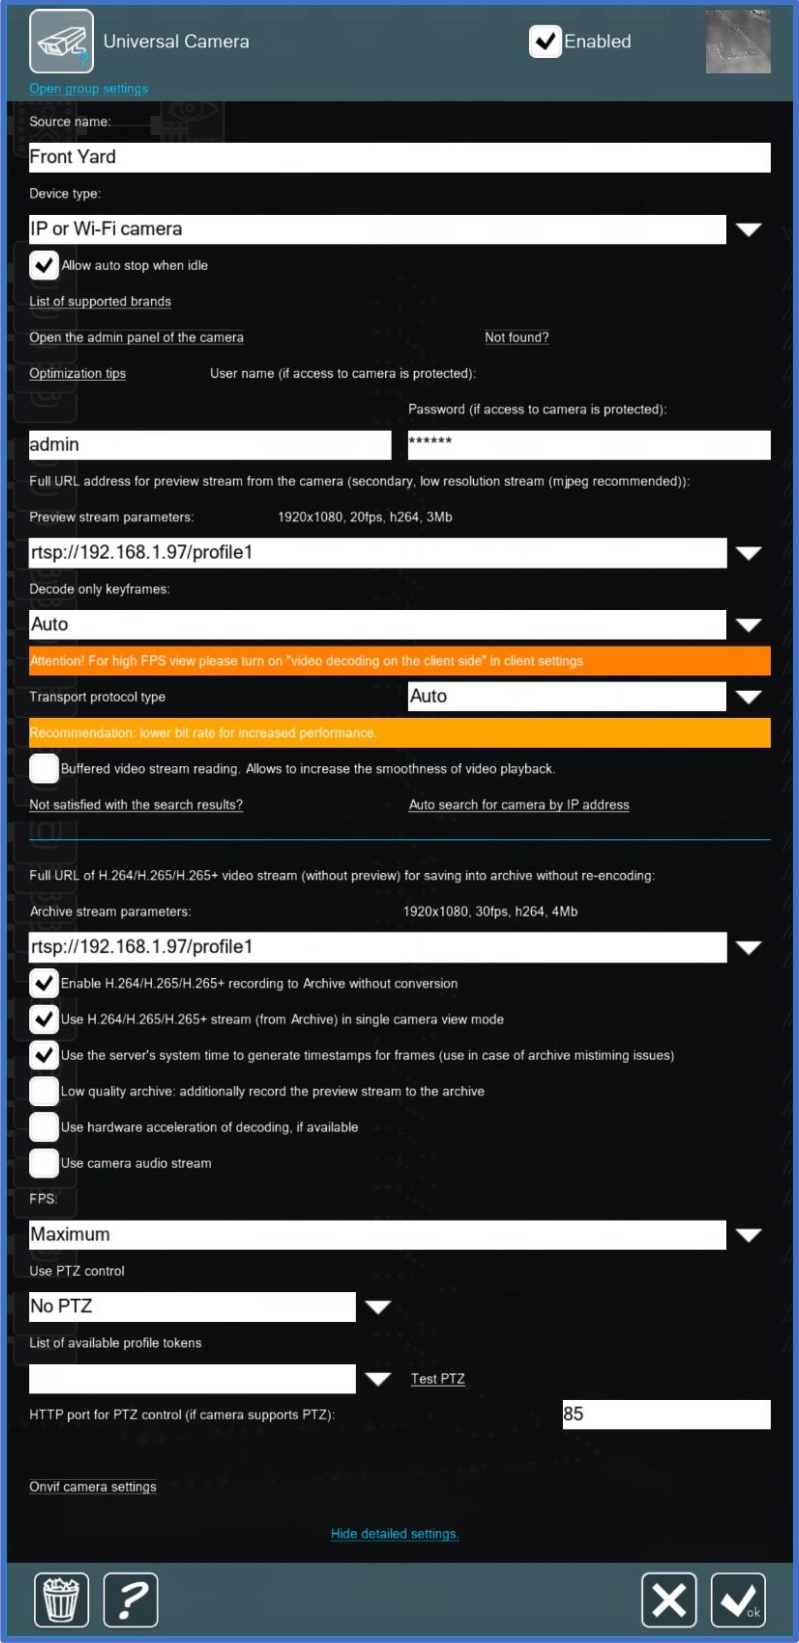
I included screenshots of my camera configuration windows below. They are all configured the same with the exception of the source name, the preview URL and the archive URL. The first screenshot shows the entire configuration window. The application cannot display the entire dialog at once with my monitor. You will need to scroll through the dialog using the arrows above and below the dialog.
My cameras are all IP cameras. I selected most of the default values for the remainder of the dialog with the exception of the third option below the archive URL: “Use the server’s system time to generate timestamps…”
I want my archives to contain full resolution as well as all frames whenever motion is detected. I learned from past experiences you may need to see multiple frames in order to recognize people and/or objects. In fact, software capable of enhancing images will use multiple frames to create better images. But the objects should be very similar between frames. This requires faster frame rates. That is why I selected “Maximum” for the FPS. My cameras do not have PTZ nor audio, so I disabled both in all cameras.
|
Figure 3: Universal Camera configuration for camera 1 (full dialog)
|
|
Figure 4: Universal Camera configuration for camera 1 (partial dialog)
|
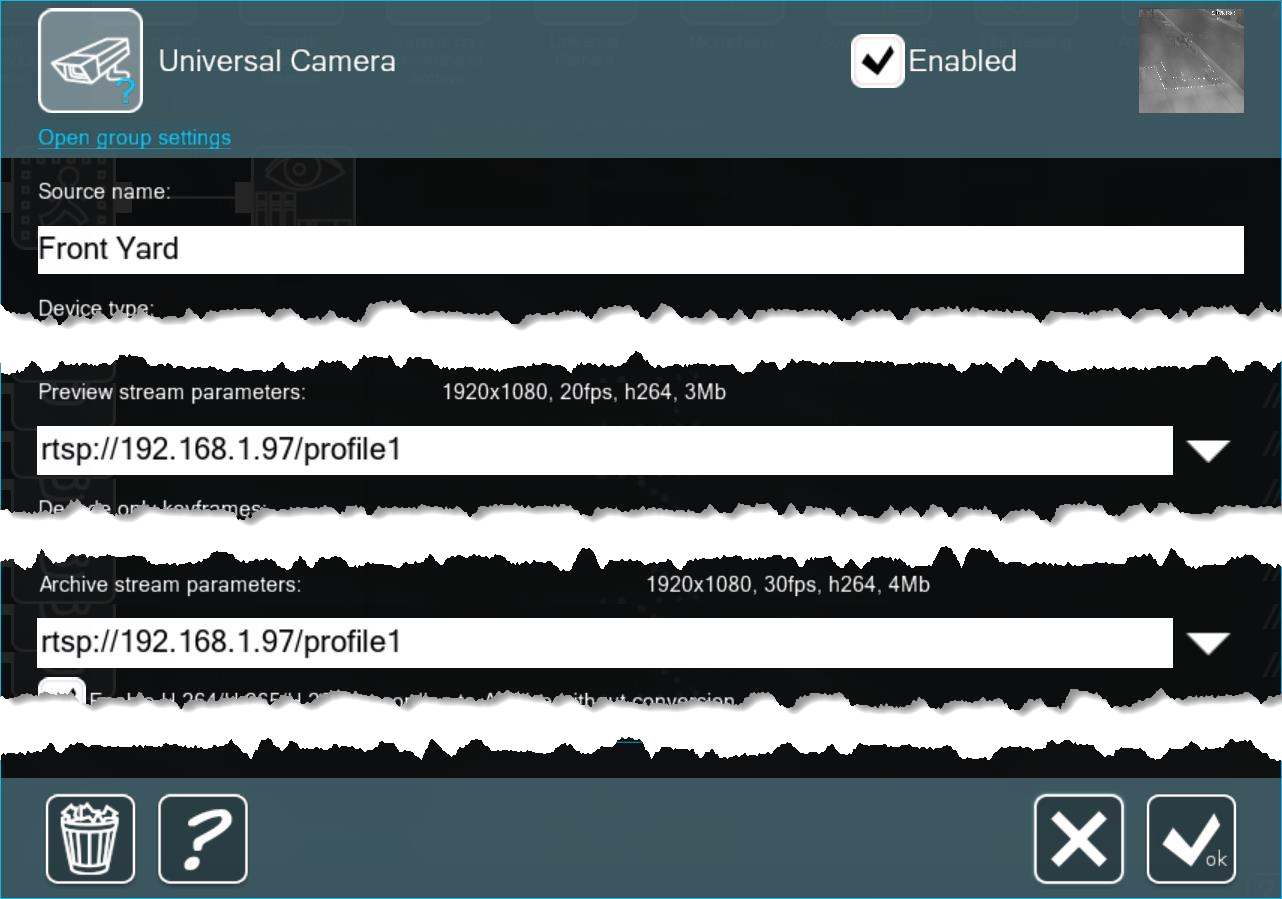
I named camera 1 “Front Yard”. My DHCP server reserves IP address of 192.168.1.97 this camera. The camera has 3 streaming profiles. I assigned “profile1” with 1920×1080 pixel resolution, 30 fps, and 4096 bits per image. The videos are actually compressed using the h264 protocol, so the actual network bandwidth can be better depending on the compression.
For now, I am using the same profile for both the preview image and the archive image. Notice the “Preview stream parameters” displays only 20fps while the “Archive stream parameters” displays 30fps.
Xeoma is able to archive compressed videos directly from the stream. That means Xeoma does not have to decompress the video before recording, making video files smaller and recording much faster. The preview stream, however, does decompress the video before displaying. The extra overhead to decompress and to display the stream causes the preview to skip frames, whereby decreasing the frame rate.
|
Figure 5: Universal Camera configuration for camera 2 (partial dialog)
|
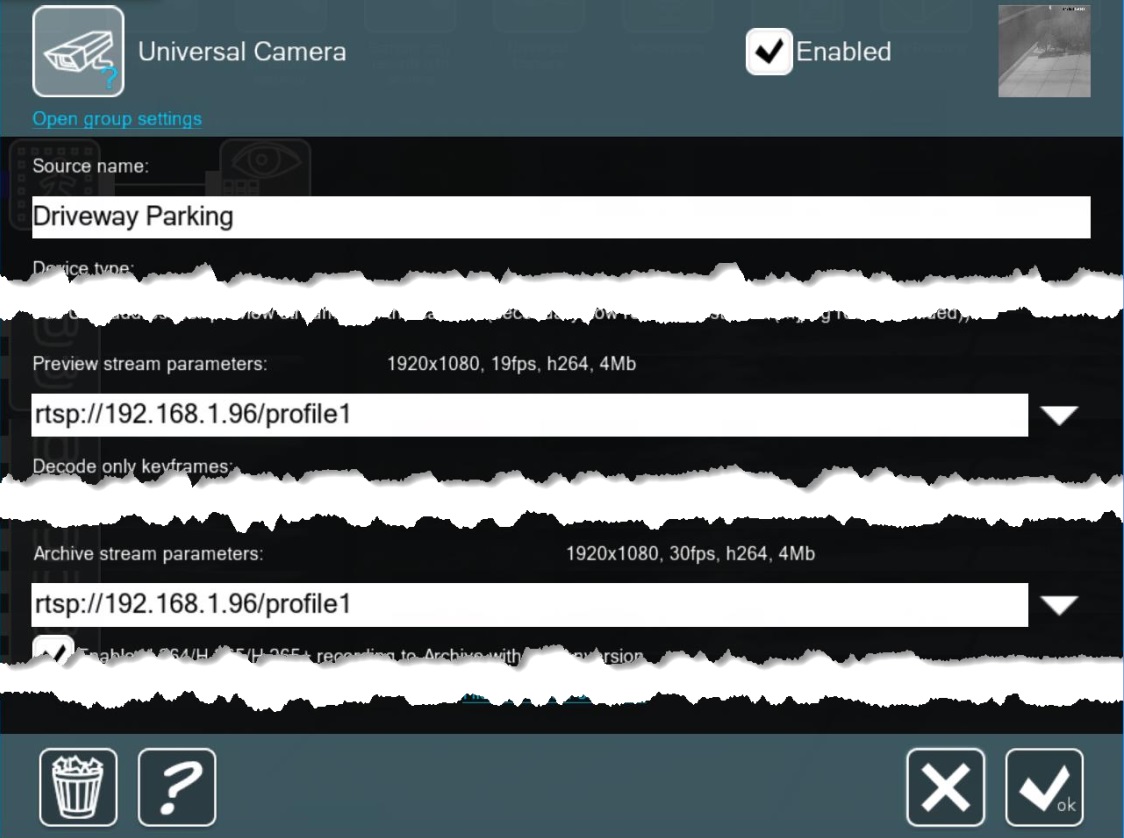
I named camera 2 “Driveway Parking”. My DHCP server reserves IP address 192.168.1.96 for this camera. The camera has 3 streaming profiles. I assigned “profile1” with 1920×1080 pixel resolution, 30 fps, and 4096 bits per image. The videos are actually compressed using the h264 protocol, so the actual network bandwidth can be better depending on the compression.
For now, I am using the same profile for both the preview image and the archive image. Notice the “Preview stream parameters” displays only 19fps while the “Archive stream parameters” displays 30fps.
Xeoma is able to archive compressed videos directly from the stream. That means Xeoma does not have to decompress the video before recording, making video files smaller and recording much faster. The preview stream, however, does decompress the video before displaying. The extra overhead to decompress and to display the stream causes the preview to skip frames, whereby decreasing the frame rate.
|
Figure 6: Universal Camera configuration for camera 3 (partial dialog)
|
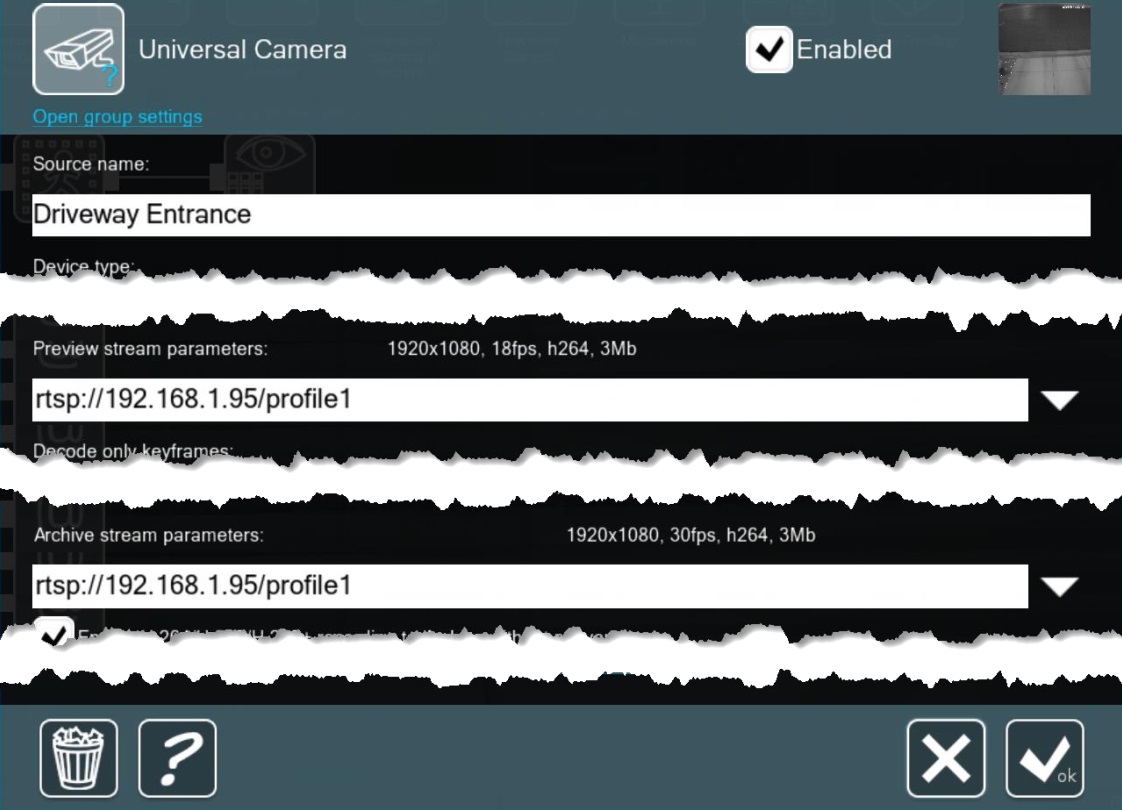
I named camera 3 “Driveway Entrance”. My DHCP server reserves IP address 192.168.1.95 for this camera. The camera has 3 streaming profiles. I assigned “profile1” with 1920×1080 pixel resolution, 30 fps, and 4096 bits per image. The videos are actually compressed using the h264 protocol, so the actual network bandwidth can be better depending on the compression.
For now, I am using the same profile for both the preview image and the archive image. Notice the “Preview stream parameters” displays only 18fps while the “Archive stream parameters” displays 30fps.
Xeoma is able to archive compressed videos directly from the stream. That means Xeoma does not have to decompress the video before recording, making video files smaller and recording much faster. The preview stream, however, does decompress the video before displaying. The extra overhead to decompress and to display the stream causes the preview to skip frames, whereby decreasing the frame rate.
|
Figure 7: Universal Camera configuration for camera 4 (partial dialog)
|
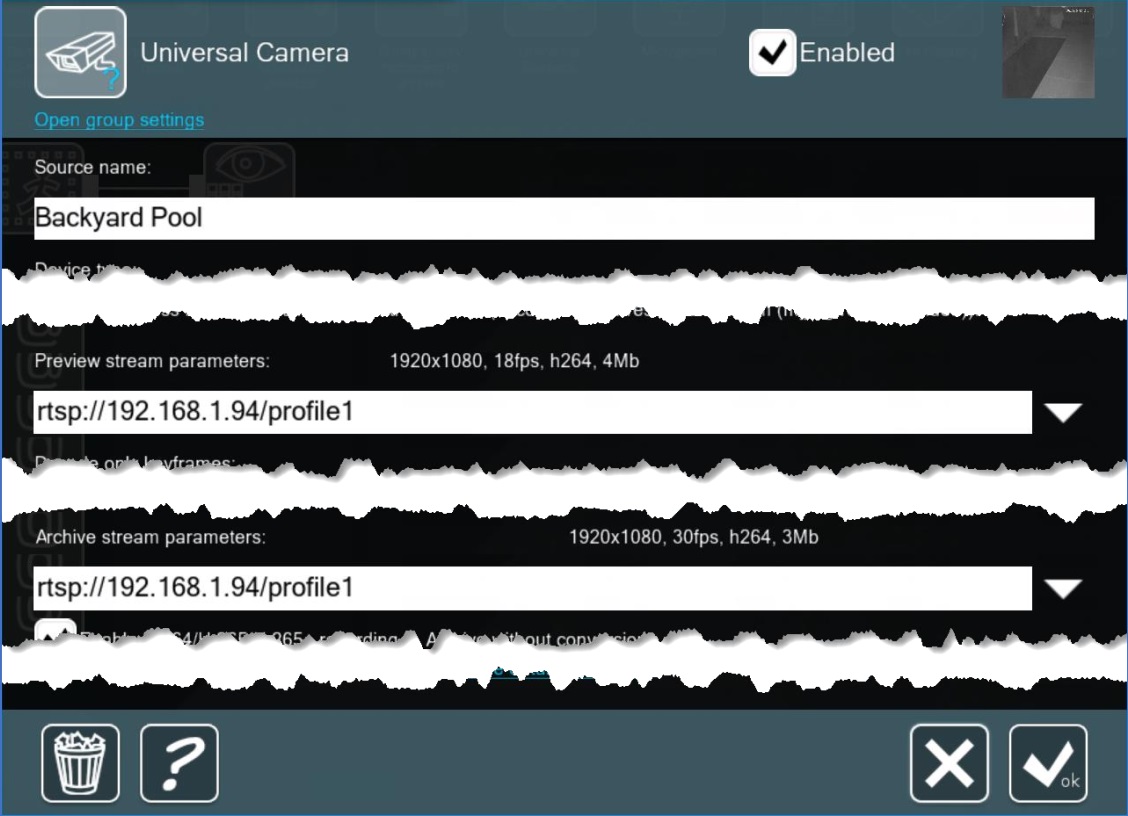
I named camera 4 “Backyard Pool”. My DHCP server reserves IP address 192.168.1.94 for this camera.
The camera has 3 streaming profiles. I assigned “profile1” with 1920×1080 pixel resolution, 30 fps, and 4096 bits per image. The videos are actually compressed using the h264 protocol, so the actual network bandwidth can be better depending on the compression.
For now, I am using the same profile for both the preview image and the archive image. Notice the “Preview stream parameters” displays only 18fps while the “Archive stream parameters” displays 30fps.
Xeoma is able to archive compressed videos directly from the stream. That means Xeoma does not have to decompress the video before recording, making video files smaller and recording much faster. The preview stream, however, does decompress the video before displaying. The extra overhead to decompress and to display the stream causes the preview to skip frames, whereby decreasing the frame rate.
Motion Detector configurations
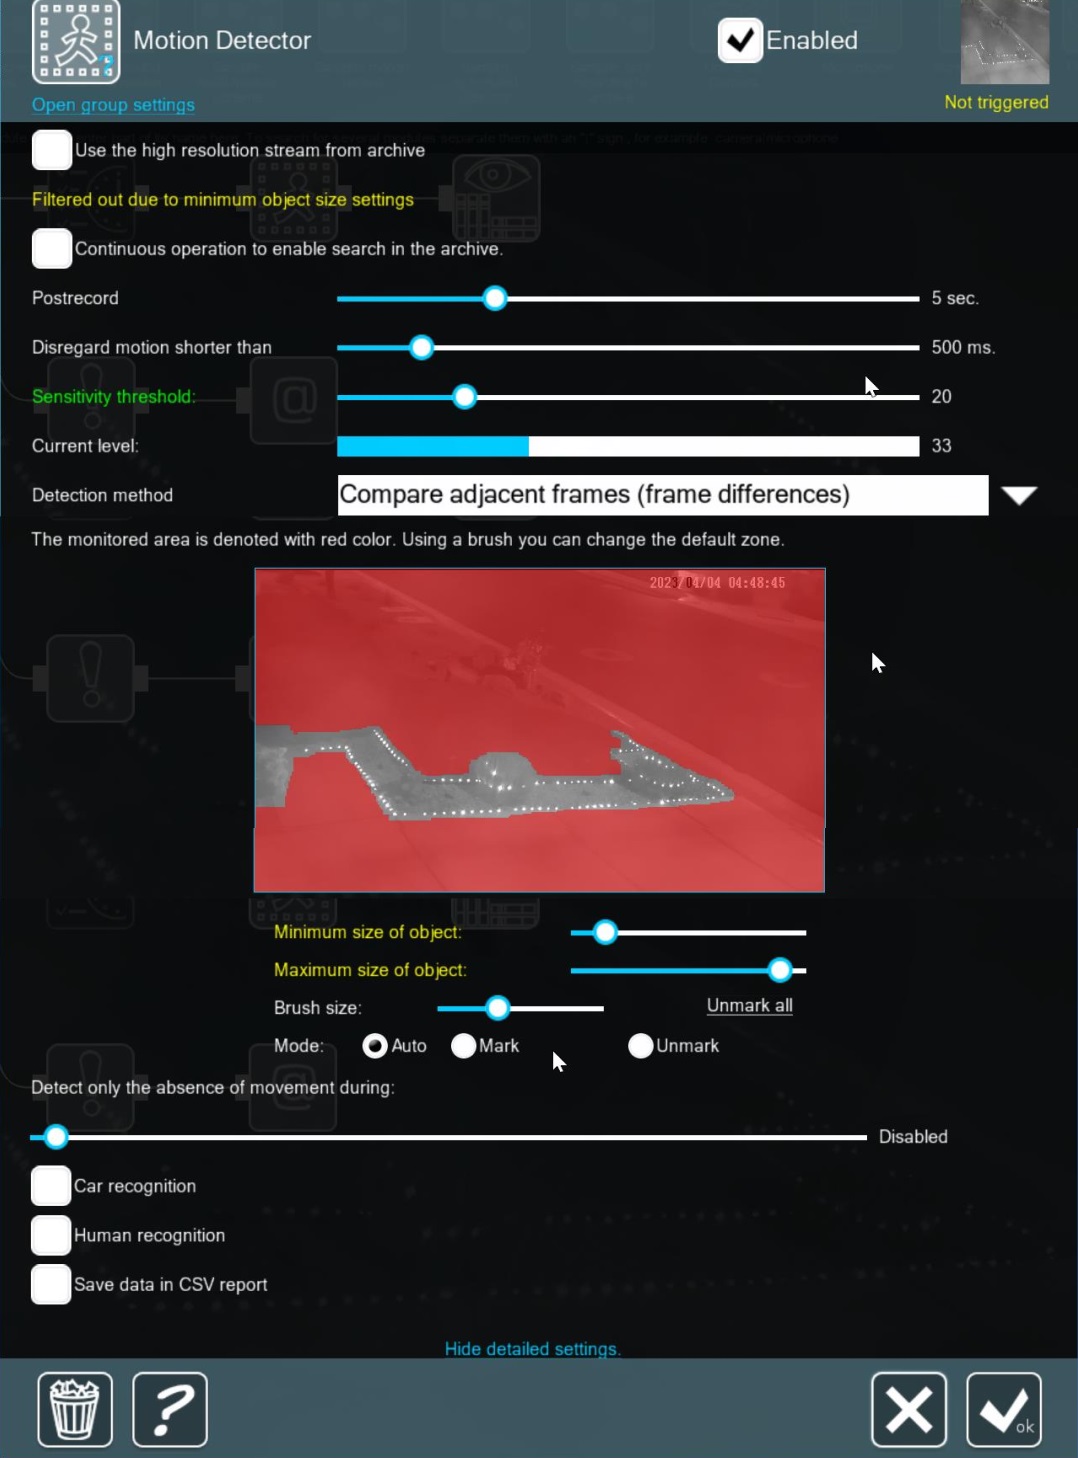
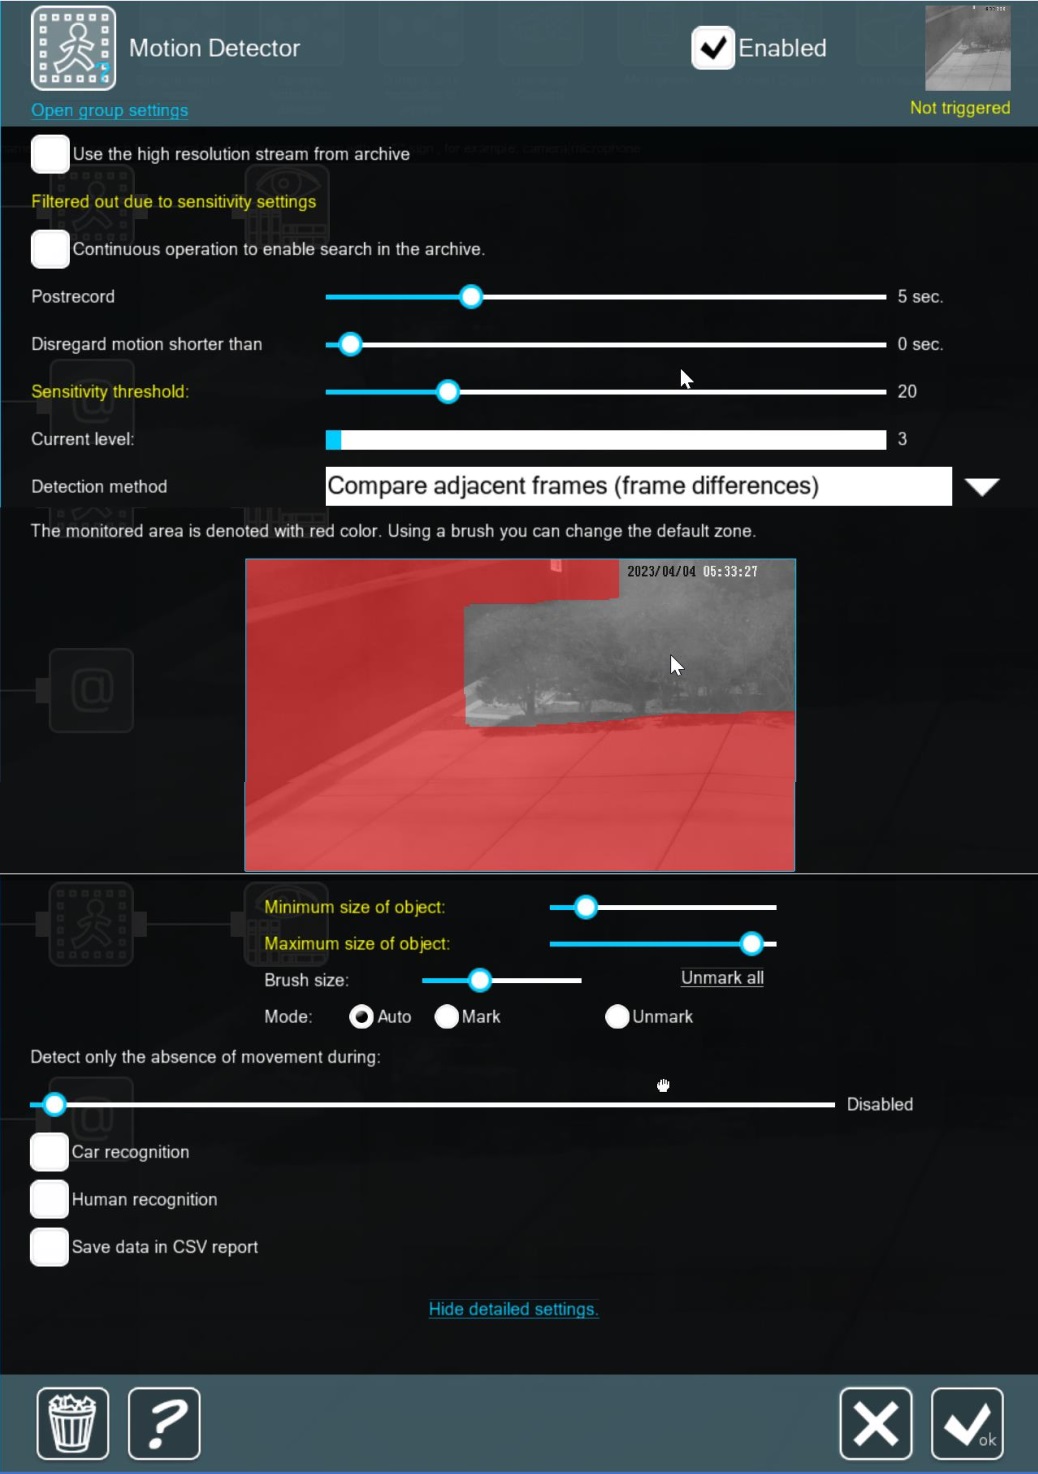
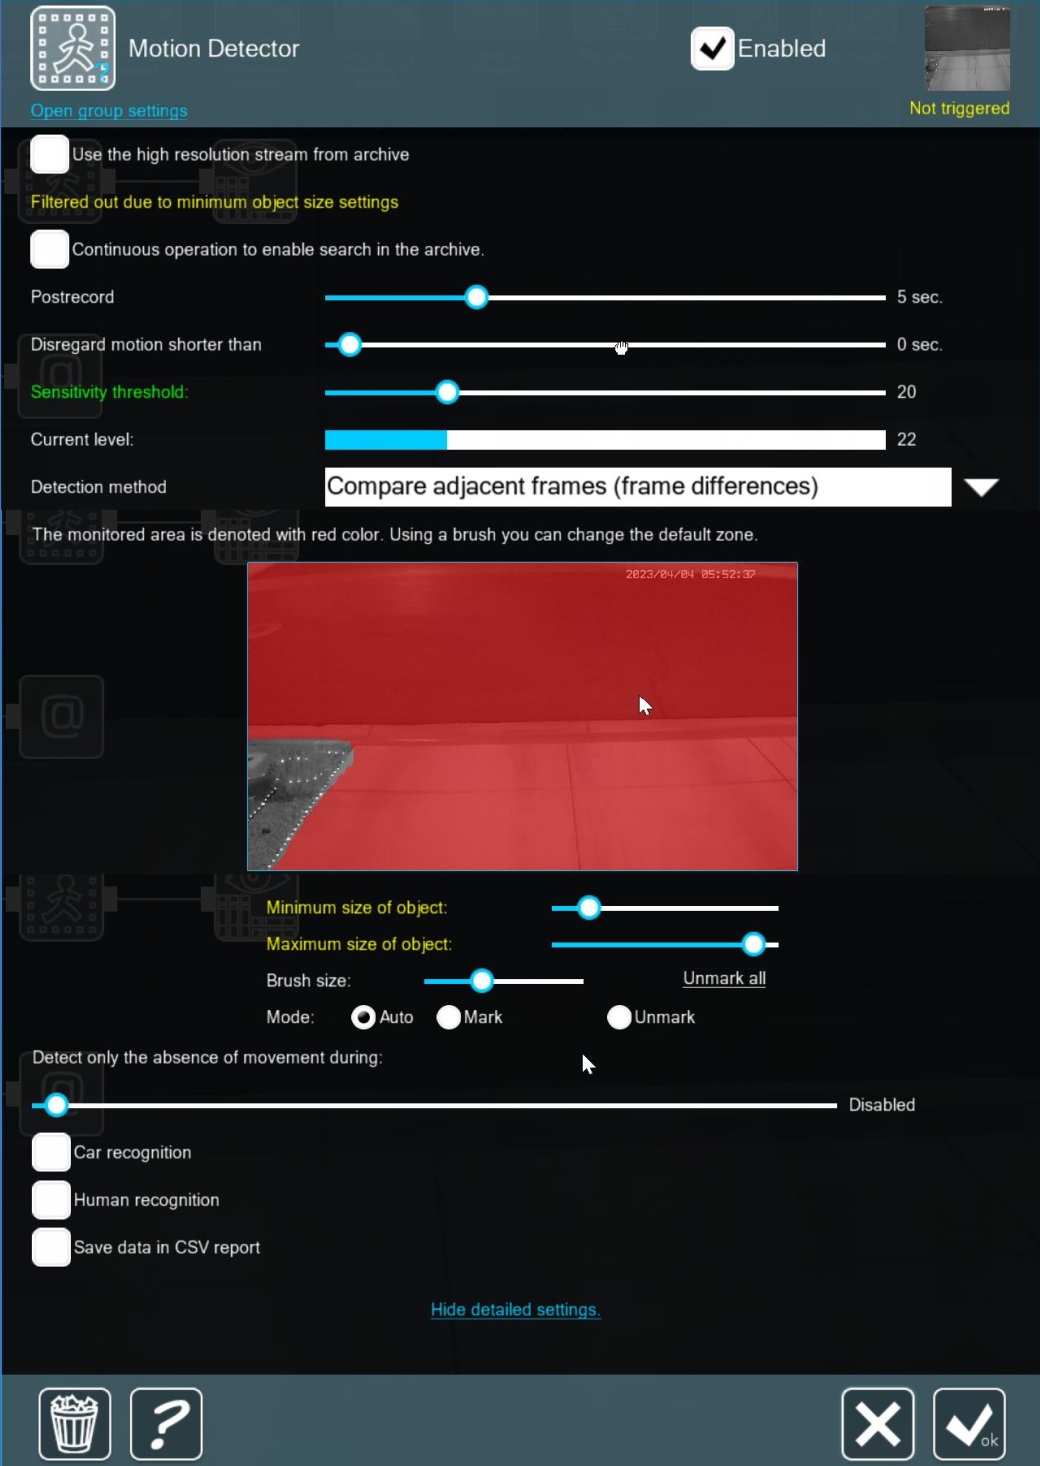
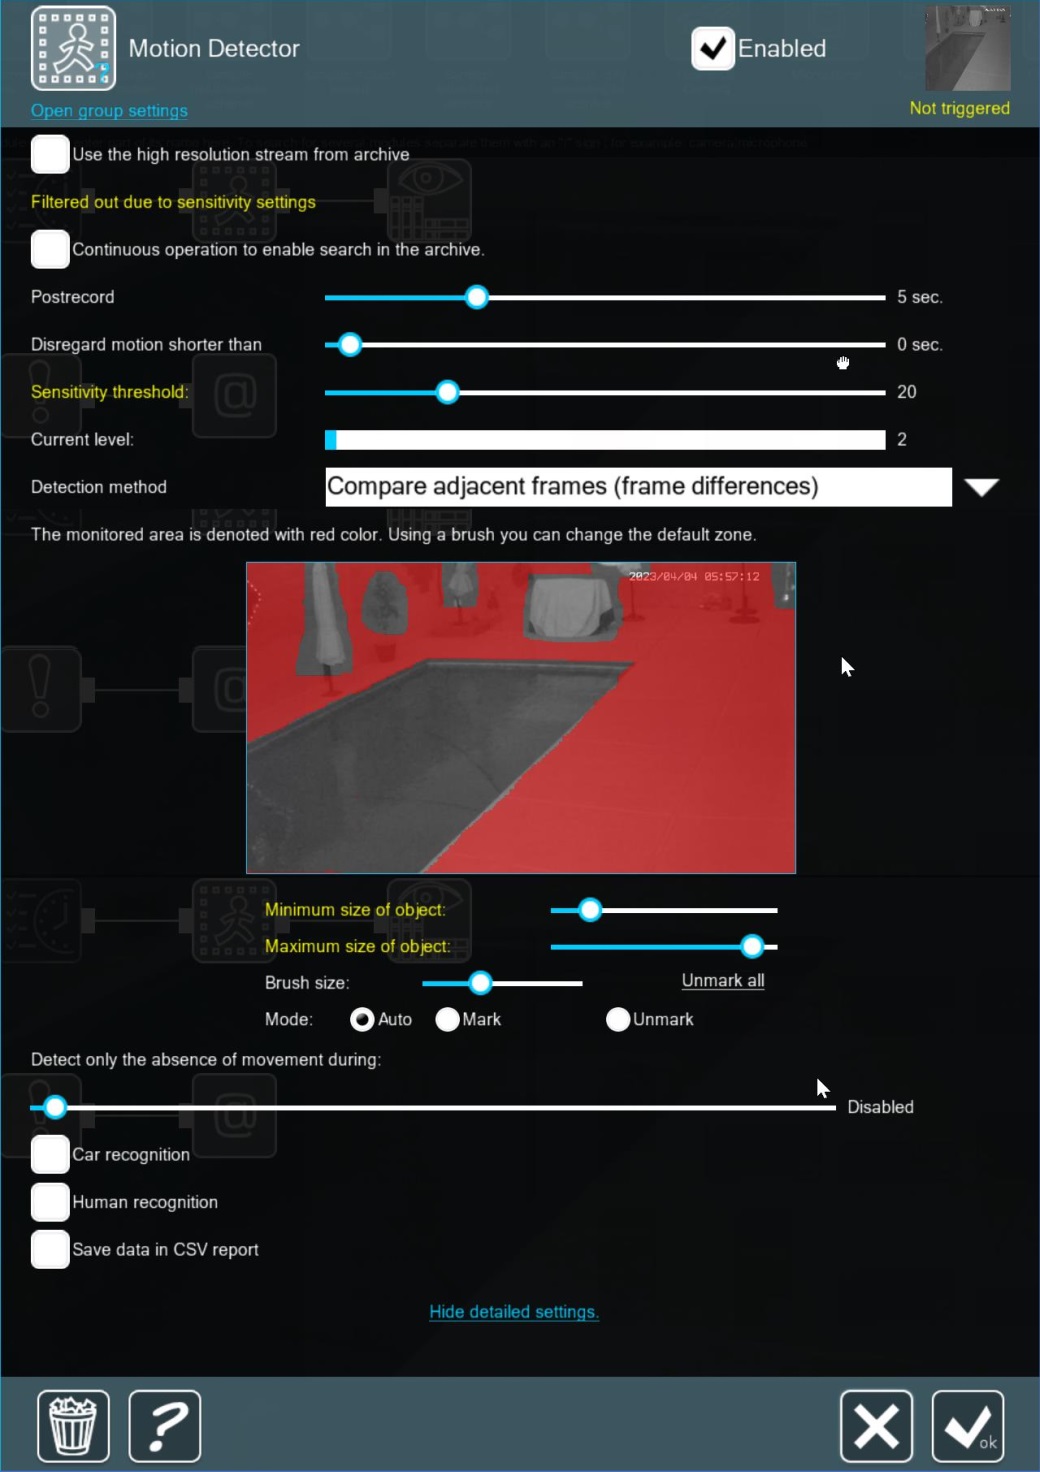
The following screenshots are the configuration dialogs for each camera. They are configured the same except for the motion detection mask. Each dialog contains an image mask. The red areas in each mask allows motion detection. The clear areas (where the image is visible) will not allow motion detection. This is actually the image mask. The image mask blocks that portion of the image from reaching the motion detector.
|
Figure 8: Motion Detector for camera 1, masks light show
|
|
Figure 9: Motion Detection for camera 2, masks bushes
|
|
Figure 10: Motion Detection for camera 3, masks light show
|
|
Figure 11: Motion Detector for camera 4, masks pool and accessories
|
|
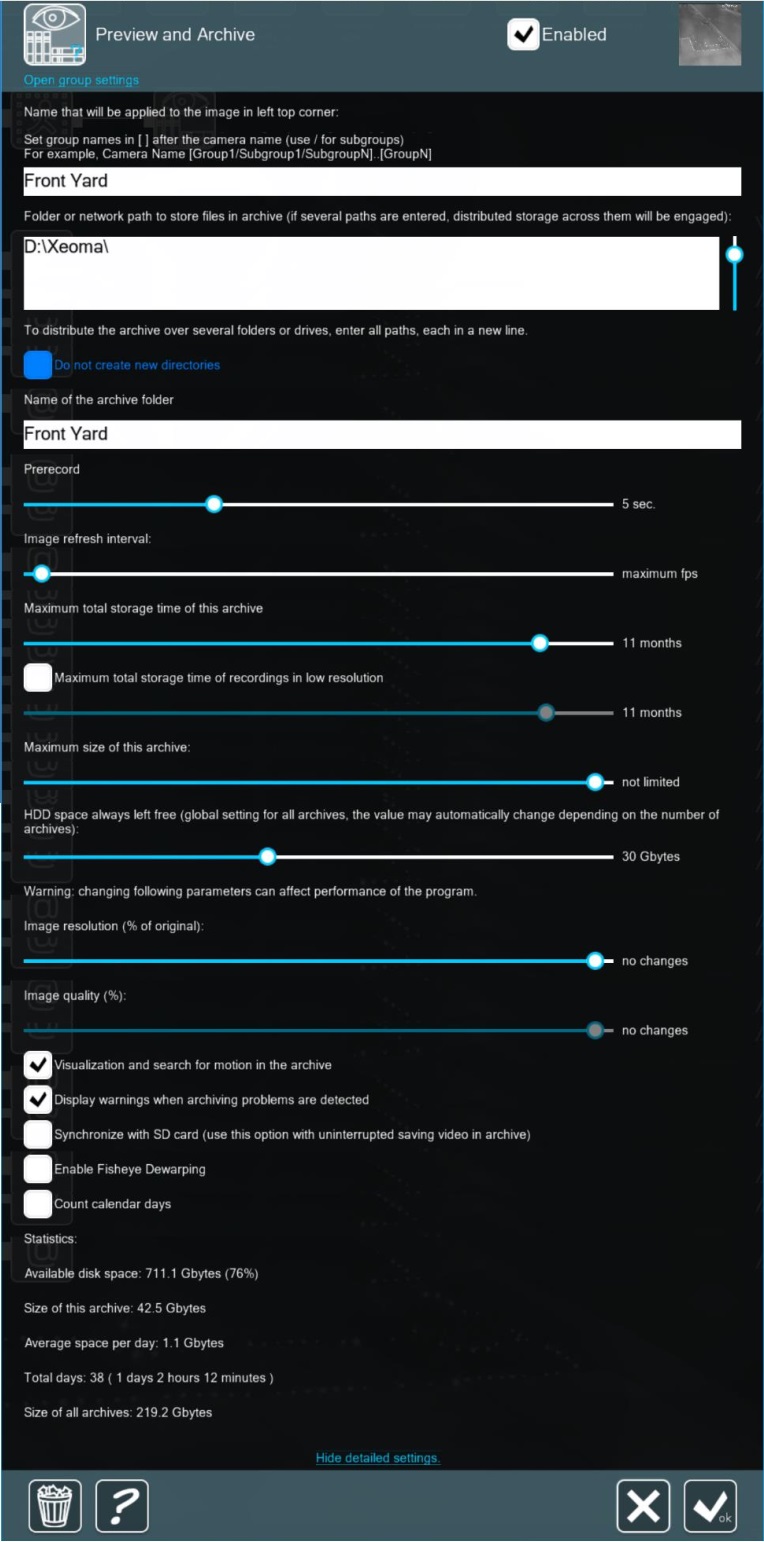
Figure 12: Preview and Archive for camera 1 (full dialog)
|
Preview and Archive configurations
The previous screenshot shows The Preview and Archive configuration dialog for camera 1. This operator is very powerful; it basically separates Xeoma from all the rest. I configured all cameras the same except for the Preview name and the Archive name.
|
Figure 13: Preview and Archive for camera 1 identification (partial dialog)
|
I assigned the preview and the archive with the same name for clarity. I installed a removable Solid-State Drive (SSD) to store all the archives. The root folder for all archives is D:\Xeoma.
|
Figure 14: Preview and Archive for camera 1 quality (partial dialog)
|
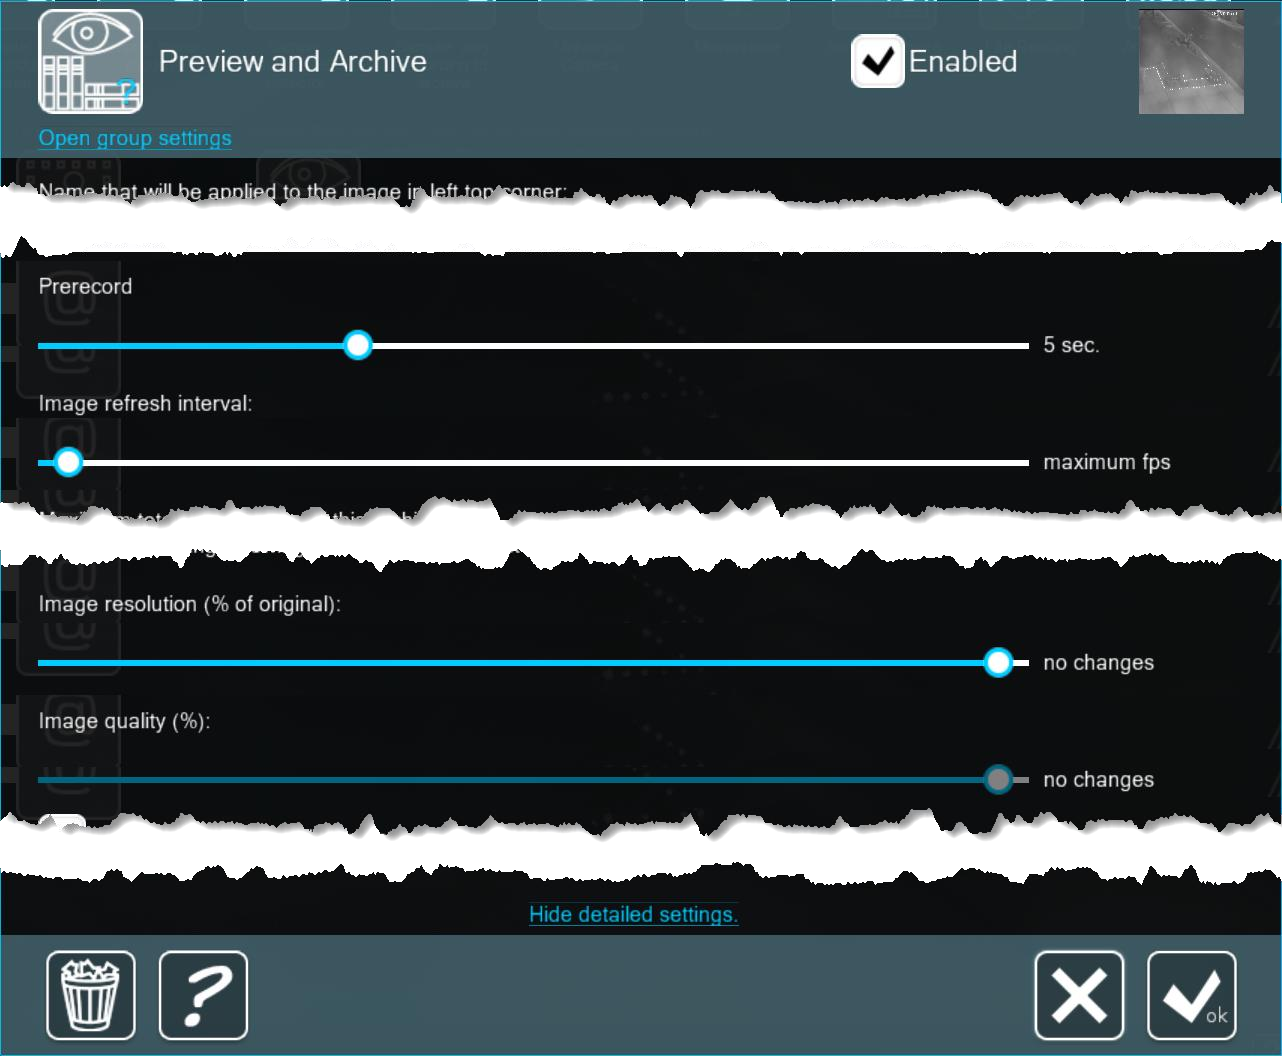
One of my important requirements is the ability to record at least 5 seconds of pre-triggered images.
This dialog allows a wide range of possible values. One thing I should probably mention is I noticed the sliders seem to have a logarithmic scale as opposed to linear. That means the left end of the slider increments with smaller steps (more resolution). As you drag the slider to the right, the values increment with larger steps (less resolution). I actually like this feature.
As mentioned before, I want my archives to contain full image resolution and all frames. So, I set the “Image resolution” to no change, the “Image quality” to no change, and the “Image refresh interval” to maximum fps.
|
Figure 15: Preview and Archive for camera 1 storage (partial dialog)
|
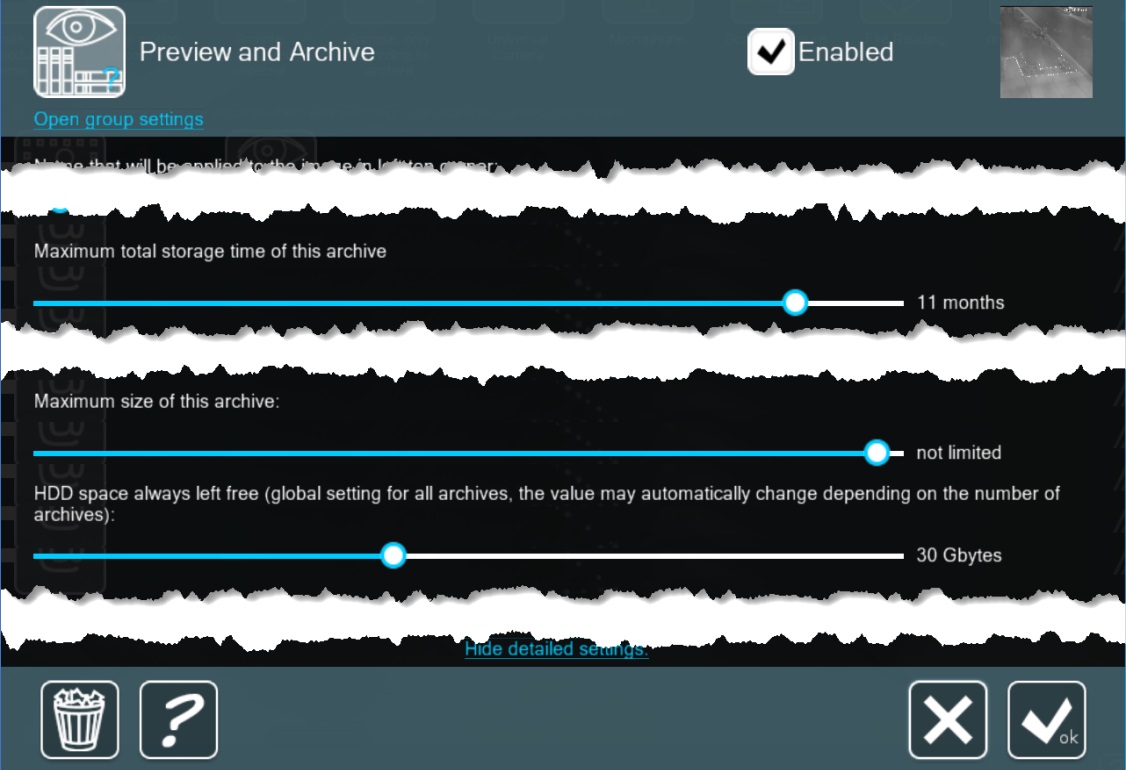
Another requirement is the ability to overwrite old recordings. This is handled by two properties:
“Maximum total storage time…” and “HDD space always left free….” In my configuration, Xeoma will begin to erase old files before writing new files either after 11 months or the SSD only has 30 GBytes remaining. I tested this feature during my evaluation by first setting the maximum time to 3 days.
Xeoma began erasing files after 3 days. Then I set the Maximum time longer, set the HDD remaining space to a large value, and copied some large files to the SSD until the drive had a few more GBytes remaining than specified. As expected, Xeoma began erasing files once the remaining GBytes equaled that specified value.
Playback
I have the cameras, the motion detection, the display, and the recordings configured for my installation.
In my opinion, however, a security system isn’t very useful unless you can search the archives and playback suspicious activities. The following screenshots demonstrate how Xeoma satisfies my requirements.
The Pro version is the only version that can synchronize all cameras during playback. All other versions only allow one camera at a time during playback.
|
Figure 16: Playback all cameras (Pro version)
|
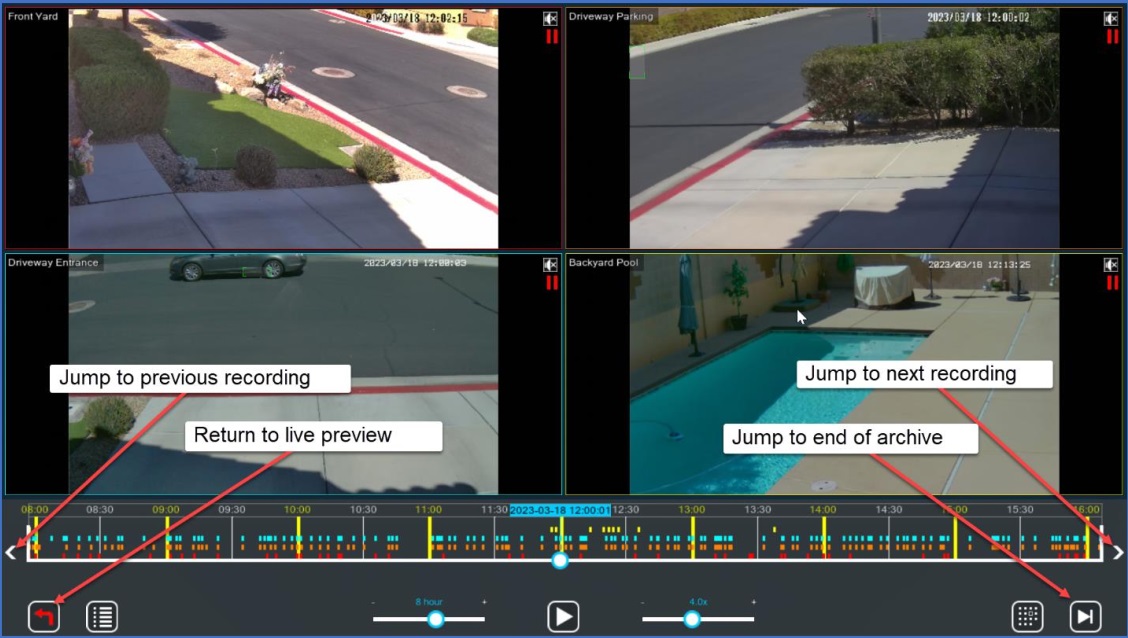
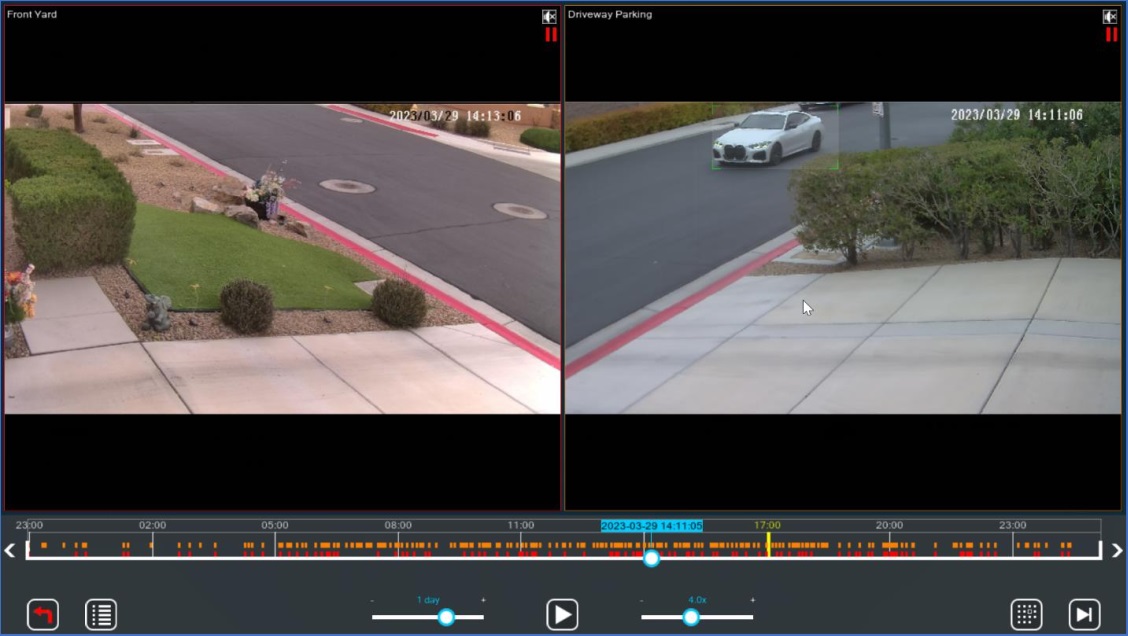
The screenshot above shows the playback screen from the Pro version with all cameras selected for playback. I paused the playback, so all four tiles indicate they are paused.
There is a left pointing arrow and a right pointing arrow to the left and right of the timeline respectfully.
These allow you to jump to the previous (left) or to the next (right) recording.
The red “back” arrow icon on the bottom-left returns the viewer to live preview.
The “end” arrow icon on the bottom-right takes you to the end of the archive.
|
Figure 17: Playback all cameras – date search (Pro version)
|
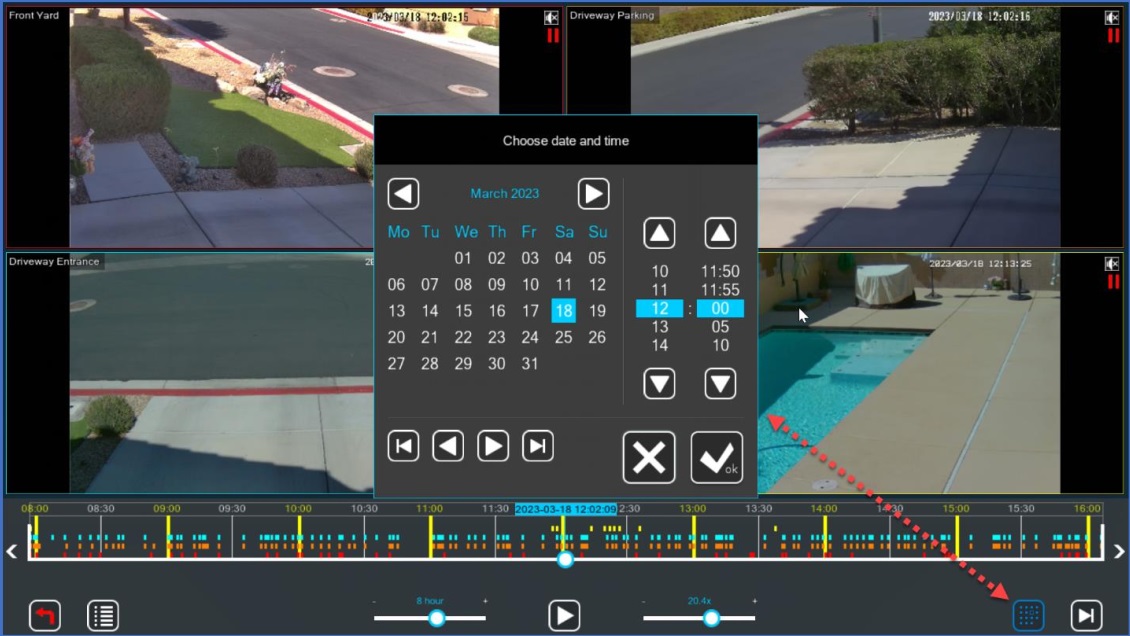
The screenshot above shows a quick method to search for recordings from a specific date and time. Simply click the dot matrix icon on the lower right to display the calendar dialog. From there you can select the date, then select the hour, and finally select the time. When finished, click the checkmark (OK) icon.
|
Figure 18: Playback all cameras – timeline (Pro version)
|
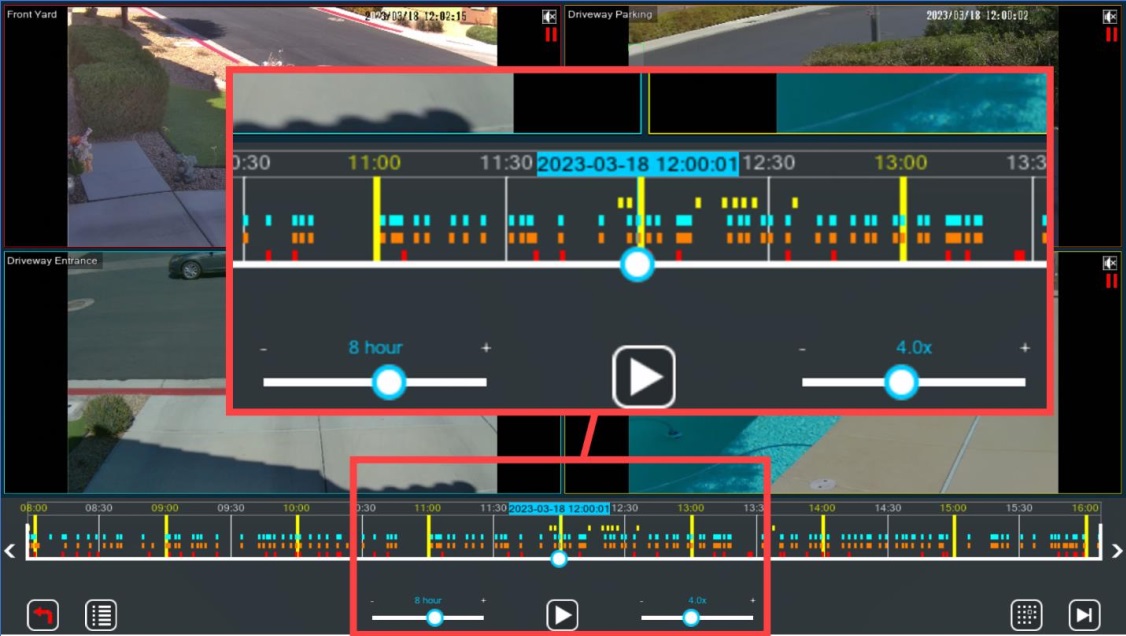
The screenshot above magnifies a portion of the timeline. The timeline scale is determined by the slider on the lower left. I have it set to 8 hours. The timeline then displays time intervals. On this display, the yellow vertical bars represent 1-hour intervals. The timeline itself is a large slider. Its handle (big circle in the middle) indicates the date and time of the displayed recordings. Click the “Play” icon to playback the recordings. The speed of the player can be adjusted by the slider on the lower right. I have mine set to 4.0x, meaning it will playback 4 times the recorded speed (my archives record at 30fps, so this playback session will play at 120fps).
The timeline also displays four rows of colored rectangles. Each rectangle represents an archive segment. Each row represents the archive segments for a specific camera. The red row represents the top-left archive. The orange row represents the top-right archive. The cyan row represents the bottom-left archive, The yellow row represents the bottom-right archive.
|
Figure 19: Playback all cameras – archive menu (Pro version)
|
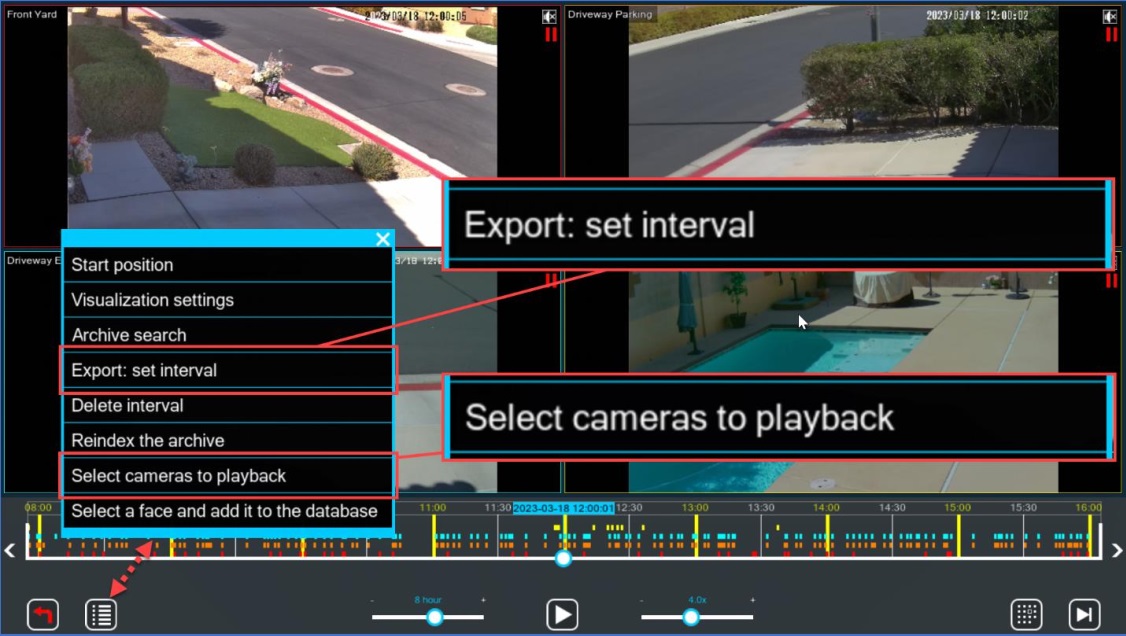
The screenshot above shows the Archive menu. Click the menu icon on the lower left to view the menu.
The two items I’m interested in are the “Export…” and the “Select cameras….” The “Select cameras to playback” menu item does exactly that. You can select this item and then click on
the camera views to select cameras for playback. The Pro version allows you to select more than one camera.
The “Export: set interval” menu item allows you to save a section of the archive to a new movie file. This is the essential feature. Once you have identified the section of the archive you are interested in, you can bracket it and export a movie file to distribute to the police, security, or anyone else that may be interested.
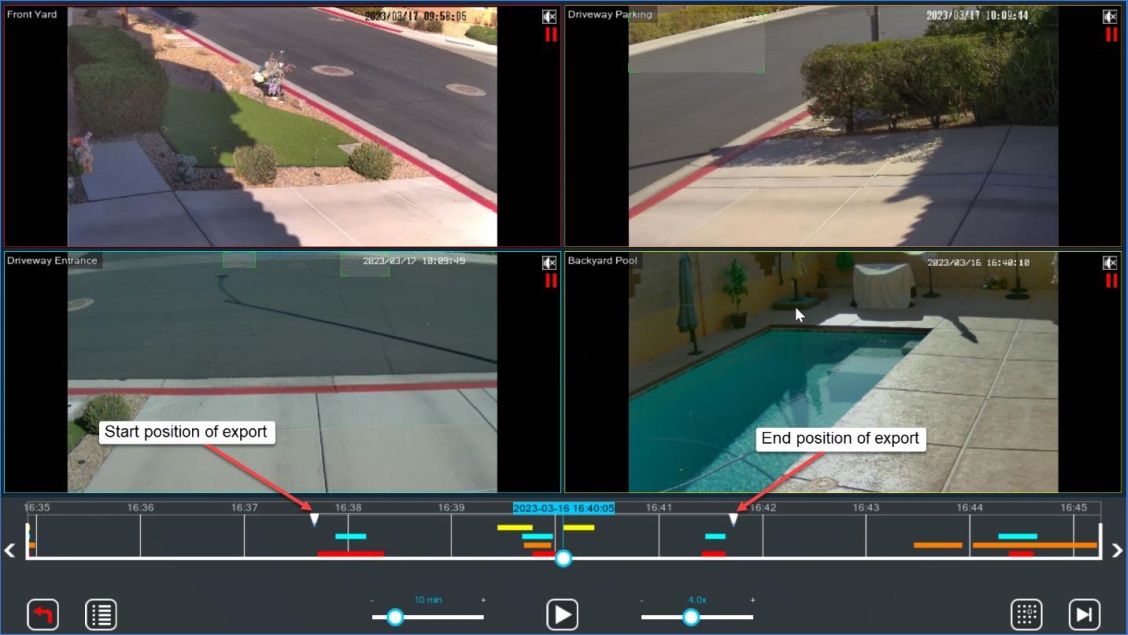
To create a movie, you need to make sure the entire segment fits on the current timeline. You may need to adjust the timeline’s scale. It’s also best to adjust the scale so the segment consumes most of the timeline. This allows you the best resolution for setting the start and end positions of the movie.
|
Figure 20: Playback all cameras – Export: set interval
|
I adjusted the timeline scale to 10 minutes. Then I clicked on the “Export: set interval” menu item. As seen in the screenshot above, two downward pointing triangles appear at the top of the timeline. These markers are used to set the interval for the exported movie file(s). Drag the marker on the left to set the start position of the export. Then drag the marker on the right to set the end position of the export.
|
Figure 21: Playback all cameras – Export the segment
|
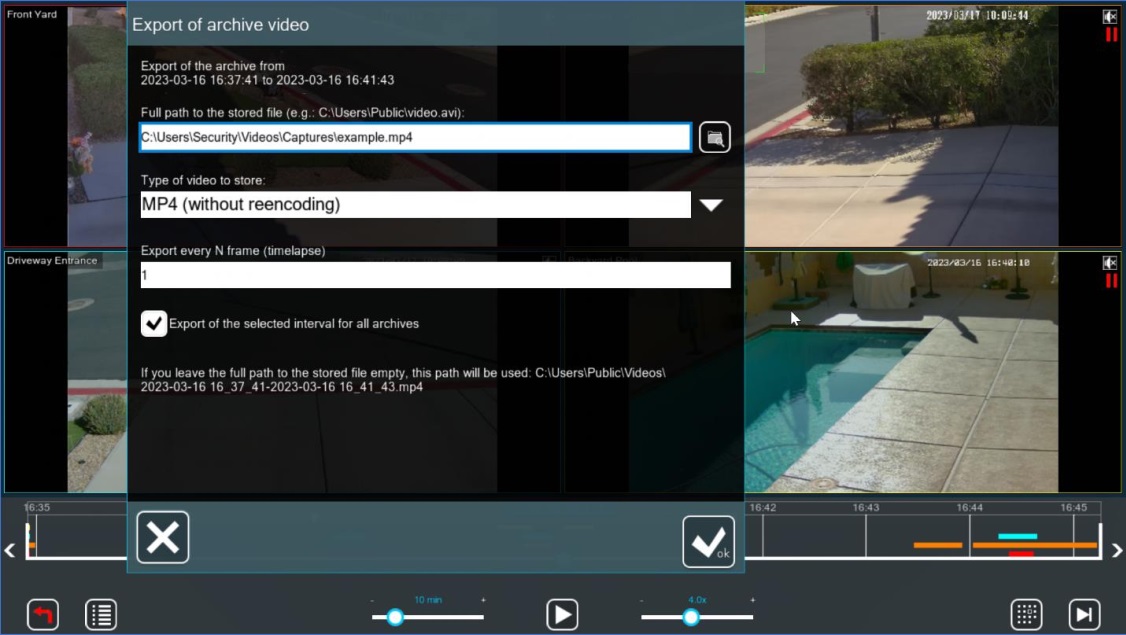
When you are satisfied with the selected interval, click the menu icon again. This time the export menu item changes to “Export the segment.” Click the menu item and a dialog will appear similar to the dialog on the screenshot above. Here you can edit the full path of the new movie file, select the file type, the frame interval, and whether to save all camera archives with the same selected interval.
I set the file name to example, the file type to MP4 (without reencoding), the frame interval to 1 (this means to write every frame), and I checked the “Export of the selected interval to all archives.” Xeoma created four movie files after I clicked on the checkmark icon. Each filename was prepended with the archive name specified in the “Preview and Archive” dialog.
|
Figure 22: Playback two cameras (Pro version)
|
The screenshot above shows a playback of two archives. Notice the timeline only displays two rows of recorded segments.
|
Figure 23: Playback camera 2
|
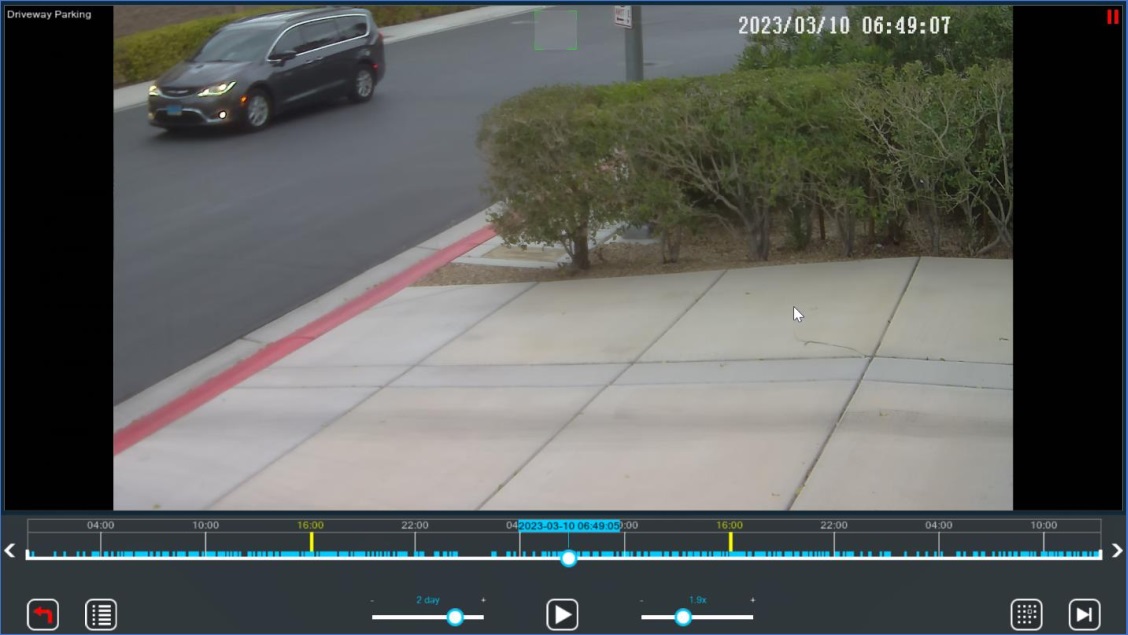
The screenshot above shows the playback of a single camera. Notice the timeline only displays one row of recorded segments.
|
Figure 24: Playback camera 1, live cameras 2-4
|
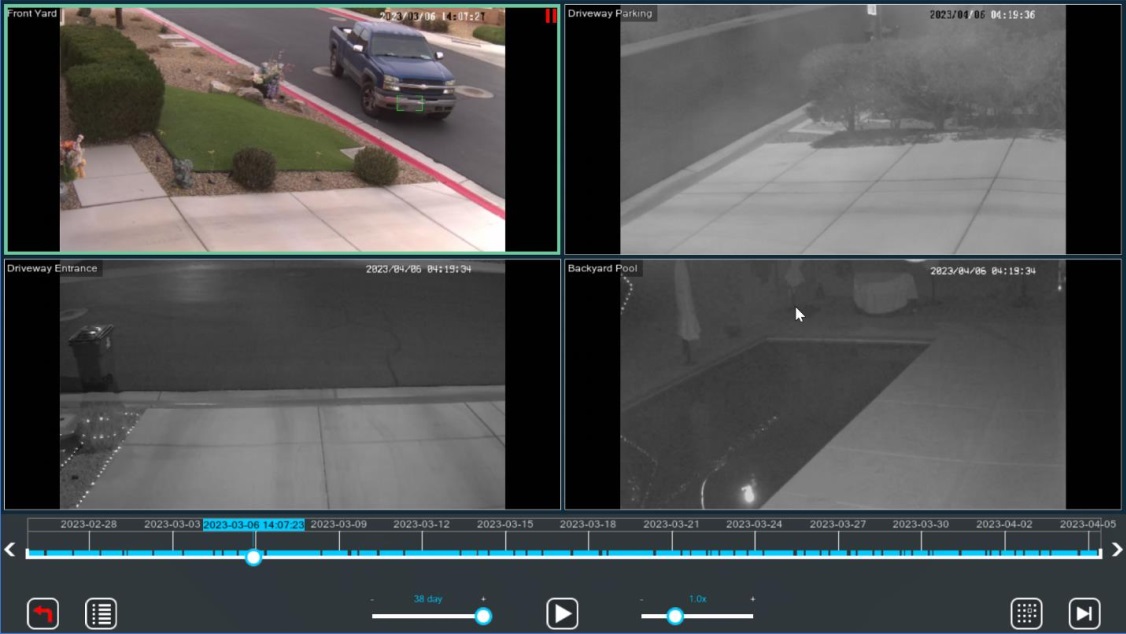
If you start the playback by clicking on the “Play” icon displayed at the upper right corner of a camera tile, you should see a screen similar to the above screenshot. Here I am able to playback recordings of one archive (in this case, camera 1) while watching the other cameras in live preview mode.
|
Figure 25: Remote access – connect to
|
Remote access
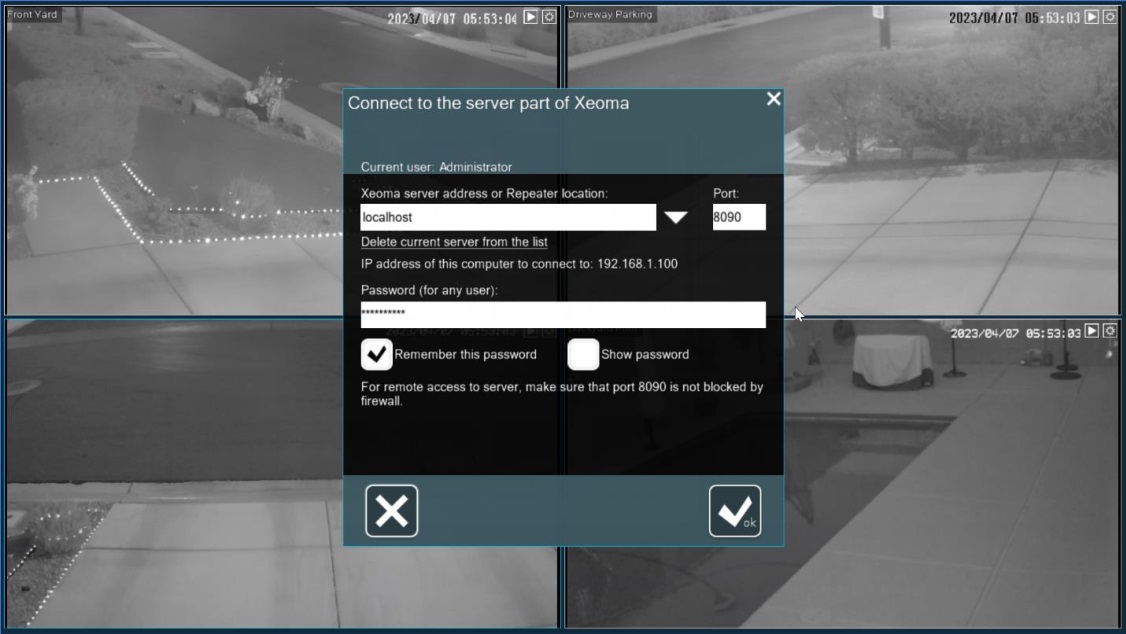
From the main menu, you can select “Remote access,” which then displays a second menu where you can click on “Connect to.” The screenshot above shows the dialog for configuring remote access.
Remote access uses IP port 8090 by default (this can be changed). Xeoma creates a default secure password. You need to check the box labeled “Show password” and write it down (or you can create your own).
To connect from a device within your LAN, you would simply use the IP address and port specified in the dialog. Before you can connect from a device outside your LAN, you need to configure your router to route incoming messages through the specified port to the server’s local IP address. Then connect using the IP address assigned by your ISP and use the port specified in this dialog.
I downloaded a client app to my tablet and one to my mobile phone. I use my tablet for monitoring my cameras from my family room. It uses WiFi and is part of my LAN, so I connected using the local IP address for the server. I want to use my mobile device from outside my LAN, so it connects using the IP address assigned by my ISP. Both devices work great and I can see all four cameras on the one screen.
I feel comfortable since connecting to the server requires a client application, knowledge of the IP port, and (most importantly) a secure password.
Conclusion
Xeoma is the best software-based NVR I was able to find. It meets all my requirements and exceeds my expectations. Xeoma has many features and capabilities I do not use at this time, but I plan to explore some more in the near future. I highly recommend installing Xeoma and giving it a try. It is better than a hardware NVR solution and it can be upgraded. A hardware NVR will eventually become outdated and you’ll be forced to purchase a new system someday, whereby having to reconfigure and somehow transfer your data. Xeoma can be updated as new technologies and features are implemented and you won’t need to lose any settings nor your data.
April 7, 2023
