A guide to effective use of the command line, console, and terminal
Xeoma video surveillance software runs on various operating systems, including Linux. It can be operated from the console in server mode, without a graphical user interface. A wide range of commands is available for managing Xeoma through the console.
Installing Xeoma on Linux | List of supported console commands
Command prompt: basic operation
Example in screenshots
Main console commands
Access rights in Linux
What is root in Linux?
How to create a simple script

Let’s clarify the concepts:
-
A console is a system that provides a text-based interface for managing an operating system.
The command line is essentially an input field within this interface where the user enters commands.
A terminal is an application that emulates a physical console by creating a window for accessing it.
In basic terms, a terminal provides access to a console where you interact with your computer through the command line. In this article, we’ll help you understand these concepts better and expand your computer management capabilities.
You might be wondering: why do I need to use a console if there’s a graphical interface? However, there are a number of situations where a console is preferable, or sometimes it is the only option. For example, we often encounter situations where a video surveillance server is deployed on a machine without a graphical interface. In such cases, using a console is the only way to manage the Xeoma video surveillance software server locally. Knowing basic console commands ensures effective operation in any Linux environment and opens the possibility of using these same commands in other OSes.
Avoid using unfamiliar commands to avoid taking unnecessary risks. If a command isn't found, you can find and install the relevant utility or library from the repositories. The terminal has built-in help (man or help commands). Always check the path before running potentially dangerous commands (like file/folder deletion) and regularly backup important data.
Command prompt: Basic Operation
The command line is available for various operating systems (Windows, macOS, Linux), and its operating principles are roughly the same across all operating systems.
How to open and run the command prompt (terminal):
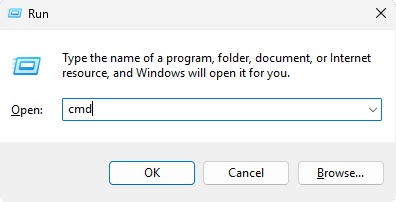
![]() Windows: Press Win + R, type cmd, and press Enter. Alternatively, search for “Command Prompt” in the Start menu. For PowerShell, search for “PowerShell.” (Note: PowerShell is a powerful command-line scripting language based on the .NET Framework, developed by Microsoft.)
Windows: Press Win + R, type cmd, and press Enter. Alternatively, search for “Command Prompt” in the Start menu. For PowerShell, search for “PowerShell.” (Note: PowerShell is a powerful command-line scripting language based on the .NET Framework, developed by Microsoft.)
![]() macOS: Open Finder – go to the Applications folder – then to the Utilities folder – inside you will find the Terminal application (path: /Applications/Utilities). Alternatively: Press Command + Space (⌘ + Space) to open Spotlight – type “Terminal” – press Enter.
macOS: Open Finder – go to the Applications folder – then to the Utilities folder – inside you will find the Terminal application (path: /Applications/Utilities). Alternatively: Press Command + Space (⌘ + Space) to open Spotlight – type “Terminal” – press Enter.
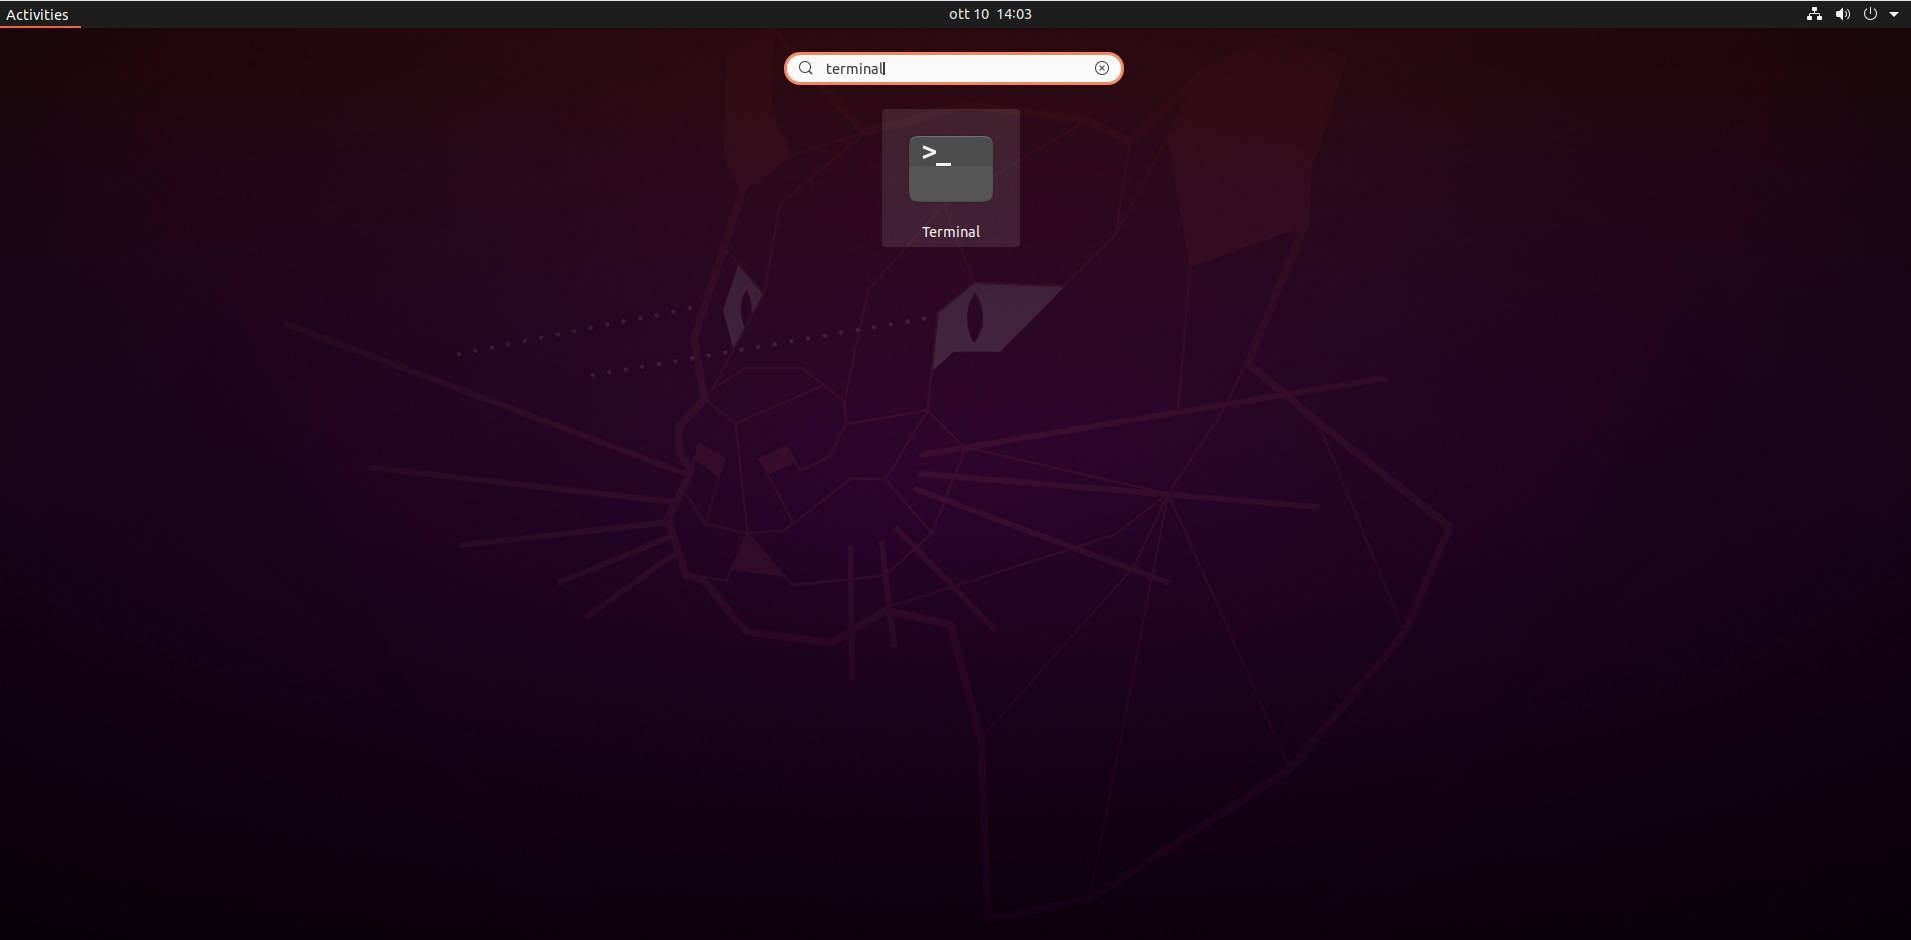
![]() Linux: On most distributions, you can find the terminal in the application menu or open it by pressing Ctrl + Alt + T (sometimes Ctrl + Shift + T is used, especially on distributions with XFCE). Alternatively: Look for “Terminal”, “Console”, or something similar in the application menu (it is often located under the “System”, “Utilities”, or “Administration” category) – click on this item to open a terminal window.
Linux: On most distributions, you can find the terminal in the application menu or open it by pressing Ctrl + Alt + T (sometimes Ctrl + Shift + T is used, especially on distributions with XFCE). Alternatively: Look for “Terminal”, “Console”, or something similar in the application menu (it is often located under the “System”, “Utilities”, or “Administration” category) – click on this item to open a terminal window.
Differences between different operating systems:
Windows: Uses cmd (Command Prompt) and PowerShell. PowerShell is a more powerful shell with an object-oriented approach. The syntax of some commands differs from Linux/macOS.
macOS and Linux: Use the Bash (Bourne Again Shell) shell by default. Command syntax is generally compatible between the two systems.
1. Open the Command Prompt
Windows: Press Win + R, type cmd, and press Enter. Or search for “Command Prompt” in the Start menu.
macOS/Linux: Find the Terminal app in the Applications menu or use a keyboard shortcut, such as Ctrl + Alt + T in Linux.
2. Get Started
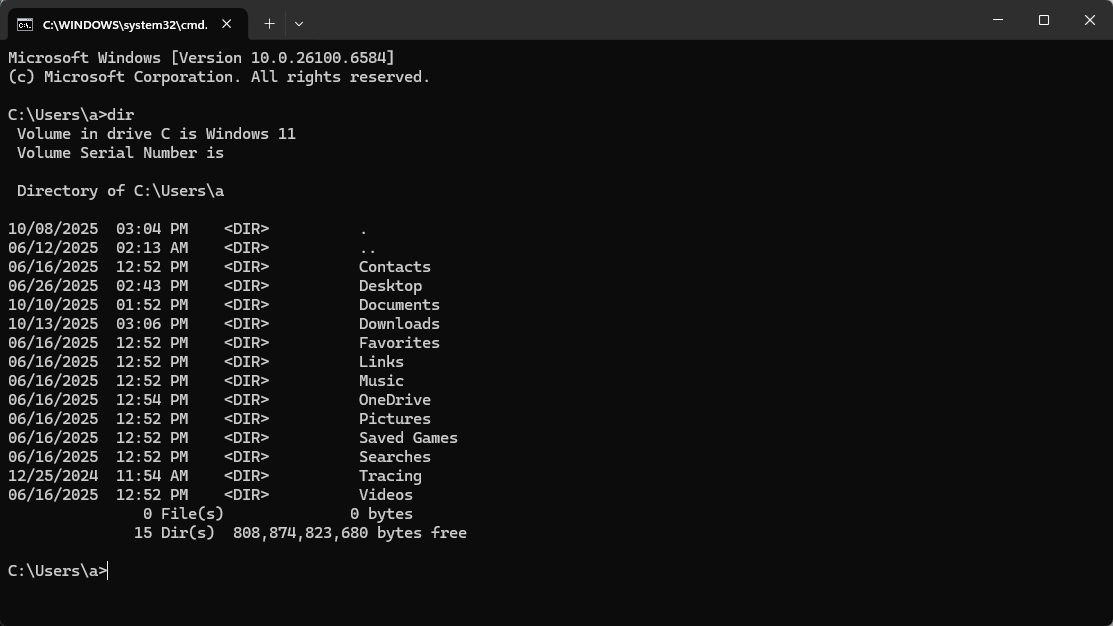
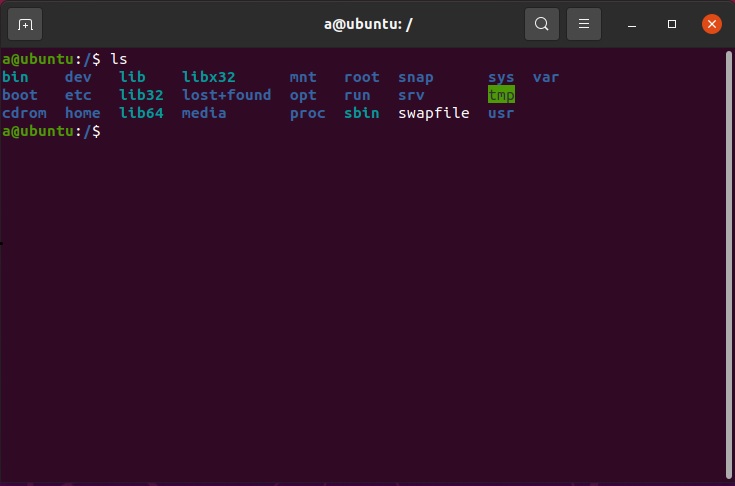
Once the console opens, you’ll see a command prompt where you can enter commands. For example, to see a list of files and folders in the current directory, type dir (Windows) or ls (macOS/Linux) and press Enter.
Windows:
macOS/Linux:
3. Exit the console
Type exit and press Enter.
Windows:
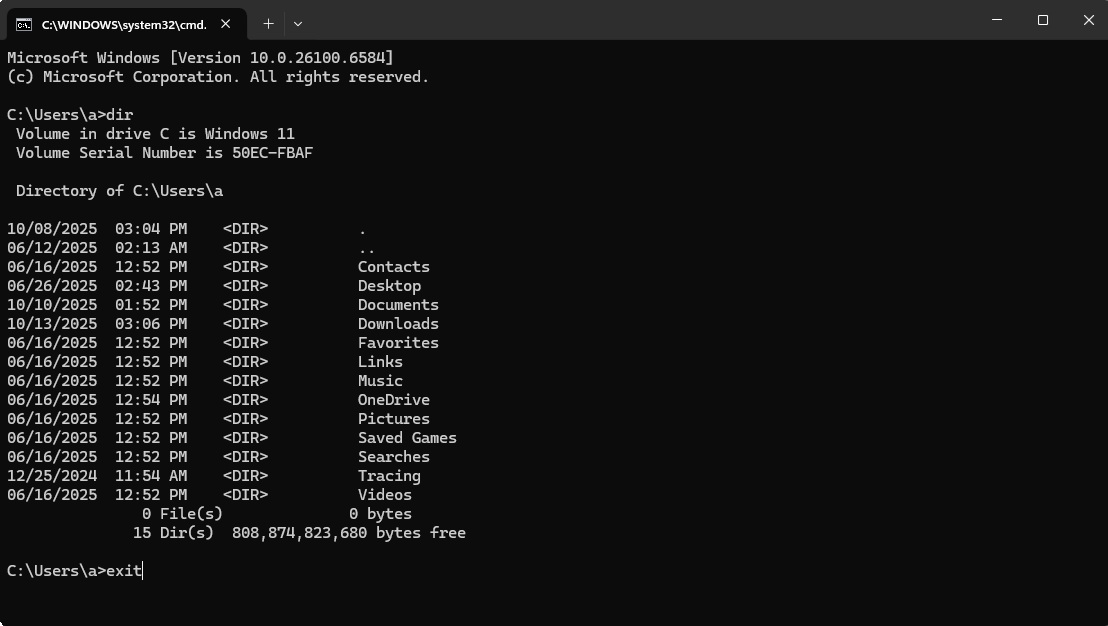
macOS/Linux:
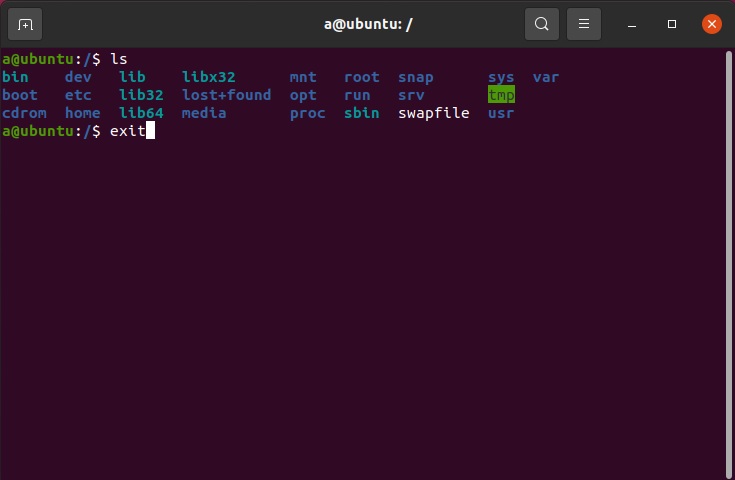
Main console commands:
Below you'll find a list of essential console commands (Linux, macOS, and some Windows PowerShell commands), divided into groups. There may be slight differences in the commands between systems. There are many other useful commands and options you can explore as needed.
1. Navigating the file system:
pwd (print working directory): Shows the current directory.
ls (list): Shows the contents of the current directory. Add -l for verbose output (long listing with permissions, owner, size, and modification date), -a to show hidden files (those starting with a dot), and -h to show file sizes in a more readable format (e.g., KB, MB, GB).
cd: Change directory. For example, cd Documents will change to the "Documents" folder. cd ..: Go up one level, cd ~: Go to the home directory, cd /: Go to the root directory.
mkdir: Creates a new directory (Make Directory). For example, mkdir my_new_folder.
rmdir: Removes an empty directory (Remove Directory). For example, rmdir empty_folder.
rm: Deletes files and directories. Be careful, deleted files are usually irrecoverable! For example, rm my_file.txt. rm -r my_directory: Deletes a directory and all its contents recursively, rm -f my_file.txt: Forcefully deletes a file, without asking for confirmation.
cp: Copies files and directories. For example, cp my_file.txt new_file.txt.
mv: Moves or renames files and directories. Example: mv old_file.txt new_file.txt.
2. Working with Files:
cat: Displays the contents of a file on the screen. For example, cat my_file.txt.
more/ less: View the contents of a file page by page. Example: less my_file.txt (a more advanced version).
head: Displays the first few lines of a file (default 10). head -n 20 my_file.txt (display the first 20 lines)
tail: Displays the last few lines of a file (default 10). tail -f my_file.log (monitor file changes in real time)
echo: Displays text on the screen. echo "Hello, world!"
grep: Searches for lines matching a given pattern. For example, grep "keyword" my_file.txt.
wc: Counts the number of lines, words, and characters in a file. For example: wc my_file.txt
touch: Creates an empty file or changes the last access time of an existing file. For example, touch my_new_file.txt.
3. Process Management:
ps: Lists running processes. ps aux: Shows all processes, including those started by other users.
top (Table Of Processes): Updates active processes every 2 seconds. The PID column indicates the process ID, USER indicates the user, etc. There are also more advanced terminal utilities on Linux—atop and htop. They display not only active processes with a two-second update, but also monitor boot time and more. These utilities are useful for system administrators, but for the average user, they're overkill.
kill: Terminates a process by its process identifier (PID). For example, kill 1234. pkill: Kills a process by its name; killall: Kills all processes with the specified name. For example, killall firefox.
4. Network:
ping: Tests connectivity to a remote host. For example, ping google.com.
ifconfig/ ip addr: Displays information about network interfaces.
netstat: Displays network connections and statistics.
ssh: Connects to a remote host via SSH. Example: ssh user@remote_host.
5. Other:
man: Opens the man page for a command. For example, man ls will display help for the ls command.
history: Displays the command history.
clear: Clears the screen.
exit: Closes the console.
sudo: Runs a command as the superuser (root). Example: sudo apt update (password required)
whoami: Displays information about the currently logged in user.
I/O Redirection:
>: Redirects the command output to a file (overwriting the existing file). For example, ls > file.txt will save the list of files to file.txt.
>>: Redirects the command output to a file (appends to an existing file).
<: Redirects the contents of a file to the command as input.
Tips for Beginners:
– Use autocompletion: Start typing a command and press Tab to autocomplete the command or file name.
– Use the up and down arrow keys to view the command history.
– Explore the help system using the man command (or help in Windows) to get information about any command.
– Create test directories and files to try out different commands without risking system corruption.
– Use web search if you don’t know how to perform a specific task.
If an error occurs
- Make sure you typed the command correctly
- Check the path specified
- Check permissions
- Restart the console if necessary
Advantages of using the command line:
Efficiency: Many tasks can be completed faster using the command line than using the graphical interface.
Automation: You can create scripts to automate tasks.
Remote access: The command line allows you to manage a server or computer remotely.
Flexibility: The command line provides access to a wider range of tools and functions than the graphical interface.
While the command line, console, and terminal may seem complex, they significantly expand your ability to manage your computer. Don’t be afraid to start small, practice, and you’ll easily master these powerful tools.
In Linux, permissions determine who can do what with files and folders—who can view, modify, delete, or execute them.
There are three main types of permissions:
Read (r) – the ability to view the contents of a file or directory
Write (w) – the ability to modify the contents of a file or create files in a directory
Execute (x) – the ability to run a file as a program or enter a directory
User categories:
Owner (u) – the user who created the file
Group (g) – the user group to which the file belongs
Others (O) – all other users on the system
To change permissions, use the chmod command. Permissions are specified in numeric or symbolic format.
Tips:
– Always check current permissions with ls -l
– Avoid overusing rwxrwxrwx permissions
– Regularly check and adjust permissions
– Use the minimum necessary privileges
Root is a special superuser account in UNIX systems with full access rights to the system. The root user (superuser) is a key element of Linux system administration, granting complete control over the operating system. Proper use of root privileges will help you manage the system quickly and efficiently.
– has unlimited access to all files and directories
– can perform any system operations
– has the default login “root”
– can log in to the system without a password on behalf of other users
– can modify system files and manage access rights
Two ways to obtain root privileges:
– using the sudo su command (for systems with the sudo package)
– using the su command and entering the root password
Understanding the Linux permissions system is important for ensuring security and proper system operation. Properly setting permissions helps prevent unauthorized access and protect data.
Let’s create a script that will backup a specific folder to an archive file. Here are sample scripts for Linux/macOS (bash) and Windows (batch).
According to the script, the script should:
Specify the source folder for the backup.
Specify the archive file name.
Use system tools to create the archive.
Display a message about the successful backup.
Script for Linux/macOS (bash):
1 #!/bin/bash

2

3 # Settings

4 SOURCE_DIR="/path/to/your/folder"  # Folder to be backed up

5 BACKUP_DIR="/path/to/folder/containing/backups" # Folder where to store the backups

6 BACKUP_PREFIX="backup_"  # Archive file name prefix

7 ARCHIVE_FORMAT="tar.gz"  # Archive file format: tar.gz, tar.bz2, zip

8

9 # Obtain current date and time

10 TIMESTAMP=$(date +%Y%m%d_%H%M%S)

11

12 # Create archive file name

13 ARCHIVE_FILE="$BACKUP_DIR/$BACKUP_PREFIX$TIMESTAMP.$ARCHIVE_FORMAT"

14

15 # Create folder for backup storage if it doesn't exist

16 mkdir -p "$BACKUP_DIR"

17

18 # Create archive file with the given file format

19 case "$ARCHIVE_FORMAT" in

20  "tar.gz")

21    tar -czvf "$ARCHIVE_FILE" "$SOURCE_DIR"

22    ;;

23  "tar.bz2")

24    tar -cjvf "$ARCHIVE_FILE" "$SOURCE_DIR"

25    ;;

26  "zip")

27    zip -r "$ARCHIVE_FILE" "$SOURCE_DIR"

28    ;;

29  *)

30    echo "Unsupported archive file format: $ARCHIVE_FORMAT"

31    exit 1

32    ;;

33 esac

34

35 # Check if the archive file was created successfully

36 if [ $? -eq 0 ]; then

37  echo "Archive file created successfully: $ARCHIVE_FILE"

38 else

39  echo "Error while creating archive file!"

40 fi
How to use:
Replace /path/to/your/folder with the path to the folder you want to archive.
Replace /path/to/folder/containing/backups with the path to the folder where you want to store the archive.
Change ARCHIVE_FORMAT to select the desired archive format (tar.gz, tar.bz2, zip).
Save the script, for example, as backup_folder.sh.
Make the script executable: chmod +x backup_folder.sh.
Run the script: ./backup_folder.sh.
Script for Windows (batch):
1 @echo off

2 setlocal enabledelayedexpansion

3

4 set "SOURCE_DIR="C:\path\to\your\folder""

5 set "BACKUP_DIR="C:\path\to\backup\folder""

6 set "BACKUP_PREFIX=backup_"

7 set "ARCHIVE_FORMAT=7z"

8

9

10 for /f "tokens=1-3 delims=/" %%a in ('echo %date%') do (

11    set "day=%%a"

12    set "month=%%b"

13    set "year=%%c"

14 )

15

16

17 if "!day!" neq "" if "!day!" lss "10" set "day=0!day!"

18 if "!month!" neq "" if "!month!" lss "10" set "month=0!month!"

19

20

21 set "hour=%time:~0,2%"

22 if "!hour!" lss "10" set "hour=0!hour!"

23 set "minute=%time:~3,2%"

24 set "second=%time:~6,2%"

25

26 set "TIMESTAMP=!year!!month!!day!_!hour!_!minute!_!second%"

27

28

29 if not exist "%BACKUP_DIR%" mkdir "%BACKUP_DIR%"

30

31 echo Creating backup with timestamp: !TIMESTAMP!

32

33 if "%ARCHIVE_FORMAT%"=="zip" (

34    powershell -command "Add-Type -AssemblyName System.IO.Compression.FileSystem; [System.IO.Compression.ZipFile]::CreateFromDirectory('%SOURCE_DIR%', '%BACKUP_DIR%\%BACKUP_PREFIX%%TIMESTAMP%.zip')"

35 ) else if "%ARCHIVE_FORMAT%"=="7z" (

36    "C:\Program Files\7-Zip\7z.exe" a "%BACKUP_DIR%\%BACKUP_PREFIX%%TIMESTAMP%.7z" "%SOURCE_DIR%\*"

37 ) else (

38    echo Archive format not supported: %ARCHIVE_FORMAT%

39    exit /b 1

40 )

41

42 if !errorlevel! equ 0 (

43    echo The archive was successfully created.

44 ) else (

45    echo Error creating archive!

46 )

47

48 endlocal
How to use:
Replace “C:\path\to\your\folder” with the path to the folder you want to archive.
Replace “C:\path\to\backup\folder” with the path to the folder where you want to store the archive.
Change ARCHIVE_FORMAT to select the desired archive format (zip, 7z). To use 7z, make sure 7-Zip is installed and the path to 7z.exe is correct.
Save the script, for example, as backup_folder.bat.
Run the script by double-clicking the backup_folder.bat file.
tar -czvf (Bash): The tar command to create a tar.gz archive. c – create, z – gzip, v – verbose (show files), f – filename (archive file name).
tar -cjvf (Bash): The tar command to create a tar.bz2 archive. c – create, j – bzip2, v – verbose, f – filename.
zip -r (Bash): The zip command to create a zip archive. -r – recursive (include subdirectories).
powershell -command (Batch): Invokes PowerShell to create a zip archive. PowerShell has built-in support for zip archives.
“C:\Program Files\7-Zip\7z.exe” a (Batch): Uses 7-Zip to create a 7z archive. The path to 7z.exe may vary depending on your 7-Zip installation. a – add to archive.
The date and time format in the Batch script may depend on your system’s regional settings.
These scripts create an archive containing all files and subdirectories from the specified folder. You can customize these scripts to exclude specific files or directories from the archive by adding the appropriate parameters to the tar or zip commands. You can also add logging to record information about the backup process to a file.
Additional tips:
For more complex tasks, you can use more advanced automation tools, such as cron (Linux/macOS) or Task Scheduler (Windows), to automatically run the script on a schedule.
Don’t forget about error handling. Always check the return code of commands and provide informative error messages.
Use comments to explain what your script does and make it more understandable for others (and for yourself in the future).
November 17, 2025
Read more:
Xeoma installation instructions for Linux
Supported console commands in Xeoma
Video Surveillance on Linux: Why Choose Debian