Download this User Manual in PDF
Found a feature that is not described in this manual, or have questions or suggestions? Please, let us know.
Complete Xeoma User Manual
Table of contents:
CHAPTER 1. INTRODUCTION
1.1. Introduction
1.2. Key features and typical applications
1.3. System requirements
1.4. Modes of functioning
CHAPTER 2. GETTING STARTED
2.1. Getting started
2.2. Interface of Main Window in Xeoma
2.2.1. Interface of Main Window in Xeoma
2.2.2. Quick settings window
2.2.3. Detailed settings window
2.2.4. Module settings window
2.3. How modules and chains work
2.3.1. How modules and chains work
2.3.2. Chain branching
2.4. Auto scan and search for cameras
2.4.1. Auto scan on first launch
2.4.2. Local camera search
2.4.3. Search by IP / Password
2.4.4. Adding cameras manually
2.4.5. Adding cameras by duplication
2.4.6. Adding cameras by POST request (available in Xeoma Pro)
2.4.7. Module chain’s sample for adding new cameras
2.5. Layouts menu (grid, visualization, decoding settings)
2.5.1. Pages (camera tabs)
2.5.2. Getting rid of blank sides
2.5.3. Automated scrolling
2.5.4. Larger grid mode
2.5.5. “Show only active cameras”
2.5.6. “Switch to active Pages”
2.5.7. Interface enhancements
2.5.8. Motion visualization
2.5.9. eMap interactive maps
2.5.10. Decoding settings
2.6. Changing cameras order
2.7. Camera bulk management: Device List
2.8. PTZ control and zoom
2.8.1. Basic PTZ control and zoom
2.8.2. Digital zoom
2.8.3. PTZ control in a browser
2.8.4. PTZ Tracking – automated object follow
2.8.5. Setting up PTZ presets and PTZ guard tours
2.9. Camera bulk management: eMap
2.10. Changing camera’s names in preview
2.11. Direct saving to archive, or “Dual Streaming”
CHAPTER 3. MODULES SETUP
3.1. Sources settings
-3.1.1. Universal camera
-3.1.2. Microphone
-3.1.3. File reading
-3.1.4. Screen capture
-3.1.5. Another Xeoma
-3.1.6. FTP receiver
-3.1.7. HTTP receiver
-3.1.8. ANPR Speed Receiver
3.2. Destination settings
-3.2.1. Sound Alarm
-3.2.2. Application runner
-3.2.3. Pop-up window (in Client)
-3.2.4. Sms Sending
-3.2.5. Sending Email
-3.2.6. Save to file
-3.2.7. FTP upload
-3.2.8. ANPR Sender to FTP
-3.2.9. HTTP request sender
-3.2.10. HTTP upload to other Xeoma
-3.2.11. RTSP Broadcasting
-3.2.12. Preview
-3.2.13. Web server
-3.2.14. Preview and archive
-3.2.15. ANPR Speed Sender
-3.2.16. Mobile notifications
-3.2.17. Streaming to YouTube
-3.2.18. Telegram Bot notifications
3.3. Filters
-3.3.1. Day Detector
-3.3.2. Motion detector
-3.3.3. Loitering Detector
-3.3.4. Object Detector
-3.3.5. Detector of Abandoned Objects
-3.3.6. Scheduler
-3.3.7. Marking
-3.3.8. Smoke Detector
-3.3.9. Sound Detector
-3.3.10. Face Detector
-3.3.11. Problems Detector
-3.3.12. Image Resize
-3.3.13. Image rotate
-3.3.14. Image Crop
-3.3.15. PTZ tracking
-3.3.16. Automatic Number Plate Recognition
-3.3.17. Fisheye Dewarping
-3.3.18. Visitors Counter
-3.3.19. Cross-Line Detector
-3.3.20. Privacy Masking
-3.3.21. Button Switcher
-3.3.22. Unitor
-3.3.23. Relay switch
-3.3.24. Condition
-3.3.25. HTTP marking
-3.3.26. HTTP switcher
-3.3.27. Camera-Embedded Detector
-3.3.28. Face Detector (Emotions)
-3.3.29. FaceID
-3.3.30. Object type recognition
-3.3.31. SmartHome – RIF+
-3.3.32. QR code recognition
-3.3.33. Smart Card reader
-3.3.34. GPIO module
-3.3.35. Moving to PTZ preset
-3.3.36. Gender Recognition
-3.3.37. Sports Tracking
-3.3.38. Crowd Detector
-3.3.39. Color Recognition
-3.3.40. Senstar PTZ tracking
-3.3.41. Object size filtering
-3.3.42. Vehicle Speed Detector
-3.3.43. Age Recognizer
-3.3.44. My detector
-3.3.45. Sound Events Detector
-3.3.46. Detector of construction site safety
-3.3.47. Text Recognition
-3.3.48. Modbus Controllers
-3.3.49. Parking Spots
-3.3.50. Slip and Fall Detector
-3.3.51. Eye Tracking
-3.3.52. Thermal Camera Data
-3.3.53. Bird detector
-3.3.54. Heart Rate Monitor
-3.3.55. Freight Unloading Counter
3.4.1. Universal Camera
3.4.2. Motion detector
3.5. Archive
-3.5.1. Archive settings and saving
-3.5.2. Archive playback
-3.5.3. Professional features in Archive
3.6. Face Detector and Face Recognition
3.7. Visitors Counter
3.8. Marking
3.9. Relay Switch
3.10. Privacy masking
3.11. Smoke detector
3.12. Object detector
3.13. HTTP marking (POS integration)
3.14. HTTP request sender (integration with home automation)
3.15. HTTP upload to other Xeoma
3.16. RTSP Broadcasting
CHAPTER 4. MORE FEATURES FOR ADVANCED SURVEILLANCE
4.1. Client-server architecture
4.2. Installation
4.3. Licensing
4.4. Activation
-4.4.1. Online activation
-4.4.2. Offline activation
-4.4.3. Activation on virtual machines
-4.4.4. Activation on virtual machines with license server
-4.4.5. Hardware keys (USB flash drive)
4.5. Updates
-4.5.1. Updates to new versions
-4.5.2. Downgrade to previous version
4.6. Operators and user access rights
-4.6.1. User access rights
-4.6.2. PTZ blocking for operators/users
4.7. Settings Restore (backup of settings and archives)
4.8. The visualization of movement
4.9. Heatmap
4.10. TLS secure connection
4.11. Automated backup copy of recordings (in FTP)
4.12. Failover
4.13. Hardware acceleration
-4.13.1. Server
-4.13.2. Client
-4.13.3. Modules
4.14. Integration with external devices
-4.14.1. Integration with external devices: sending commands (e.g. barrier)
-4.14.2. Integration with external devices: receiving commands (e.g. enabling recording by signal)
-4.14.3. Integration with external devices: overlay titles (for example, with cash registers)
-4.14.4. Integration with external devices using external databases
-4.14.5. Integration with external devices using GPIO module
-4.14.6. Integration with external devices using RIF+ module
-4.14.7. Integration with external devices using Modbus controllers module
-4.14.8. Integration with external devices using Senstar PTZ tracking module
-4.14.9. API Xeoma
-4.14.10. Binding of external sensors to the signal inputs of the cameras
CHAPTER 5. REMOTE ACCESS
5.1. Work with proxy servers
5.2. Remote access options
-5.2.1. Client-to-server remote access
— 1. Connection within the same network
— 1.1. Manual connection (suitable for any device)
— 1.2. Connecton via scanning the QR code (works only in Xeoma app for Android)
— 2. Connection from another network
— 2.1. Connection from another network with public IP address
— 2.2. Connection from another network with P2P and other substitutes of public IP address
5.3. Repeater
5.4. Web server
-5.4.1. Part 1. Remote view of cameras via browser
-5.4.2. More about the web browser interface
-5.4.3. Part 2. Saving footage to another computer
-5.4.4. Part 3. IP camera emulation
-5.4.5. Part 4. Having live broadcasting on your site
5.5. Web server customization
5.6. Android app
5.7. iPhone/iPad app
5.8. VPN connection
CHAPTER 6. OTHER PRODUCTS
6.1. Xeoma Pro Your Cloud (your VSaaS)
6.2. Xeoma Cloud
6.3. Customization of Xeoma
CHAPTER 7. IN CONCLUSION
7.1. Uninstallation
7.1.1. Stopping the program
7.1.2. Reinstalling the program
7.1.3. Complete program uninstallation
7.1.4. Deleting the Xeoma Mobile Application
7.2. Tips on how to reduce CPU load
APPENDIX.
1 – Typical applications. Scenarios
2 – Typical video surveillance goals and how to do that with Xeoma
3 – Easy start guide even for newbies
4 – Console work
5 – Supported console commands
6 – Console launch troubleshooting
7 – Web server customization for online view of cameras in Xeoma
8 – Xeoma settings
9 – Change camera order
10 – Multi-server mode
11 – Repeater
12 – Step-by-step guide on using free rebranding of Xeoma
13 – Device List (devices by groups)
14 – FTP-receiver: easier way to connect your camera
15 – Dual streaming with rtsp (h264) cameras
16 – How to set Xeoma on Raspberry Pi with ARM processor
17 – How to move Xeoma recordings
18 – Time lapse in Xeoma
19 – Several monitors for video surveillance or Autostarting Xeoma in multiple screens mode (videowall)
1.1. Introducing Xeoma
Xeoma is a complete video surveillance solution with unlimited flexibility owing to its innovative construction-set principle. Easy for non-tech savvies, powerful for professionals, it allows to build both small and enterprise-level systems with truly unlimited number of cameras (up to several thousand cameras on single computer). The program works on Windows, Linux, Mac OS and Android devices (full-featured version) with full remote access and view from any mobile devices and computers.
Xeoma offers auto-detection of and support for almost any cameras – IP, ONVIF, USB webcams, H.264, H.265, H.264+, H.265+, MJPEG, MPEG4, PTZ, WiFi (up to 99.9% of cameras on the market supported). With its help, in just a few seconds a computer and a camera will turn into a ready to work out-of-the-box surveillance system.
Intellectual motion detector with advanced false alarm avoiding logic, motion-triggered or scheduled notifications (SMS, email, sound alarm, etc.) and screen captures, work with sound are perfect for staff monitoring and parental control.
Shared access rights, encryption, password protection, network clustering, also on operating systems without graphical shell, make monitoring efficient and stable even for professional-scale surveillance systems. No installation and no admin privileges required. Professionals will certainly appreciate automatic backup to FTP server, powerful web server and remote view of all cameras with sound (flash video streaming), cyclic archive with export feature.
Economy at its best: Try the demo edition of Xeoma with unlimited functionality! Use it as long as you want. Once you feel like extending your system, you can purchase a license at most economical price! Save at expense of security staff or costly surveillance solutions, replacing and maintaining out-of-date surveillance equipment.

|
Starting from version 22.11.25, you can switch directly from the program interface to trial versions of all editions: Pro, Standard, Lite and Starter (previously the Trial mode represented only the Pro edition). This is useful if you are interested in purchasing a license for a specific mode and want to make sure that the selected edition has everything you need.
Also, in that version added support for PTZ presets as well as setting up speed of PTZ tours (as in the regular mode, a Xeoma Pro / Xeoma Pro Trial is required for the PTZ presets and tours functionality). |
Xeoma doesn’t contain any spy, virus or malware. It is completely safe.
Download Buy Videos Contact us
1.2. Xeoma key features
Camera/sources processing:
- Compatible with any webcams, analog cams, including WiFi wireless cctv cameras
- Supports IP-cameras (including H.264, H.265, H.264+, H.265+, JPEG/MJPEG, MPEG-4, Fisheye, PTZ and ONVIF, wireless cams, i.e. perfect both for wired and wireless cctv)
- Any resolution (Mpix)
- Screen captures from all monitors simultaneously
- Adjustable sound quality and sound volume
- Up to 2 000 cameras can be connected on 1 computer!
Professional surveillance made easy:
• Free rebranding and customization
• Quick setup: group settings of modules
• Quick navigation and control of cameras with Device list
• Hardware acceleration QuickSync (for Intel processors) and CUDA (for NVidia graphic cards) on Windows and Linux
• Possibility to set decoding on the client side to lower CPU and network load
• Backup and restore configuration
• Failover and automatic switching to the backup server if the main one/ones is down
• Redistribution of resources in case of camera’s failure
• Restoring configuration and making backup via interface (Main menu – Install – Restore)
• Xeoma Cloud Service
• Xeoma Pro – professional extension to regular Xeoma
• Setup of cameras, modules, and schemes in a configuration file in Xeoma Pro
• Creating a surveillance network of Xeoma cctv software servers by using web server
• Multi-Server and Multi-Client connection architecture for video surveillance of any size
• Flexible setup of access rights (user permissions)
• Password protection of settings
• Fullscreen view
• Work with multiple monitors (video-walls)
• Pop-up monitor mode with showing active cameras and detected motion/or other events on the necessary monitor (Pop-up window)
• Objects masking/blurring (for private territories)
• Sound detector that can react to screaming, shooting, breaking windows etc.
• TLS-encryption between server and clients
• Support of IPv4 and IPv6 protocols
• Heat map of the areas with most action in them
• Digital zoom in real-time or archive
• Support for PTZ control
• 360° camera image rotation
• Instant screenshots of camera image
Intellectual modules and features:
- Fisheye cameras image dewarping
- eMap – map of your video surveillance site with interactive cameras on it
- Face detector
- Object detector to follow objects even if they’re not moving
- Synchronization with camera’s SD card
- Synchronization with cashier registers
- LDAP active directory synchronization
- Easy home automation system integration thanks to HTTP request sender and HTTP switcher modules
- Possibility to create your own cloud video surveillance service with Xeoma Pro
- Privacy masking to blur areas you’re not supposed to record, or faces
- Automatic object tracking with zoom (PTZ tracking) and visualization of moving objects
- Sabotage detector to notify you when problems are detected
- PTZ control also in browsers
- Quick turning on/off of chains remotely (HTTP Switcher) and locally (Button Switcher)
- Search in archive for motion events by time or in selected areas
- RTSP and HTTP broadcasting: emulation of IP cameras streaming in MJPEG, JPEG, H264, etc.
Remote access:
- Remote view via mobile devices (Android, iPhone, iPad supported)
- Online view of all cameras with sound
- Full remote access to settings, archive and cameras from a workstation
- Internet broadcasting
- Possibility to embed camera image to your site
- Remote access even with dynamic IP address
- View of archives and basic setup in web browsers
- Setting up of zone(s) of any size and shape to monitor for motion
- Visual motion detection, with time of the last detected movement shown on preview
- Setting up maximum object size to be ignored, and sensitivity level of sensor
- Pre-record option to store several seconds preceding motion detection
- Post-record to continue recording after the event has finished
- Record delay
- Enhanced algorithm to avoid false alarms caused by pets or weather changes
- Loop recording
- Adjustable maximum size of archive and compression rate of images stored to archive
- Possibility to store archive onto different HDDs, RAIDs
- Support for network attached storage (NAS), Google Cloud disc, etc.
- User-friendly built-in media player with multi-thread rapid playback mechanisms and search for motion event or specific time
- Export of a selected extract right from the viewer
- Deletion of unneeded extracts from the viewer
- Search for motion events by time and in selected areas
- Simultaneous synchronized view of several archives
Notifications and reactions:
- Text message (SMS) sending
- E-mail notifications (with attached JPEG images and MJPEG videos)
- Event-triggered pop-up window
- Sound alarm
- Running a specified external program
- FTP server upload of images and videos with sound
- Saving files to the specified path with cyclic recording
All high-demand features:
- Hidden mode of work
- WEBM (VP8 and VP9), MPEG-4, MP4 and MJPEG video formats
- Marking (embedded time and date, custom text, GPS coordinates, or image stamp over camera’s stream)
- Scheduler, setting up when system’s components are to start/end work
- Adjustable volume of sound in preview mode
- Quick setup: duplicating of chains
- Adjustable preview mode (camera layouts, window transparency, font)
- Automatic slide show of real-time images
- 1-click-easy updates
- New versions notifications
Xeoma advantages:
- Full-featured work on Windows, Mac OS X, Linux and Android
- Free download
- Full featured trial (demo) edition can be used multiple times
- Free edition with no time-of-use
limits - Ready to work right after downloading with default settings
- No installation needed
- No admin rights required
- Simple additional settings
- Flexible control like in a children’s construction set
- Innovative intuitive graphical interface
- Dynamic development and addition of cutting-edge features
- Available in Main languages:
English, Spanish, Italian, Brazilian Portuguese, Chinese, French, German, Japanese, Hungarian, Polish and Russian.Additional languages:
Dutch, Danish, Romanian, Turkish, Croatian, Finnish, Greek, Czech, Bulgarian, Vietnamese, Swedish, Slovenian, Taiwanese, Korean, Ukrainian and Belorussian.
Typical applications:
- Object monitoring in non-working hours (office, store, warehouse)
- Security surveillance (perimeter security monitoring, car, etc.)
- Smart home systems integration
- Staff monitoring (industry workers, office employees, caregivers and home staff)
- Monitoring of activity of children and office workers on computer, control over visited sites
- Pet surveillance
- Watching machinery in industries
1.3. Minimum system requirements:
Officially supported operating systems:
Windows – Windows 7, Windows 8, Windows 10, Windows 11, both 64-bit and 32-bit versions, Windows Server 2008 R2/2012/2016.
Linux – both 32-bit and 64-bit versions with XWindows or console/server. Available for Linux based on ARM processor (e.g. Raspberry Pi) or Intel processors.
Supported Linux distros:
Ubuntu latest versions (12, 13, 14 and newer),
Debian 7 and up,
openSUSE 12.2 and up,
Mint 13 and up,
CentOS version 7 or higher,
Red Hat Enterprise Linux version 6 or higher,
Astra Linux (version 2.11.3 and up);
ALT OS (version 8.2 and up);
RED OS (version 7.2 and up).
Note: Linux console sound support requires: libasound2. To install or run Xeoma on Linux please make sure you are uncompressing xeoma_linux.tgz archive on Linux machine. Otherwise, it is required to execute: chmod a+x xeoma.app and then you can run Xeoma as usual: ./xeoma.app
If you are installing 32 bit version on your 64 bit Linux distro (although it’s better to download the 64 bit version in this case), you might need to install ia32-libs.
Sailfish OS 3.0.3.9 and up
Mac OS X version 10.9* or higher.
Android – Android OS 5.0 (API LEVEL 10) or higher, 20 Mb of free operating memory, screen resolution – 450×450 or higher.
iPhone/iPad – iOS version 9 or higher.
Raspbian released on 2016-02-29 or later (for Raspberry 2 or higher).
HarmonyOS 3.0 and up.
Unofficially supported operating systems:***
Linux Kali (version 18 and up);
RancherOS;
Fedora (version 31 and up);
Elbrus (version 1.4.3 and up);
PCLinuxOs (version 2018.06 and up);
elementary OS Linux (version 5.0 and up);
Arch Linux version 2020.10.01.
For more detailed information please visit our minimum system requirements calculator page.
*Support for Windows XP, Windows Vista or lower, and Ubuntu 11.10 or lower, and 32-bit Mac OS, as well as for Raspberry Pi I device is discontinued in version 17.6.23 and up. Please make sure to upgrade to a more recent operating system by that time if you are planning to use future versions of Xeoma.
**Starting from version 17.7.31 Xeoma requires GLIBC_2.17 or higher so it is recommended that you use CentOS 7 or higher.
***Officially supported operating systems are tested with Xeoma before any release. Unofficially supported operating systems were successfully tested with Xeoma several times at user requests (but not before every release of Xeoma new versions).
Available languages:
Main languages:
English, Spanish, Italian, Brazilian Portuguese, Chinese, French, German, Japanese, Hungarian, Polish and Russian.
Additional languages:
Dutch, Danish, Romanian, Turkish, Croatian, Finnish, Greek, Czech, Bulgarian, Vietnamese, Swedish, Slovenian, Taiwanese, Korean, Ukrainian and Belorussian.
See Xeoma information in your language
1.4. Xeoma’s modes of functioning
Xeoma can be used in either of its 3 modes: Free, Trial and Commercial (which in its turn is divided into Starter, Lite, Standard, and Pro editions). By default, the downloaded Xeoma starts in the Trial edition, and you can activate a corresponding license to switch it to a commercial mode.
|
|
Starting from version 22.11.25 you can switch directly from the program interface to trial versions of all editions: Pro, Standard, Lite and Starter (previously the Trial mode represented only the Pro edition). This is useful if you are interested in purchasing a license for a specific mode and want to make sure that the selected edition has everything you need. |
See more about peculiarities of each of the modes below:
The Free edition lets you view unlimited number of video sources (cameras) and up to three modules in each scheme. Maximum 4 Preview and Archive modules (store archive for 5 days before overwriting), maximum 4 Sending Email modules are available. Please pay attention: remote connection in Free edition is not available. See video about Free edition
Trial version has no limitations in functionality, number of video sources or modules but all settings will be reset in 8 hours and will not be saved at program restart. Please note that in Trial version you can store your Archive for only 1 hour, then it will be rewritten. Remote server can be connected to with any version of Xeoma. You can check video about Trial edition here. If you need more time to test Xeoma before you buy, simply contact us to get a demo license.

The Starter edition is the first of 4 commercial editions, a modern and minimalistic version of Xeoma that is perfect for both beginners and advanced users. You can use it at home or for small business. It includes all the necessary features and modules for video surveillance: remote access from any device, unlimited number of cameras for a preview, up to 3 modules in a chain and opportunity to archive records max from 2 video sources. Read more here. Xeoma Starter license can be purchased here

Lite version lets you use up to four video sources (depending on your Lite license’s number of sources) and up to six modules in each scheme. Xeoma Lite doesn’t support updates of the program, and renewals are not applicable. You can use the version that you activated Xeoma Lite on for unlimited time. See also video about Lite edition or read more here

The Standard edition has no limitation in remote connections and video sources number. Total number of video sources/cameras in use depends on your license. Xeoma Standard licenses can be used together with Pro licenses. More about Xeoma Standard | PDF presentation about Xeoma Standard | Video about Standard edition

The Pro edition has all the advantages of the Standard edition + professional modules like ANPR, Face Recognition, Smoke Detector, etc. Xeoma Pro and Standard licenses summarize. Pro licenses can be used to create Your own Cloud solution. See more about Xeoma Pro here

Also available are Additional modules – intellectual modules many of which are based on artificial intelligence technologies that are bought separately. They must be activated after Xeoma Standard or Xeoma Pro licenses. The additional modules do not work in Xeoma Lite, Xeoma Starter or free edition. Additional modules are available for testing in the trial edition of Xeoma with a limited testing time.
Face Recognition (Artificial Intelligence option) – purchased per number of faces you will have in the face database on a server, for each server separately. Testing time is 1 hour, then the settings are reset and another hour of testing is available, etc.
Search in archives by photo (option in the Xeoma archive viewer) – purchased 1 piece per server (for any number of cameras). Trial mode: the search will display only one latest incident where this person (face) was detected.
Emotion Recognition + search in archives by emotions – purchased per number of cameras that will be using it, for each server separately. Testing time is 1 hour, then the settings are reset and another hour of testing is available, etc.
Object Recognizer + search in archives by objects – purchased per number of cameras that will be using it, for each server separately. Testing time is 1 hour, then the settings are reset and another hour of testing is available, etc.
FaceID (face comparison) – purchased per number of cameras that will be using it, for each server separately. Testing time is 1 hour, then the settings are reset and another hour of testing is available, etc.
Smart-card reader – purchased per number of cameras that will be using it, for each server separately. Testing time is 1 hour, then the settings are reset and another hour of testing is available, etc.
QR Code recognition – purchased per number of cameras that will be using it, for each server separately. Testing time is 1 hour, then the settings are reset and another hour of testing is available, etc.
SmartHome – RIF+ – purchased per number of cameras that will be using it, for each server separately. Testing time is 1 hour, then the settings are reset and another hour of testing is available, etc.
Detector of construction site safety – purchased per number of cameras that will be using it, for each server separately. Testing time is 1 hour, then the settings are reset and another hour of testing is available, etc.
Sound Events Detector – purchased per number of cameras that will be using it, for each server separately. Testing time is 1 hour, then the settings are reset and another hour of testing is available, etc.
Age Recognizer – purchased per number of cameras that will be using it, for each server separately. Testing time is 1 hour, then the settings are reset and another hour of testing is available, etc.
Vehicle Speed Detector – purchased per number of cameras that will be using it, for each server separately. Testing time is 1 hour, then the settings are reset and another hour of testing is available, etc.
Color Recognition – purchased per number of cameras that will be using it, for each server separately. Testing time is 1 hour, then the settings are reset and another hour of testing is available, etc.
Gender Recognition – purchased per number of cameras that will be using it, for each server separately. Testing time is 1 hour, then the settings are reset and another hour of testing is available, etc.
Crowd Detector – purchased per number of cameras that will be using it, for each server separately. Testing time is 1 hour, then the settings are reset and another hour of testing is available, etc.
Slip and Fall Detector – purchased per number of cameras that will be using it, for each server separately. Testing time is 1 hour, then the settings are reset and another hour of testing is available, etc.
Sports Tracking – purchased per number of cameras that will be using it, for each server separately. Testing time is 1 hour, then the settings are reset and another hour of testing is available, etc.
Seabird recognition – purchased per number of cameras that will be using it, for each server separately. Testing time is 1 hour, then the settings are reset and another hour of testing is available, etc.
Drone and Airplane recognition – purchased per number of cameras that will be using it, for each server separately. Testing time is 1 hour, then the settings are reset and another hour of testing is available, etc.
Mask detector – purchased per number of cameras that will be using it, for each server separately. Testing time is 1 hour, then the settings are reset and another hour of testing is available, etc.
Modbus controllers – purchased per number of cameras that will be using it, for each server separately. Testing time is 1 hour, then the settings are reset and another hour of testing is available, etc.
Text Recognition – purchased per number of cameras that will be using it, for each server separately. Testing time is 1 hour, then the settings are reset and another hour of testing is available, etc.
Eye Tracking – purchased per number of cameras that will be using it, for each server separately. Testing time is 1 hour, then the settings are reset and another hour of testing is available, etc.
Parking Spots – purchased per number of cameras that will be using it, for each server separately. Testing time is 1 hour, then the settings are reset and another hour of testing is available, etc.
360° Surround View – purchased per number of cameras that will be using it, for each server separately. Testing time is 1 hour, then the settings are reset and another hour of testing is available, etc.
You can switch between modes via Main Menu -> Information or Main Menu -> Information -> About.
Comparison table for Xeoma video surveillance software editions:
| Trial | Free | Starter | Lite | Standard | Pro | |
|
Most important features |
||||||
| Maximum number of available sources | Unlimited | Unlimited | Unlimited (2 for an Archive) | 4 | Unlimited (depend on license type) | Unlimited (depend on license type) |
| Maximum number of modules in chain | Unlimited | 3 | 3 | 6 | Unlimited (depend on license type) | Unlimited (depend on license type) |
| Live view | Yes | Yes | Yes | Yes | Yes | Yes |
| Saving recordings to Archive | Yes | Yes | Yes | Yes | Yes | Yes |
| Archive retention period before overwriting | 1 hour | 5 days | 5 days | Unlimited | Unlimited | Unlimited |
| Remote access | Yes | No | Yes | Yes | Yes | Yes |
| Multiple user profiles available | Yes | No | No | No | Yes | Yes |
| Able to work in shellless (no-GUI) OS | Yes | No | Yes | Yes | Yes | Yes |
| Possibility to use Repeater* | Yes | Yes | Yes | Yes | Yes | Yes |
| Time of work | 8 hours since launch, then custom settings are reset | Unlimited | Unlimited | Unlimited | Unlimited | Unlimited |
| Can be used with Additional modules (bought separately) |
Yes (trial time) |
– | – | – | Yes | Yes |
| Watermark Free | Yes | – | Yes | Yes | Yes | Yes |
| Updates to new versions of Xeoma | Yes | Yes | Yes (1 month since purchase date) | No | Yes (1 year since purchase date)
extend the free updates period with up to 80% discount |
Yes (1 year since purchase date)
extend the free updates period with up to 80% discount |
| Customization | Yes | No | Yes | Yes | Yes | Yes |
| Other key features |
free of charge
settings are restored to defaults every 8 hours/at program exit all features available for test (except for settings backup and Additional ANPR) |
free of charge
maximum 4 Preview and Archive modules, maximum 4 Sending Email modules user profiles available for access on the same computer unlimited time of work with free updates of the program |
paid mode (requires a license)
Unlimited number of cameras for a preview maximum 2 Preview and Archive modules, maximum 2 Sending Email modules Only administrator’s profile for the Remote access |
paid mode (requires a license)
limited number of available modules |
paid mode (requires a license)
Standard licenses cumulate with Pro all regular modules available |
paid mode (requires a license)
Pro licenses cumulate with Standard regular + special PRO modules available |
|
Work with cameras |
||||||
| Camera view in web browser (Web server module) | Yes, 1 camera | No | Yes | Yes | Yes | Yes |
| Change of settings in web browser | Yes | No | No | Yes | Yes | Yes |
| PTZ control | Yes | – | – | Yes | Yes | Yes |
| PTZ control through web browser | Yes | – | – | – | – | Yes |
| Digital zoom | Yes | – | – | – | Yes | Yes |
| PTZ Tracking | Yes | – | – | – | Yes | Yes |
| Fisheye Dewarping | Yes | – | – | – | Yes | Yes |
| Device List | Yes | Yes | Yes | – | Yes | Yes |
| Interactive maps eMap | Yes | – | – | – | – | Yes |
| Visualization of movement – preview | Yes | Yes | Yes | Yes | Yes | Yes |
| Various layouts | Yes | – | – | Yes | Yes | Yes |
| Fullscreen mode | Yes | – | – | Yes | Yes | Yes |
|
Work with recordings |
||||||
| Search through recordings for motion events by date/date | Yes | Yes | Yes | Yes | Yes | Yes |
| Search through recordings for motion events in a certain area | Yes | – | – | – | Yes | Yes |
| Synchronized playback of several archives | Yes | – | – | – | – | Yes |
| Synchronization with camera’s SD card | Yes | No | No | No | No | Yes |
| Visualization of movement – archive | Yes | – | – | – | – | Yes |
| Possibility to delete pieces of archive | Yes | Yes | Yes | Yes | Yes | Yes |
| Possibility to make intervals of archive undeletable | Yes | – | – | – | – | Yes |
|
Availability of modules |
||||||
| Quick turning off/on of the cameras | Yes | Yes | Yes | Yes | Yes | Yes |
| Button Switcher | Yes | – | – | – | – | Yes |
| HTTP Switcher | Yes | – | – | – | Yes | Yes |
| Visitors Counter | Yes | – | – | – | Yes | Yes |
| Loitering Detector | Yes | – | – | – | – | Yes |
| Face Detector | Yes | – | – | – | – | Yes |
| Privacy Masking | Yes | – | – | – | – | Yes |
| Motion Detector | Yes | Yes | Yes | Yes | Yes | Yes |
| Sound Detector | Yes | – | – | – | Yes | Yes |
| Smoke Detector | Yes | – | – | – | – | Yes |
| Detector of Abandoned Objects | Yes | – | – | – | – | Yes |
| Problems Detector | Yes | – | – | – | Yes | Yes |
| Object Detector | Yes | – | – | – | Yes | Yes |
| Camera Embedded Detector | Yes | – | – | – | Yes | Yes |
| GPIO | Yes | – | – | – | Yes | Yes |
| Image Rotate | Yes | Yes | Yes | Yes | Yes | Yes |
| Image Resize | Yes | – | – | – | Yes | Yes |
| Picture in Picture | Yes | – | – | Yes | Yes | Yes |
| Unitor | Yes | Yes | Yes | Yes | Yes | Yes |
| SMS Sending | Yes | – | – | – | Yes | Yes |
| RTSP Broadcasting | Yes | – | – | – | – | Yes |
| Streaming to Youtube | Yes | – | – | – | Yes | Yes |
| FTP Upload | Yes | – | – | – | Yes | Yes |
| FTP Receiver | Yes | Yes | Yes | Yes | Yes | Yes |
| ANPR Sender to FTP | Yes | – | – | – | – | Yes |
| Senstar PTZ tracking | Yes | – | – | – | – | Yes |
| Move to PTZ preset | Yes | – | – | – | – | Yes |
| Telegram Bot notifications | Yes | – | – | – | – | Yes |
| Saving still image (preview, archive) | Yes | – | – | – | Yes | Yes |
| Sound alarm – client | Yes | – | – | – | – | Yes |
| Sound alarm – server | Yes | Yes | Yes | Yes | Yes | Yes |
| HTTP Marking | Yes | – | – | – | Yes | Yes |
| Application Runner | Yes | – | – | – | Yes | Yes |
| Sending Email | Yes | Yes | Yes | Yes | Yes | Yes |
| Relay Switch | Yes | – | – | – | Yes | Yes |
| HTTP Receiver | Yes | – | – | – | Yes | Yes |
| HTTP Upload to other Xeoma | Yes | Yes | Yes | Yes | Yes | Yes |
| HTTP Request Sender | Yes | – | – | – | Yes | Yes |
| Save to File | Yes | Yes | Yes | Yes | Yes | Yes | Bird detector | – | – | – | – | – | Yes |
|
Activation, interface |
||||||
| Client parts update automatically | Yes | – | – | – | – | Yes |
| LDAP synchronization | Yes | – | – | – | – | Yes |
| Activation on virtual machines, including Docker | – | – | Yes, since version 20.10.22. Details here | Yes, since version 20.10.13. Details here | Yes, details here | Yes, details here |
*Repeater is an optional service, bought separately for additional price.
2.1. Let’s get it started, or how to use Xeoma
You can also view Xeoma Video Tutorial
Suppose you have a goal of conducting video surveillance. You have a computer or a tablet, a camera or several cameras to start with, and an area to monitor. Xeoma will be a perfect solution, for it works with cameras of all types (hundreds of models are supported), and can work on various operating systems. These are the simple steps to make it work.
1. Download Xeoma for your operating system from our site. You can choose between official release or beta version (usually more recent, also stable but undergone only alpha-testing). Suggested version of Xeoma for the device you’re accessing our site from is to be found above the download options table. If you don’t know what to use, try this one on this device.
Xeoma consists of 2 parts – server and client – the downloadable executable file contains both (except for iOS, Linux/ARM). You can separate the two parts when you run Xeoma or install it.
For OS with graphical shell:
For console (don’t forget to unpack the archive after it’s downloaded):
2. Run Xeoma as usual applications on the computer that will become the core of your video surveillance system. This will be your server. It will process cameras and other sources, save recordings, etc. If Xeoma is not activated yet, including when you run it for the first time, it will be launched in the trial edition. Switch between free, trial and commercial editions in Main menu. Troubleshooting of launch and installation
|
|
Starting from version 22.11.25, you can switch directly from the program interface to trial versions of all editions: Pro, Standard, Lite and Starter (previously the Trial mode represented only the Pro edition). This is useful if you are interested in purchasing a license for a specific mode and want to make sure that the selected edition has everything you need. |
For OS with graphical shell: simple click or double click on Xeoma executable file (make sure to unpack the archive if it was archived)
For console:
Simply drag Xeoma executable file to console/command line/Terminal, or copy-paste the path to Xeoma executable file in console/command line/Terminal, or input the path to Xeoma executable file manually, and hit “Enter”:

Note: if later on you would need to launch only the server part, add the -core parameter before hitting “Enter”
and if you’d need to launch only the client part of Xeoma, add the -client parameter before hitting “Enter”.
Note: with the ‘-programdir [DirPath]‘ console command you can set the directory to unpack Xeoma’s files to for the first launch.
3. When you first launch Xeoma, it scans the network in search for cameras. All cameras that Xeoma finds will be added to the Main Window. Cameras that require authorization and therefore cannot be added yet will be listed in ‘+’ menu in the panel below. If the scanning takes too much time, or if all your cameras are already added, you can stop the search by clicking on scanning progress bar in the right bottom corner. More about automatic search.
4. By default, all found cameras are added with a default scheme of Universal camera – Scheduler – Motion detector – Preview and archive – Problems detector – Email sending modules with default settings (exception is the Lite and Free edition where default chains are Universal Camera – Motion Detector – Preview and Archive, due to limitation of maximum count of modules in chains). You can add, delete or re-configure modules the way you need.
- Camera: select image resolution and refresh interval (for USB cameras), or a stream with pre-configured parameters (for network cameras). Analog cameras will be detected either as USB or IP cameras, depending on the method they are connected through. More about configuring a camera
- Motion detector: select a zone or several zones to monitor for motion, set pre- or post-record, sensitivity of the sensor.
- Scheduler: set time and dates the following modules are to work. By default, set to work 24/7.
- Preview and Archive (also known as the Archive module): you can re-configure where to save files to, how long to keep files before they are overwritten, maximum size the archive is allowed to take. By default, time of storage is 1 hour in the trial mode. When in the commercial or free mode, you can set archives to be kept for a longer period of time.
5. Xeoma executable file is portable. That means you can choose to install Xeoma or just launch it when you need it. Install Xeoma to make it start with your operating system. Hidden mode of work can also be set in the Installation menu. Learn why you need installation
6. To view recordings, press the small ‘Play’ button in the top right corner of camera image in Main window or a bigger ‘Play’ button in the panel below. You will get to the built-in archive player where recordings can be viewed and exported.
7. Play around with settings, cameras and chains to fine tune Xeoma so that it does exactly what you need. Try Xeoma’s intellectual modules, video analytics and neural networks Additional modules.
8. Buy and activate Xeoma license when you are convinced it is exactly what you want.
Remote access and view of cameras live and recorded feeds is also required? Xeoma is perfect for meeting this goal as well. Use the data from Connection dialog to connect remotely, from any other place, for example, from another workstation.
No remote access required? Then Xeoma can work without Internet connection. Instruction on Offline activation
You can also create user profiles for those who are authorized to watch and control the cameras, and assign them specific rights and permissions, and many other useful features.
Tip: For work on operating systems with no graphical shell, please check our console guide.
2.2. Interface of Main window in Xeoma
2.2.1. Interface of Main window in Xeoma
 Main program window includes operating system’s window title/titlebar (1) and program interface – preview boxes (2) (live images from cameras and other sources of signal) and a bar below the previews (3). Window title usually contains version of Xeoma used (4), mode of functioning (5) and name of the screen you’re currently in (6). When connected to a remote server, you can also see IP address of the server in the window title and if version of the client doesn’t match the server’s, the client version as well.
In the titlebar there are usual control buttons: ‘Minimize’, ‘Maximize’, ‘Close’. Window position can be moved on the screen by dragging with mouse of its titlebar. Window can be resized by any edge and border.
Each preview box has small archive (7) and settings (8) icons in the top right corner used to access archive viewer and detailed configuration of the camera (source) by clicking on corresponding icons. If the camera supports PTZ controlling, a small PTZ icon will be shown along with the other two.
Below the archive and detailed settings icons in the upper right corner, you will see the time of last archive recording (9) (if there is a motion detector module in the chain, this time will display when there was motion and archive was recorded for the last time). Clicking on the time of last recording will initiate an instant replay of the event – open archive on the necessary spot in the timeline. Moreover, when archive is being recorded, the preview box frame will become red in color, and this frame will disappear when archive is not being recorded. You’ll see red ‘•Rec’ inscription if archive is being recorded at the moment, and no ‘•Rec’ inscription if not.
In the left top corner of the preview box there is the preview’s name (11) that can be set up in Universal camera module’s settings, group name can be specified in Preview and archive module. Click on the name here to open the settings.
Quick overview of settings for each preview box can be accessed by clicking on the preview box image (anywhere within the preview box) (12).
|
|
Starting from Xeoma version 22.11.25, a new feature to change the scale of the program interface with hotkeys has been added: use the combinations CTRL and +/- or CTRL and the mouse wheel (up to zoom in; down to zoom out) to scale the interface. |
|
|
If you’re connected under a particular User with restricted rights to change settings, review archive etc., then particular icons and menu options might be not available in Xeoma. You can connect under necessary users (or Administrator) via Main menu – Remote access – Connect to. Users can be configured via Main menu – Remote access – Users.
|
The popup bar below in the main preview window has buttons as follows: ‘Main menu‘, ‘Plus‘, ‘Screw-nut‘, ‘Play‘, ‘Layouts‘. The bar can be hidden by dragging it down and showed by dragging it up, or simply by clicking on it.
- ‘Main menu‘ is a menu symbol. It has somewhat different option depending on what screen you’re at at the moment. In real time view screen it opens a dialog that allows to
– configure remote access options (including Repeater and user profiles setup),
– enable/disable Device List (camera groups),
– turn all sources off and back on,
– install or uninstall the program to autostart (including Hidden mode),
– activate a license in Registration menu,
– find information about the program, your licenses, open Xeoma Video Tutorial and switch between trial/free/commercial versions of the program, leave feedback or visit official developer’s site etc.,
– switch languages.
- ‘Plus‘ button is used to add new cameras. If there were any cameras detected in the local network, they will be available for adding right in this menu. If not, there are choices of either add random world camera, duplicate the last scheme, repeat scanning for cameras, or use advanced search for cameras, this time with use of login, password, subnetwork indication, or camera’s port.
Also, here you can duplicate the camera you last viewed – this option comes in handy when you need to quickly clone complicated schemes because their settings are almost identical. Via ‘+’ menu you can add cameras manually as well (specifying their URLs)
- ‘Screw-nut‘ is the same as settings symbol in top right corner of a preview box – here it is used to access Detailed Settings of the camera you last viewed and configure all features in the visual way.
- ‘Play‘ in the lower panel is similar to the archive symbol in top right corner of a preview box – here it opens a dialog to select archive recordings of which cameras you’d like to view. After selection archive viewer will be opened where all recordings made with the “Preview and Archive” module can be viewed and extracts in chosen format can be exported.
- ‘Layouts‘ is a menu about how Xeoma looks. More about the Layouts menu.
Tip: another good way to conveniently control and group cameras is Device List.
Tip: as of Xeoma version 23.12.7 every item in any menu that leads to a submenu is marked with a white arrow. Items without an arrow, therefore, lead either to a dialog window or to enabling/disabling something.
2.2.2. Interface in Quick settings window
Quick settings interface has a side popup panel with list of features in use for this camera with check boxes to turn them on or off quickly. Click on a module’s name to open its settings and set it up right in this window. Use arrows to navigate between chains (cameras).
The bottom bar in Quick settings acquires additional icons, as compared to the Main window interface: ‘Arrow‘, ‘Red Cross‘, ‘Flip‘ and Volume (optional: Screenshot icon – if you chose in the Main Menu to have it as a button).

![]() Click ‘Flip‘ to activate intuitive PTZ (pan-tilt-zoom) control that can be used to rotate and zoom in/out your PTZ camera.
Click ‘Flip‘ to activate intuitive PTZ (pan-tilt-zoom) control that can be used to rotate and zoom in/out your PTZ camera.
Both the icon and the control will only be shown if Xeoma found PTZ commands for the camera.
The contents of the PTZ control depend on the camera type and your license.
For cameras that do not support ONVIF you will see such humble control with zoom in/out icons (3):

And for ONVIF-compliant cameras it will additionally display two buttons for zooming in or out camera’s focus (4), and if there is a valid Xeoma Pro license in this server a button for PTZ presets (1) and a button for PTZ guard tours (2), as well as additional options icon (5) to control camera’s devices like IR-illumination, camera’s wiper etc.:

Read more about pan-tilt-zoom opportunities in Xeoma
‘Arrow‘ is used to go back to the previous window, in this case – to the preview window (main window).
‘Red Cross‘ will delete the current camera and all modules connected to it (the whole chain). Please pay attention – the action is irreversible.
Click ‘Volume‘ to activate volume control and adjust volume of sound. Screenshot does the same as Screenshot menu option: instant captures of this camera image and stores them to a default folder that you can change.
2.2.3. Interface in Detailed settings window

The bottom bar of Detailed settings window is nothing unusual compared to those of previous screens.
Modules represent features that can be used to achieve maximum efficiency of the video surveillance system Xeoma. Thanks to the construction-set principle you can .
Top panel is the list of available modules and ready-to-use sample chains, under top panel there is the scheme of work. To the left there is an arrow symbolizing going back to the previous screen you were on before you went to the Detailed settings, and the Eye symbol that will take you to the Main Window.
- To add a module into a scheme drag it down to the scheme.
- To connect modules place one of them on another or drag a line (a wire, or connection) from one of them to another.
- To delete connection between modules click on it.
- To change the order of modules simply drag a module on another connection.


To set a module up click on it, when it’s in the scheme of work area.
Note: a scheme will only work when all modules you chose are wired (connected with white lines). If modules are connected with grey lines, it means one of the modules is switched off and all of the following ones are not getting image from it.
Generally, 2 modules are necessary for every scheme to work: 1 source module and 1 destination module of any kind.
For example, the default scheme is Universal camera -> Scheduler -> Motion detector -> Preview and Archive. You can build a scheme much more complicated than that though, depending on your goals.
“Open group settings” option in module’s detailed settings allows applying group settings to all modules (e.g. to all “Motions detectors”, “Preview and archives” etc.) It’s very helpful in terms of quick configuration of many cameras.

2.2.4. Interface in Module settings window
 To open a module’s settings, you can either click on the module name in the left panel of the Quick Settings Screen, or click on the module icon in the field of work of the Detailed Settings Screen.
Naturally, various modules will have various settings. But some elements are the same.
(1) – Icon of the module you’re in the settings for. Click it to get more information about what this module does.
(2) – Module state: Enabled, Disabled (or Ignored – only for filter modules (or “Skipping” (in versions before 20.10.13). Enabled – module is working and passing signal on to other modules it’s connected to via white wires. Disabled – module is disabled, signal does not get through on to following modules. Ignored (in versions before 20.10.13 “Skipping”) – module is ignored, signal gets through as if there was no such module in the scheme.
(3) – Camera image with the Triggered or Not triggered text (in versions before 20.10.13 – Skipping or Not skipping).
(4) – Some modules have some of their settings hidden under ‘Advanced settings’ link. Usually it’s more complicated settings that not every one needs. Click on it to expand the advanced setting of a module.
(5) – Recycle bin. Click it to delete the module.
(6) – Information icon. Click it to get more information about what this module does.
(7) – The big X button is the cancel button. Click it to discard the changes you applied during the current visit to the settings window.
(8) – The big tick button is the OK button. Click it for Xeoma to accept and remember the changes you applied during the current visit to the settings window.
(9) – Group settings (where applicable) this option at the top of the module’s settings window will help you apply changes to all or some modules of this type. It’s convenient when you need to quickly set up many modules of the same type.
2.3. How modules and chains work
2.3.1. How chains work
Operation of the circuits is based on the principle of logical sequential connection of modules:
Signal source (audio or video, or both together) + optional filter modules (detectors) + destination modules (notifications, recording, etc.).
Typically, a circuit requires at least 2 modules to operate: 1 video source module and 1 destination module. For example, Universal Camera -> Preview and Archive. This will be a permanent recording. You can also create a more complex scheme, depending on the task. For example, Universal Camera -> Schedule -> Motion Detector -> Preview and Archive. In this example, the video stream from the camera is first filtered by time: if now is the “allowed” time, the stream goes further along the chain and gets to the Motion Detector, where it is also checked for compliance with the set conditions (whether there is motion, does it satisfy the conditions of intensity, object size, etc.). If a stream satisfies all the conditions of all filter modules through which it passes, then it enters the destination modules.
Although in most cases, at least one destination module is required – recording video feeds with the “Preview and Archive” module, there are exceptions when no destination modules are needed: for example, when you only need to display information (for example, line crossings on the screen and save reports without saving records from the camera. However, even in this case, it is better to use the module that will end the chain – the module called Preview.
Attention: working connections (lines) between modules are white. If connections and subsequent modules are gray, it means that the previous module is blocking the image.

No image from cameras? See troubleshooting here and here
2.3.2. Chain branching and parallel operation of modules
Moving along the chain, the signal can get into a situation where the chain splits into several branches. If subsequent modules are enabled and running, the flow will go through all such “forks”.
An excellent example is the default chain that is created when new cameras are added. Universal Camera – Motion Detector – Preview and Archive, and at the same time Universal Camera – Problem Detector – Email Sending. In this chain, the signal will go through several branches at the same time – from one camera through filter-modules and into the destination modules of these branches.
It is also a standard situation when there are several destination modules in the chain (writing to the archive, sending a notification by email, sound signal, etc.)
Closing the forks. There may also be a situation when, after splitting into several branches, the chain closes back into one destination module. In this case, the signal that comes into that one destination module works according to the OR-OR principle. Let’s look at an example: when using a Motion Detector, you might need to set several monitoring zones with different (!) settings for each zone. For example, when motion monitoring with greater intensity and duration is required in one part of the camera “vision” than in the other. And despite the branching for the Motion Detector, you still want recording of all events into one archive. The chain then forks into two Motion Detectors, each with its own settings, and then merges into one archive. Records will be saved when at least 1 of these detectors has a motion event that satisfies limitations set in motion detectors.
Attention! When closing several branches into one module, please mind that if at some moment the signal arrives simultaneously from several branches, then only one will be written to the module, the one that started earlier. This is important if you subsequently search the archive by these characteristics.
2.4. Auto scan and search for cameras
Note: this section is for adding cameras to a standalone Xeoma systems. If you’re looking for guidance on connection of cameras to Xeoma Cloud instead, see here
2.4.1. Auto scan on first launch
When you start Xeoma video surveillance software for the first time, you will see a welcome screen. In it, you will be asked if the program should proceed with the default automatic scan of the local network in search of available cameras. Local network search is also sometimes referred to as the simple search.
The welcome window will have options
Add automatically
Add manually
Do not add
Unless otherwise selected within 10 seconds, the simple search will start by default, adding all found cameras.

|
If you are working with Xeoma through console/command line/Terminal, you can disable the automatic search with the -noscan command (alternatively, -noscanptzandaudio can be used to disable scanning for audio and PTZ functions in camera). See more about console commands here |
Add automatically
Xeoma video surveillance software will scan your home network for available cameras, and add them if possible. You don’t need to input camera model.
|
|
Xeoma is programmed to use dual streaming algorithms whenever possible. It means that by default it will be looking for a MJPEG streams or additional H264/H265 ‘substream’ with low parameters to use for preview of the camera. For the archiving purposes, the ‘Main’ stream is selected from the streams the camera offers (more often H264 / H265 with maximum settings). If the camera does not have dual streaming capability or if some streams are not configured, used are streams that are available. If the picture quality or load level do not suit you, we recommend going to the settings of the Universal camera modules and reconfiguring the streams used. |
All found non-password-protected cameras and cameras with standard authorization data will be added to the Main window of Xeoma with a standard Xeoma modules chain, with default settings suitable for most cases. You can add, remove or reconfigure modules as you need.
Standard chain for the Trial mode, Xeoma Lite, Xeoma Standard, Xeoma Pro is Universal camera – Schedule (configured to work around the clock) – Motion detector with minimal restrictions – View and Archive (with overwrite after 1 hour), and also Problem detector and Sending to Email (configuration required).
Standard chain for the Free and Starter modes: Universal camera – Motion detector – Preview and Archive
Cameras with more complex passwords will not be added to the Main Window – they will be listed in the ![]() “+” menu in the bottom panel. You can add them by selecting them from the list and entering the required access data in the window that opens.
“+” menu in the bottom panel. You can add them by selecting them from the list and entering the required access data in the window that opens.
Also in the + menu you can select the “Add all cameras below” option, and all found cameras will be added to the Main window. For cameras requiring authorization, you will need to enter a username and password in the settings of the Universal Camera module.
Attention! If adding new cameras automatically could a critical load on the processor, you will see a warning about high load, and subsequent found cameras will not be added to the Main Window. They can be found in the ![]() “+” menu and, if desired, added from there by clicking on them.
“+” menu and, if desired, added from there by clicking on them.
Add manually
As in the case of automatic addition of cameras, a scan of the local network will be launched, but cameras will not be automatically added to the Main window. Instead, you will see small previews of all the cameras found. You can add the desired ones to the Main window by clicking on their images. The rest of the found cameras will be available in the + menu. You can add them by clicking on them in the list.
Do not add
The local network will be scanned, available cameras will be found, but not added to the Main window – they will be listed in the + menu. You can add them by clicking on them in the list.
On subsequent launches of Xeoma video surveillance software the welcome window will not be displayed, and automatic camera search will not be launched in all modes except the trial mode. In the trial mode, the autosearch of cameras will be launched at every start (since the previous settings and all found cameras in the trial mode are reset at every restart).
|
|
Cameras are searched “in the background”, so you can continue to work while the program is searching. However, if the search takes too long or if all the needed cameras have already been found and added, the search can be stopped by clicking on the search progress bar. You can start the search for local cameras again through the option “Search for local cameras” in the + menu. |
Attention! You can add as many cameras as your Xeoma license and Xeoma mode allow.
When switching between Xeoma modes, automated search is enabled only for trial mode. For other modes, you can start camera search manually.
Cameras connected to a DVR are often not easy to find. In this case, it is recommended to add them manually by inputting their stream URLs.
2.4.2. Local camera search
You can start the search for local cameras again through the item “Search for local cameras” in the ![]() “+” menu. Acts completely like an automatic scan on first launch .
“+” menu. Acts completely like an automatic scan on first launch .
2.4.3. Search by IP / Password
If the cameras are located outside the local network of the Xeoma server, use the search for external cameras by IP / password. Select the Search by IP / Password option from the + menu. A dialog will open in which you need to enter the known data about the camera (its external IP address, authorization data, port of the desired stream). It is not necessary to fill in all the fields, but it is desirable, so the probability of a successful search will be higher. After pressing the OK button, automatic scanning of the specified address will start, and if successful, the found camera will be added to the Main window.
Search of the list of cameras by IP / password is supported. Specify several addresses, ports, passwords in the corresponding fields separated by commas, spaces, etc., and the search will be carried out for all of them. All cameras that match the conditions will be added.
|
|
The IP address can be either IPv4 (for example, 11.22.333.44) or IPv6 (for example a1::aoe12:122pob). |
Cameras connected via DVR are often not easy to find. In this case, it is recommended to add them manually by writing their stream connection string. See 2.4.4. Adding cameras manually below
|
|
Read more on how to connect a remote camera, including one that has no fixed IP address, in our article “Add a remote camera in Xeoma” |
2.4.4. Adding cameras manually
If you know the exact URL of the desired camera stream, you can use it to add a camera manually. To do this, select the “Add new camera manually” option in the “+” menu. A standard chain will be automatically added, but without the settings of the Universal camera. The settings dialog of the Universal Camera will immediately open, where you can enter the URL of the preview stream and/or the stream for direct saving to archive.
2.4.5. Adding cameras by duplication
You can duplicate an already configured camera into other chains using the “+” menu. If your cameras’ URLs are identical differing only by one or two digits in the IP address, you can duplicate chains and change just these few numbers in new chains instead of adding all cameras manually one by one. All other settings will already be set, as in the source chain that you make a copy for.
2.4.6. Adding cameras by POST request (available in Xeoma Pro)
If you need to add a camera to the program without starting the client part, you can add a chain according to a pre-configured template by sending a POST request:
{
“template”: “FileName”
}
to the address http://IP:Port/api?add=&login=ADMLOG&password=ADMPAS
Instead of IP, Port, ADMLOG and ADMPAS, use the server’s real IP address, port, and login and password of Xeoma administrator profile.
Place the template files in the “ChainTemplates” folder, which should be in the working folder of the Xeoma in server (in the same place as the Additional, XeomaArchive folders).
The template file must contain the description of the chains in the same format as, for example, in the config-files of the Cloud users (see “Default cameras config” in the user’s config file) – see the example here (more details here).
2.4.7. Module chain’s sample for adding new cameras
Starting from Xeoma 21.3.4, we’ve added the opportunity to change the default module chain’s sample that all new cameras are added with in Xeoma. The new scheme is set in the DefaultChain.txt file – the example of the new default module’s chain is written here. Place this file in the ChainTemplates folder in the program directory. When Xeoma starts, the server will check for the presence of this file: if it exists, then all cameras will be added with the module chain’s sample specified in this file.
Example of the contents of the DefaultChain.txt file:
chain1.UniversalCamera1=
chain1.MotionDetector2=
chain1.MotionDetector3=
chain1.Preview+Archive4=
chain1.WebconnectorTransmitter5=
chain1.HttpRequestSender6=
chain1.UniversalCamera1.connected=WebconnectorTransmitter5
chain1.UniversalCamera1.connected=MotionDetector2
chain1.MotionDetector2.connected=Preview+Archive4
chain1.UniversalCamera1.connected=MotionDetector3
chain1.MotionDetector3.connected=HttpRequestSender6
According to this data, you will create the following module chain’s sample for adding new cameras:

List the modules you need and connect them according to your requirements.
Please view Xeoma modules’ names here. The information about connections between modules and such syntax can be found here.
Thus, setting up the module chain in Xeoma becomes easier and faster!
2.5. Layouts menu
Multiple camera feeds on a single screen can be quite a confusing mess, unless arranged properly. Xeoma holds an abundance of tools to help you with that. Too many camera images on one screen? Want the cameras to scroll automatically? Need to get rid of black borders on the sides of the video? Want the program to show exactly what it detected and where and even enlarge the right window when it happens? How about an interactive map of the complex with every camera accounted for? All these can be customized by accessing Xeoma’s “Layouts menu”.
2.5.1. Pages (camera tabs)
Click the button with a window to start optimizing your screen. The most basic (and the most useful) function is “Manage layouts”. To assign a specific set of cameras to a single screen choose “Layout: custom” and click on the camera images you need (they will be highlighted in blue), then click the window-button again. In the upper left corner you will now see 2 tabs: “All cameras” and “Page 1”. The latter is the one you’ve just created, right-click on it to rename the tab, e.g. the area these cameras oversee. If you need to change the images’ positions on the screen, simply drag them.

If you need another page simply go to “Layouts menu” → “Manage layouts” → “Layout: custom” → “Add new tab” and highlight other cameras. Made a mistake while selecting cameras for a certain page? Choose “Edit current tab” in the same menu and select/deselect the camera images. Don’t need the page anymore? Click “Delete current tab” (the cameras will stay connected to the server, you can still see them in the “All cameras” tab). Finally, if you want Xeoma to arrange the cameras automatically by the sample, choose “Layout: XxY” (the first number is the amount of cameras across the window, the second – down the window). If you don’t want the tabs to be visible in the window, go “Layouts menu” → “Manage layouts” → “Hide pages panel”.
To make sure that users can see only certain layouts and cameras, you can restrict users’ rights to move cameras. To do this, enter the program as an administrator and go to “Main menu” – “Remote access” – “Users”. In the window that opens, find the “Changing of camera order is allowed only to administrator” option and put a tick in it. Next, in the “Preview menu” (the four squares icon), select “Use the user’s camera order” and click on the desired user name. To customize the layouts for a particular user, go to “Preview menu” – “Manage layouts” – “Layout: custom” and create layouts with a custom camera order for a particular user.
Please note that for the settings to apply, you must close the program on the client side and then restart it.
Important! If you uncheck the “Changing of camera order is allowed only to administrator” checkbox, all user layouts settings are reset. After activating it again, you will have to recreate the layouts and set the camera order for users again.
2.5.2. Getting rid of blank sides
The black borders on the sides of the image can be rather annoying. To get rid of them you will need to go “Layouts menu” → “Manage layouts” and choose “Stretch: select cameras” (if you want to affect only specific cameras) or “Stretch: all cameras”. Now you can select the the type of stretching: “Original”, “Stretch” or “Fit in”. The first means no stretching – the images are shown the way they are. “Stretch” will eliminate the black borders by stretching the image in the right sides, which will slightly affect the proportions. Please be advised that “Fit in” will force the image to both fit the window and keep the proportions intact by cutting parts of it off if necessary.
2.5.3. Automated scrolling
If you are making your own security station, you may want Xeoma to automatically scroll between several pages with a fixed interval. To do that go “Layouts menu” → “Manage layouts” → “Automatic scrolling” and choose the interval (5 sec, 1 min or 5 min). All done!
2.5.4. Larger grid mode
When you have several camera feeds on a single page one or two of those may be more important than the others. If you want them to take more space on the screen, you will need the “Larger grid mode” menu. There pick “Larger grid: 1×1” (if you need 1 big image, pick “Larger grid: 2×1” for 2). If Xeoma enlarged the wrong video, access the “Larger grid mode” and choose “Click-to-add mode”, then simply click on the right image.
If your chains have detectors in them (e.g. “Motion Detector”) you can make Xeoma enlarge an image as soon as a detector there is triggered. Go to “Layouts menu” → “Larger grid mode” → “Form group by detectors”. Easy!

2.5.5. “Show only active cameras”
Starting from version 19.3.7, Xeoma offers a special Layouts option: a separate tab where only triggered cameras are shown (i.e. those cameras whose filter modules were triggered).
Instructions are simple: create a separate tab with all cameras that you need this feature for, and while you’re in this page, go to “Layouts” -> “Manage Layouts” -> “Larger grid mode” -> “Show only active cameras”.
You can use this feature for as many cameras as you want and have license for. As soon as the event is detected the camera will be “opened” in that tab, and stay there for 5 seconds* (default value) after the event has ended. You can set a longer time in “Layouts” -> “Manage layouts” -> “Larger grid mode” -> “Display time of active cameras” – the currently selected value will be in green font.
|
|
*Starting from version 19.11.26 you can choose time of camera display in the “Active cameras” tab after the event ended. Options are 5, 10, 30 seconds, 1, 2, 5 minutes. |

2.5.6. Switch to active Pages
Starting from official version 22.3.16 Xeoma has a new layouts mode called “Switch to active Pages” with the help of which the client part will automatically display a Page with a triggered (“active”) camera or cameras on it. You can select what kind of event should make the camera ‘active’ – start of recording (triggered detectors) or appearance of a message from a Problems Detector or from an HTTP Switcher.
This mode stands out from the other layouts modes in these ways:
1) a special alarm icon will be added to a Page or Pages that have an active camera and that the interface will be switched to,
2) a Page with an active camera will be force opened and displayed even if another Page is being watched at the moment,
3) the whole Page will be opened, even if just one camera of the Page’s is triggered.
To have only the triggered camera displayed, please use the Active camera mode instead.
Naturally, you need to have Pages set up before you proceed to set up the ‘Switch to active Pages’ mode. See the Pages section above to learn how to do it.
You can open the Layouts menu – Manage Layouts – Larger grid mode from any Page. You will see 3 new lines in the dialog that opens:

Switch to active Pages – press this option to enable the mode with automated switching to the Page with an active camera. When the mode is enabled, this option will change its name to “Disable the “Auto switching to active Pages” mode” which you need to click if you’d like to exit the mode.
Time to display an active page – press this option to set how long the Page will be displayed before switching back. Available values are 5 seconds, 10 seconds, 30 seconds, 1 minute, 2 minutes, 5 minutes.
The value currently selected and used will be written in green letters.
“Auto switching to active Pages” mode – click this option to set which event will make a camera triggered (“active”). Available values are: Cameras with recording in progress, Cameras with problems or warnings, and With HTTP Switcher messages.
The value currently selected and used will be written in green letters.
Layout management is a very important factor in creating effective security systems protecting both your private and business life.
2.5.7. Interface enhancements
You can adjust Xeoma’s window itself by accessing the “Window settings” menu. If either your traffic or your CPU experience a high load you can adjust the “Maximum FPS” slider. The image will be less “smooth”, however. If you can’t see the camera names on screen, check the “Font size for camera names” and set it higher. The interface itself can be enlarged too by adjusting the “Scale interface (in percents of original size)” slider. You can also enable the transparency of the window (by checking the box “Turn transparency on” and change it with the slider “Transparency”. Finally, you can check the box “Always on top” to make sure that Xeoma’s window is never blocked by another one.

2.5.8. Motion visualization
Sometimes the program can prove to be more attentive than a human. Suppose it manages to notice a movement the guard missed. Can it point out exactly what moved? Sure. Go “Layouts menu” → “Visualization settings” → “Turn on visualization of movement”. Now Xeoma will consistently highlight every movement the “Motion Detector” noticed with a frame.
You can also visualize the trajectory of the moving object by selecting “Turn on movement track visualization” in the same menu. Now Xeoma will add green dots on the screen following the object’s path.
If a camera is disconnected or not sending any feed you would want to know that right away, Xeoma can help you with that, too. Go to “Layouts menu” → “Visualization settings” → “Show red cross over disconnected cameras”. With this option on, every time the image of any camera “freezes”, it will be crossed out alerting the viewer.
2.5.9. eMap interactive maps
If you are managing the security for an entire building, you may need an interactive map with cameras marked on it to facilitate the control. Go to “Layouts menu” → “eMap” and press “Load map”. Now click the folder-button to the right to choose the file containing the map (any image file will do: png, jpg, bmp, etc.). Press “Save” to keep this map in Xeoma. Once the map is loaded you can start adding cameras to it by clicking “Add camera to map”. Select the camera’s IP in the drop-down menu and click its location on the map. After the camera appears on the map you can also press and turn it so that it faces the right way.

When any detector is triggered within a chain for a camera, you will see the detector’s symbol outlined in red under its respective camera.
2.5.10. Decoding settings
Client decoding settings
If H264/H265 streams are used in your system, Xeoma receives them in a compressed (“encoded”) form. You might not notice that but to view such streams they need to first be decoded at some point. If H264/H265 streams are used for preview (the “URL for preview” field in the “Universal Camera” settings) they are decoded when they first arrive to Xeoma. If H264/H265 streams are used for archive saving, they are decoded when you view the archive recordings.
|
|
MJPEG streams don’t require decoding as they arrive in an uncompressed form – that’s why working with MJPEGs is less CPU-intensive. |
Decoding of H264/H265 streams (especially of those with high resolution and/or bitrate) can take a lot of system resources. In such case, high CPU load can cause the video stream to appear as jerky, or result in other system faults.
To mitigate the CPU load on your Xeoma server you can shift the decoding process to the client side – partly or wholly. If you do that, the server will be receiving and storing streams in an “untouched” (compressed) form, and the decoding will be launched only on the client’s device and only when the client requests to view the steam.
|
|
Important note: the filter modules (like Image Rotate, Face Recognition, etc.) use the preview stream to function (or the archive stream, if that is specifically selected in the module’s settings), for which the H264/H265 stream needs to be decoded too. So if there are any filter modules in a chain, an H264/H265 stream for them will be constantly decoded even if no human is really watching, just so that the filters can work. |
You can turn the decoding on the client side on in the “Layouts menu” – “Client decoding settings”. This option will also be of use if the network bandwidth between server and client is very low (for example, in mobile networks). If decoding is done on the client side it will receive a compressed, ‘lighter’ stream.
In the dialog you will have a flexible choice of what parts of decoding to shift to the client side – whether it’s just the preview steam for the Multiple Cameras View mode; the preview stream used for the Single Camera View mode; decoding of the archive view stream; all these options together, or a combination of them.

Video decoding on the client side for live preview has the following options:
Enabled – enables the decoding of H264/H265 streams for live preview on the client side.
Enabled for Single Camera View mode – decoding will be conducted on the client side for H264/H265 streams that are open in the Single Camera View window.
Auto detection decoding of H264/H265 streams that are used for preview will only be conducted on the client side if the client equipment has enough power to do that, otherwise the server part will have to do that job.
Disabled – H264/H265 streams used for preview will only be decoded on the server part.
To sum it up if your priority is to relieve server of some load, then select the forced decoding on the client part for all video streams or a part of them. If shifting some of the load is preferred but not critical – you can go for the Auto detection option.
Video decoding on the client side for archive view has options as follows:
Enabled – enables decoding on the client side for H264/H265 streams used for view of archive recordings through the built-in viewer.
Disabled – disables decoding on the client side for H264/H265 streams used for view of archive recordings through the built-in viewer.
Another way to eliminate part of the processor load – either on the server or the client side – is to use the so called hardware acceleration of decoding. It means that some of the computation will be done with the graphical system’s resources (NVidia CUDA and Intel QuickSync are supported for Windows, Linux). To turn it on for the client side, use the Hardware acceleration of video decoding on the client side option. Before you use it, you are advised to check if the client device equipment supports either of the technologies – otherwise there will be no effect.
More ways of reducing CPU load.
2.6. Changing cameras order
You can change the order the cameras are laid out on your main screen simply by dragging the preview box of the camera to the right place (i.e. exchanging its position with another preview box).
Photo instruction on changing cameras order
2.7. Device List (devices by groups)
When working with large numbers of cameras, the quick access and grouping of Device List might come in especially handy. Here is the instruction.
2.8. PTZ control and zoom
In Xeoma, you can have manual control over camera’s PTZ (pan tilt zoom) functions or, if a camera doesn’t support it, use digital zoom.
Besides, available are automated objects tracking (specifically, sports balls can be tracked across a field), work with presets and guard/patrol tours, specific modules to work with a Senstar sensor system or run scenarios after a rotation.
|
|
Starting with Xeoma 23.12.7 we added the autofocus feature. You can automatically check for loss of focus on cameras with ONVIF-facilitated support for PTZ, and attempt to return it. Find ‘Autofocus Settings’ in the ‘Universal Camera’ module’s settings and select one of the two options: ‘Autofocus based on image analysis’ which makes the program constantly check the camera scene for signs of defocusing, or ‘Autofocus at regular time interval’ to just make the camera focus back regularly at given intervals. |
2.8.1. Manual PTZ (pan, tilt and zoom) control
If your camera was connected to Xeoma all right, and pan tilt zoom commands it supports were successfully identified, you will see the PTZ control icon in the top right corner of camera’s preview box on the Main Screen/Quick Settings Screen, or in the lower panel of the Quick Settings Screen. Clicking on the icon yields opening of the PTZ control. Click on the arrows to turn camera up/down/left/right. Click on + or – to zoom in or out.
See this guide on adding PTZ cameras
Here is a table comparing all PTZ options in Xeoma:
| Standard | Pro | Additional Module | |
| Camera with actual physical PTZ possibilities: | |||
| Manual PTZ control (pan and tilt) |
Yes | Yes | N/A, use Xeoma Standard or Xeoma Pro |
| Manual zoom in/out and camera rotation |
Yes | Yes | N/A, use Xeoma Standard or Xeoma Pro |
| Automatic zoom in/out and camera rotation |
See PTZ Tracking | ||
| PTZ presets and programmed tours |
– | Yes | N/A, use Xeoma Pro |
| PTZ Tracking |
Yes | Yes | N/A, use Xeoma Standard or Xeoma Pro |
| Move to PTZ Preset |
– | Yes | N/A, use Xeoma Pro |
| Senstar PTZ Tracking |
– | Yes | N/A, use Xeoma Pro |
| Digital zoom (no real PTZ): | |||
| Manual zoom in/out in preview |
Yes | Yes | N/A, use Xeoma Standard or Xeoma Pro |
| Manual zoom in/out in archives |
Yes | Yes | N/A, use Xeoma Standard or Xeoma Pro |
| Auto zoom in/out in preview |
See Automatic Object Tracking in preview | ||
| Auto zoom in/out in archives |
N/A | N/A | N/A |
| Manual pan-tilt rotation (in preview and in archive) |
Yes | Yes | N/A, use Xeoma Standard or Xeoma Pro |
| Automatic Object Tracking in preview |
N/A | Yes | N/A, use Xeoma Pro |
| Automatic Object Tracking in archives |
N/A | N/A | N/A |
Troubleshooting
If the PTZ control is shown but clicking on arrows, + or – of the control does not work, go to the Detailed Settings Screen for this camera, open module settings of the Universal camera and go down to the PTZ options list. Try different options there, if any other is detected for your camera. If a non-standard port is used for pan tilt zoom commands in your camera, you can specify the correct one in the provided box. If none of this works, try using a different URL for your camera or contact Xeoma Support Team to get information.
If you’re sure that the camera does support PTZ yet the PTZ control is not shown in Xeoma:
a) Make sure you’ve filled in correct and full authorization data for the cam.
b) Try to re-add this camera with the same or different URL.
c) Make sure you’ve specified the correct PTZ port for the cam.
2.8.2. Digital zoom
Digital zoom is a method to digitally enhance the image, bringing the subject closer electronically without using the lens.
If your camera has a quite high resolution and you need to descry a far away object – just enable the option in the Main Menu of the Quick Settings Window or the Archive Viewer Window and zoom in and out by scrolling mouse wheel.
There are several ways to enable digital zooming:
1) Real-time digital zooming of the camera
To activate digital zooming, follow the instructions:
-Click on the camera you want to zoom
-Click on the “List” button in the lower left corner
-In the window that appears, select “Zoom”
-Use your mouse wheel to zoom in and out OR left-click on the area you want to zoom in. If you want to enlarge the image, click the left mouse button again and so on until you have enlarged the image to the size you want
2) Digital zooming in the archive
To activate digital zooming in the archive, follow the instructions:
-Go to the archive of the camera you want to zoom
-Click on the “List” button in the lower left corner
-On the menu that appears, select “Turn zoom mode on”
-Select the segment of video you want to zoom
-Use your mouse wheel to zoom in and out OR left-click on the area you want to zoom in. If you want to enlarge the image, click the left mouse button again and so on until you have enlarged the image to the size you want
* Digital zoom is available in Xeoma Standard and Pro modes. Not available in the free version of Xeoma, Starter and Lite.
|
|
Starting from Xeoma version 22.11.25, a new feature has been added to the PTZ menu – PTZ by clicking or selecting area. Previously, such functionality was available only for digital (software) zoom, but now it has become available for any PTZ cameras. This feature is available if there is at least one Xeoma Pro license activated on the server. |
2.8.3. PTZ control in a browser
See web server
2.8.4. PTZ Tracking – automated object follow
With the ‘PTZ Tracking’ module, your Xeoma automatically detects moving objects and makes the camera follow them (i.e. rotate to track them), which helps you to effectively discover and handle incidents. For convenience in operation you can set up maximum vertical/horizontal steps, the time of following the object for before going back to the start position, zoom speed and more.
In advanced video surveillance systems like Xeoma automatic PTZ tracking can be combined with manual PTZ control.
Note that if the camera does not have physical support for PTZ, automated tracking with digital zoom of the picture can be used instead.
Learn more here
![]()
|
|
If you want to “follow” objects in figurative meaning you can use “Motion track visualization” that visualizes the object’s path in camera frame in the Layouts menu. |
|
|
Starting from version 21.3.4, Xeoma has the opportunity to set a PTZ preset as a start position that the ONVIF-compliant PTZ camera will go back to after it finishes tracking the object. Find this option in the “PTZ Tracking” module settings if you have a valid Xeoma Pro license in the server. |
|
|
Xeoma also has other modules that can provide PTZ Tracking. For example, the PTZ Sports Tracking is using artificial intelligence mechanics to find a sports ball in camera’s sight and rotate the camera to always follow it. Also works for tracking players. See more here |
Troubleshooting of the ‘PTZ Tracking” module
For troubleshooting of the ‘PTZ Tracking” module, see here
2.8.5. Setting up PTZ presets and PTZ guard tours
Many PTZ cameras have a very useful ability to remember user-defined points of interest (often referred to as “presets”) and automatically move from one such point to another. Such moving between points using presets is called PTZ patrolling or PTZ guard tour.
|
|
Attention! PTZ presets and PTZ touring is supported in Xeoma starting from version 18.7.10 for cameras that work through ONVIF. You need to have a valid Xeoma Pro license for at least 1 camera to use this feature. |
1. If you have a valid Xeoma Pro license activated in the server that you’re viewing cameras for, and your camera has PTZ functionality controlled through ONVIF, the regular PTZ control will have options for managing presets and tours (also called patrols).
For quick jump to a selected preset, click the “Presets” button.
To add or change a preset or to make or change a tour click the “Tour” icon. Once in the “PTZ Tour” window, you can make or change a patrol tour – a schedule of positions (presets) that the camera needs to “visit”, and the stay time in each of the positions.
Note: to add a preset or change one of the existing ones, first use arrows and zoom buttons to position the camera in the desired position before you click the “Tour” button.
If you’re here to add a preset, enter a new preset’s name in the “Preset settings” field and click the “+” below the field.
If you want to change an already existing preset, select the preset from the list, and click OK. Note: a camera might not allow to change or remove its “built-in” presets. All presets created through Xeoma can be removed.
If you’re in this window to make a guard tour, you need to work with the “Tour management” window.
2. Enter the Tour’s name in the “Tour management” field and click the “+” button under it. You will get to the “PTZ Tour Settings” dialog offering to form a tour schedule out of the available presets (1):

Select a preset from the list and set the time for camera to “stay” in that position with the slider (2). Click the “+” button (3). The selected preset will be shown in the tour schedule field (4) where you can use up and down buttons to shift presets order (5).
Repeat these actions with all needed presets. After the tour schedule is done, click the OK button, and you will get back to the “PTZ Tour” dialog.
3. After you have at least one tour set up, they will be shown and can be chosen from the “Tour management” dropdown list. Besides, more icons will be below it – apart from the already known “+” button to add more tours (6) there will be an icon for editing the tour currently selected in the “Tour management” field (7); an icon for deletion of the tour currently selected in the “Tour management” field (8); and an icon for launching the tour currently selected in the “Tour management” field.
Press the “START” button on the right for the camera to start moving to the specified positions. When a tour is launched, this icon will change its look and stop the tour when pressed (9).

When the tour is launched, the camera preview will have an overlay with the preset name that the camera is currently visiting.
If you need several tours for this camera, repeat these steps.
Note: There are particular cameras that provide a list of presets that can not be changed or deleted. I.e. Xeoma takes a list of PTZ presets from the camera through ONVIF, and there are particular cameras that provide Preset1, Preset2…Preset1000. And these PTZ presets can not be deleted and in rare cases can not be changed. This usually happens with ‘no name’ Chinese cameras. So in this case you can choose e.g. “Preset10” and adjust this preset (position, configuration etc.), but all these presets (even the unnecessary ones) can not be deleted from Xeoma.
|
|
Working with PTZ presets and PTZ tours should not be mixed with the ‘Moving to PTZ preset’ module which is meant for doing certain scenarios after going to a preset. Learn more about the module here |
2.9. eMap (interactive map of the site)
 E-Map displays the monitoring area on an electronic map, by which the operator can easily find the cameras. Download the facility plan to the program and locate security equipment. Drag and drop camera icons on the scheme, name your cameras and specify each camera angle. To improve video surveillance effectiveness please use the built-in motion and noise detectors. As soon as one of the detectors will trigger, Xeoma will show you what is happening on the map. You will see the red sensor and can easily determine in which room there was a movement or noise threshold exceeded the limit. Navigate to camera preview in 1 second!
Xeoma’s eMap is multilayered, it can store as many maps for different floors as you need. Click “Load map” again and choose a different name and path. “Save” it and you now have 2 different maps to work with. You can switch between them by using the drop-down menu “Choose map”. Add cameras to the second map the same way you did for the first one.

Now it’s as simple as clicking a camera to access its image. Moreover, if the chains for your cameras contain detectors (e.g. “Motion Detector”), the eMap will help you oversee their work. Each time a detector reacts, an outline of that detector’s symbol will appear in red right under the camera.

If you no longer need a certain eMap, you can always click it in the “Choose map” drop-down menu and press “Delete map” underneath. If you misplaced a camera on the map, you can press Delete camera from map and simply click it.
|
|
Starting from Xeoma 21.11.18 an option to view interactive maps in fullscreen mode is added to eMaps. Now you can make a map fit to screen size to not miss important details – especially in sites with multiple cameras per map.
Starting from Xeoma 21.11.18 a possibility to select transparency level of maps, including full opacity, is added to eMaps. With this change, you can find a perfect ratio of alert icons visibility and background camera video feed. Starting with Xeoma 22.6.3 it’s now possible to use eMap (interactive maps) in multi-server mode. |
2.10. Changing camera’s names in preview
If you want to change the camera’s name in its preview box top left corner, use one of the following ways:
1. Mainly the Source name setting in Universal Camera is designed to change camera’s name:

2. You can also change the camera’s name in the Preview and Archive or Preview modules settings:

Name of the camera will be comprised of what is set up in Universal Camera and Preview and Archive or Archive so it might be a good to only set up camera’s name in just one of these places.
3. Click on the camera name in Main Window or Single Camera Window.

Right in this window a settings dialog will be opened:
– “Preview and Archive” (“Preview”), if you never edited the camera’s name. See 2,
– “Universal Camera”, if you edited the camera’s name before. See 1
For changing of camera name in web browser view see Web Server
2.11. Direct saving to archive, or “Dual Streaming”
The “Direct saving to archive” feature (also called “Dual Streaming”) is one of Xeoma’s default mechanisms for optimizing server resource consumption. The essence of this method is to use several streams from the camera wherever possible:
– one, usually with lower characteristics (resolution, fps and bitrate), is used for tasks related to stream display and stream processing by filter modules;
— another, with greater or even maximum characteristics, is saved without modifications* to the archive.
Requirements for the “Direct Saving to Archive” function (all conditions must be met):
1. Works only with the “Universal Camera” module as the source module. Other source modules (such as “Screen Capture” or “HTTP Receiver”) are not suitable.
2. If you need to save recordings, only the “Preview and Archive” module can be used. Other destination modules (such as “Save to File” or “HTTP Sender”) are not suitable.
3. Camera should be an IP (network) one, or an analog camera connected via DVR or NVR.
4. The camera must support dual streaming, i.e. have the required two streams (at least one H.264/H.265/H.264+/H.265+ stream). More about dual streaming
If watching of cameras live in Xeoma is not needed, just one stream – a H.264/H.265/H.264+/H.265+ one – can be used alone (see details of such cases below).
—
Advantages of the “Direct saving to archive” mode:
1. Lower CPU load thanks to the use of a MJPEG ‘preview stream’ (or H.264/H.265/H.264+/H.265+ with low performance): you do not have to decode a heavy stream on an ongoing basis, instead this arrangement decodes a stream with lower characteristics. A “heavy” stream is decoded only when it is accessed (when viewing an archive or a single camera (see below)).
2. No degradation in viewing quality. In most cases, there are dozens of cameras on one screen, in which case the screen size will not fit viewing dozens of cameras in maximum quality at the same time anyway. Along with this, it is possible to use the maximum quality stream (i.e. the “archive stream”) when one camera is viewed. In this case, the load at this moment is even lower usually, because it is not required to display all other cameras.
3. Direct saving to archive saves recordings in the compressed mkv format, which means significant saving of disk space compared to uncompressed recordings.
Learn more about the difference between MJPEG and compressed streams, and their benefits
—
How to enable the “Direct saving to archive” mode:
The mode starts working automatically if an rtsp stream (H.264/H.265/H.264+/H.265+) is input in the field “Full URL address of the rtsp stream of the IP camera for direct recording to the archive” (the so-called “archive stream”) in the settings of the “Universal Camera” module.
If this field is empty, the mode will not work, and for all purposes, including recording, the stream from the “Full IP camera URL for viewing (to reduce the load, it is advisable to use an MJPEG stream or an H264 stream with low parameters )” field (so-called “preview stream”) will be used instead. Please note that if the H.264/H.265/H.264+/H.265+ stream is specified as the “preview stream” it will be decoded in real time – in which case, the load on the processor and disk requirements will increase proptionally to the characteristics of the “preview stream”.
When performing the auto scanning for cameras, Xeoma gives preference to streams that are suitable for direct saving. Since many cameras support dual streaming, they are added to Xeoma already with the direct saving to archive setup.
If a camera doesn’t have fitting streams, or they could not be found during the search, Xeoma will use what cameras have.
More about the settings of the “Universal Camera” module
—
Disadvantages of the “Direct saving to archive” mode:
1. Filter modules that modify image cannot apply their modifications to archive recordings. See peculiarities of recording with the “Direct Saving to Archive” mode..
2. Since two streams are usually connected and used, there may be additional network load as compared to using just one stream, especially a compressed one.
3. Lots of aspects that need to be kept in mind. ‘Direct saving’ affects the settings of the “Universal Camera” module and the filter modules used in the chain, decoding settings and window settings in the “Layouts” menu, and – indirectly – Users settings.
4. For real-time viewing: if filter modules are needed, they will use the “preview stream” for their work by default. If we are talking about intelligent modules, the quality of the “preview stream” may not be enough for sufficient accuracy of their work, because they might require a higher quality (more detailed) stream. In this case, it may be necessary to turn off the direct saving to archive mode, or check the “Use archive stream” option for some or all of these modules, which, in fact, will bring back the constant decoding of the “heavy” stream for these cameras – that will naturally result in heightened CPU usage and might decrease savings of system resources.
5. Not all cameras have dual streaming. While most network cameras support dual streaming, this is not available for some cameras, including USB cameras, or analog cameras connected via a tuner or USB dongle.
6. The only destination module for recording that can be used is the Preview and Archive module.
—
What happens if the “archive stream” field has a URL, but the “preview stream” field is empty?
In this case, direct saving to the archive will be carried out, but the image from the camera will not be displayed for preview – there will be an inscription on a black background instead of the preview stream.
Filter modules present in the chain can work if the option “Use stream from archive (high resolution)” is checked in the settings of these modules (i.e., they can, for example, save reports or metainformation about recognized objects).
If the filter module in a chain with no preview stream does not have such a setting, or if this option is not checked, then such a module will be ignored (i.e. the module will not work, it will be in the ‘Ignored’ state).
—
What happens if the “archive stream” is unstable and disconnects from time to time?
If both fields are filled in (“Full URL of the IP camera for viewing (to reduce the load, it is advisable to use an MJPEG stream or an H264 stream with low parameters)” and “Full URL of the rtsp stream of the IP camera for direct recording to the archive ”) in Xeoma’s “Universal Camera” settings, then if the “archive stream” disappears, the “preview stream” will be used temporarily instead to make recordings from. At the same time, Xeoma will constantly try to reconnect to the “archive stream”, and if it is restored at one point, it will be used for saving to the archive again.
—
In which editions of Xeoma is the “Direct saving to archive” mode available?
The “Direct saving to archive” mode available in all 6 editions of Xeoma, plus in Xeoma Cloud, as well as in Xeoma Pro Your Cloud.
By the way, this method is not only used in Xeoma Cloud, but there are also restrictions on the characteristics of the “preview stream” if it’s a H.264/H.265/H.264+/H.265+ stream.
—
Peculiarities of recording with the “Direct Saving to Archive” mode:
As you might already know, when the “Direct Saving to Archive” mode is engaged, the “archive” stream is not decoded until viewing the records is needed, which allows not to decode the “heavy” stream all the time, rather to decode at the moment when they are needed: usually it’s the moment the camera archive is viewed. Since the “archive stream” is not decoded on a constant basis, it is impossible to make changes to it at the time it is being recorded*. If you need to have any image modifications (Image Crop / Rotate / Resize, Masking) in Xeoma records, then the direct saving to archive mode will have to be disabled.
*The only modifications available for recordings in the “Direct save to archive” mode are 1) the filtering of motion events according to data from “Motion Detector” (that is, not recording pieces of archive where there were no motion events), and 2) applying the date-and-time marking. It is still impossible to add modifications to an undecoded stream, so these two exceptions are actually using workarounds: the date/time marking is actually separate subtitles that are stored ‘next to’ recordings. And Motion Detector actually uses the “preview stream” to detect motions, and sends commands to cut the “archive stream” accordingly.
—
Peculiarities of live view with the “direct save to archive” mode (client part):
![]() Important: in this paragraph we are talking only about viewing cameras in real-time. For information about archiving see here
Important: in this paragraph we are talking only about viewing cameras in real-time. For information about archiving see here
Most modifier modules (filters) work with a “preview stream”. The quality of the “preview stream” may affect the operation of video analytic modules (for example, smoke and fire recognition): with a low quality of the stream, the recognition accuracy may be lower. Thus, you are faced with a choice between reducing the processor load through the use of dual streaming, and the recognition accuracy. In cases where you’d like a filter module to work with high quality images, check the option “Use stream from archive (high resolution)” in its settings. This action will enable decoding of the “archive stream” and using it for video analytics: the load on the processor will increase, however the records will still be saved in a compressed mkv container saving disk space. More about this option
For other modules – for example, “Image Crop” or “Masking” – the quality of the “preview stream” is not so important, so the only thing to be wary of is situations where the “preview stream” shows a different scenery than the “archive stream” (a rare discrepancy yet present in some cameras).
For modules “Privacy Masking”, “Marking”, “HTTP Marking”, “Image Crop”, “Image Rotate”::
when a filter module from this list is added to the chain with the “Direct save to archive” mode, the effect of these modules is shown in Single Camera View and Multi-Camera View windows automatically.
Prior to version Xeoma 22.6.28, this might not have been available. If your Xeoma is older and you cannot see modificiations from the listed modules, see the paragraph below.
For modules “Fisheye Dewarping”, “Face Recognition”, “Object Recognizer”, “ANPR”, “Gender Recognition”, “Crowd Detector”, “Object Size Filtering”, “Age Recognition”, “Text Recognition”, “FaceID”, “Image Resize”, “Face Detector (Emotions)”, “Visitors Counter”, “Cross-Line Detector”, “Unitor” (that is, modules that need to impose some kind of visualization or modification on the image):
When a filter module from this list is added to a chain with the “Direct save to archive” mode, the effect of these modules may not be shown immediately. To enable the display of the effect of these modules in live view, follow these steps (or make sure they are already done):
1. Uncheck “Force decoding on the client” in the Users settings (Main menu – Remote access – Users) for the required user profile. This action is available only to the Administrator profile.
2. In “Layouts” – Decoding Settings select “Disabled” from the “Video decoding on client in live view” drop-down list. If this option is not available, go back to step 1.
3. In “Layouts” – Decoding Settings lower or set to “0” the “Maximum number of cameras for which a high-resolution stream will be displayed (from the archive)” slider.
What does this mean? In order for the module to be able to analyze the image from the preview stream, the stream must be decoded by the Xeoma server part (see the paragraph above for exceptions).
For “QR Code Recognition”, “Color Detector”, “Slip and Fall Detector”, “Eye Tracking”, “Parking Spots”, “Sports Event Tracking”, “Safety Gear Detector”, “Smoke Detector”, “Abandoned Objects Detector”, “Loitering Detector”, “Object Detector” (that is, modules that do not overlay their analytical information on the image):
This list of modules uses a “preview stream” for its work and saves the received analytical information into reports or as metadata. Metadata – for example data about all the episodes when an abandoned item was discovered – is stored separately from the records and synchronized when viewing the archive is started. Besides, the same goes for visualization data (for example, green dots showing the path of a moving object) also works “through” direct saving, since this does not require decoding of the main stream (“archive stream”).
It should be taken into account that the quality of the “preview stream” may affect the operation of such modules (for example, the accuracy of smoke and fire detection): less details can be seen in a low quality stream; consequently the recognition accuracy will be lower. Thus, you may face a choice between reducing the processor load through the use of dual streaming, and the recognition accuracy. In cases where you’d like a filter module to work with high quality images, check the option “Use stream from archive (high resolution)” in its settings. This action will engage decoding of the “archive stream” and using it for video analytics: the load on the processor will increase, however the records will still be saved in a compressed mkv container saving disk space. More about this option
For modules “Scheduler”, “Problem Detector”, “Relay Switch”, “Button Switcher”, “Condition”, “HTTP Switcher”, “Camera Embedded Detector”, “RIF+”, “Smart Card Reader”, “GPIO”, “Moving to PTZ Preset”, “Senstar PTZ Tracking”, “Modbus Controllers”, “Vehicle Speed Detector”, “Thermal Camera Integration”:
These modules do not analyze the camera stream at all, they only receive an external signal for action, so direct saving to the archive does not affect their work.
Modules settings
3.1. Sources settings
Universal camera
![]() This module allows you to select as source of the image – a camera (IP (network),including wireless cameras, USB, or analogue) or world Internet camera (‘Random IP Camera’).
This module allows you to select as source of the image – a camera (IP (network),including wireless cameras, USB, or analogue) or world Internet camera (‘Random IP Camera’).
Name of the camera that is shown in Multi-Camera View can be specified in Universal Camera’s ‘Source name’ field, or in Preview or Preview and Archive module settings.
Read more about the module, addition of cameras and optimization of working with IP cameras here
Read also: Camera connection troubleshooting / List of supported cameras
Microphone
![]() This module allows you to select the sound source – microphone. Select the microphone from the list of available audio devices. Whether you need this module in your chain, or not, depends on the type of camera – usually USB cameras require the Microphone module to work with sound, while IP cameras usually have the sound stream embedded and don’t need a Microphone module.
This module allows you to select the sound source – microphone. Select the microphone from the list of available audio devices. Whether you need this module in your chain, or not, depends on the type of camera – usually USB cameras require the Microphone module to work with sound, while IP cameras usually have the sound stream embedded and don’t need a Microphone module.
Use this module to monitor your staff activity.
More about this module in this article
File reading
This module (Device) allows you to select JPEG or MJPEG files as image source. Create a modules chain, where the File Reading module will be connected to the Preview and Archive or Preview modules. You can also add other modules to the chain according to your goals.

Specify the full path to JPEG or MJPEG file you want to use as a source:

The selected image/video will be displayed as a camera in Xeoma. Name of the camera can be specified in Preview module’s settings (or Preview and Archive module):


Use this module to broadcast specialized advertisements in JPEG or MJPEG format, especially usefull for resellers to promote the program.
Read also “How to use a video as a camera in Xeoma?”
Screen capture
![]() This module allows you to capture your screen(s) and pass this video stream on to the following modules in the chain – for example, the recording unit (the “Preview and Archive” module). The Screen Capture module is available for Windows, Linux and Mac OSX.
This module allows you to capture your screen(s) and pass this video stream on to the following modules in the chain – for example, the recording unit (the “Preview and Archive” module). The Screen Capture module is available for Windows, Linux and Mac OSX.
In this module’s settings you can specify the frequency of shots and size relative to the original image size. As usual, you can give name to this source’s preview box in the settings of Preview, Preview and Archive, or Universal Camera modules.
Used with motion detector, it can help you start recording as soon as there’s activity on the computer.
Use this module to monitor what your children or staff are doing on their computers, record educational videos, or save a training session.
Another Xeoma
![]() The module allows you to receive audio / video stream that is transmitted by other copies of Xeoma over the network. To do this, specify the URL of the audio / video stream and access parameters, in ‘Another Xeoma’ settings. Name of the camera can be specified in Preview module settings (or Preview and Archive module). You can set image resolution and frame rate in the advanced settings.
The module allows you to receive audio / video stream that is transmitted by other copies of Xeoma over the network. To do this, specify the URL of the audio / video stream and access parameters, in ‘Another Xeoma’ settings. Name of the camera can be specified in Preview module settings (or Preview and Archive module). You can set image resolution and frame rate in the advanced settings.
More about Another Xeoma and Web Server connection
FTP receiver
![]() The module allows you to use an FTP server as a source or, simply put, stream your camera image to Xeoma via FTP. It’s convenient when you don’t want or cannot perform port-forwarding on your router at the place where camera is located, or when there’s no IP address that can be assigned to the camera (like when the camera is connected via the mobile Internet) thus no program can find it. Configure your camera so that it passes the image (JPEG) on to the FTP server via the IP address of your computer using the specified port, user name and password. You can assign this module a preview name in Preview module settings (or Preview and Archive module).
The module allows you to use an FTP server as a source or, simply put, stream your camera image to Xeoma via FTP. It’s convenient when you don’t want or cannot perform port-forwarding on your router at the place where camera is located, or when there’s no IP address that can be assigned to the camera (like when the camera is connected via the mobile Internet) thus no program can find it. Configure your camera so that it passes the image (JPEG) on to the FTP server via the IP address of your computer using the specified port, user name and password. You can assign this module a preview name in Preview module settings (or Preview and Archive module).
Detailed photo instruction on how to set this module up can be found here.
HTTP receiver
![]() This module allows you to get video and audio from another Xeoma server. Enter port and path to access this Xeoma from other Xeoma copies.
This module allows you to get video and audio from another Xeoma server. Enter port and path to access this Xeoma from other Xeoma copies.
To restrict access to this address, enter username and password. In the corresponding field you’ll see the address for access to video or images. Find more in this article
ANPR Speed Receiver
 This module receives data from ANPR Speed Sender modules, and based on it detects violation of speed limit. Enter unique IDs of the first point and the second point from your ‘ANPR Speed Sender’ modules, and the time a vehicle should pass them in (seconds or minutes).
The module will calculate the time difference between a vehicle crossing those points, and trigger if it is less than the allowed value you specified. A still shot from the camera containing the violator’s vehicle, its license plate and the time of occurrence, will be stored to the folder you specify. The module requests data from the Sender module once in 10 minutes to keep the network load low.
Read more in “License plate recognition: Speed limit violation“
3.2. Destination settings
Sound Alarm
![]() This module allows the server to play the specified sound at image received. In Xeoma Pro the sound can be played on clients too. If you want the signal to be triggered when motion is detected, plug it after a motion detector. You can select a wav sound file from the list or specify the path to the file manually, specify the file playback interval (sound will be played with each incoming frame, but not more than the specified interval) and duration of play. Click ‘Test’ for verification of the settings.
This module allows the server to play the specified sound at image received. In Xeoma Pro the sound can be played on clients too. If you want the signal to be triggered when motion is detected, plug it after a motion detector. You can select a wav sound file from the list or specify the path to the file manually, specify the file playback interval (sound will be played with each incoming frame, but not more than the specified interval) and duration of play. Click ‘Test’ for verification of the settings.
Application runner
![]() This module allows you to run the specified application. If you want the application runner to be triggered by detected motion, connect it after motion detector module. Specify the path to the program to run with the use of macros and interval (program will be run with each incoming frame, but not more than the specified interval). Click ‘Test’ for verification of the settings.
This module allows you to run the specified application. If you want the application runner to be triggered by detected motion, connect it after motion detector module. Specify the path to the program to run with the use of macros and interval (program will be run with each incoming frame, but not more than the specified interval). Click ‘Test’ for verification of the settings.
Use this module to run a third party application or script.
The following macros are supported by the “Application runner” module:
%JPEG% – sending the full path to the JPEG image to the program (if ‘Test’ button is used – this will be the default 100×100 picture)
%BMP% – sending the full path to the BMP image to the program (if ‘Test’ button is used – this will be the default 100×100 picture)
%FACECOUNT% – shows the number of faces from “Face recognition” module
%NAMES% – macro to receive names from “Face recognition” module
%FACEID% – the time of a face detection + name + percentage of resemblance
%TEXT% – macro to receive the text from the module “Text Recognition”
%EYEANGLE% – pupils’ direction from the module “Eye Tracking”
More information about this module can be checked here
Pop-up window (in Client)
![]() This module allows you to automatically restore Xeoma from the minimized state at received incoming frames. Connect this module to the necessary module in your modules’ chain (e.g. “Motion detector” + “Pop-up window” or “Face recognition” + “Pop-up window” etc.). This way your Xeoma Client window will pop up (will be maximized) from the minimized state upon the triggered (if there’s motion being detected, face being recognized and so on).
This module allows you to automatically restore Xeoma from the minimized state at received incoming frames. Connect this module to the necessary module in your modules’ chain (e.g. “Motion detector” + “Pop-up window” or “Face recognition” + “Pop-up window” etc.). This way your Xeoma Client window will pop up (will be maximized) from the minimized state upon the triggered (if there’s motion being detected, face being recognized and so on).
This module is also used to send push-notifications for Xeoma on Android upon the trigger. Starting from Xeoma 20.10.22 another module is used to send push-notifications – “Mobile notifications”.
Sms Sending
![]() This module allows to set up the automated sending of text messages (SMS) to a cell phone. You can set the interval between messages sending, and use macros to specify which camera and at what time detected motion. Select one of the options to send messages: with use of clickatell.com or bulksms.com sites, or using a GSM modem.
This module allows to set up the automated sending of text messages (SMS) to a cell phone. You can set the interval between messages sending, and use macros to specify which camera and at what time detected motion. Select one of the options to send messages: with use of clickatell.com or bulksms.com sites, or using a GSM modem.
If you choose clickatell.com, you will need to specify your login, password and API ID (or just API ID) received after registration on the site. In modem option, you only need to connect the modem. After that, enter phone number(s) to send messages to, message text and select sending frequency.
API ID (Api key) – This key is available on the site that you use.
In clickatell.com you need to go to the tab ‘Manage my product’, click ‘My Connections’ and select ‘XML’ in the drop down box ‘Add connection’, then click ‘Submit and Get API ID’ – your API ID will appear in the window.

In bulksms.com you will need only login and password you got during the registration. You can also get 5 free text messages for testing with this service.
Sender’s number or name: you can use any name, but you must be registered on the site, with which you are sending text messages. If you get an error after the test that warns you about the wrong sender, the name you specified is incorrect, or not consistent with the administration of the site. If you leave the sender field empty, number that you specified during registration will be used.
Recipients’ numbers: SMS can be sent to multiple numbers at the same time, just separate numbers by ‘;’ ‘,’ or space.
For more information, go to the site you are registered with.
After the module is set up, click ‘Test’ to test its work.
Use this module to send messages about emergency situations. Problems detector module plus sms sending can notify you about:
– RAM is running out;
– Disk space is running out;
– The server was restarted incorrectly;
– No audio stream;
– Picture became too dark;
– Picture became too bright;
– Camera turned or obscured;
– The server was restarted correctly;
– No access to database;
– Database errors;
– Camera image is missing or isn’t changing;
– The network resource is not available anymore.
Sending Email
![]() This module allows you to set up automated e-mailing at event detection. You can set the interval between emails, and attach incoming video and images (specify maximum count of attached images, time between pictures captures, videos’ fps and duration, and maximum size of messages). Also use macros to work with the problems detector and motion detectors. Pictures that can be attached – up to is how many pictures you can have attached to each email message according to Max message size set up with the slider below.
This module allows you to set up automated e-mailing at event detection. You can set the interval between emails, and attach incoming video and images (specify maximum count of attached images, time between pictures captures, videos’ fps and duration, and maximum size of messages). Also use macros to work with the problems detector and motion detectors. Pictures that can be attached – up to is how many pictures you can have attached to each email message according to Max message size set up with the slider below.
For example, you don’t want each message to be bigger than 2 Mb. It means that each message can have up to 26 pictures (this number can vary depending on camera’s resolution & picture size – which in most cases can be configured in web admin of your camera).
Select your mail server from the list or specify your own. If your mail server is not listed, you can specify the settings manually. Enter SMTP-server address and port as well as the method for encrypting data. Enter username and password of your email. In ‘Recipient’ line specify recipient’s email (or emails separating them with space, comma or semicolon). You can send email to multiple addresses. Enter subject and message text (optional). Click ‘Test’ for verification of the settings.
Please note that if you connect email sending module after motion detector, it will certainly affect the result. For example, if you have a 1 minute interval between messages and set up the email sending module to attach 2 pictures to each message. This means that every 30 seconds the program will check motion detector if there is motion at THAT moment. If there is, the picture gets stored in temporary memory waiting for being sent. If not – it doesn’t. In the next 30 seconds the program checks again, to get another picture if there is motion this time. And at that instant it sends an email with all pictures that it stored during that time interval (during 1 minute in our example). If there are no pictures, no message is sent.
If you want to be able to view the attached videos on your mobile device, MP4 format of videos should probably be your choice for it is supported by most mobile devices.
“Sending email” module’s settings:

Use the high resolution stream from archive – this line means that “Sending email” module will use 2nd stream (for archive recording, it’s usually in higher resolution) from “Universal camera” module’s settings. So you’ll receive attachments with higher resolution.
Prerecord – if you want the picture or video to capture something before a detector is triggered, set it to a few seconds.
Count as one several consequent events that happened during – this is best described with an example:
-the motion detector detects something for 5 seconds, then after 10 seconds – something else for 5 seconds
-if the e-mail is set for the interval of 5 seconds – you will get 2 messages (2 different events detected)
If you know that detectors can trigger often in your situation, and you don’t want Xeoma to flood your e-mail account with messages every few seconds – this is the slider that allows Xeoma to compress all the triggered events into a single message.
The delay interval for adding pictures/videos – if you have any attachments to the e-mail, this will force Xeoma make those not immediately upon a detector triggering, but with a delay.
Attention: if you use Prerecord, then you should set sliders “Count as one several consequent events that happened during” and “The delay interval for adding pictures/videos” to 0, as it’s shown below:

Otherwise, Prerecord is ignored.
Time between messages – this decides how often Xeoma can send you messages; in the above mentioned scenario of a flooded mailbox this would also help, but all the potential messages in between will be ignored and lost. (N.B. this timer takes priority over the rest; if e.g. the delay between images is greater than this timer – you will still get messages, but no attachments)
In ‘Sending email’ module’s settings you can use different macros as Email subject and Email message to receive emails with particular information according to the macros.
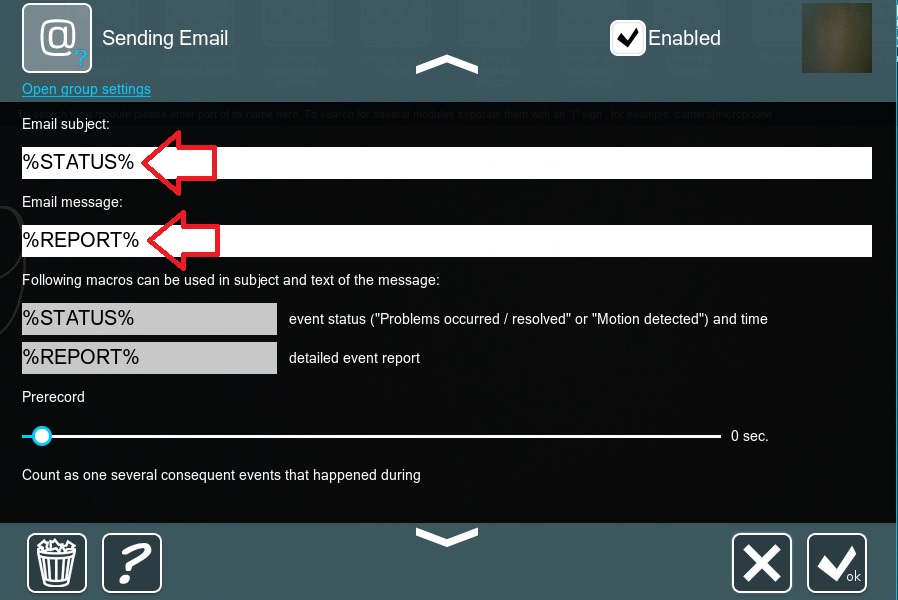
You can use the following macros:
%TEXT% – macro to receive a recognized text from the module “Text recognition”
%OBJECT% – this macro allows receiving information about the object that was detected by the “Object recognizer” module
%GENDER% – this macro allows receiving info about gender from “Gender recognition” module
%NUMBER% – macro to receive license plate’s number in plain text from “ANPR” module, e.g. A110PB77 etc.
%FACECOUNT% – it shows the number of faces from “Face recognition” module in the email
%NAMES% – macro to receive names from “Face recognition” module
%TIME% – a detection time
%AREA% – status of parking spaces from “Parking Spots” module
%REPORT% – macro to receive information on the problem’s type from “Problems detector”
%STATUS% – trigger type (the movement was detected, problem or its solution was found)
Use this module to send emails about emergency situations. Problems detector module plus email sending can notify you about:
– RAM is running out;
– Disk space is running out;
– The server was restarted incorrectly;
– No audio stream;
– Picture became too dark;
– Picture became too bright;
– Camera turned or obscured;
– The server was restarted correctly;
– No access to database;
– Database errors;
– Camera image is missing or isn’t changing;
– The network resource is not available anymore.
Save to file
![]() This module allows you to save incoming frames in a specified file. You can specify the path to store videos and images, name to be assigned to stored files and use macros.
This module allows you to save incoming frames in a specified file. You can specify the path to store videos and images, name to be assigned to stored files and use macros.
For example, if you want JPEG images to be saved on the C drive in the Public folder and subfolder Pictures with a core name img and added current date and time. Specify the full path to the file C:\Users\Public\Pictures\img_% ym-d_h-is%. jpg. You can specify the interval between frames saving.
Use this module to save different files to different discs and folders.
Note that you’ll not be able to review videos from the ‘Save to file’ module in Xeoma’s internal video player. In order to review videos inside Xeoma, please use ‘Preview and archive’ file.
You can find information about macros available for the module in here
FTP upload
![]() This module allows you to upload an image or video file to a specified FTP (SFTP)-server. Specify server address, port, username and password and check the box for secure connection. Specify the path to the saved file using the offered macros. You can specify the interval and type of stored data. Click ‘Test’ for verification of the settings.
This module allows you to upload an image or video file to a specified FTP (SFTP)-server. Specify server address, port, username and password and check the box for secure connection. Specify the path to the saved file using the offered macros. You can specify the interval and type of stored data. Click ‘Test’ for verification of the settings.
ANPR Sender to FTP
![]() This module allows to send data from the Xeoma’s ANPR module to an FTP server. Data is sent as a tar archive that includes a JPEG image of the recognized license plate, and a text report. A text report can have information about this recognized plate number, its coordinates on the image, size of the image, and a timestamp. In corresponding fields please enter the server’s address, port and username of the FTP server. Using the available macros, set a path to the file to save, as well as the path to the report file example that should be sent to the server.
This module allows to send data from the Xeoma’s ANPR module to an FTP server. Data is sent as a tar archive that includes a JPEG image of the recognized license plate, and a text report. A text report can have information about this recognized plate number, its coordinates on the image, size of the image, and a timestamp. In corresponding fields please enter the server’s address, port and username of the FTP server. Using the available macros, set a path to the file to save, as well as the path to the report file example that should be sent to the server.
HTTP request sender
![]() This module allows to generate and send HTTP requests. If you want to send motion-triggered requests, connect the module after the motion detector module. Check the box ‘Show all parameters’ to set request parameters. Use the {ID} macro while setting up parameters for module’s unique identificator. The resulting URL will be shown in ‘Resulting URL’ field.
This module allows to generate and send HTTP requests. If you want to send motion-triggered requests, connect the module after the motion detector module. Check the box ‘Show all parameters’ to set request parameters. Use the {ID} macro while setting up parameters for module’s unique identificator. The resulting URL will be shown in ‘Resulting URL’ field.
See 3.14. HTTP request sender (integration with home automation)
HTTP upload to other Xeoma
![]() This module can transmit video and audio over the net to other copies of Xeoma. Enter port and path on a remote Xeoma server, to transmit audio and video to.
This module can transmit video and audio over the net to other copies of Xeoma. Enter port and path on a remote Xeoma server, to transmit audio and video to.
To restrict access on a remote server, enter username and password. In the corresponding field you will see the address that will be used to access video stream or images.
More in 3.15. HTTP Upload to Other Xeoma
RTSP Broadcasting
![]() This module allows to transmit data over the network using rtsp broadcasting. Additional software ffmpeg is required for broadcasting in libx264. You can download it from our site or use your ffmpeg. By downloading ffmpeg from our site you accept terms of the GNU GPLv2+ license agreement. Additional software is not required for broadcasting in mjpeg or mpeg4, as it can use the embedded ffmpeg. You can also select the desired compression level for the resulting stream.
This module allows to transmit data over the network using rtsp broadcasting. Additional software ffmpeg is required for broadcasting in libx264. You can download it from our site or use your ffmpeg. By downloading ffmpeg from our site you accept terms of the GNU GPLv2+ license agreement. Additional software is not required for broadcasting in mjpeg or mpeg4, as it can use the embedded ffmpeg. You can also select the desired compression level for the resulting stream.
More in 3.16. RTSP Broadcasting
Preview
![]() This module allows reviewing current image from camera in real time:
This module allows reviewing current image from camera in real time:
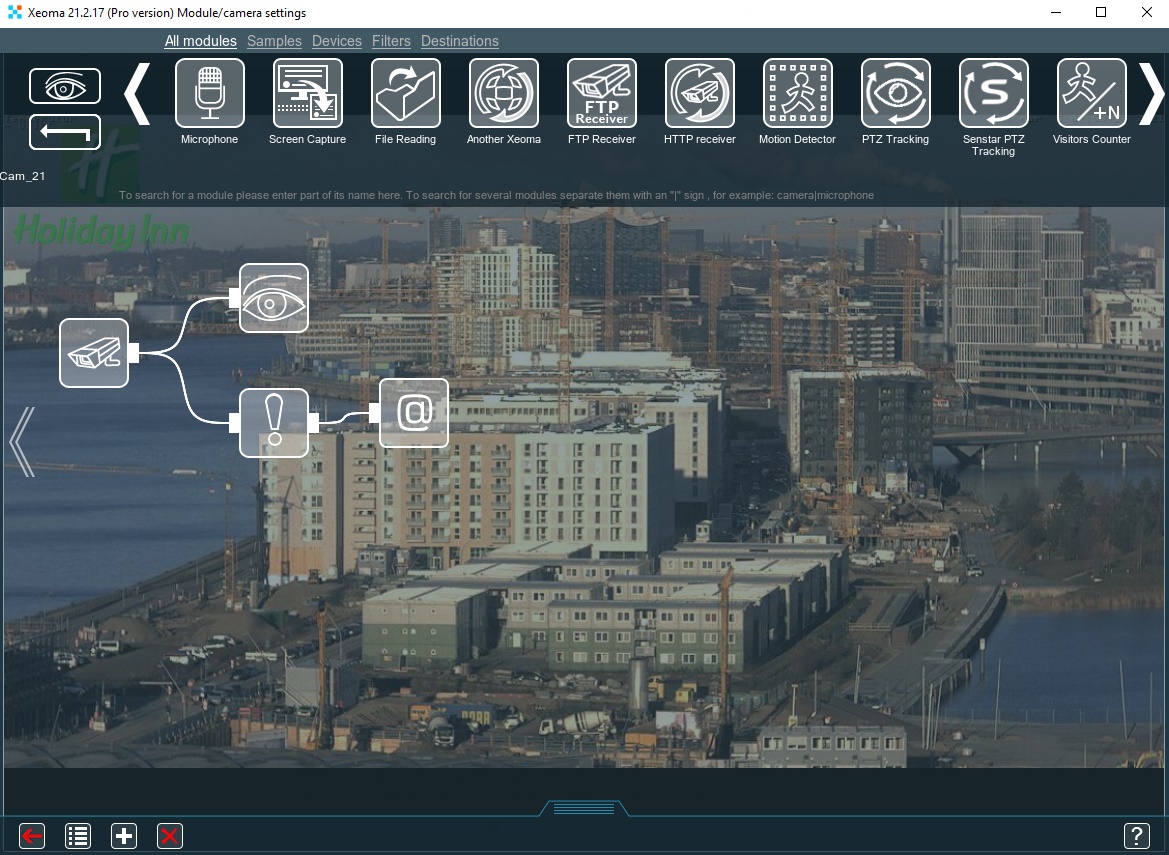
Unlike the “Preview and Archive” module, this module does not record video from a camera into the archive. It can be used on sites where monitoring is carried out online, and archive recordings are not needed. Useful for Xeoma Starter mode, which allows you to view the unlimited number of sources.
You can specify necessary name that will be displayed on this “Preview” module’s image:

Web server
![]() More about web server here
More about web server here
Use this module to broadcast your camera on your site or to view your camera via browser.
Preview and archive
![]() More about archive here
More about archive here
Use special option in this module to synchronize with SD cards.
ANPR Speed Sender
 This destination module records the time a vehicle passes a control point, and sends the data to a ANPR Speed Sender to calculate the elapsed time between points and decide whether the speed limit has been exceeded.
There should be a pair of ANPR Speed Sender modules (one for each of two control points) connected after an ANPR module, as well as one source module “ANPR Speed Receiver” (all three can be on the same computer).
Enter the control point’s unique identificator (ID) that should be different from another point’s ID, connection data for the Xeoma server with the ANPR Speed Receiver that will be be detecting speed limit violations, and the path to a folder where a camera image with the vehicle’s license plate and date and UNIX-time of detection will be saved. You can select the timestamp synchronization method – GPS module or the computer’s time.
Read more in “License plate recognition: Speed limit violation”
Mobile notifications
![]() The “Mobile notifications” module will allow you to receive PUSH notifications on your mobile devices e.g. when particular module is triggered. Read more in this article.
The “Mobile notifications” module will allow you to receive PUSH notifications on your mobile devices e.g. when particular module is triggered. Read more in this article.
Streaming to YouTube
![]() Use the Streaming to YouTube module to push a camera feed to your Youtube channel as a live broadcast. Xeoma’s Youtube streaming will be a perfect way to build trust within businesses that have traditionally been stained with myths and fears like elderly care, pet hotels, or fast food and small HoReCa establishments. Besides, live streaming from your workshop will help people get interested and get to know more about the process of your craft. Moreover, it’s also an easy workaround for when remote view of camera video stream is needed but there’s no public IP address in there. This module will be available in Xeoma Standard and Xeoma Pro editions.
Use the Streaming to YouTube module to push a camera feed to your Youtube channel as a live broadcast. Xeoma’s Youtube streaming will be a perfect way to build trust within businesses that have traditionally been stained with myths and fears like elderly care, pet hotels, or fast food and small HoReCa establishments. Besides, live streaming from your workshop will help people get interested and get to know more about the process of your craft. Moreover, it’s also an easy workaround for when remote view of camera video stream is needed but there’s no public IP address in there. This module will be available in Xeoma Standard and Xeoma Pro editions.
Telegram Bot notifications
![]() This module is used to send messages to a bot in the Telegram messenger. Messages can include custom text and/or pictures from the camera.
This module is used to send messages to a bot in the Telegram messenger. Messages can include custom text and/or pictures from the camera.
To work with the module, a token for telegram bot access is required.
Instructions on how to get the token:
1. Open telegram, and look for “BotFather” in the search bar
2. Run (/start) and create a new bot (/newbot)
3. Copy the token that you will get after a new bot is created.
This module is available in Xeoma Standard, Xeoma Pro and Trial editions. Find more information about the module here
3.3. Filters
Day Detector
![]() This module automatically filters frames in low (insufficient) light. This module can be used for recording in the daytime, for example, at remote sites where the recording according to the “Schedule” module is not relevant – for example, in nature reserves when observing animals that live in accordance with the biorhythms of the Earth, and not the schedule.
This module automatically filters frames in low (insufficient) light. This module can be used for recording in the daytime, for example, at remote sites where the recording according to the “Schedule” module is not relevant – for example, in nature reserves when observing animals that live in accordance with the biorhythms of the Earth, and not the schedule.
To disable the module, uncheck box in upper right corner. In this case all following modules will not receive image. If you want to disable the filter without disabling the whole chain, check ‘Hidden’ – the icon will have different color of the filter circuit then. To enable the module back, check the box.
Motion detector
![]() More about motion detector here
More about motion detector here
Use this module to detect motion, absence of motion, to ignore cloud or shade movement. Combine this module with PTZ tracking to monitor moving objects. All these functions will help you to control your staff.
Loitering Detector
![]() This module will be triggered when some object is in this zone the specified time. Connect this module in a chain after the “Object Detector” module where you selected the detection zone, object size, etc. required settings. In Loitering Detector’s settings set triggered time. Find more information about the module in this article
This module will be triggered when some object is in this zone the specified time. Connect this module in a chain after the “Object Detector” module where you selected the detection zone, object size, etc. required settings. In Loitering Detector’s settings set triggered time. Find more information about the module in this article
Object Detector
![]() It’s an enhanced version of Motion Detector that will allow to follow objects around even if they are not moving, and distinguish separate objects from each other.
It’s an enhanced version of Motion Detector that will allow to follow objects around even if they are not moving, and distinguish separate objects from each other.
Detector of Abandoned Objects
![]() This module will determine if an object in camera’s field of view is left unattended for an unacceptable amount of time, and trigger pre-set reactions. To avoid false alarms, please set what minimal and maximum size can am object have to trigger the alarm. For example, it will allow the module to react to unattended luggage rather than people moving around the railway station.
This module will determine if an object in camera’s field of view is left unattended for an unacceptable amount of time, and trigger pre-set reactions. To avoid false alarms, please set what minimal and maximum size can am object have to trigger the alarm. For example, it will allow the module to react to unattended luggage rather than people moving around the railway station.
Set up the zone of detection of any shape of size. Use brush to paint red an area or areas to be monitored. Leave transparent spots where objects will not be monitored. You can change brush size for filling or clearing zone of monitoring. In the ‘Auto’ mode automatically brush effect – filling or clearing – is selected automatically depending on the area under the brush.
You can set time after which an object is considered abandoned. For example, if you set 10 seconds, only items that were unattended for more than 10 seconds, will trigger the reaction(s).
“Continuous work to enable search by motion in the archive” option, if ticked, the Detector will be switched to the “Ignored” state (in versions older than 20.10.13 – “Skipping”) (when archive is connected after the Detector, it will conduct continuous recording). The option is used when continuous recording is required but search of objects is also needed in the archive. This way the Detector in Xeoma security camera software will only collect data about unattended (abandoned) objects.
Read more about the module here.
Scheduler
![]() This module allows you to set the days and time when connected to scheduler modules will work. You can specify days and time of work, for example from 5 pm to 11:59 pm on weekdays (that is till 11:59:59 because the minute gets recorded to the end). You can also specify time for work days and set round-the-clock work on weekends. Alternatively, you can specify a timer, so that the module turns on and off after a certain period of time has passed. To disable the module, uncheck box in upper right corner. In this case all following modules will not receive image. If you want to disable the filter without disabling the whole chain, check ‘Hidden’ – the icon will have different color of the filter circuit then. To enable the module back, check the box.
This module allows you to set the days and time when connected to scheduler modules will work. You can specify days and time of work, for example from 5 pm to 11:59 pm on weekdays (that is till 11:59:59 because the minute gets recorded to the end). You can also specify time for work days and set round-the-clock work on weekends. Alternatively, you can specify a timer, so that the module turns on and off after a certain period of time has passed. To disable the module, uncheck box in upper right corner. In this case all following modules will not receive image. If you want to disable the filter without disabling the whole chain, check ‘Hidden’ – the icon will have different color of the filter circuit then. To enable the module back, check the box.
Marking
![]() This module helps embed waterstamp of time and date, GPS coordinates, custom text or image overlay into image from the camera or other video source. You can choose marking position, date/time format and set up desired font size.
This module helps embed waterstamp of time and date, GPS coordinates, custom text or image overlay into image from the camera or other video source. You can choose marking position, date/time format and set up desired font size.
If you want to record archive with marking, then you’ll need to untick “Enable H.264/H.265/H.265 recording to Archive without conversion” checkbox in the “Universal camera” module’s settings. In this case archive will be recorded in .xem format.
If you want to record the date/time marking into archive, but also store H264 archive stream without conversion, then in this case Xeoma archive will be recorded into .mkv format, and marking will be added as subtitles. So please make sure to turn on subtitles if you play the archive recrding in the 3rd party player.
See more about Marking here
Smoke Detector
![]() This module detects smoke in the monitored area. Use sensitivity threshold scale to determine what level of smoke in the zone should trigger reactions. The 0 level denotes that any level of fogginess in the picture will be considered smoke. 100 means high sensitivity level, at this level only thick fogginess in the picture will trigger the alarm or any other action you specified.
This module detects smoke in the monitored area. Use sensitivity threshold scale to determine what level of smoke in the zone should trigger reactions. The 0 level denotes that any level of fogginess in the picture will be considered smoke. 100 means high sensitivity level, at this level only thick fogginess in the picture will trigger the alarm or any other action you specified.
Set up a zone or zones of detection of any shape of size. Use red color to define the area to be monitored for smoke. Leave transparent spots that shouldn’t be monitored for smoke. You can change brush size for filling or clearing zone of monitoring. In the ‘Auto’ mode the brush effect – filling or clearing – is selected automatically depending on the area under the brush.
To avoid false alarms use the “Ignore motion shorter than” option where you should set a specific time in seconds before fogginess is considered a smoke and triggers pre-set reactions.
“Continuous work to enable search in the archive”: if ticked, the Smoke Detector will be switched to the “Ignored” state (in versions older than 20.10.13 – “Skipping”) (for example, if an archive is connected after the motion detector, it will conduct continuous recording). The option is used when continuous recording is required but so is all data about “smoke” events. With this option on, the Smoke Detector in Xeoma security camera software will only collect data about “smoke events”.
Also available in Xeoma: fire detection
Sound detector
![]() This module allows to analyze audio streams and react to sounds that exceed a certain limit. If your camera has a built-in microphone, you can connect the detector directly to the “Universal camera”. If the microphone is installed separately, make sure to add the module “Microphone” and connect it to the detector.
This module allows to analyze audio streams and react to sounds that exceed a certain limit. If your camera has a built-in microphone, you can connect the detector directly to the “Universal camera”. If the microphone is installed separately, make sure to add the module “Microphone” and connect it to the detector.
The settings for the module include:
Continuous recording (search will be accessible through the menu of archive) – check this box, if you want the detector to record footage 24/7 and then review the archive for the results; with this you can go Archive menu → Show sound data from Sound Detector, Xeoma will mark the detected sounds with orange on the timeline.
Post-record – regulate how much footage you need to keep in the archive after the detector triggers.
Sound threshold, % – set the detector’s sensitivity, so that it triggers to specific sounds (e.g. loud crash of a window or a gunshot), ignoring the unnecessary noises (e.g. cars honking). N.B. The higher it goes, the more sounds will be ignored.
Current sound level, % – check what the detector can hear in real time; this is useful for initial setup when you need to adjust the threshold.
Face detector
![]() The module is meant for detection of human faces in the cameras’ field of view. It can be used to detect excessive presence of people where they are not supposed to be or, in reverse, detect if there are insufficient staff.
The module is meant for detection of human faces in the cameras’ field of view. It can be used to detect excessive presence of people where they are not supposed to be or, in reverse, detect if there are insufficient staff.
Face Recognition will help look for certain people in live view and archive. For face recognition to work, a training is required beforehand to add faces of people that will be recognized later on. You can add faces in two ways: in real time using image from camera or during playback of the archive. See ‘Help on faces recognition in Face Detector’s settings for more information.
In combination with the ‘Privacy Masking’ module, can dynamically blur people faces in camera’s view.
New innovative feature: Mask Detector – option that will automatically detect people wearing or not wearing a medical protective facial mask.
See more about Face Detector
Problems Detector
![]() Built-in tools for system self-test. This filter module notifies you whenever emergency situations arise: no image from camera, no sound, defocusing, image degradation detection, camera was turned, image is too dark, image is too bright, no free disk space left, RAM is running out or server is restarted. Archive’s timescale marks the intervals where a problem was detected or was no recording because of camera issues (camera “freezes”, etc.).
Built-in tools for system self-test. This filter module notifies you whenever emergency situations arise: no image from camera, no sound, defocusing, image degradation detection, camera was turned, image is too dark, image is too bright, no free disk space left, RAM is running out or server is restarted. Archive’s timescale marks the intervals where a problem was detected or was no recording because of camera issues (camera “freezes”, etc.).

Problem messages are duplicated on the viewport. By choosing the desired font, you will not miss the message about the problem:
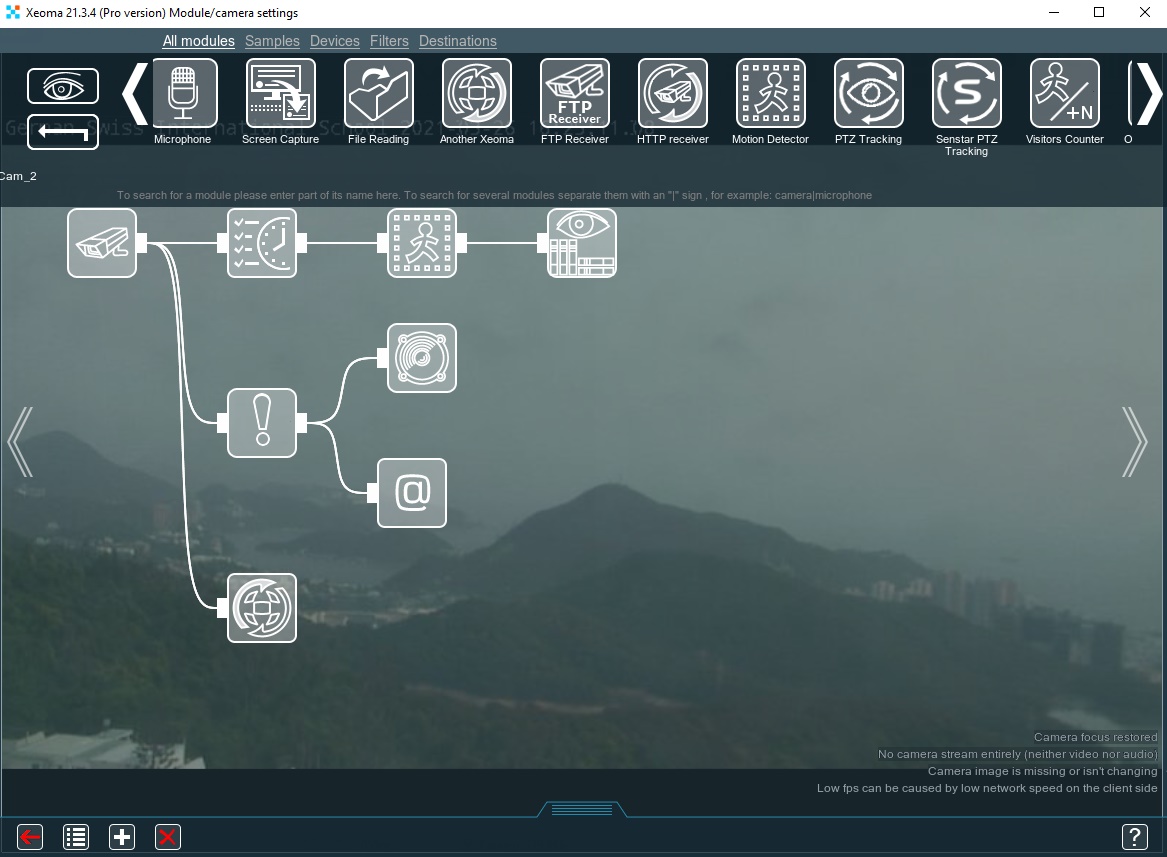
You can use the option to check access to a network resource (for example, a modem). To do this, specify the address of a network resource for verification and set the desired interval of availability check. Also “Problem detector” can record found problems to the log file:

The log will be written to the ProblemsDetector.log file in the Logs folder in Xeoma settings’ folder. There are many different messages in the log, here is a list of them:
Problems detector module plus sms/email sending can notify you about:
You can find the detailed instruction on how to use the “Problems detector” module here.
Image Resize
![]() The Image Resize module allows to reduce the size of the incoming image.
The Image Resize module allows to reduce the size of the incoming image.
Adjust the size of the result image in % of original’s size in the settings of the module.
More in this article
Image Rotate
![]() The Image Rotate module allows to rotate and flip camera image.
The Image Rotate module allows to rotate and flip camera image.
Use slider to set the rotation angle. Untick the “90-degree pitch (rounded down)” option to use arbitrary rotation angle. Otherwise, when ticked, it will round down the value to 0, 90 or 180.
More in this article
Image Crop
![]() The Image Crop module allows to dynamically crop the camera image. Paint the zone you want to keep in red in the module’s settings dialog. Unmarked pieces will be cropped.
The Image Crop module allows to dynamically crop the camera image. Paint the zone you want to keep in red in the module’s settings dialog. Unmarked pieces will be cropped.
More in this article
PTZ tracking
![]() This module allows to automatically move a PTZ camera in the direction of moving objects. For PTZ Tracking to work, the camera must support PTZ functions and the module should be connected in the chain after a Motion Detector module. You can set up sensitivity, detection method and other settings in ‘Motion detector’ module’s settings. This way ‘PTZ Tracking’ will be working accordingly.
This module allows to automatically move a PTZ camera in the direction of moving objects. For PTZ Tracking to work, the camera must support PTZ functions and the module should be connected in the chain after a Motion Detector module. You can set up sensitivity, detection method and other settings in ‘Motion detector’ module’s settings. This way ‘PTZ Tracking’ will be working accordingly.
You can set the speed of reaction to moving objects (the camera will move if the motion lasts longer than the selected length); time to return to the start position and wait until the next tracking; move and zoom limits for the camera; as well as step size for camera movement and zoom (affects speed/rotation angle).
Find more information about the module in this article
Automatic Number Plate Recognition (ANPR)
![]() This module allows to recognize vehicle license plates of different countries, create white and black lists, store log files and so on. This module is not available for Android.
This module allows to recognize vehicle license plates of different countries, create white and black lists, store log files and so on. This module is not available for Android.
Also available in Xeoma: vehicle speed detection (time difference method) and radar-meter-based method.
Fisheye Dewarping
![]() This module allows to dewarp image from fisheye cameras and get it in the regular format.
This module allows to dewarp image from fisheye cameras and get it in the regular format.
Find more information about the module in this article
Visitors Counter
![]() The Visitors Counter module allows to count how many visitors were detected in the field of view of the camera, and show this information on preview. For example, paint a line in Motion Detector’s settings of the monitored zone. Connect Visitors Counter after the detector. Everyone crossing this line will be counted as a visitor. You can use either of the two counting methods: 1-directional count is meant for when visitors only move in 1 direction – either enter or leave. With this method, each crossing of the line will add 1 to the counter. 2-directional counter should be used in environments where visitors can be both entering and leaving the place. With this method, every 2nd crossing of the line will be counted as 1 visitor. ‘Reset the counter every’ defines how often the counting will be started anew (for example, at the beginning of the day or a shift). You can also save reports in a CSV file.
The Visitors Counter module allows to count how many visitors were detected in the field of view of the camera, and show this information on preview. For example, paint a line in Motion Detector’s settings of the monitored zone. Connect Visitors Counter after the detector. Everyone crossing this line will be counted as a visitor. You can use either of the two counting methods: 1-directional count is meant for when visitors only move in 1 direction – either enter or leave. With this method, each crossing of the line will add 1 to the counter. 2-directional counter should be used in environments where visitors can be both entering and leaving the place. With this method, every 2nd crossing of the line will be counted as 1 visitor. ‘Reset the counter every’ defines how often the counting will be started anew (for example, at the beginning of the day or a shift). You can also save reports in a CSV file.
See more about Visitors Counter
Cross-Line Detector
![]() This module lets you draw a virtual line and is triggered if the drawn line is crossed. The modules is capable of detecting the direction of movement and counting how many times the line was crossed in certain direction.
This module lets you draw a virtual line and is triggered if the drawn line is crossed. The modules is capable of detecting the direction of movement and counting how many times the line was crossed in certain direction.
Connect this module in a chain after the “Object Detector” module where you selected the detection zone, object size, etc. required settings. In Cross-line Detector’s settings start dragging a line in the camera preview box. Ends of the line will have green dots, click on one of these and drag the line to change its position. The line will also have a red triangle showing the direction the moving object should be moving in to trigger the alarm. Click “Toggle direction” to change this direction.
If you have several lines, you can select the needed one with the “Select line” dropdown list. Tick “Show count of visitors” to make Xeoma count how many times the lines were crossed in the chosen direction.
Find more information about the module in this article
Privacy Masking
![]() Privacy Masking module allows you to dynamically blur areas in view of the camera that you are not allowed to record. Our company cares about protecting the integrity of private property, especially in large cities, where the lens of your CCTV camera can easily see your neighbor’s window.
Privacy Masking module allows you to dynamically blur areas in view of the camera that you are not allowed to record. Our company cares about protecting the integrity of private property, especially in large cities, where the lens of your CCTV camera can easily see your neighbor’s window.
Deploy this module to hide private areas on your recordings. Can be used in combination with detector type filters to dynamically blur detected objects like faces, LPR, etc.
The “Privacy Masking” module can be connected to the “Motion Detector” module (it is recommended to set the “Compare to the accumulated background” mode in it) or to the “Object Detector” module, and in the “Privacy Masking” module check the box “Use a detector to select zones for masking”.
Or the module can be used without detectors and the required area for masking can be marked in the module itself with a brush. In order for data from the module to be written to the archive, in the “Universal Camera” module it is necessary to uncheck the direct entry “Use recording of H.264 stream to Archive without recoding”.
This module is available in Xeoma Pro edition. Since Xeoma Pro and Xeoma Standard licenses summarize, you can purchase Xeoma Pro license for 1 camera and add it to your Standard license in order to use the “Privacy masking” and other intellectual Pro modules for 1 camera (you can purchase Pro licenses for any amount of cameras).
Button Switcher
![]() This module allows for quick turning on/off of the modules in the chain connected after this module with the help of the button in the lower panel or option in Main menu. Add the Button Switcher module into the chain and click the lower panel button or option in the Main Menu whenever you need, for example, to start or stop recording fast. You can set module’s name (ID). All modules with the same ID will be affected the same way (turned off or on).
This module allows for quick turning on/off of the modules in the chain connected after this module with the help of the button in the lower panel or option in Main menu. Add the Button Switcher module into the chain and click the lower panel button or option in the Main Menu whenever you need, for example, to start or stop recording fast. You can set module’s name (ID). All modules with the same ID will be affected the same way (turned off or on).
Use this module to quickly start/stop recording.
Unitor
![]() The Unitor module helps combine output from two video sources into one. Connect two cameras or other video sources to the Unitor and you will have a merged image as the result. Additionally, you can use 1 audio source.
The Unitor module helps combine output from two video sources into one. Connect two cameras or other video sources to the Unitor and you will have a merged image as the result. Additionally, you can use 1 audio source.
You can select cameras’ position in relation to each other (horizontal or vertical combination), as well as change their order.
Please note that Unitor will give you only 1 audio stream in the result.
Use this module to combine two video streams in one.
For more information on this module, please read the Unitor article or view the Unitor video.
Relay switch
![]() This module is a streams switcher. When it receives a signal from a managing module, it closes the circuit and lets through the stream from the managed (secondary) chain.
This module is a streams switcher. When it receives a signal from a managing module, it closes the circuit and lets through the stream from the managed (secondary) chain.
For more information on this module and its settings see 3.9. Relay Switch.
Condition
![]() This module is a kind of relay switch that works with the preset logical condition you choose. Another name for the module is Denial as, unlike other filters in Xeoma, it basically checks if the preceding modules (filters) are NOT triggered.
This module is a kind of relay switch that works with the preset logical condition you choose. Another name for the module is Denial as, unlike other filters in Xeoma, it basically checks if the preceding modules (filters) are NOT triggered.
Connect Condition after detectors and before destination modules.
Choose type of work:
Logical AND – the module will push video on to following modules when ALL preceding modules are NOT triggered at the moment.
Logical OR – the module will push video on to following modules when at least ONE of the preceding modules is NOT triggered at the moment.
If you’d like to cancel this reverse for a module (i.e. make Condition work when the module is “triggered” rather than “NOT triggered”), tick a module’s name in the list (only modules connected to Condition are listed). Please pay attention that its mechanism of work is reverse to what you’d have if you connected modules without it.
HTTP marking
![]() This module is a combination of “HTTP switcher” and “Marking” modules. This module allows to switch on/off all following modules (the whole chain connected after the HTTP marking) and save meta information upon receiving an http-request. It works like a circuit breaker/closer and can receive commands to either break the circuit (with the URL for switching off) or close it (with the URL for switching on). It saves meta information about the command and the identifier (ID). With this ID, you can find an entry in the web archive and view it (Web Server module required in a scheme then). Upon receiving a command to continue, the module keeps the circuit closed. If a command to continue or switch off has not been received in a long time, the circuit will be broken automatically.
This module is a combination of “HTTP switcher” and “Marking” modules. This module allows to switch on/off all following modules (the whole chain connected after the HTTP marking) and save meta information upon receiving an http-request. It works like a circuit breaker/closer and can receive commands to either break the circuit (with the URL for switching off) or close it (with the URL for switching on). It saves meta information about the command and the identifier (ID). With this ID, you can find an entry in the web archive and view it (Web Server module required in a scheme then). Upon receiving a command to continue, the module keeps the circuit closed. If a command to continue or switch off has not been received in a long time, the circuit will be broken automatically.
For example, you can connect HTTP marking in a chain before the Archive module, and send the switching off URL with the identifier (example: “id=123”). To continue recording, send the command to continue. To resume recording, send the switching on URL request.
Requests can be sent through home automation systems or simply via a web browser.
HTTP switcher
![]() This module allows to switch on/off all following modules (the whole chain connected after the HTTP switcher) upon receiving an http-request. It works like a circuit breaker/closer and can receive commands to either break the circuit (with the URL for switching off) or close it (with the URL for switching on).
This module allows to switch on/off all following modules (the whole chain connected after the HTTP switcher) upon receiving an http-request. It works like a circuit breaker/closer and can receive commands to either break the circuit (with the URL for switching off) or close it (with the URL for switching on).
URL-path for switching off: send this http request to make HTTP switcher block video stream for the set period of time (or permanently, until the switching on URL is sent).
URL-path for switching on: send this URL to make HTTP switcher stop blocking the video stream (close the circuit). If there is a timeout specified, when it’s finished, the module will resume blocking the video stream.
For example, you can connect this module in a chain before the Archive module, and send the switching off URL when you need to stop recording. To resume recording, send the switching on URL request. Requests can be sent through home automation systems or simply via a web browser.
Use {ID} macro to get a unique name for this module. If macro is not used and the path is the same for all HTTP senders, upon receiving a request all modules of this kind will be switched on/off.
Use “timeout_seconds” parameter to set or change time of work (for example: http://10.1.10.10:10090/http_sender_on?module=HttpSwitcher.7&timeout_seconds=5).
Use “show_status” parameter to get the module’s current state information (for example: http://10.1.10.10:10090/http_sender_on?module=HttpSwitcher.7&show_status).
Camera-Embedded Detector
![]() This module can use the built-in detectors and sensors of IP cameras that support the ONVIF protocol, as well as send commands to the camera. With this module in use, you can configure analytics rules in your camera, and stop using Xeoma detectors thus shifting some of the server load to the camera side.
This module can use the built-in detectors and sensors of IP cameras that support the ONVIF protocol, as well as send commands to the camera. With this module in use, you can configure analytics rules in your camera, and stop using Xeoma detectors thus shifting some of the server load to the camera side.
Read more about the module
Face Detector (Emotions)
![]() The module can automatically recognize human emotions (happiness, fear, neutrality, sadness, etc.) in faces appearing in the camera frame, and display them on the screen, save to a spreadsheet report or send to a third-party program for processing. It can also be used as an alternative to the current Face Detector for detection of faces (but not recognition), or in conjunction with it, for example, to determine the emotions only of known or unknown persons. This module is purchased separately and activated over the Xeoma Standard or Xeoma Pro licenses. Available for testing in a trial mode for 1 hour, then reconfiguration is required.
The module can automatically recognize human emotions (happiness, fear, neutrality, sadness, etc.) in faces appearing in the camera frame, and display them on the screen, save to a spreadsheet report or send to a third-party program for processing. It can also be used as an alternative to the current Face Detector for detection of faces (but not recognition), or in conjunction with it, for example, to determine the emotions only of known or unknown persons. This module is purchased separately and activated over the Xeoma Standard or Xeoma Pro licenses. Available for testing in a trial mode for 1 hour, then reconfiguration is required.
For more information on this module and its settings see this setup guide.
FaceID
![]() This module recognizes human faces in camera image and compares them to faces from database (a remote LDAP database or a database stored on the same machine). This module only works if connected after the QR Code Recognition or Smart Card Reader modules. QR Code Reader or Smart Card Reader get information about person’s ID and send this meta data to FaceID that searches the database for the person’s face with this information. It can be used in complex access control systems in restricted entry enterprises, in university campuses, in private residences, wherever greater level of security and identity verification of a pass holder is required. This module is purchased separately and activated over the Xeoma Standard or Xeoma Pro licenses. Available for testing in a trial mode for 1 hour, after that reconfiguration is required. Find more information about the module in this article.
This module recognizes human faces in camera image and compares them to faces from database (a remote LDAP database or a database stored on the same machine). This module only works if connected after the QR Code Recognition or Smart Card Reader modules. QR Code Reader or Smart Card Reader get information about person’s ID and send this meta data to FaceID that searches the database for the person’s face with this information. It can be used in complex access control systems in restricted entry enterprises, in university campuses, in private residences, wherever greater level of security and identity verification of a pass holder is required. This module is purchased separately and activated over the Xeoma Standard or Xeoma Pro licenses. Available for testing in a trial mode for 1 hour, after that reconfiguration is required. Find more information about the module in this article.
Object type recognition
![]() The module can automatically classify objects in the camera field of view (person, car, animal, bird, motorcycle, airplane, drone etc.) and respond – or ignore – to selected types of objects. “Object Recognizer” is ideal in environments where there is movement expected in the field of view, and you need the system to respond (or not respond) only to a certain type of object. This module is purchased separately and activated over the Xeoma Standard or Xeoma Pro licenses. Available for testing in a trial mode for 1 hour, then reconfiguration is required.
The module can automatically classify objects in the camera field of view (person, car, animal, bird, motorcycle, airplane, drone etc.) and respond – or ignore – to selected types of objects. “Object Recognizer” is ideal in environments where there is movement expected in the field of view, and you need the system to respond (or not respond) only to a certain type of object. This module is purchased separately and activated over the Xeoma Standard or Xeoma Pro licenses. Available for testing in a trial mode for 1 hour, then reconfiguration is required.
!New innovative feature: seabirds/birds detection. Crops protection for farms and fishing facilities by mean of Artificial Intelligence in Xeoma.
!New innovative feature: drones detection. Perfect feature for airports and private territories. Protect your privacy and prevent dangerous accidents by means of AI-feature in Xeoma.
For more information and demo licenses please contact us.
For more information on this module and its settings see this setup guide.
SmartHome – RIF+
![]() This module works with RIF+ automation devices. Various sensors can be connected to the device, and the module can receive their alarms. This module is purchased separately and activated over the Xeoma Standard or Xeoma Pro licenses. Available for testing in a trial mode for 1 hour, after that reconfiguration is required. Read more
This module works with RIF+ automation devices. Various sensors can be connected to the device, and the module can receive their alarms. This module is purchased separately and activated over the Xeoma Standard or Xeoma Pro licenses. Available for testing in a trial mode for 1 hour, after that reconfiguration is required. Read more
QR code recognition
![]() The QR Code Recognition module is a filter module that scans the camera picture for QR code and when finds one, sends the video signal further along the scheme. This module is usually used in chain before the FaceID module which can compare face in camera view with a face of the person identified by that QR code. The module also works with the “Application Runner” module where it can send information about the QR code using the %TEXT% macro. It can be used in complex access control systems in restricted entry enterprises, in university campuses, in private residences, wherever greater level of security and identity verification of a pass holder is required. This module is purchased separately and activated over the Xeoma Standard or Xeoma Pro licenses. Available for testing in a trial mode for 1 hour, after that reconfiguration is required.
The QR Code Recognition module is a filter module that scans the camera picture for QR code and when finds one, sends the video signal further along the scheme. This module is usually used in chain before the FaceID module which can compare face in camera view with a face of the person identified by that QR code. The module also works with the “Application Runner” module where it can send information about the QR code using the %TEXT% macro. It can be used in complex access control systems in restricted entry enterprises, in university campuses, in private residences, wherever greater level of security and identity verification of a pass holder is required. This module is purchased separately and activated over the Xeoma Standard or Xeoma Pro licenses. Available for testing in a trial mode for 1 hour, after that reconfiguration is required.
Find more information about the module here.
Smart Card reader
![]() The module receives information about the card holder from Omnikey access card readers and passes it further along the chain to the FaceID module to compare the photo from the database with the face of the person in front of the camera. It can be used in complex access control systems in restricted entry enterprises, in university campuses, in private residences, wherever greater level of security and identity verification of a pass holder is required. The module also works with the “Application Runner” module where it can send information about the access card using the %TEXT% macro. This module is purchased separately and activated over the Xeoma Standard or Xeoma Pro licenses. Available for testing in a trial mode for 1 hour, then reconfiguration is required.
The module receives information about the card holder from Omnikey access card readers and passes it further along the chain to the FaceID module to compare the photo from the database with the face of the person in front of the camera. It can be used in complex access control systems in restricted entry enterprises, in university campuses, in private residences, wherever greater level of security and identity verification of a pass holder is required. The module also works with the “Application Runner” module where it can send information about the access card using the %TEXT% macro. This module is purchased separately and activated over the Xeoma Standard or Xeoma Pro licenses. Available for testing in a trial mode for 1 hour, then reconfiguration is required.
Find more information about the module in this aricle.
GPIO module
![]() This module works with devices connected to the GPIO interface. The module can both respond to triggering of external sensors (use an input pin for this), and send a signal to trigger external devices (use an output pin for this).
This module works with devices connected to the GPIO interface. The module can both respond to triggering of external sensors (use an input pin for this), and send a signal to trigger external devices (use an output pin for this).
When the input pin is triggered, the module is switched to a the “Ignored” state (in versions older than 20.10.13 – “Skipping”) so that it passes the video signal further along the chain.
When the modules connected before this module in the chain are triggered, a signal is sent to the output pin.
Find more information here.
Moving to PTZ preset
![]() When this module receives alarms from previous modules in the chain, it can move a selected camera to a pre-defined position. The camera must support PTZ controls though ONVIF protocol.
When this module receives alarms from previous modules in the chain, it can move a selected camera to a pre-defined position. The camera must support PTZ controls though ONVIF protocol.
Gender Recognition
![]() This module is based on Artificial Intelligence and enables automatic recognition of a person’s gender. Ideal for retail stores where promo ads or notifications can be adjusted based on a visitor’s gender for higher sales rates.
This module is based on Artificial Intelligence and enables automatic recognition of a person’s gender. Ideal for retail stores where promo ads or notifications can be adjusted based on a visitor’s gender for higher sales rates.
This module is purchased separately and activated over the Xeoma Standard or Xeoma Pro licenses. Available for testing in a trial mode for 1 hour, then reconfiguration is required.
Read more in “Gender recognition in Xeoma”
Sports Tracking
![]() Sports Tracking is the module available starting from Xeoma 19.11.26 and based on artificial intelligence data sets designed for automatic detection of a sports ball or players in camera’s field of view, and automatic tracking – rotation of the camera to always follow the object. This is especially highly-demanded in video broadcasts of team sports events. The module can be used in different playfield conditions for soccer, but American football, basketball and other team games can be added at request.
Sports Tracking is the module available starting from Xeoma 19.11.26 and based on artificial intelligence data sets designed for automatic detection of a sports ball or players in camera’s field of view, and automatic tracking – rotation of the camera to always follow the object. This is especially highly-demanded in video broadcasts of team sports events. The module can be used in different playfield conditions for soccer, but American football, basketball and other team games can be added at request.
‘Sports tracking’ module can automatically zoom in when following the ball. If there are 2 balls on the field, ‘Sports tracking’ module will follow the ball that it detected in the beginning using its Artificial Intelligence and computer vision.
This module is purchased separately and activated over the Xeoma Standard or Xeoma Pro licenses. Available for testing in a trial mode for 1 hour, then reconfiguration is required.
Read more in “Sports Ball Detection and Tracking”
Crowd Detector
![]() This module is based on Artificial Intelligence networks and can count people’s heads and detect if the number is bigger or smaller than needed (detect people crowding), and cause a pre-set reaction. It can also be used for passengers count in a public transportation enclosure like subway carriage, bus, tram, train, etc. You can select how many people should be there in the camera’s field of view to trigger the module. New: social distance tracking.
This module is based on Artificial Intelligence networks and can count people’s heads and detect if the number is bigger or smaller than needed (detect people crowding), and cause a pre-set reaction. It can also be used for passengers count in a public transportation enclosure like subway carriage, bus, tram, train, etc. You can select how many people should be there in the camera’s field of view to trigger the module. New: social distance tracking.
This module is purchased separately and activated over the Xeoma Standard or Xeoma Pro licenses. Available for testing in a trial mode for 1 hour, then reconfiguration is required.
Read more in “Crowd detector”
Color Recognition
![]() This module is triggered when it detects the selected color in the specified area in real time. The module is designed for independent work to intercept an object by a color, or to work in conjunction with other modules like License Plate Recognizer, for example, detecting violations of traffic rules in combination with a traffic light (detection of drivers ignoring the red signal).
This module is triggered when it detects the selected color in the specified area in real time. The module is designed for independent work to intercept an object by a color, or to work in conjunction with other modules like License Plate Recognizer, for example, detecting violations of traffic rules in combination with a traffic light (detection of drivers ignoring the red signal).
Choose a color for detection from the suggested basic ones or input a color in the RGB or HSV color scheme. Use the Sensitivity threshold slider to allow detection of undertones of a selected range. Paint the area where color should be monitored in red with a brush. Areas not marked in red will be ignored when searching for colors. Select the “Analyze only the changing areas” to ignore static objects in camera image (the module will look for moving objects only then). You will need a “Motion Detector” module in the chain before module if you want to use this feature.
This module is purchased separately and activated over the Xeoma Standard or Xeoma Pro licenses. Available for testing in a trial mode for 1 hour, then reconfiguration is required.
See the module’s promo page here
Senstar PTZ tracking
![]() This module allows to combine your video surveillance system with a security system with Senstar sensors, and automatically turn the camera into the alarm zone.
This module allows to combine your video surveillance system with a security system with Senstar sensors, and automatically turn the camera into the alarm zone.
For full operation this module must be connected into a chain with an ONVIF PTZ camera.
To receive alarms from sensors, in the module’s settings you need to enter network address of a computer with installed “Senstar Network Manager” software that has connection for your video security system enabled.
Use the module’s advanced settings to determine from which devices to process alarm signals and what position to move camera to at alarm:
Select device number, enter alarm number and necessary coordinates of the camera position (use the “Apply current coordinates” button for auto input of the camera’s current position). Then click “Add” to add a new alarm to process, “Update” to edit the current selected alarm, or “Delete” to delete the current selected alarm.
Upon receiving an alarm from the processed alarm list, the camera will automatically turn to the selected zone, and recording to archive or any other destination will be engaged (time of recording is set by the “Postrecord” setting).
Most sensors by Senstar are supported, e.g. FlexZone, OmniTrax, UltraWave and other.
Object size filtering
.") New module in Xeoma “Object size filtering” allows to filter out objects according to the configured parameters in module’s settings (width, height). This way the module can be used to detect objects with particular parameters/size. Find more information about this module in this article
New module in Xeoma “Object size filtering” allows to filter out objects according to the configured parameters in module’s settings (width, height). This way the module can be used to detect objects with particular parameters/size. Find more information about this module in this article
Vehicle Speed Detector
![]() This module works in combination with the ANPR module and the ISKRA DA/40 speed meter appliance. The ANPR module must be connected in a chain after this module, and its recognition method should be set to “In combination with the Speed Detector module”. It is recommended to use the “ANPR Sender to FTP” module as a destination module in this chain.
This module works in combination with the ANPR module and the ISKRA DA/40 speed meter appliance. The ANPR module must be connected in a chain after this module, and its recognition method should be set to “In combination with the Speed Detector module”. It is recommended to use the “ANPR Sender to FTP” module as a destination module in this chain.
More info in this article
Age Recognizer
 Additional module in Xeoma “Age Recognizer” is based on AI and neural networks. This module can be used to recognize people’s age in realtime using computer vision. Find more information about the Age recognizer module in this article.
My detector
 “My detector” allows users to add neurodetectors and use them in Xeoma.
By means of this module one can create a module in Xeoma based on a 3rd-party utility. This module will be suitable for integration with different utilities and plugins and creating a separate ‘my detector’ neurodetector. Find more information about the module in in this article.
Sound Events Detector
![]() This module is based on artificial intelligence and detects sound events like cries and screams, gun shots, breaking of glass and car alarms.
This module is based on artificial intelligence and detects sound events like cries and screams, gun shots, breaking of glass and car alarms.
Find more information about the module in this article
Detector of construction site safety
![]() This module based on artificial intelligence detects safety gear elements in people in the camera image: safety helmets and/or work robe.
This module based on artificial intelligence detects safety gear elements in people in the camera image: safety helmets and/or work robe.
Read more about the module here.
Text Recognition
![]() This module is used to recognize text in the specified area of the camera’s live video stream. The module can also trigger needed reactions when it detects a given word or words in the recognized text, or when it detects a number that is equal to, greater or less than a given value.
This module is used to recognize text in the specified area of the camera’s live video stream. The module can also trigger needed reactions when it detects a given word or words in the recognized text, or when it detects a number that is equal to, greater or less than a given value.
Read more about the module here.
Modbus Controllers
![]() This module is for receiving commands from controllers that work through a Modbus protocol, and triggering reactions in Xeoma. This is a very popular type of controllers used in automation systems, smart homes, traffic lights equipment, etc.
This module is for receiving commands from controllers that work through a Modbus protocol, and triggering reactions in Xeoma. This is a very popular type of controllers used in automation systems, smart homes, traffic lights equipment, etc.
Such controllers will have input ports (or inputs) that will send triggers to Xeoma (six ports from 0 to 5). Select to which input ports Xeoma should react by checking its checkbox. See the controller’s documentation to learn what input port is assigned to which trigger. Upon getting a trigger from a certain input port, you can select to which module the video stream should be pushed to, if multiple modules are connected in the chain after this module. So that you can have your system have different reactions to different input port triggers.
When you add the module, input the controller’s IP address and port (usually 502). Tick the needed ports’ “React to state of this input port” checkboxes. Select which of the following modules should get the video stream if it gets triggered. You can also tick the “Invert port state” checkbox if you’d like to have a reverse reaction: push video when there are no incoming triggers, and stop when there are.
Click ‘Test’ to see if there is a connection to the controller.
Please find more information about this module in this article.
Parking Spots
![]() The «Parking Spots» Additional module of the Xeoma video surveillance software is used to automatically determine and update the status (empty/occupied) of parking spaces in a parking lot. This module is a way of detecting the required type of objects in the selected zones.
The «Parking Spots» Additional module of the Xeoma video surveillance software is used to automatically determine and update the status (empty/occupied) of parking spaces in a parking lot. This module is a way of detecting the required type of objects in the selected zones.
Read more about the module here.
Slip and Fall Detector
![]() Additional module called “Slip and Fall Detector” is based on neural networks and able to detect when people in the camera view slip and/or fall. This feature will be useful in health and patient care organizations, especially in work with elderly people, as well as in city surveillance for instant reaction to accidents (including falling off a chair or a bed).
Additional module called “Slip and Fall Detector” is based on neural networks and able to detect when people in the camera view slip and/or fall. This feature will be useful in health and patient care organizations, especially in work with elderly people, as well as in city surveillance for instant reaction to accidents (including falling off a chair or a bed).
Read more about the module here.
Eye Tracking
![]() Additional module called “Eye Tracking” in Xeoma is a neural-network-based Additional module that allows your video surveillance system to detect the direction of a person’s gaze. It does not require special equipment and sensors. With the received data you’ll be able to create statistics for different causes such as neuromarketing, scientific research and other application scenarios.
Additional module called “Eye Tracking” in Xeoma is a neural-network-based Additional module that allows your video surveillance system to detect the direction of a person’s gaze. It does not require special equipment and sensors. With the received data you’ll be able to create statistics for different causes such as neuromarketing, scientific research and other application scenarios.
Check more in this article.
Thermal Camera Data
![]()
Thermal Camera Data in Xeoma is a new powerful yet very affordable tool for solving tasks related to determining the temperature of objects. This module receives information about temperature from HikVision thermal cameras and triggers when the minimum, maximum or average temperature is equal to, higher, lower than the defined value, or is in the specified range.
Learn more about the module in this article.
Bird detector
![]() The Bird Detector is a module based on artificial intelligence that detects birds in the camera’s field of view and helps you keep track of them. This module is designed for use on thermal PTZ cameras, but it can be used with fixed thermal cameras as well.
The Bird Detector is a module based on artificial intelligence that detects birds in the camera’s field of view and helps you keep track of them. This module is designed for use on thermal PTZ cameras, but it can be used with fixed thermal cameras as well.
The module is able to recognize a bird at a distance of up to 350 meters, even when the bird looks like a dot on the screen. Based on AI-powered technologies predicting the bird’s flight direction, the module allows you to move the PTZ camera in the direction of the bird’s flight, following it as smoothly as possible.
Learn more about the module in this article.
Heart Rate Monitor
![]() (Coming soon) Heart Rate Monitor is an Additional module in Xeoma video surveillance software. It is a unique tool that uses camera vision to determine the heart rate of a person in sight. No additional sensors required!
(Coming soon) Heart Rate Monitor is an Additional module in Xeoma video surveillance software. It is a unique tool that uses camera vision to determine the heart rate of a person in sight. No additional sensors required!
Based on Artificial Intelligence arrays, this Xeoma module detects a person in sight, locates the center of their face and then proceeds to read micro changes only visible to computer vision to estimate the person’s heartbeat rate.
Learn more about the module in this article.
Freight Unloading Counter
![]()
Freight Unloading Counter is a module in Xeoma based on artificial intelligence and deep machine learning that detects freight vehicles in camera sight and counts the ones that got unloaded. This module is available in the Xeoma Pro edition.
Freight Unloading Counter can be used with any camera such as IP or USB. Unloading statistics is stored in .csv log files that can be exported in Excel. Also, freight vehicles unloading statistics can be displayed on the screen with the “Marking” module.
Learn more about Freight Unloading Counter in Xeoma
3.4.1. Universal camera
![]() This module allows you to select as source of the image – a camera (IP, USB, including wireless cameras, or analog cameras) or world Internet camera (‘Random IP Camera’).
This module allows you to select as source of the image – a camera (IP, USB, including wireless cameras, or analog cameras) or world Internet camera (‘Random IP Camera’).
Name of the camera that is shown in Main Window (Multi-Camera View Window) can be specified in ‘Preview’ or ‘Preview and Archive’ module settings or in the ‘Source name’ field of ‘Universal Camera’s’ module settings. The %IP% macro can be used here to show the camera’s IP address.
When Xeoma is first launched, it starts in the Trial mode that launches automated search for cameras. The found cameras will be added to the Main Window or put in the “+” menu in the bottom icons panel.
See general information about the automated search here
For IP cameras:
You can add an IP (network) camera in any way through the “+” menu in the bottom icons panel (see more about the auto search in section 2.4. Automated search).
You can set the following parameters in the Universal Camera settings (see details under screenshots):


Source name: here you can input the name of the camera that is shown in Main Window (Multi-Camera View Window). The %IP% macro can be used here to be substituted by the camera’s IP address.
Device type: allows changing between IP cameras, USB cameras, and random world Internet camera. The dialog interface will change according to the choice showing only the settings specific for the selected type.
The ‘Allow auto stop when idle’ tickbox: when checked, the module will stop receiving stream from the camera if it is not used in the following modules (for example, when the module is followed by a ‘Scheduler’ whose settings say it’s non-working hours now). If unticked, auto stop will be disabled – the camera will be sending its stream continuously, without stops when idle (which can be especially profitable if the camera takes too long to start sending the stream when it’s not idle anymore). Please note that if the camera is followed by filters that require stream all the time, auto stop will not be engaged even if this option is ticked.
The ‘List of supported brands’ text link will take you to our website (a web page will be opened in your device’s default browser). Internet connection is required for this option.
The ‘Not found?’ / ‘Optimization tips’ text links will open a tip pop-up window with search/optimization advice.
Starting from Xeoma 22.10.12 the settings dialog of the ‘Universal Camera’ module now features a new option to open the camera’s web admin page in a default browser.

Use this button to quickly apply some changes in camera settings through its browser admin panel (outside of Xeoma).
User name and password fields: here you can input credentials to access the camera stream. Usually these are the same that are used to access the camera’s web administrator page but sometimes cameras have separate credentials for some streams or ONVIF users.
Full URL address for preview stream from the camera (secondary, low resolution stream (mjpeg recommended)) section is used for setup of the preview stream.
Preview stream parameters: a field for the URL for the camera’s stream that will be displayed in the Multi-Camera View Window (also called “for preview”) and used for work of detectors (unless selected otherwise in the detector’s settings). The field is usually filled in with the URL that Xeoma found automatically, but you can input a known URL here manually. During the auto search Xeoma usually finds several options of the stream that could be used “for preview” – in which case you can see the available options in the drop down menu here. Information about the stream will be stated in square brackets before the actual URL – like [640×360 25 fps h264 1024 kb]. Editing it will not take any effect – this is just for information. Xeoma takes the parameters from the camera stream (resolution, frames-per-second rate, format, bit rate) that are set up in the camera’s web admin.
It is recommended to take advantage of the camera’s multi-streaming function (called ‘direct saving to the archive without conversion’ in Xeoma) for best performance when possible (see more below).
Decode only keyframes is only shown when an H264/H264+ stream is used in the ‘Full URL address for preview stream from the camera (secondary, low resolution stream (mjpeg recommended))’ field (not available for MJPEG or H265 streams).
Check this box to decrease the processor load coming from decoding of compressed H264 streams by decoding only keyframes of the stream. The higher the resolution of the stream used “for preview”, the better this option helps to decrease the processor load. Might result in less smooth (more “jerky”) stream perception – depending on the key frames interval set in camera.
Transport protocol type: allows choice of Auto, TCP, UDP, UDP Multicast methods of the stream’s frames transfer. Try a different option in this dropdown menu if you’re experiencing the stream distortions (gray or green distortions). More advice on fighting distortions here
The ‘Buffered video stream reading’ checkbox is for enabling pre-buffering of video stream for smoother display. Might result in 1-5 seconds delay and increased RAM consumption.
The ‘Not satisfied with the search results’ text link will open a tip pop-up window with search advice.
The ‘Auto search for camera by IP address’ text link will open up a pop-up dialog where you can launch a search for cameras. To try this option, you need to have the camera’s IP address in the “Full URL address for preview stream from the camera” field.
Full URL of H.264/H.264+/H.265/H.265+ video stream (without preview) for saving into archive without re-encoding section is used for taking advantage of the camera’s multi-streaming capabilities. Must be used with the ‘Enable H.264/H.265/H.265 recording to Archive without conversion’ checkbox (see below).
Input the camera’s main stream’s URL in the Archive stream parameters field to have it recorded into the archive (also called “for archive”). The field is usually filled in with the URL that Xeoma found automatically, but you can input a known URL here manually. During the auto search Xeoma usually finds several options of the stream that could be used “for preview” – in which case you can see the available options in the drop down menu here. Information about the stream will be stated in square brackets before the actual URL – like [1280×720 25 fps h264 2 Mb]. Editing it will not take any effect – this is just for information. Xeoma takes the parameters from the camera stream (resolution, frames-per-second rate, format, bit rate) that are set up in the camera’s web admin.
This URL can be used for display in Single-Camera View Window if the option ” is ticked (see below).
Enable H.264/H.265/H.265+ recording to Archive without conversion: tick this box to enable using of the URL from the Archive stream parameters field. If this option is not checked, the URL from the Archive stream parameters field will be ignored, and the URL from the
Preview stream parameters field will be used for recording instead.
Use H.264/H.265/H.265+ stream (from Archive) in single camera view mode: check this box to make the URL from the ‘Archive stream parameters’ field be displayed in the Single-Camera View Window.
|
|
Please note that the multi-streaming option (also called the ‘direct saving to the archive’ in Xeoma) only works for cameras at least one of streams in which is in H264/H264+/H265/H265+ . If you use the Preview and Archive module to save video recordings (default module), video recordings from cameras using this ‘direct archive saving’ option will be saved in .mkv. If this option is not used, recordings will be saved in .xem. In both cases, the recordings can be viewed in the Xeoma’s built-in archive viewer. Read more about dual streaming here |
Option ‘Low quality archive: additionally record the preview stream to the archive‘ (available with Xeoma 22.3.16 and up) enables parallel saving of recordings in low quality in addition to regular (usually, high quality) archives.
The low quality archive can be used for
* less processor load during simultaneous view of several cameras recordings (especially when speed multiplier is used);
* export of archive pieces in tight network environment;
or
* disk space optimization in long-term storage of important video evidence.
The storage time of the low quality archive can be set in the ‘Preview and Archive‘ module settings.
For export, a lower quality archive can be selected in the Export dialog of Xeoma’s built-in archive viewer.
For using low quality archive in the simultaneous view of several cameras recordings (Xeoma Pro feature), tick the ‘Prioritize lower resolution recordings at simultaneous view of several archives’ in Layouts menu -> Client decoding setting.
Use hardware acceleration of decoding, if available: tick this checkbox to enable using hardware acceleration – CUDA (for Nvidia graphics cards) or QuickSync (for Intel processors). See more in ‘4.13 Hardware acceleration’ section
For Linux machines, only CUDA is available, for Windows both CUDA and QuickSync are available. For Mac OS, Android or Linux ARM hardware acceleration is not available yet.
Use camera audio stream: when unticked, the camera’s sound stream will be ignored.
When ticked, an additional field “Full URL address for sound stream from the camera” (e.g. http://IP/audio.cgi) will appear for a sound stream where you can input a URL for the camera’s audio stream if it is transmitted separately (find it in the camera’s web admin interface, documentation or Internet). Usually still the sound if transferred in the camera’s RTSP stream along with the sound so more often than not this field will be filled with the same URL as in “Archive stream parameters” field.
Full URL address for sound stream from the camera” (e.g. http://IP/audio.cgi): see above.
Sound quality/sampling frequency: select a needed value in kHz from the dropdown menu. The sampling frequency affects the frequency range of the received digital sound stream.
FPS: this dropdown menu allows to select the frames-per-second rate (for a JPEG stream only). Available options: Maximum and from one frame a day to 50 frames per second.
Use PTZ control:dropdown menu allows to select a set of PTZ commands found for the camera. Only works for cameras with actual PTZ, Select a needed set of PTZ control commands and click the «Test PTZ» test link to test it. If done correctly, you will see a PTZ control in Xeoma’s Single Camera View Window and will be able to manually or automatically rotate the camera. See more about PTZ in Xeoma here
HTTP port for PTZ control (if camera supports PTZ): use this field to input a different port for PTZ control if camera uses an unusual one. See the camera’s web admin page (enter its IP address in a browser’s address bar) for information on the port it uses.
Settings for PTZ inversion of camera rotation: if the camera is mounted upside down compared to the designed use, you might want to invert the reaction to PTZ commands (rotate camera right when pushing the ‘left’ button, etc.). With this option you can turn on horizontal, vertical inversion or both.
List of available profile tokens (only available for ONVIF cameras): if the PTZ profile from the Use PTZ control setting (see above) doesn’t work, you might want to try another option in this dropdown menu. In rare cases, PTZ commands are tightly bound to camera streams so if it’s unacceptable for you to change URLs to enable the needed PTZ profile, you can select stream profiles here – this setting will only affect availability of PTZ commands while having no effect on the stream URL used “for preview”.
ONVIF camera settings: (only for cameras with support for ONVIF) this option will open a pop-up window with basic settings like sharpness, fps, shutter speed. etc, Xeoma displays here only options that the camera sends through ONVIF. If an option is not available here, it must mean that the camera doesn’t support control of it over ONVIF.
Note: camera focus settings as well as auxiliary features like wiper/washer are to be found in another place: in the PTZ control dialog (the Quick Settings / Single Camera View window).
For USB-cameras: choose your camera from the list. Select the required combination of image refresh rate (fps) and image resolution (set by the camera’s drivers). Below are the regular settings for image settings like brightness, contrast, sharpness, etc. that you can change with the slider. ‘Back to defaults’ will set the settings back to the camera’s initail settings.
For Internet cameras: you can specify the image refresh rate in the advanced settings menu.
For analogue cameras:
Xeoma supports video capture cards that use DirectShow/WDM drivers and have 1 chip per channel. Such capture cards are seen in Windows as a number of separate devices (Device #1, Device #2, etc.) Xeoma will detect them as a number of USB webcams. Xeoma works with default settings, so if something is not working the way you wanted, you need to change the defaults on your card/analogue camera.
Xeoma also works with DVRs that have direct URLs for JPEG, MJPEG, WEBM (VP8 and VP9) or MPEG-4 streams for each channel and stream video over http or rtsp protocols. Xeoma “sees” such DVRs as a number of separate IP cameras. Sometimes these cameras are found automatically with simple search or search by IP/password (both launched in ‘+’ menu in the panel below). Sometimes, however, in order to connect DVR to Xeoma, you need to know the exact URLs for video streams of this DVR (http/rtsp for MJPEG/H264). It can be found in the device documentation, or its web admin interface, or you can contact the manufacturer of this DVR and ask them directly.
3.4.2. Motion detector
This module is very important in security camera software, as it allows you to set motion detection in the given area, motion cessation, penetration into the forbidden zone, detect staying in the zone, control the staff activity, distinguish between moving objects and the background.
Based on computer vision, this module detects pixel changing in the video stream. Fixing events in a searchable log. Integral search according to metadata and information from all systems.
Use sensitivity level scale to specify what data will be saved to archive. The 0 level denotes that the system will be very sensitive to any objects of any speed or size. 100 means high sensitivity level, at this level only major objects with unquestionable motion will trigger the alarm or any other action your specified. The scale of current sensitivity level lets you know what speed and rate of motion is needed to make your system react.
Masks: set up the zone of detection of any shape of size. Use red color to define the area where motion is to be monitored. Leave transparent spots where motion will be ignored. You can change brush size for filling or clearing zone of monitoring. In the ‘Auto’ mode automatically brush effect – filling or clearing – is selected automatically depending on the area under the brush. Only objects of bigger size than your ‘Object size’ will trigger the alarm, so please choose carefully.
The visualization of movement allows to trace the motion path of a moving object. So even if you weren’t there to catch the movement, you can always see where the moving object was coming from.
You can choose between two detection methods in Xeoma security camera software: by comparing adjacent frames (the so called frame differences method) or by comparing the accumulated background (the so called background subtraction method).
Additionally you can choose detection delay – motion lasting less than specified value (in seconds) will be ignored. Pre-record lets you store the events preceding the direct detection of movement to archive. Post-record option allows to save to archive frames after movement ended.
Settings can change the color they’re written in. If a setting is blocking video, it will be colored in yellow. If the setting starts to let the video through to following modules, it gets green.
With the “Detect only the absence of motion during” option you can make the motion detector work in reverse and detect only when motion in front of the camera stopped, for example, when counters or moving parts of equipment are being monitored. Use the slider to set time – if motion will be absent for more than this value, the following modules will be triggered.
“Continuous work to enable search by motion in the archive”: if ticked, the motion detector will be switched to the “Ignored” state (in versions older than 20.10.13 – “Skipping”) (when archive is connected after the motion detector, it will conduct continuous recording). The option is used when continuous recording is required but search by motion is needed in the archive. This way the motion detector in Xeoma security camera software will only collect data about motion events.
Starting with Xeoma 20.10.13, “Car recognition” and “Human recognition” options are available in the “Motion detector” module’s settings under Xeoma Peo license to avoid false alarms when it’s needed to detect motion only from a car or a human. You can tick necessary option and reduce false alarms to a minimum (this option, however, might increase the CPU load). And starting with Xeoma 23.6.14, you can set the required accuracy level of this humans or cars recognition option to fine tune the setting to match your environment and get rid of alarms caused by lower recognition accuracy.
There’s also a hard-wired option in the “Motion detector” module that helps avoid false alarms whenever a camera switches to the IR-mode.
For troubleshooting false positives read also: False Alarms Issues in CCTV Software Xeoma
Read also Motion Detector advanced options in video surveillance program Xeoma article.
|
|
Starting with Xeoma 23.3.22 version we improved selection of the zone in the module’s settings, if the aspect ratio of low and high resolution streams is different. Now in this and other similar modules, where the detection zone is configured in the settings, the particular stream that is selected for operation will be used (by default it is the preview stream, and if the option “Use the high resolution stream from archive” is checked, then the stream for archive recording will be used). |
3.5. Archive
The “Preview and Archive” module allows you to store the incoming image to the archive for a later view and displays the image on the screen. Like Preview module, it allows you to view current image in real time mode. Interactive search in the archive, according to the given parameters. When the cursor is on the corresponding preview box, it gets a blue frame around it.
Archive settings and saving
In its settings, you can give your camera a name to be displayed on main window in preview box for this camera (it will be used in Device List, eMap, and while assigning User access rights); and set a certain group or groups for this camera to belong to for further work with Device List. Also, in this module’s settings you can set storage time of records (meaning how long the records will be kept until they are over-written by more recent records); maximum archive size (the disc space that this camera take on your hard drive for archive); and frames saving frequency.

|
|
Starting from Xeoma version 21.4.2 you can use “smart” automatic distribution of records across disks. Specify several folders, disks or paths to RAID arrays in the settings of the “Preview and Archive” module, and Xeoma will distribute archives evenly, saving the next recording to the disk with more free space. Available for Xeoma Standard, Xeoma Pro editions, as well as for the Xeoma Pro Your Cloud service.
Starting from official version 22.3.16, Xeoma features an option to opt out of automated creation of missing folders from the path. This will be mostly useful in Unix systems and when a disk is mounted in a specified folder by the user. |

It’s worth noting that the “HDD space always left free” option works automatically depending on the number of cameras.
Starting from Xeoma 23.3.22 if the value of this setting has been changed manually, the newly set value will be used. If this is not done, then the automatically set value recommended by the program will be used.
In the advanced settings (click to expand the advanced settings) you can reduce image resolution and quality of stored frames in % of the original (by default it’s the same as the original image); specify path to store archive files to, or set a global limitation (will be applied to all archives) of how much free space Xeoma should always leave free.
|
|
Parallel saving of recordings in high and low quality is available in Xeoma since version 22.3.16. The low quality archive can be used for less resource-hungry simultaneous view of several cameras recordings; for export; or for long-term storage of important video evidence. See more here |
Note: thanks to loop recording, once the limit is exceeded Xeoma’s archive will start recording over oldest materials. You will never have to face the problem of the full disk or archive stopping recording if the place reserved for it comes to an end. But if the global disc limitation setting leaves Xeoma no place to store records to, it will not record. Under the path box there’s a Preview.Archive.{Number} name that will be useful should you decide to look for Xeoma records for this camera directly on disc.
N.B. If your total archive size is over 3 TB, we recommend making sure that the archive’s database (can be found in …/Xeoma/XeomaArchive/Database) and the archive itself are kept on separate drives.
|
|
Starting with Xeoma beta 23.12.7 a noise reduction option ‘Enable noise reduction’ has been added to the settings of the ‘Preview and Archive’ module. The option works with any audio types in Xeoma, and delivers clean sound even when the direct saving to the archive is used. Noise reduction applies only to archive recordings. This feature becomes available for all cameras if Xeoma Pro license for at least 1 camera is activated, and also for Xeoma Pro Trial edition. |
3.5.2. Archive playback
All recordings from the camera(s) will be stored in default user catalog, unless you set another path, conveniently sorted in folders by date. Archive recordings can be watched in both online and offline modes. You can browse the archive, with Xeoma continuing to monitor and record.
Archive of Xeoma is equipped with a handy built-in media player that utilizes multi-thread rapid playback mechanisms. Timescale of the archive is adjustable (seconds to days) so you can easily and quickly find the required time period and begin playback from that point. Pull the timescale slider to the right or to the left to change the timescale, or scroll your mouse wheel. Moreover, the Calendar lets you choose date and time for quick jump. Use arrows to navigate and choose the date and time. You can adjust the records playback speed, for example, to play fragments that are of little or no interest to you in the fast mode and focus on the parts worth more attention – pull the speed slider to the right or to the left to accelerate or slow down the playback (by default set at usual speed). Pushing white arrows on the sides of timeline will make the slider bar jump to the next/previous minute (or to the next/previous event in case of viewing search results).
Below you will find a detailed overview of all elements you can find there.

Here are the elements and controls that you can encounter in the Archive Player interface.
1 – Camera name. The name is taken from this camera’s ‘Universal Camera’ or ‘Preview and Archive’ modules. If both have some name, you will see a combination of those.
2 – Go to previous/next camera. These double arrows are used to switch to viewing the previous (left arrow) or next (right arrow) archive. Technically, this might be not the previous/next camera but the previous/next archive of the same camera you’re viewing now if it has multiple ‘Preview and Archive’ modules in its chain, or if the camera is duplicated several times.
The arrows are only shown when there are cameras/archives to switch to: For example, if you’re viewing the last camera, there will be no right arrow because there is no next archive.
3 – “Pause”. If playback is paused (see “9”), there will be a red pause sign in this place.
Next, there is an overview of elements in the so called ‘lower panel’ of Xeoma’s Archive Viewer. The lower panel dissolves when idle for over 3 seconds, so as to get in the way of the view. It is brought back by any action, for example, moving the mouse.
4 – To the previous / next recording. These arrows located at the ends of the timeline can be pressed once to jump to the previous (left arrow) or to the next (right arrow) minute of recording (or to the previous/next event in case you’ve done a search through archive), or it can be held to accelerate the jumps.
5 – Exit archive. Press this button to leave the Archive Viewer and go back to Live View.
6 – Archive menu. Press this button to open a menu that has more options for search, export, zoom, etc. See more about this menu and its options below
7 – Timeline of the Archive Player. It has time marks of minutes, hours, days, years… depending on the selected timescale (see 12) and on how many recording there are. Segments with recordings will be depicted in light blue color (7), while segments that have no recordings will remain blank (8). There might be also segments painted gray – those signalize that there have been issues with the video stream during that timeframe.
![]() Please note that colors of recordings can be different when Xeoma Pro’s simultaneous view of several archives is being used.
Please note that colors of recordings can be different when Xeoma Pro’s simultaneous view of several archives is being used.
![]() If a search through recordings has been performed, those segments that have the sought-for objects will be in bright green color. See more below in Options of the archive menu
If a search through recordings has been performed, those segments that have the sought-for objects will be in bright green color. See more below in Options of the archive menu
9 – Pause/resume playback. This button has two forms: by default, when the archive is being played back, it will depict a pause icon meaning that you can pause the playback. When the playback is paused, this button will change to ‘Play’ icon, which you can press to resume playback (besides, there will be a red pause shown in (4)).
10 – the timeline Slider bar. A blue section with time/date of the recording currently played back will be displayed above the slider. The slider bar moves along the timeline as playback progresses, and can be drawn to an arbitrary place with a mouse starting playback from that moment.
11 – Playback speed is a slider that regulates the speed of how fast the recordings are played back. By default it’s set to 1х (normal speed of how events happen). Press the slider bar and pull it to a side to change the playback speed: to the right – to the “+” sign – to increase speed (maximum acceleration is 900x – 900 times the normal speed), or to the left – to the “-” sign – to decrease the playback speed.
The 0.05х speed engages frame-by-frame playback.
When playback speed is in the negative value, it enables reverse playback – displaying recordings in reverse direction from “now” into the “past”. For example, the -2.0х speed gets recordings played back backwards twice as fast. Read more about that below, in the Reverse playback section.
12 – Timescale is a slider that regulates the scale of the timeline in Xeoma’s Archive Player. Press the slider bar and pull it to a side to change the timeline scale: to the right – to the “+” sign – to increase scale and display detailed minutes and hours marks over the timeline, or to the left – to the “-” sign – to descrease scale to display days’, months’ or years’-worth of recordings (if there are any). With the smallest scale you can see all recordings on timeline and select a recording with the needed date/time and then increase the scale to see more detailed timeline for this recording. The largest scale is 1 minute, and with that scale the timeline also displays seconds.
13 – Calendar is a button that opens a pop up window with dates and times from which you can select a specific time and date of a recording to playback. The left part of the Calendar window has an actual calendar opened at the current month. Days that have recordings are in white color, while days that there were no recordings in are gray. Below are arrows to jump to the next/previous day or to the day of the first/last entry in the archive.
The right part of the Calendar window has hours and minutes wheels to select a more specific time for the recording selected in the left part. The wheels also use white color in hours or minutes that there are recordings for. Minutes are grouped by 5, rounded down, so if you’d want to view a recording of 10:03 am, you should select 10 in the hours wheel, and 00 in the minutes wheel – it covers any recording made from 10:00 to 10:05 am.
14 – Go to the end of the archive moves the timeline slider bar (10) to the beginning of the latest entry in this archive.
![]() Please note that when there has been performed an archive search of some kind, a different button that has two forms will appear in place of this button. One form – green Play button – denotes that only episodes with the sought for objects will be played back; the other form – white Play button with a green line underneath – denotes that all recordings will be played back, with or without the sought for object type.
Please note that when there has been performed an archive search of some kind, a different button that has two forms will appear in place of this button. One form – green Play button – denotes that only episodes with the sought for objects will be played back; the other form – white Play button with a green line underneath – denotes that all recordings will be played back, with or without the sought for object type.
Reverse playback
Starting from Xeoma 23.3.22 the reverse playback function (i.e. playback in reverse direction, from a point in timeline and back into the previous events) is added to the Xeoma Pro edition. Reverse playback is available for regular recordings, dual archives (lower quality parallel recording) and simultaneous view of recordings from several cameras.
You can use keyboard hotkeys for the new reverse playback function. Hit the keyboard’s “+” to engage regular forward playback, or “–” to enable reverse playback.

Let’s see what options there are in the Archive menu of Xeoma’s Archive Player window.
First off, there’s a Start position option in Archive menu that allows to set what part the archive will be opened at when you enter it next time – at the very first entry, at 5 minutes to end of the archive or at the moment where you left off (the latter being the default).
Next, there is a Xeoma Pro’s ‘Visualization settings’ option to enable or disable the motion visualization in recordings playback, similar to live view motion visualization. You can read more about other features exclusively available in Xeoma Pro here
Next option is the Archive search that allows to perform search for various objects through recordings. Most of the options require a corresponding module to be working in the camera’s chain and gathering the data. For example, search by motion requires a ‘Motion Detector’ , and search by emotions requires Additional ‘Face Detector (Emotions)’, and so on. This submenu also has ‘License plates log’, ‘Log of recognized faces’ options to view log of events for these types of objects.
The Export option allows to save a certain extract from the archive in the format of your choice. This will come in handy if you usually store in MJPEG (.xem) and need to show an extract to the authorities and need it to be playable in most players. Or, you need to save just a screenshot from the archive. This all is done via the Export option. Click it once to get the white little triangles shown over the timeline. Move them to enframe the needed extract. Go to the menu and click Export once again. A prompt will be shown asking where to save this extract to and what format it should be converted to.
The export dialog offers several video+audio formats, and one audio-only format (.wav which is available starting from Xeoma 23.3.22).
If an extract with one video stream and multiple sound tracks needs to be exported, .mkv format should be selected. .mkv is also the one container format that supports subtitles for the Marking module in case it uses direct saving to the archive feature.
|
|
If a multi-sound extract needs to be exported, .mkv format should be selected. |
With the new option to save a lower quality archive in addition to a regular archive (available with Xeoma 22.3.16 and up), the lower quality recordings might be used for export – especially for quick remote download in tight network environment.
With this feature you can select whether to export recordings from the high quality archive of a camera, or from the lower quality archive.
You can enable saving a lower quality copy of camera video feed in the ‘Universal Camera‘ module settings.
The storage time of the low quality archive can be set in the ‘Preview and Archive‘ module settings.
With the ‘Delete interval’ option you can permanently delete fragments from the archive. It works similar to export – select the fragment with white markers and click the option again. Be careful, this action cannot be undone.
Options to make some parts of the archive immune to deletion, to view such parts, or to revoke this deletion immunity status are also available in this menu for the systems with Xeoma Pro licenses.
Reindex the archive: If you want to expand your Archive using the footage that wasn’t recorded by Xeoma, you will need to make the Archive “see” the right files. To do that, choose Reindex the archive in the Archive menu. Starting with Xeoma 23.6.14 you don’t have to wait until full re-indexing is completed to see your recordings – each recording will be available as soon as they are re-indexed.
Turn zoom mode on: If a certain part of the footage is too small to discern, you can use digital zoom to take a better look. Choose ‘Turn zoom mode on’ in the Archive menu. Now you can use the mouse-wheel to zoom in and out to where the cursor currently is. Also you can simply click the place you need enlarged. Finally, you can hold the left mouse button and drag a frame over an area to zoom in it.
Screenshot is a way to make a screenshot while viewing the Archive. Click ‘Screenshot’ in the Archive menu and choose location for storing screenshots in the new window, which can be either Save on both client and server side or Save on client side only. To quickly access all the screenshots you have already made, select Open screenshots directory. Alternatively, you can either Print the screenshot or use Email to option to send it to a specified address.
The Select cameras to playback is yet another option restricted to Xeoma Pro – it allows to select cameras that you’d like to simultaneously view archives from in Xeoma’s Archive Player.
Select a face and add it to the database is an option for Xeoma’s ‘Face Recognition’ training that allows to add a face of someone you see in recordings to the recognition database, either white or black list. See more on Face Recognition training options here
Create heat map is also an option shown in systems with Xeoma Pro licenses. This option will help make a colored representation of most ‘popular’ areas in camera sight – those with most motion. The motion data is taken from Xeoma’s ‘Motion Detector’ module, so this module must be in the chain of the camera you’d like to create a heat map for. See more about heat maps
Next up is the ‘Play ONVIF archive’ option, also available in the Xeoma Pro edition. Using this option, recordings stored on an ONVIF-compliant camera or DVR’s side can be viewed in Xeoma’s Archive Player. See more about this feature
Mini previews over the timeline
Starting with Xeoma 23.12.7 the cursor hovering over the timeline in Xeoma’s Archive Player will bring up small thumbnails (mini preview pictures) of some key frames within those episodes – much like when viewing a video on YouTube. The place that your cursor is hovering over will get a ‘ghost’ version of the timeline slider bar, while the ‘main’ slider bar (see 10 in section 3.5.2 Archive playback) remains the same.

3.5.3 Professional features in Archive (requires Pro license)
View of several archives simultaneously
If you’d like to view archived footage from several different cameras simultaneously, you can Select cameras to play in the Archive menu. After that click on the cameras you need to highlight and press the Archive button. You will see all the cameras on screen and their footage will be marked with differently colored lines at the bottom.
With the new option to save a lower quality archive in addition to a regular archive (available with Xeoma 22.3.16 and up), the lower quality recordings might be used for less processor load during simultaneous view of several cameras recordings (especially when speed multiplier is used). For that, tick the ‘Prioritize lower resolution recordings at simultaneous view of several archives’ in Layouts menu -> Client decoding setting.
You can enable saving a lower quality copy of camera video feed in the ‘Universal Camera‘ module settings.
The storage time of the low quality archive can be set in the ‘Preview and Archive‘ module settings.
Visualization of motion
Visualization of motion function doesn’t only detect moving objects, it also provides its tracing.

Possibility to mark a piece of an archive as undeletable
Select a certain period of time in archive and mark it as a undeletable (Archive-> Main menu-> Delete interval-> Save selected interval as undeletable). This function allows you not to lose important segments of the recording and will reduce to the minimum the possibility of their removal by operators.

Search by motion
Search by motion function makes navigation in the Archive easier and more convenient. After you choose this option, select a rectangular area right over the camera view to search for motion events in. The found motion events will be showed on timeline in green color. You can have several search areas selected at the same time. To unselect an area, click inside it. To unselect all areas, use the option in the archive player menu.

Search for recognized license plates
If you are using “ANPR” module, the Archive can help you view the results of its work. Select Search by license plates in the Archive menu to select any license number the camera detected. Xeoma will instantly jump to the right section of the Archive to show that particular vehicle. Alternatively, you can choose License plates log to access the full list of detected plates sorted by date (you can jump between different days using the calendar).
Addition of faces for recognition (training)
If you are using the module “Face Detector”, you can train Xeoma to recognize a certain face from the Archive. To do that, choose Select a face and add to the database in the Archive menu. You will need to input the person’s name and then drag a frame around their face.
NVR or DVR storages
Xeoma can work with surveillance video capture cards. It allows to utilize the existing analog cameras within IP network and perform central management over both analog and IP cameras.
Xeoma works both with NVR and DVR storages. There are some factors that affect the DVR / NVR storage capacity: video compression (codec), resolution, and motion detection recording, so Xeoma will easily help you to use the storage space effectively.
Using Xeoma you will be able to optimize the storage of almost any DVR or NVR.
Alternative option to reduce HDD space
Another option is to use Saving to File module to save videos with other codecs (for example, high compressive H.264) – this way videos won’t take so much space but will not be played with the built-in player of Xeoma either.
Or, if yours are rtsp (H264) cameras, you can use direct saving to archive without re-encoding.
Parallel saving of recordings in high and low quality.
Starting with version 22.3.16, Xeoma offers parallel saving of recordings in low quality in addition to regular (usually, high quality) archives.
The low quality archive can be used for
* less processor load during simultaneous view of several cameras recordings (especially when speed multiplier is used);
* export of archive pieces in tight network environment;
or
* disk space optimization in long-term storage of important video evidence.
You can enable saving a lower quality copy of camera video feed in the ‘Universal Camera‘ module settings with the ‘Low quality archive: additionally record the preview stream to the archive’ option. The preview stream from the ‘Full URL address for preview stream from the camera…’ field will be then used to save recordings from, in addition to the high quality regular recordings. The disk space requirements will increase correspondingly as per the preview stream parameters. See this note on how to calculate space requirements with the low quality archive.
By default, the storage time of the low quality archive is the same as the storage time of the main high quality archive. To set custom storage time, tick the ‘Maximum total storage time of recordings in low resolution’ box in the ‘Preview and Archive‘ module settings and select new storage time with the slider below.
Please note that for technical reasons you cannot select a custom name or a custom path for saving of the low quality archives. Low quality archives will be saved in the same directory and with the same name as the camera’s main archive, but with a .lq extension.
For export, a lower quality archive can be selected in the Export dialog of Xeoma’s built-in archive viewer.
For using low quality archive in the simultaneous view of several cameras recordings (Xeoma Pro feature), tick the ‘Prioritize lower resolution recordings at simultaneous view of several archives’ in Layouts menu -> Client decoding setting.
You can estimate required disc space for archive storage with our minimum system requirements calculator.
|
|
Advanced: although viewing of archives is naturally a thing that can be only done with graphical interface, there are some advanced options that can be selected to control some aspects of archive recording:
The ‘-noarchivedb‘command can be used to opt out of making an archive database that is used to write down meta data about motion events and search in archive. If you use this option, those two will not be available. |
3.6. Face Detector and Face Recognition
Among other features Xeoma enables your camera to detect people’s faces and recognize specific faces. It can also store a full list of people within its range. This comes especially useful in monitoring staff activity or creating automatic security systems preventing trespassing. It can be set to ignore low numbers of people or stop recording when a certain number is exceeded. Don’t want the camera to detect people that simply pass by? Want to make sure that Xeoma doesn’t mistake one person for another?
High recognition and identification accuracy is based on the use of several facial views for comparison. The system allows you to recognize the faces of people in motion.
Operational scheme : capture, recognition and saving biometric vectors of faces, when the person is in the frame, in the online mode. Combinations of proprietary algorithms and third-party algorithms are used.
You can do it via the module “Face Detector”. Put it in your chain and click it to access the settings. If you want it to simply detect all the faces that enter the camera’s field of view, choose “React to any faces” within “Reaction type” block. You can also set the minimum amount of faces for triggering with a slider (set it higher if you want to make sure that a certain place is never crowded). In detailed settings you can choose which area within the camera’s field of view is supposed to contain faces (much like “Motion Detector”). Also the range of face recognition can be altered, for example, if your camera is set in a narrow place, where people’s faces are always close to the camera, it is better to set the range to “Short” or “Medium”.
Face Recognition
If you need the camera to recognize a specific set of faces, Xeoma can be trained to do so. There are 2 ways to do it:
1) In “Face Detector” settings enter the person’s name (or any other ID) and click on “Train person recognition” when the face you need to save is within the camera’s field of view. Xeoma will add this face to the database and attach the name (or ID) to it.
2) If the person you want to add has already been recorded, you can access the archive and pick the right face from there. Click on the Archive button for the right camera, find the frame that contains the face you need (the bigger – the better) and go “Archive Menu” -> “Select a face and add to the database”. Now just type in the name and draw a square around the face. Done!
With a database for several faces you can now set “Face Detecor” to either react only to selected faces or to unknown or unselected faces. The latter one is useful for monitoring any unauthorized personnel. When you select either of these options, you will see your whole database below as a list of names (or ID) with boxes you can check or uncheck as you see fit. With this you can make Xeoma recognize only specific people and ignore the others or pay attention only to unknown persons.
Don’t forget to use the “Minimal recognition accuracy” slider. It allows you to adjust how close to the original the detected face should be. If you notice that your camera sometimes, for example, mistakes an unknown person for a listed person, set the slider higher.
Integration with automation systems
When a face is detected, Xeoma can send this information to automation systems with the “HTTP Request Sender” module. “PTZ Tracking” connected after the “Face Detector” will make your PTZ camera follow the person, and “Sound Alarm” will trigger the alarm.
3.7. Visitors Counter
“Visitors Counter” is a unique function that allows you to effectively analyze the footfall traffic for your shop, showroom or your office attendance. The module allows to exclude the staff from the calculation data (when it is used together with the “Face recognition” module).
Start by inserting the module “Visitors Counter” after the “Motion Detector” in your chain.

Mark the entrance with a line (simply draw it with the brush tool), which visitors would have to cross in order to be counted.

*In Xeoma version 20.10.13 and higher the green Skipping/yellow Not Skipping inscription is replaced with green Triggered/yellow Not triggered.
You can adjust the module “Visitors Counter” in order to facilitate data collection. You can choose the counting method (1- or 2-directional) and the interval for the counter’s resetting. 1-directional method will count every single time the line is crossed (useful when people always move in the same direction). 2-directional method, on the other hand, only counts every second crossing of the line as 1 visitor (useful for keeping track of people exiting and entering through the same door).
Also you are free to save the data collected in a CSV report, which can show you what time the visitors entered or exited. This is especially useful for keeping statistical data and sending it to external software for detailed analysis.

To reach maximum efficiency in counting the visitors, we recommend installing the camera perpendicular to the floor, right over the entering or exiting people. This helps to avoid any false triggering of the counter due to image projection.
3.8. Marking module
If you have multiple cameras on a single server and, consequently, several video feeds on one screen, it is important to always keep track of every camera’s position, and date and time it shows. If you are a security guard, you need to know exactly where to go, when the camera detects something and there is precious little time to think.
Xeoma was made with this in mind. The module “Marking” is what serves all these functions. You simply add it to your chain (any position will do) and click it to access its settings.
First, you need to choose the “Type of marking” at the top of the window.
a) If you pick “Date and Time” you can also adjust the “Date/time format” you prefer in the drop-down menu below. The slider “Font size” is also worth paying attention to. One of the common problems for the new users is that they can’t see the marking on the main screen simply because it’s too small. Some cameras display date and time automatically, though.

b) If you pick “Custom text” you can input anything you want on display in the Text field below. One of the best ways to use it, is to indicate the place that the camera watches and its position on the video feed.

c) If you pick “GPS coordinates” you need to make sure that you have specialized GPS equipment connected both to your camera and to your machine. If it is connected properly, the video feed will now show the camera’s longitude and latitude, height and velocity (if any).

d) Picture-in-picture: If you pick “Image overlay” you can either input the full path to the image-file in the field “Path to the image to overlay” or click the button to the right and pick the file through explorer. Don’t forget to adjust “Scale (on sides)” and “Transparency” sliders to prevent the image from obstructing the view. For example, you can use this feature to put a map with the marked camera position on screen for easier navigation, or embed your logo to the camera video feed.

For all of the above you can pick the “Position” on screen (any of the 4 corners).
Do you need more than one marker on the same camera’s video feed? No problem! Simply put several “Marking” modules in your chain and set them to show what you require in different corners of the screen.

As you see, even with all the camera detectors, it is still very easy to put all the information you need right where it can be accessed with no difficulties whatsoever.
Marking in the archive
“Can I see my markings in the archive as well?” If you are using direct saving to the archive (the box “Enable H.264 recording to Archive without conversion” is CHECKED), then time and date will show up in the “Archive viewer” as subtitles (it will replace your selected position and font with standard ones). These subtitles for time and date type of marking will also be saved for exported extracts from the archive viewer (the ones exported in .mkv).
Another marking type, “custom text”, will only be applied for online view of cameras with the direct saving to archive setup, but it will not appear in recordings view or exported extracts.
Otherwise, for .xem recordings when direct saving to the archive is not used, Marking of all types is available for the archive recordings as well as for the live view of cameras.
3.9. Relay Switch
This module is a streams switcher. When it receives a signal from a managing module, it closes the circuit and lets through the stream from the managed (secondary) chain.
For example, connect two Universal cameras to the Relay Switch module. Put a Motion Detector after the first Universal camera but before the Relay Switch. This way, when motion is detected, the second camera will be turned on and start passing its video stream to the modules you connect after the Relay.
Depending on the selected mode of operation, the Relay Switch offers various types of behavior after the motion from the first camera is over.
“On as long as there’s signal” – the secondary chain will be turned on and working as long as the managing module keeps sending the signal, and turned off when it stops.
“On with the 1st signal, off with the 2nd” – the secondary chain will be turned on when the first signal comes, and turned off when the next signal comes.
“On just once, during the time selected below:” – the secondary chain will be turned on just one time when the signal comes, and turn off automatically after the time you specify below with the slider.
Relay in action
If you need to protect a certain spacious area (e.g. a warehouse) with only a couple of cameras, here is how to do it. You’ll need one camera with a narrow field of view and another one with a wider field of view. The first one should control only the entrance to the facility. The second one should be able to oversee most of the interior. The entrance, of course, needs to be under surveillance 24/7, however, the interior doesn’t have to be monitored unless the first camera detects something.

Here the first camera is connected to the “Motion Detector” and records all motion using “Preview and archive” module. However, the “Motion Detector” is also connected to the “Relay Switch”. This module ensures that the second camera doesn’t record anything on its own.

Now alter the “Relay Switch” settings like this:

*In Xeoma version 20.10.13 and higher the green Skipping/yellow Not Skipping inscription is replaced with green Triggered/yellow Not triggered.
With this, once the first camera detects motion at the door, the second camera begins continuous recording of the interior, so that you can keep an eye on whoever entered. When the first camera detects motion again (the person leaves), the second one stops recording. A great way to save both disk space and bandwidth without decreasing security.
If the second camera has PTZ-functions, you can make it “follow” the visitor. All the filters you want to append to the second camera can be put AFTER the “Relay Switch”. The chain should look something like this:
![]()
This will provide decent security for a building for a very moderate price.
3.10.Masking
Privacy Masking module allows to dynamically blur the areas that you are not allowed to record. It will especially help if your camera’s view is catching private property of someone (your neighbors house, for example).
Combined with filter modules it can dynamically blur detected objects (for example, faces or license plates).
It can be used on its own for uninterrupted blurring of static objects (for example, neighbors’ windows). In this case, in the module’s settings you should untick the detector box and select the detection zone to blur.

*In Xeoma version 20.10.13 and higher the green Skipping/yellow Not Skipping inscription is replaced with green Triggered/yellow Not triggered.

Alternatively, you can connect the Privacy Masking after detectors – Motion Detector, ANPR, Face Detector depending on what you need to blur (tick the detector box and select the detection zone in the corresponding detector’s settings).
Masking will be applied to the camera image in real time and in recordings, also in browser interface (except when direct saving to archive is used any filters that modify the stream including Privacy Masking).
3.11.Smoke Detector
One of the new features of Xeoma is a “Smoke Detector”. With this you can be sure that you are the first to know if any fire breaks out. Let us look at the module’s functions.

If we enable Continuous operation, the module won’t prevent the stream from being recorded in the Archive. This will allow us to search for the detected smoke in the Archive later. Working mode allows you to switch between Smoke detection, Fire Detection and Smoke and Fire detection with CUDA (starting with Xeoma 23.12.7) working modes. The Sensitivity threshold helps to make sure that the detector is not triggered under normal circumstances (e.g. when somebody simply lights a match or a cigarette). However, if the place the camera monitors is supposed to be completely smoke-free, you can set the threshold very low. Sometimes there can be a momentary gust of smoke or steam that you don’t want to detect either. This is where the slider Ignore motion shorter than steps in. Set it to a couple of seconds to filter these out.
Here is a chain you can use in a warehouse:

The “Motion Detector” puts all the movement it detects in the “Preview and Archive”. This includes all visitors and the smoke too. At the same time, the “Smoke Detector” informs the owner of any smoke via “SMS Sending” and trips an alarm (“Sound Alarm”).
Such smoke detector cameras ensure the earliest possible detection of the fires and, most importantly, safety for both you and your property.
3.12. Object Detector

*In Xeoma version 20.10.13 and higher the green Skipping/yellow Not Skipping inscription is replaced with green Triggered/yellow Not triggered.
The main principle behind this module is very simple: as long as it detects an object – it will skip the video to the next module in the chain. When there is no object on screen – the detector won’t skip anything. The devil, as usual, is in the details. To make sure that the “Object Detector” pays attention only to the objects you need, it requires some fine-tuning. First and foremost, you need to determine the size of the object(s). The sliders Minimum size of object and Maximum size of object will help you with that. Now mark the area containing the object(s) with a brush. To facilitate the whole process, just put the desirable object(s) somewhere where the video system can see them and fiddle with both sliders until the module consistently shows Triggered (in versions older than 20.10.13 – “Skipping”) in the top right corner. Then let a person pass between the camera and the object(s). Did the Triggered sign turn into Not triggered during that? If so, then everything is set correctly. If not – try raising the Maximum size of object.
Now, how can we apply this? As previously has been mentioned, the vague name of this feature covers an impressive range of possibilities. Let’s take a few examples.
Store. How does one measure the popularity of a given item in a shop? The obvious answer is “by how often customers buy it”. But this would be a rather superficial, one-sided analysis. A more complete answer is “by how often it catches somebody’s eye”. This is where the “Object Detector” works its magic. Set the camera to view the item in question, make a simple chain of “Universal camera” – “Object Detector” – “Preview and Archive”. Now, in a few days, you can look at the Archive and check the gaps in the recording – these are periods when a customer took the item from its place for a closer look. The more of those – the better.
Warehouse. Stolen objects detection. Let’s say you have an item stored you don’t want moved or touched. Naturally, you want to make sure that the workers attending the warehouse follow this rule. Set the camera to view the item in question, make a simple chain of “Universal camera” – “Object Detector” – “Preview and Archive”. Now, if the archive is incomplete – you know exactly when the item was moved.
These are but a few examples of what object detection is capable of, teamed up with a decent video system and a flexible mind. VCA grows rapidly and Xeoma never falls behind.
3.13. HTTP Marking And Integration With POS:
You can add dynamic text overlay from your POS (point of sale) device on recorded files with Xeoma’s module HTTP Marking:
Work with POS-terminals, cash systems, cash machines (or any other source of data – ATM, scales, barcode reader, etc.). The cash management system is designed for trading enterprises. The system accepts text data, generates events, stores them in the archive with reference to the video recordings.
Text search in the archive by title, request (based on the receipt, on the number of goods in the receipt, on refunds, on the size of discounts, etc.) – allows you to identify thefts and other economic violations by staff or store visitors, as well as find operational errors and cash discipline violations. The module allows to display data in the camera’s overlay.
Your cashier register needs to send such information as:
Xeoma’s machine IP address and port
“id” = ID of operation or number of the check
“start” = start check and start recording
“stop” = finish check and stop recording
“continue” = if your cashier register is set to stop recording automatically after, say, 5 seconds yet check is taking more time this time, you can send this command to not finish the check yet.
So, here’s what you need to do in Xeoma:
1. Connect the HTTP Marking module to the chain after the needed module, usually simply after camera and before archive. For example:

2. No special setup is needed. Set your cashier register up in accordance with the information in HTTP Marking settings. Mostly it’s information on how to use this module and this field (not editable):

*In Xeoma version 20.10.13 and higher the green Skipping/yellow Not Skipping inscription is replaced with green Triggered/yellow Not triggered.
3. When event starts (for example, check begins) your cashier register will send command like
http://192.168.0.10:10090/http_marking?id=4&module=HttpMarking.60&cmd=stop
Where
192.168.0.10 will be replaced with your Xeoma server machine’s IP address
10090 – with port you will use
id=4 with whatever ID your register sends
HttpMarking.60 with your HTTP Marking number is Xeoma (if you have several modules of this type, they will differ through this number)
cmd=stop – command
start – to start recording
continue – to continue recording (if auto-stop is enabled)
stop – to stop recording
You can test it without cashier register simply by sending the HTTP commands (start and stop) in a browser address bar like
http://192.168.0.10:10090/http_marking?id=4&module=HttpMarking.60&cmd=start
and then
http://192.168.0.10:10090/http_marking?id=4&module=HttpMarking.60&cmd=stop
4: Search for needed episode the archive by ID.
Go to web interface with a link like
http://localhost:10090/
(where localhost can be replaced with your Xeoma server machine’s IP address)
Click Archive link (it only appears if you already have at least one video recording)

Choose a camera that you would like to view archive for, by clicking on its image:

You will see a search box to the right. Enter any of the used ID there and click the search button or hit Enter

You will see a list of events with this ID. Click on the needed to view it.

In order to start an event, you will need to put this URL in your browser’s address bar:
http://localhost:10090/http_marking?module=HttpMarking.1¶ms=param1=value1|param2=value2
You should put your IP address instead of localhost (e.g. 192.168.0.1). Now you can type in actual parameters (instead of param1, param2, etc.) and their values (instead of value1, value2, etc.). The separator is “|”, you can use any letters, e.g. Work Day Start, WORK DAY START, work day start or Work_day_start. You can send a command to multiple markers like this: HttpMarking.1|HttpMarking.2. The command should look something like this (all spaces will be autamically converted to %20):

To end an event, send this command to the right “HTTP Marker” (or several):

With that, you can access the archive and start the Search by HTTP Marking. The dialogue window will ask you for the parameters’ values (or you can search for all the values simultaneously) and the interval within which to conduct a search. The timescale should look like this:

The green parts indicate the events the search has discovered, while the counter called Currently displayed shows you how many of those events were found and which of them you are currently viewing.
If there are multiple parameters, Xeoma will put them one under another, you can have as many as you’d like:
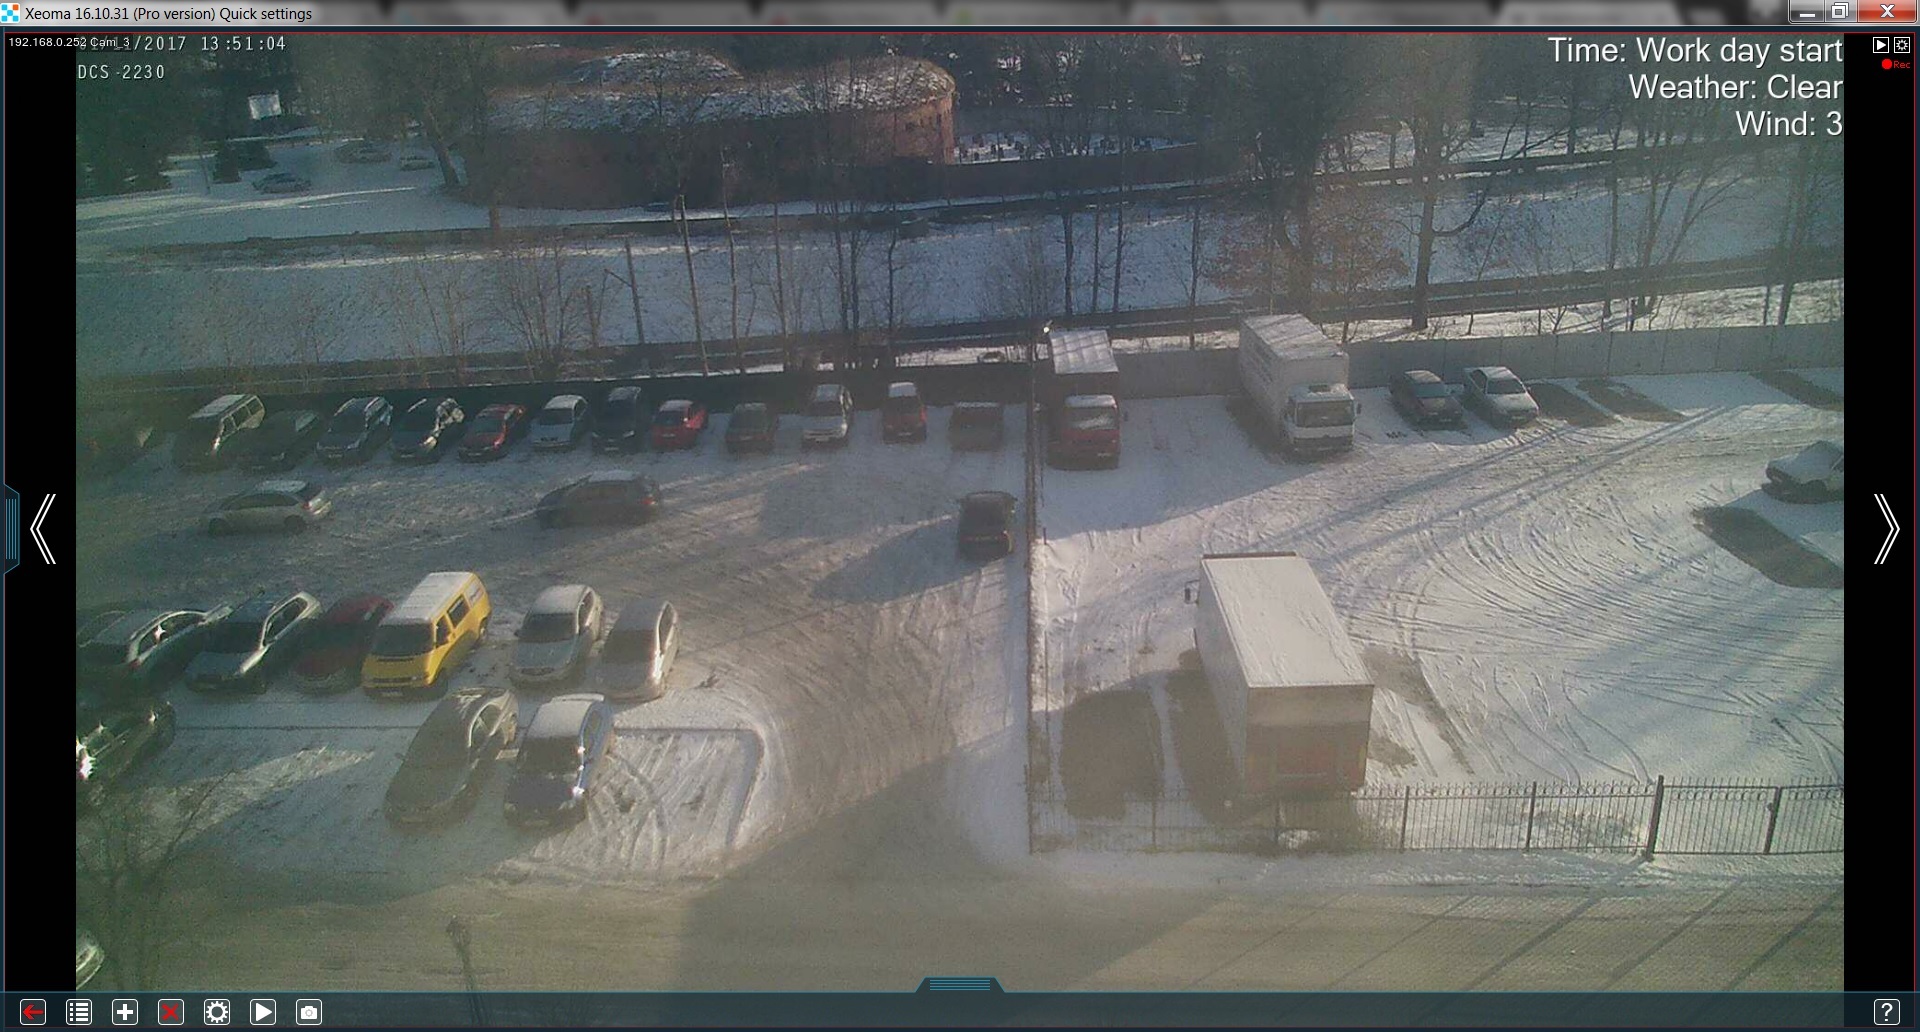
3.14.HTTP Request Sender (integration with home automation)
This module allows to generate and send HTTP requests. Integration with third-party solutions (from “smart home” to banking sector) via the accessible REST HTTP API and SDK, as well as with any external system that can run an executable file.
It will also perfectly work with the smart home systems or supplement your home security system. If you want to send motion-triggered requests, connect the module after the motion detector. The module will send HTTP request with configurable parameters to the specified address when it receives image. For example, when the motion is detected, the module will send HTTP request to the “HTTP switcher” module and it will enable other modules, for example:

Here we see that “HTTP Request Sender” sends requests to enable sound alarm and archive recording when motion is detected, and disables it when the motion ends. Please pay attention to the sensitivity level and the object size settings of the motion detector.
Let’s have more precise look at the “HTTP request sender” settings:

Enter the URL and port of the HTTP server in boxes marked with red.
So it will look like this:

When we entered the URL and port of the HTTP server, it appeared in the Resulting URL.
In the detailed settings, set up the sending interval and time when you want the request to be sent.

When you set up the HTTP Request Sender module properly and want to save changes, click on «OK». The module is set up easily and working with it is pretty simple since all the settings are comprised in one menu of Xeoma IP security cameras software.
Starting from 20.11.30 Xeoma version, the “HTTP Request Sender” module now supports the %REPORT% macro to get information from the “Problems Detector” module, other macros are:
%FACECOUNT% – shows the number of faces from “Face recognition” module
%CROWD% – shows the number of people from “Crowd detector” module
%NAME% – macro to receive names from “Face recognition” module
%TEXT% – macro to receive the text from the module “Text Recognition”
%REPORT% – macro to receive information on the problem’s type from “Problems detector”
%EYEANGLE% – pupils’ direction from the module “Eye Tracking”
%AREASTATUS% – status of parking spaces from “Parking Spots” module
%STATUS% – macros to receive license plate’s number in plain text from “ANPR” module, e.g. A110PB77 etc.
3.15. HTTP Upload to Other Xeoma and HTTP Receiver modules
The “HTTP upload to other Xeoma” module’s functions are simple: send the image received over the chain of modules to the module “HTTP Receiver” wherever it is over http protocol. The modules work in tandem, so their settings are mutually connected:

Here’s how they are to be configured:
Step 1. It’s recommended to start with adding the “HTTP Receiver” module in Xeoma on the receiving side, since it generates most of the settings to be used.
Once you add “HTTP Receiver” to the chain in computer that will be receiving the stream, and open the module’s settings, the first thing you will see is an non-editable field “Full path” the contents of which are comprised by Xeoma out of the word “localhost”, a port and the unique module name that you can put in the “URI path” below to differ between several such modules.
The Port can be anything that is currently not occupied by some other process. By default it’s 10090.
The full path might look like http://localhost:10090/myreceiver or http://localhost:10090/officecamera in result.
Since a “localhost” address only works when used on the same machine – which is not what we need in our example – we need to replace the word with the computer’s ‘home’ network address. To do that, copy the Full Path contents to a Notepad or other text editor and replace “localhost” with this machine’s private IP address to get something like http://192.168.0.54/myreceiver or http://192.168.1.12/officecamera in result.
Username and Password can be set to make sure that no one else can view that stream. However, it won’t be possible without using Xeoma and knowing both the IP and the module’s unique name, so those are optional.
After “HTTP Receiver” is set, copy the resulting path and credentials (if used), and go over to Step 2, which is to be done on the sending side.
Step 2. While in computer that will be sending the stream (in our case, the machine with the USB camera), end the modules chain for this cam with the “HTTP upload to other Xeoma” module.
Its settings will basically reflect the “HTTP Receiver” settings:

Insert the full path that you got in “HTTP Receiver” after replacing “localhost” with the receiving machine’s private IP address (http://192.168.0.53/mycamera in our example) into the Address field. Insert a new port in the ‘Port’ field if you used another port instead 10090 in Step 1. The same goes for credentials: if you set a login and password in Step 1, repeat them here too.
What makes this particular pair of modules stand out is the ability to relay more than just the image – the sound is transferred as well. “HTTP upload to other Xeoma” looks for the machine with the designated IP, checks if it has the with the same unique name (and username/password if any) and sends the stream to it. This creates a secure transmission of both video and audio between 2 machines.
Among others, it is used in Xeoma’s new version (17.3.30) to enable the 1-click Cloud mode: modules “HTTP upload to other Xeoma” connect to all your local cameras while Xeoma Cloud creates “HTTP Receivers” with all the necessary information already inside.
|
|
It is possible to transfer streams from one Xeoma’s server to another using other methods. One of them is FTP. Connect “FTP Upload” to the camera and create a chain with “FTP Receiver” on the second machine. This won’t work as a solution for this situation, however, as the result will be only the visuals, no audio. FTP is capable of transferring sound only when the stream’s format is H.264, which is native to IP cameras only.
Another option is transfer through the web. Connect the “Web Server” to the camera, while using “Another Xeoma” on the second machine. This won’t fit our specific needs either for the same reason – plenty of video, no audio. |
However, these examples work only within the same local network. And what if the two computers are in different blocks or even cities? In that case, the first computer requires an external static IP address. If you go with the first option, you need to put the second computer’s public IP address or its substitute in “HTTP upload to other Xeoma”.
To sum up, the solution looks like this:
- Launch Xeoma on the first computer – the one that will be receiving the camera stream – and make a chain with the “HTTP Receiver”.
- Access its settings and indicate the unique name and username/password. Then copy the resulting line from the ‘Full path’ field and replace “localhost” with this machine’s external static (“public”) IP address.
- This concludes the work on that computer, we can close Xeoma’s window here. Now launch Xeoma on the second computer – the one that will be sending the camera stream – and add “HTTP upload to other Xeoma” to the chain for the USB-camera.
- Access its settings and indicate the first computer’s ‘full path’ along with the name for the module and username/password if necessary.


All done! Now our remote software allows this computer to view the USB-camera live or its archive at any time.
![]() Starting with Xeoma 23.6.13 P2P connection is available for use in “HTTP upload to other Xeoma” and “HTTP Receiver” as a free-of-charge alternative to having a public IP address. It is free and safe, and makes connection easy. Read more about Xeoma’s P2P connection
Starting with Xeoma 23.6.13 P2P connection is available for use in “HTTP upload to other Xeoma” and “HTTP Receiver” as a free-of-charge alternative to having a public IP address. It is free and safe, and makes connection easy. Read more about Xeoma’s P2P connection
The same configuration guide will be somewhat different when P2P connection is used:
1. First step would be enabling P2P connection on the receiving machine – the one with HTTP Receiver module. To turn it on, go to Xeoma’s Main menu — Remote Access — P2P connection configuration. You will see more information about this free service in the newly opened “P2P connection configuration” window, followed by the tickbox for enabling P2P connection and getting a unique address for the server.
Tick the “Enable the P2P connection option” and wait a couple of seconds. The “P2P address of this server” will have the unique address in the format “AAA-BBB-CCC”, an alternative to a public IP address. Copy the address.
2. Next, you can follow the general guide mentioned above – but use the just copied P2P address instead of an IP address. So when you copy the ‘Full path’ from the ‘HTTP Receiver’ and edit it to paste into “HTTP upload to other Xeoma” it will look like ABC-abc-AbC/mycamera. The rest recommendations from the guide stays the same. For example, you can use credentials for enhanced security.
3.16. RTSP Broadcasting
Enter Xeoma’s “RTSP Broadcasting” module – it allows to convert any stream into RTSP (including H.264), be it analog, USB or IP camera. First of all, let’s add it to the chain:

The broadcast is almost ready to start, now to configure the module:

If we use mpeg4 or mjpeg, everything is ready – copy-paste the path (sometimes it will include the port: rtsp://localhost:30001/RtspTranslator.10) to a “Universal camera” on another Xeoma and swap “localhost” for the first machine’s IP – you are ready to broadcast now:

If the second machine is located within a different network, the first one will require a static (fixed) IP (or its alternatives) with the right port forwarded (if no port is present in the path, forward 554 – this is the default RTSP-port).
However, both mpeg4 and mjpeg are quite “heavy” for the network. If you’d like to stream in H.264 and reduce the network load, choose libx264 as Encoder type. You will also need a specific version of ffmpeg for this to work properly, downloadable here:
Windows: https://felenasoft.com/xeoma/downloads/ffmpeg/win/ffmpeg_win.exe
Linux: https://felenasoft.com/xeoma/downloads/ffmpeg/linux/ffmpeg_linux
Starting with version Xeoma 20.10.13 was added support for RTSP Broadcasting module under ARMv8 for Xeoma Pro.
Starting with Xeoma 22.10.12 RTSP Broadcasting module became available in Xeoma Standard edition.
Please note that this option is unavailable for Mac OS, as there are no ffmpeg versions for it. Indicate the path to that file on your machine:

To minimize the bitrate choose High compression rate. As a result, you will get a compressed broadcast now with a significantly lowered bitrate without losing the quality.
This method does have a downside – compressing and encoding a stream is a task meant for the CPU, one that has to be performed continuously. As such, the server’s CPU load is going to rise the higher the compression.
This showcases the underlying choice a video surveillance administrator needs to make: CPU load or network load? This in turn boils down to: powerful server or powerful network? With only a few cameras there is little to consider, as even ancient technology will be able to handle that much, but the higher grows the scale (50-80 cameras per server) the more substantial become the requirements. The most common solution to this is, naturally, the middle ground: MJPEG stream for the preview and H.264 stream for the archive – this way the server won’t have to decode the image in real time, while the network will hold only 1 unencoded stream per camera.
CHAPTER 4. MORE FEATURES FOR ADVANCED SURVEILLANCE
4.1. Xeoma Client-Server Architecture
Xeoma is based on Client-Server architecture. It means that there are 2 parts of Xeoma – Xeoma Server and Xeoma Client – that build its architecture. Server is processing cameras and other sources and basically does all the automated work while Client is used for viewing and interacting with server. Client can be on the same or on a remote machine, including mobile phones.
When you first download Xeoma, you get it in an executable file form. When you run Xeoma IP camera software with this launcher, you run both Server part and Client part. Server is working in background and Client is what you see as main Xeoma window.

Later on, when you use remote access, you will use the benefits of this client-server architecture to connect with the client part on one computer to the server part on another (you can connect multiple clients to the same server). It’s done via Main menu -> Remote access -> Connect to Connection dialog, where you need to replace ‘local’ IP address (address of the computer you run Xeoma on) with ‘remote’ IP address or Repeater location, see remote access info.
|
|
Read also: The difference between Server and client settings and Setting up the client part in Xeoma |
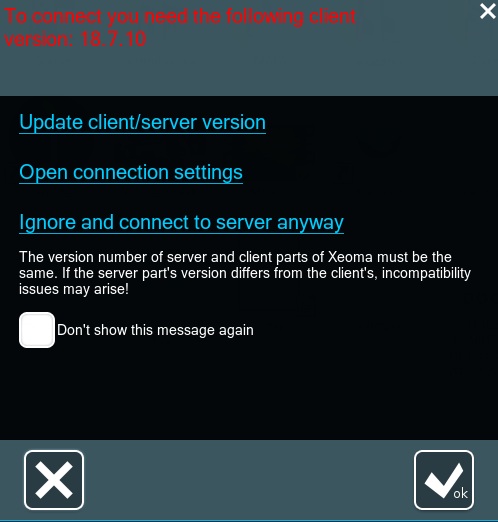
No matter in what mode you use your Xeoma, it can work either with or without being installed on your PC. The difference is that if you need Xeoma to start automatically at your PC’s every restart, you need to set it to autostart – either server alone or with client part. To do that, just check boxes in installation menu.
Licenses are only for the server part. This is a great news for those who are planning to use remote access feature – no matter how many clients connect to the server, you only buy license for the server. Check the most economical offers for Xeoma licenses at our purchase page.
Xeoma mobile apps are available for Android and iOS:
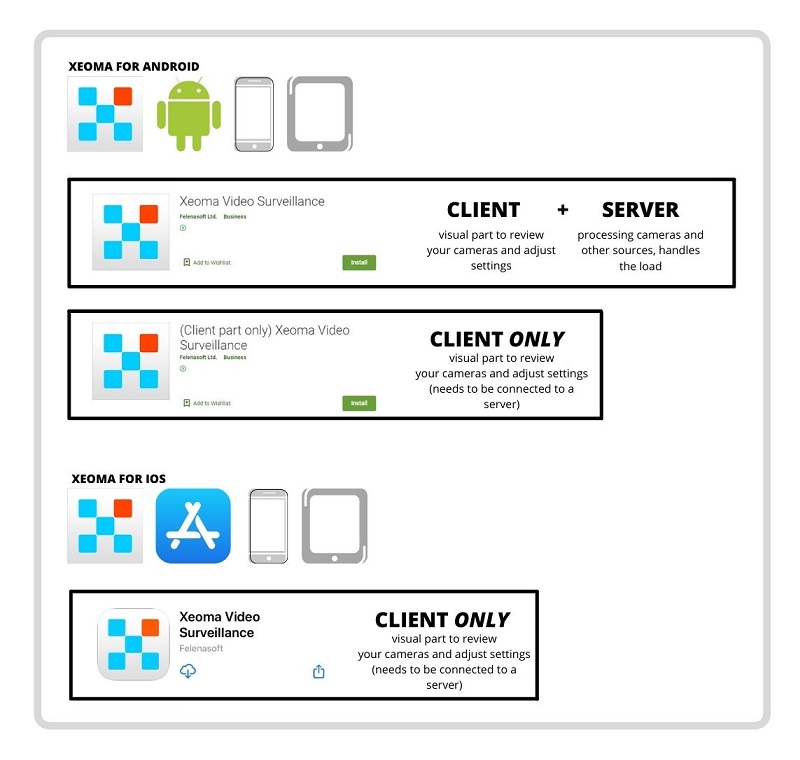
4.2. Program installation
Xeoma doesn’t require installation and can start working right after being downloaded. You may want to install Xeoma to make it start with your OS automatically.
![]()
Please note: Xeoma doesn’t install anything without user’s consent. Installation is user-definable.

Go to Main Menu -> Install -> Install. You will get a prompt asking what type of installation you prefer and what folder would you like to choose for the software installation.
Autorun the server: Xeoma Server will start automatically with your OS’s each start. This is a good thing for example when you need server to process cameras all the time while you only will connect to it with Xeoma Client from time to time. To do that, launch the created Xeoma shortcut on your desktop.
Autorun the client: Xeoma Client (visual part) will be started automatically with your OS’s each start, for example it can be a good idea if you have server somewhere else and would like to connect to it automatically remotely.
Note: ‘Hidden mode’ and ‘Client autostart’ are mutually excluding options because when you need stealth surveillance you wouldn’t want Client part to open up automatically at each PC’s start, completely ruining all of the conspiracy you’ve created, would you? Then choose one – either client autostart or hidden mode, or none – if you don’t need it all (for example, if you are not going to work with cameras or recording on this PC like when you are broadcasting some footage continuously to a site or FTP server). If you choose Autorun to server and Hidden Mode, Xeoma will work in stealth mode. Launcher for Xeoma will not be created on desktop (and if it was previously, it will be removed). Xeoma Server will start automatically every time OS is started but will not be shown in running processes.
Installation on Android: To install Xeoma on Android, find the application on Google Play or Huawei App Gallery (if your mobile device is not supported by Google services), click “Install”. See more details here.
Alternatively, you can download a version of Xeoma with more functions for Android from our website. Run and install the downloaded file (to do that, allow installation of applications from unknown sources in the settings of your device).
Installation on iOS: To install Xeoma on iOS devices, find the application on the AppStore and click “Download”. Please note that only the client part is available on iOS, which allows to view cameras remotely. See more details here.
|
|
Please note that the “Hidden mode” installation option is not available in Xeoma Android and iOS apps due to the limitations of the operating systems. |
When you ticked desired installation boxes and clicked OK button, the part or parts you chose will be installed on your local PC and restarted. Please pay attention: your settings will not be saved if you are using Xeoma in trial mode (for more on Xeoma modes and their limitations, please see here).
Important: installed server works as service. It can be stopped in Services folder of your task manager, or uninstalled (and thus stopped) with a client.
Important: if you connect to Xeoma and receive the following message “Ignore and connect to server anyway”, then you use different Client and Server (installed) versions.
It might cause problems with Xeoma’s work, archive reviewing etc. We recommend using the same version of Client and Server.
Xeoma’s version can be checked in the program’s header after connecting to the server (choose option “Ignore and connect to server anyway”). Older versions can be downloaded here.
Below the software installation options there is your password for remote access displayed in the box (non-editable). Tick the check box to set this password for local access as well (so, anyone accessing Xeoma even on this very computer, ‘locally’, will have to enter a password. This password can be changed in User rights dialog (or through console with the -setpassword command).
|
|
For console, an ‘-install [-argument]’ command is used to work with installation of Xeoma. Use -install -allauto to install both Server and Client parts to start with OS (see explanation above, in the section for installation with graphical interface); Use -install -coreauto to install only the Server part to autostart while the Client part will need to be started manually; Use -install -hiddenmode for Hidden mode; Use -install -allmanual to create shortcuts for Server and client part to start them manually when you need either or both. Besides, there is an ‘-installdir [DirPath]’ command that helps you change a directory to install Xeoma to. |
4.3. Licensing
Licenses can be purchased online on Buy page or from our resellers. Once you activate a Xeoma license for any amount of cameras, you get your version upgraded to the Standard edition with unlimited possibilities, full remote access, and more. You can use it as long as you want and/or need to.
Licenses are for lifetime with free updates included for 12/24/36 or 120 months since purchase date depending on the license package you purchase.
The number of licenses can be increased gradually. You can add unlimited number of licenses to the ones you already use and thus use as many cameras as all of your activated licenses allow in total.
Buying licenses is a one-time payment: no monthly or yearly fees required. However, Repeater and Cloud subscriptions are not included in regular Xeoma licenses.
In most cases you will receive license immediately after payment. If you’re purchasing the license via PayPal or swift bank transfer, it may take a couple of business days for the payment to reach us. License activation takes just a few seconds.
License is universal for Windows, Linux, Mac OS or Android.
You need the Internet connection to activate a license.
Any license can be activated only on 1 device! The license is connected to the unique server ID, it is hardware dependent but survives OS reinstalls. Moving licenses is only allowed in exceptional cases. To do that, please go to the license reset page.
Connection to the activated Xeoma from Xeoma-Client is free, no matter how many clients are connected.
Licenses are bought on a ‘per cameras/video sources per server’ basis meaning that you need a license for as many cameras (video sources) as are used on one server. You will need separate licenses for each of such servers. Please contact us to ask for a quote for your installation. Camera/video source is any video source of signal (camera, Another Xeoma, screen capture, file reading).
You can see the information about your licenses in Xeoma (Main Menu –> Information –> Active licenses). You can move the cameras between the servers by yourself, without stopping the system’s work. It’s necessary to take into account the functions, which are included in the price of a channel, as well as the total cost of the software and the whole product, as the total cost depends on several factors: productivity, licensing etc.
ATTENTION: If you have difficulties with your license, or did not receive your license right after purchase had been confirmed, please contact us!
4.4. Program activation
After you have bought a license, you will get an alphanumeric serial number. Use one of the methods to activate your license and switch your Xeoma to a commercial version of your choice or add renewal(s) to existing license(s) already activated on this machine.
To activate Xeoma Pro Cloud licenses, please follow the instruction.
Overview of Xeoma’s activation options:
| Type of Xeoma license | Activation is required for a: DEDICATED machine |
Activation is required for a: VIRTUAL machine |
||
|---|---|---|---|---|
| Machine has Internet connection | Machine doesn’t have Internet connection | Machine has Internet connection | Machine doesn’t have Internet connection | |
| Free version of Xeoma | The version doesn’t require activation. Read more here | |||
| Regular perpetual Xeoma license with one-time payment (e.g. Starter, Lite, Standard, Pro, Additional modules, Renewals, Upgrade from Standard to Pro) |
online activation (recommended) – one-time activation, can work without Internet afterwards license server – if easy transfer of licenses within the same network is required hardware key – if easy transfer of licenses in any network is required |
offline activation (recommended) – one-time activation if there is another machine in the network with Internet access license server – if there is another machine in the network with Internet access and if easy transfer of licenses within the same network is required hardware key – if easy transfer of licenses in any network is required |
online activation (recommended) – constant Internet access is required license server – if there is another machine in the network with Internet access and if easy transfer of licenses within the same network is required hardware key – if easy transfer of licenses in any network is required |
license server – if there is another machine in the network with Internet access and if easy transfer of licenses within the same network is required hardware key – if easy transfer of licenses in any network is required |
| Monthly rent of Xeoma licenses (rent of Standard, Pro, Additional modules) or demo/trial licenses |
online activation (recommended) – constant Internet access is required |
license server – if there is another machine in the network with Internet access and if easy transfer of licenses within the same network is required | online activation (recommended) – constant Internet access is required |
license server – if there is another machine in the network with Internet access and if easy transfer of licenses within the same network is required |
| Xeoma Pro Your Cloud (your own VSaaS) | Its own activation type in web browser or in config files. See here | |||
| Xeoma Cloud | The product doesn’t require activation. See more here | |||
| Repeater | Only online activation, done in another window. See more here | |||
Another spreadsheet about activation options can be found here
4.4.1. Online Activation
Simple and default type of activation in Xeoma that requires Internet access. Can be done through Xeoma Client or in console/Terminal/command line.
Can also be used behind proxy.
Via Xeoma Client:
Simply paste the license (serial number) into the Online Activation field (Main Menu –> Registration –> Activate), tick confirmation of Terms and conditions, and click the OK button.

After the activation is completed successfully, a message will appear with indication how many video sources you are able to use now.

Via console/cmd/Terminal (for Servers without graphic shell/GUI):
Drag Xeoma’s executive file (xeoma.exe, xeoma.app) into console, press Space button and enter the following command -activateOnline XXXXX-XXXXX-XXXXX-XXXXX-XXXXX (your license code), then press Enter.


If everything is fine, you’ll receive information that activation was successful.
![]() If you’d like to activate several serial numbers (licenses) on the machine follow the same instructions but instead of one serial number enter several serial numbers of yours separating them with a comma or semi-colon (no spaces) and putting a quote mark once before and after the whole set. Example: “XXXXX-XXXXX-XXXXX-XXXXX-XXXXX,YYYYY-YYYYY-YYYYY-YYYYY-YYYYY,ZZZZZ-ZZZZZ-ZZZZZ-ZZZZZ-ZZZZZ”
If you’d like to activate several serial numbers (licenses) on the machine follow the same instructions but instead of one serial number enter several serial numbers of yours separating them with a comma or semi-colon (no spaces) and putting a quote mark once before and after the whole set. Example: “XXXXX-XXXXX-XXXXX-XXXXX-XXXXX,YYYYY-YYYYY-YYYYY-YYYYY-YYYYY,ZZZZZ-ZZZZZ-ZZZZZ-ZZZZZ-ZZZZZ”
|
|
Tip: Xeoma licenses are not designed for frequent changes of equipment they work in. Please use demo licenses instead if you are still uncertain about the equipment to use Xeoma on. For frequent changes of equipment, please consider using a hardware key or a license server. |
Or, if required, click on Offline activation.
4.4.2. Offline activation
If your PC is not connected to the Internet, or using Internet connection is undesirable, you can use Offline activation in Xeoma.
Offline activation works for perpetual licenses and dedicated machines, and can also be used to add more licenses to a hardware key. See all activation options here).
Via Xeoma Client:
In order to do that please go to Main Menu –> Registration –> Activate –> Tick confirmation of Terms and conditions -> click on the Offline activation link.

Next enter your license, click “Copy to clipboard” to copy the link and enter it in a browser on another PC (device) with Internet access available. After you paste and follow the link, you’ll receive a response: a text consisting of digits and letters, which you should copy and take back to your Xeoma to be input in the response field:


If the activation was successful, Xeoma will turn to the Commercial mode (can be checked in software’s header), you will receive the ‘Activation successful’ message and the license will be available in Main menu – Information – Active licenses.

Via console/cmd/Terminal (for Servers without graphic shell/GUI):
Drag Xeoma’s executive file (xeoma.exe, xeoma.app) into console, press Space button and enter the following command -activateRequest XXXXX-XXXXX-XXXXX-XXXXX-XXXXX (your license code), then press Enter.

After that you’ll get a link that you will need to go to in a web browser on any other PC (machine, tablet, smart phone, etc.) that has Internet access. You will get a response: a text consisting of digits and letters, which you’ll need to copy and take back to your the console on the PC with no internet connection that you want to activate Xeoma license on. In the console, once again drag the Xeoma executable file or input the path to it manually, follow it with a Space and the command –activateResponse RECEIVED RESPONSE FROM BROWSER (where RECEIVED RESPONSE FROM BROWSER is the text you got in the browser of the machine with the Internet) and hit ‘Enter’:

![]() If you’d like to activate several serial numbers (licenses) in the machine, follow the same instructions but instead of one serial number enter several serial numbers of yours separating them with a comma (no spaces). Example: XXXXX-XXXXX-XXXXX-XXXXX-XXXXX,YYYYY-YYYYY-YYYYY-YYYYY-YYYYY,ZZZZZ-ZZZZZ-ZZZZZ-ZZZZZ-ZZZZZ
If you’d like to activate several serial numbers (licenses) in the machine, follow the same instructions but instead of one serial number enter several serial numbers of yours separating them with a comma (no spaces). Example: XXXXX-XXXXX-XXXXX-XXXXX-XXXXX,YYYYY-YYYYY-YYYYY-YYYYY-YYYYY,ZZZZZ-ZZZZZ-ZZZZZ-ZZZZZ-ZZZZZ
If you already have licenses activated on your Server and would like to add more, you can simply activate the new serial numbers the same way you did the original ones. Licenses will cumulate (N.B. Lite licenses cumulate only up to 4 cameras per server and only among themselves).
If you have an Upgrade from Standard to Pro, you can activate it by indicating the original license’s serial number, semi-colon, the upgrade’s serial number (no spaces). For example, XXXXX-XXXXX-XXXXX-XXXXX-XXXXX;YYYYY-YYYYY-YYYYY-YYYYY-YYYYY. As a result, you will get access to Pro features for that number of cameras. If the Standard license had more cameras than the Upgrade, only a part of it will be affected.
No matter what way to activate your license you choose, with Xeoma commercial edition you will get unlimited possibilities and activated benefits.
For information on activation Xeoma using a proxy server, please see this section.
4.4.3. Activation on virtual machines
Activation is possible on any type of virtual machines for Xeoma (Xeoma Standard), Xeoma Pro, Xeoma Lite (starting from version 20.10.13), Xeoma Starter perpetual licenses, as well as the Upgrade to Xeoma Pro, Xeoma Standard or Xeoma Pro Renewals, rented or demo Xeoma Standard or Xeoma Pro licenses.
To activate one or several of them on a virtual machine, use Xeoma’s online activation – either through Xeoma Client or console.
Please note that permanent access to the Internet is required on the virtual machine. When Internet connection is lost, the license might be deactivated but will be back if the Internet connection is restored shortly after. If the Internet access is unavailable for several days, you will need to re-activate the licenses to get the system back to work.
![]() Alternatively, if Internet access is not possible on the virtual machine you want to activate Xeoma on, you can use a hardware key or a license server, the latter meaning you will need to arrange your own license server on another computer in the network where the Internet is available and choose this license server during activation. See 4.4.4. for more information about license server.
Alternatively, if Internet access is not possible on the virtual machine you want to activate Xeoma on, you can use a hardware key or a license server, the latter meaning you will need to arrange your own license server on another computer in the network where the Internet is available and choose this license server during activation. See 4.4.4. for more information about license server.
Activation of Lite licenses on virtual machines is allowed since version 20.10.13 (needs perpetual Internet access too).
|
|
Tip: if you need to use Xeoma on virtual machines without Internet access, we recommend to use a license server or purchase hardware keys |
If you try to activate Xeoma in the regular way on a VM that has no Internet connection, you will get a warning:

See below for options in such case.
Legacy – Xeoma up to version 16.12.26:
Activation is possible on these virtual machines:
1) Hyper-V
2) KVM
3) LXC
4) VMWare
5) Virtual Box
If you have another type of virtual machine, please use one from the list instead, or use a physical machine.
4.4.4. Activation with a license server
If you have a virtual machine that doesn’t have Internet access, to make licenses work on this virtual machine, you can use a license server, which is an intermediary for activation: a dedicated machine in your network that does have constant Internet connection and perpetual ‘home’ network connection to your no-Internet machine.
A license server resembles the offline activation method since it also involves using an intermediary for activation but it’s more automated and must be functioning all the time, while offline activation is a one-time action.
![]() Alternatively, hardware keys can be used for activation of perpetual Xeoma licenses on a virtual machine that doesn’t have a perpetual Internet connection. However, only the license server option is available for no-Internet VMs that want to activate rented or demo licenses, since hardware keys do not work with those licenses.
Alternatively, hardware keys can be used for activation of perpetual Xeoma licenses on a virtual machine that doesn’t have a perpetual Internet connection. However, only the license server option is available for no-Internet VMs that want to activate rented or demo licenses, since hardware keys do not work with those licenses.
Although license servers are largely associated with activation of Xeoma on a virtual machine, they can be useful for activation of Xeoma on a dedicated machine as well: for example, when a dedicated machine doesn’t have perpetual Internet access but wants to work with rented or demo licenses, either of which require perpetual access to the Internet – or a license server. Besides, for both virtual and dedicated machines, the license server activation type can be used if a license needs to be moved between several machines periodically – similar to like a hardware key does.
Setting up a license server
Setting up a license server consists of two parts: first arranging a license server, and then selecting it in the ‘main’ machine for activation.
![]() One license server can serve several machines that need an activation intermediary.
One license server can serve several machines that need an activation intermediary.
Open Xeoma and go to Main menu -> Install -> Install license server on the machine that has Internet access and will become your dedicated license server. Remember that it must have a ‘local’ connection to the machine you need a Xeoma license on.

If you want the connection to be secure in your local network, tick the “Use password for localhost access” option:

Please wait while Xeoma is installing the license server.

After it’s done, you’ll see a corresponding message that the machine is now working as a license server.
|
|
For console/cmd/Terminal you can use the -licenseServer [LicenseServer] command to turn Xeoma in this machine into a license server machine.
Besides, you can use ‘-connectioninfoport [PortNumber]‘ to set port for License Server other than the default 4200 port. |
Selecting a license server and activation
Now, to the part #2. On the machine that you want to activate Xeoma licenses on (usually a virtual machine with no Internet access), open Xeoma and go to Main menu -> Registration -> Activate. In that Activation window, paste your license in the corresponding field, but select the license server rather than usual felenasoft.com activation server:

Agree to the Terms and Conditions, and click the OK button. This machine will send a request to your license server, it will then request activation permission for your virtual machine, and send a response to your Xeoma resulting in the license being activated. Do not turn the license server off: license checks will be performed in the background from time to time.

|
|
For console/cmd/Terminal you can use the -licenseServer [LicenseServer] command to find Xeoma license server in the local network and use it for activation. |
Please note that the license server machine should be running and have Internet access all the time you want licenses to work.
When Internet connection is lost, the license might be deactivated but will be back if the Internet connection is restored shortly.
4.4.5. Hardware keys (USB flash drive)
Xeoma licenses can used as hardware keys tied to USB flash drives. You can choose necessary Xeoma license that you want to purchase at our website and contact us.
Hardware key with Xeoma license works as a plug-n-play device, i.e. you can insert USB flash device into USB port and use Xeoma in Commercial mode. This way you can use activated Xeoma version on any device with USB port including virtual machines with no internet connection.
You can also purchase additional hardware keys with Xeoma licenses and insert them into other/different USB ports to expand your video surveillance system.
Please note that older licenses cannot be used as a hardware key. Hardware keys are only available for new licenses that will be assigned to the USB-device. It is impossible to replace the hardware key if you lose or damage it (in this case you’ll need to purchase the key with another Xeoma license again).
You can overwrite licenses from two USB-devices on one if the hardware keys are used on one server.
Also, you can add more Xeoma (Standard and Pro) licenses to your current USB key using offline activation. I.e. you can purchase a hardware key with Xeoma license on it, and then purchase more Xeoma licenses in the future if you’d like to expand the system. As well as you can purchase renewal licenses and add it to your USB key via offline activation.
Comparison of soft keys and hardware keys can be checked here.
More about hardware keys in this article.

4.5. Updating Xeoma
4.5.1. Updates to new versions
The process may vary depending on what version of webcam software Xeoma you have and whether you have installed Xeoma (through Main Menu –> Install –> Install) or not.
In all current versions of Xeoma you can use all benefits of auto-update check and notification, and easy 1-click update:

You can check if there are any updates available through Main Menu -> Information -> Check for updates. If you chose auto-search for updates you will get a notification about available updates at program start!
If your Xeoma is 13.3.7 or older:
a) If Xeoma is not installed, there should be no difficulties – just run the newer file downloaded from our site or any other resource.
b) If Xeoma is installed, you need to launch the older version, go to Installation Options and click Uninstall all except for archive and settings (please be careful, this is important to keep your current settings and transfer them to the newer version). Then, you can run the newer Xeoma and install it if needed.
By the way, you can update Xeoma offline (if there’s no Internet access on Server):
1. To do that please use any device with Internet access and download necessary Xeoma version using this link;
2. Then move necessary version of Xeoma to your Server
3. Stop previous version of Xeoma: Main menu –> Install –> Uninstall –> Delete (except for archive and settings) or via console/Terminal (-install -removeexe)
4. Launch new version of Xeoma: Main menu –> Install –> Install or via console/Terminal (-install -coreauto)
This way your Xeoma will be updated.
Automatic updates are available for both beta and release versions of Xeoma.
Also, important is to remember when you bought your license. Free updates are only included for the first 12 months since purchase date. After that you will have a choice of whether to continue on using the latest available version by the time the free updates period expires; update Xeoma to the newest version and therefore give up on using the license; or buy a new license and get more 12 months of free updates.
For information on your activated licenses, go to Main Menu -> Registration -> Active licenses. For information on all licenses registered, please fill in the online form at felenasoft.com web site.
Note: to update to beta versions as well please tick the corresponding option in the Check for updates window.
For information on updates using a proxy server, please see this section.
To disable showing notifications about available newer versions, untick all options in Main Menu -> Information -> Check for updates or the console ‘-noautoupdate‘ command (and the ‘-disableDownloads‘ command to remove the Check for updates submenu from the Main menu).
4.5.2. Downgrade to previous version (desktop versions)
Roll back or downgrade is the process contrary to the update process where you switch from a newer version to an older one. It might be required in various cases, the most popular being a) your license is too old for a new version and b) you don’t like the latest version for some reason.
If you updated to a newer version and changed your mind, you can get back to the version you have been using or to another version, older than the one you’ve updated to.
To do that, there are a few simple steps that depend on whether your Xeoma is now installed to autostart or not.
If your Xeoma is installed into autostart (more common), you need to
Step 1. Remove the current version:
* (through GUI) Go to Main menu -> Install -> Uninstall and select Uninstall except for archives and settings
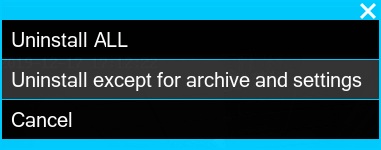
or
* (through console) drag Xeoma executable file into console and follow it with the -install -removeexe
Step 2. Get the version you want to switch to:
a) (GUI/console) go to Xeoma folder and file the Old versions subfolder in it where the copy of Xeoma you’ve been using before the update might have been saved.
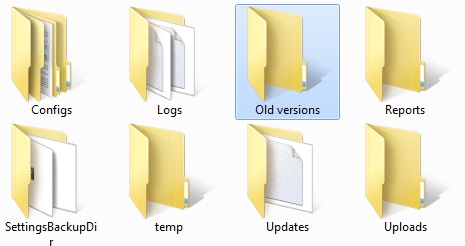
If it is not there, or if it is not the version you’d like to roll back to, you can download any old version from our History of changes page.
Step 3. Once you have the needed version of Xeoma, launch it with or without installation
(GUI) Double click on executable file to launch it. Go to Main menu -> Install -> Install for installation
(console) Drag executable file into console and hit Enter to launch both server and client part (if GUI is available). Follow the executable file with -core to launch only the server part, with -client to launch only the client part. Follow it with -install -coreauto to install the server part to autostart.
If your Xeoma is not installed into autostart (less common), you need to
1. Close the current version
(GUI) Close the current version of Xeoma by going to Main Menu – Exit or by clicking the window title bar X button.
or
(console) Click CTRL+C while in console or close the console.
2. Find and launch another version you’d like to use.
a) (GUI/console) go to Xeoma folder and file the Old versions subfolder in it where the copy of Xeoma you’ve been using before the update might have been saved.
If it is not there, or if it is not the version you’d like to roll back to, you can download any old version from our History of changes page.
Step 3. Once you have the needed version of Xeoma, launch it with or without installation
(GUI) Double click on executable file to launch it. Go to Main menu -> Install -> Install for installation
(console) Drag executable file into console and hit Enter to launch both server and client part (if GUI is available). Follow the executable file with -core to launch only the server part, with -client to launch only the client part. Follow it with -install -coreauto to install the server part to autostart.
|
|
Please note:
Downgrade of the iOS app is not possible. Downgrade of the Android app in Google Play is not possible. If your Android device supports installation of apps from outside of Google Play, you can downgrade by removing the latest Xeoma app from your device and then downloading the Android app of needed version from our site and installing it instead. |
4.6. Operators and user access rights
4.6.1. User access rights (user permissions)

In the “User permissions editing” dialog (Main Menu -> Remote access -> Users) you can create user profiles with multi-layered access rights and permissions.
In this dialog you can restrict or allow access to view of cameras (real-time and archives), restrict or allow archive removal, PTZ control, settings, switch on/off camera sound, for all or certain cameras.
Options available when Administrator user profile is selected
First of all, please note the “User” and “Password” fields. By default, they are filled with Administrator’s credentials that full rights over the system.
Please note that there can be only 1 administrator profile and multiple access is always allowed for this one.

When administrator profile is selected, you can change your local and remote access password that was originally generated by the program (simply type it in the field instead of the currently used).
Starting from version 23.3.22, it is possible to view the administrator’s and operators’ passwords hidden by asterisks. To see the password, click on the “crossed eye” icon in the right corner of the field, and you will see the password of the selected user. To hide the password back, click on the icon again (in the password display mode, the “crossed eye” changes its appearance to an “eye”).
Please note that the “User permissions editing” dialog is only available to the Xeoma Administrator.
Click ‘Add’ to add a new user. Enter the new operator’s username and password and click OK. All added user profiles will be available in the ‘User’ field dropdown list when you click the down arrow to the right.
To edit a profile’s password or rights, select the profile and apply changes; then click the OK button.
The ‘Duplicate’ option copies the assigned rights for the follow-up user. Please note that all user names and passwords must be unique.
The created password, along with the server’s IP address, should be used in the Xeoma’s Connection Dialog to login under this user profile. Pay attention that user profile’s name is just for information and is not used in the Connection Dialog.
Click ‘Export’ to save a spreadsheet file that lists all or selected user profiles and their camera permissions.
Check the ‘Multiple access under a user’ option to allow this profile to be used on several machines simultaneously. If it’s not checked, only one connection with this data will be accepted at a time.
Check the ‘Allow logon through an LDAP entry’ option to synchronize users from the directory service with Xeoma. Click ‘LDAP properties’ to open a pop-up LDAP synchronization setup dialog.
Note: work with user groups and subgroups has been added for the LDAP option. See more here
Next, there is the ‘Individual order of cameras in preview (for each machine)’ option for users of this Administrator profile to have different camera orders in various machines used for connection. Without it, in a case when several machines are used by a user profile camera order would be always overwritten with the one used last.
|
|
Use the ‘-individualsettings‘ command to store personal settings individually for each client. Use the ‘-clientIndex [ClientID]‘ for create several shortcuts with different settings. See more here |
Tick the ‘Update client parts automatically’ option (global) to make client parts of all Xeoma user profiles update to a newer version automatically once such is released. When ticked, the option will display a choice of operating systems that you would like the auto update to work for.
|
|
If you’re connected under a particular User with restricted rights to change settings, review archive etc., then particular icons and menu options might be not available in Xeoma. You can connect under necessary users (or Administrator) via Main menu – Remote access – Connect to. Users can be configured via Main menu – Remote access – Users.
|
Under the ‘User’ and ‘Password’ fields there is the time zone calibration dropdown list. This is the time zone for the server part (not for a user) for correct work with time in Xeoma: marking’s ‘Date and Time’ option, Scheduler and – most importantly – the archive recording function. By default, Xeoma’s server part displays here the time zone of the server machine but if it was detected incorrectly or if you want to change it for some reasons, you can do it here.
Note: if a user (including Administrator) connects from a different time zone, they will see archive viewer’s timeline re-calculated and shown in the user time, other ‘time’ features will be in the server’s time.
With the help of the feature “Changing of camera order is allowed only to administrator” you can prohibit users to change the camera order in Xeoma by themselves.
To activate this feature, check the “Changing of camera order is allowed only to administrator” option. The setting will automatically apply to all users.
Also, when under administrator, you can allow or restrict access to Layout and Main Menu. To do that input a password into the ‘Password’ here and tick the needed option – either ‘Limit access to the layout menu’ or ‘Limit access to the main menu’ or both (won’t work if the password box is empty). If those options are ticked, all users will need to enter a password to access any or both of the menus
Administrator can make the system to force shifting of the video decoding load onto the client (user) side for everybody connecting under a user profile (see option “Forced video decoding on the client (for all users)”). However, for some users including Administrator, you can make an exception with the “Allow video decoding on the server (for the current user)” option.
Tick the “Use the csv-file to record users’ actions” to make the system save spreadsheet file logs in Xeoma’s ‘Logs’ folder (on the server) with overall information on operators’ actions. The files will update every time tracked actions are detected.
The “enable webAPI” option will open up support for external commands when you have no ‘WebServer’ modules connected yet. At least 1 Xeoma Pro license for 1 camera or more must be activated on this server to enable this feature.
Tick the ‘Open interactive map of the site (eMap)’ option to make the eMap button appear in the Xeoma’s lower icons panel for Administrator too.
Note: this doesn’t affect the eMap option in Main menu.
Options available when another user profile is selected (other than Administrator)
If a user profile other than Administrator is selected in the ‘User’ field, the dialog will have some other options. Most importantly, the list of all cameras in this server will be displayed that should be used to set access rights for this user. Apart from access to view cameras, control of PTZ functions, export of archives, etc. can be set here too. See details below.

The upper part of the dialog when a non-Administrator user profile is selected doesn’t differ much from that of the Administrator’s but tick-a-box options here only apply to the selected user.
Here you can also set the client part of this user to always update automatically to the latest version once it’s released (option ‘Update client parts automatically’; allow or restrict multiple simultaneous access under this user profile (option ‘Multiple access under a user’); configure LDAP synchronization with the ‘Allow logon through an LDAP entry’, as well as change or add a new user profile with ‘User’ and ‘Password’ fields.
Below that a timezone selection for the server. See ‘Options available when Administrator user profile is selected’ for explanation.
Next, there is a possibility for users of this profile to have different camera orders in various machines used for connection. Use the ‘Individual order of cameras in preview (for each machine)’ for that. Without it, in a case when several machines are used by a user profile (for example, a branch manager can be using a Mac computer to watch over a selection of cameras pointed at cash registers in work time, and a smart phone for a quick glance at cameras facing doors at night time), camera order would be always overwritten with the one used last.
Alternatively, you can prohibit this user from changing the camera order on screen (‘Changing of camera order is allowed only to administrator’ option).
This function allows the administrator to set an individual camera order for each user, as well as to use it himself for viewing.
To set the camera order for a user, go to “View window” – “Use the user’s camera order”, in the window that opens, select the user you want, your camera view window will switch to the user’s. There the administrator can also change the order of the cameras by dragging them with the mouse. You can see which user’s view window is currently displayed in the top pane after the information about the program version.
With the “Allow export (if you have access to the archive)’ option you can allow (when ticked) or prohibit (when not ticked) this user profile holder to export recordings from archives of cameras that the user profile has the rights to view (this option will be applied only to those cameras’ archives that the user profile has the rights to access).
The ‘Allow access to Emap’ checkbox is used to let the user of this profile to access interactive site maps called eMap. Learn more about eMap here
Tick ‘Allow video decoding on the server (for the current user)’ to allow this user profile to not shift the decoding load onto their client part’s side as usually done, and make the server have this load instead.
‘Allow users to change their password in web page’ is the setting is to give this user profile the right to change their assigned password through Xeoma’s web interface that opens up with the Web Server page.
Below is given the ‘Priority of PTZ control’ option that we explain below
Finally we have gotten to probably the most important part of user profiles – the ‘Access to cameras permissions’ section that is used for setup of rights to access cameras, archives, settings, etc.
For a quick search for a camera please enter its name as it is shown in the camera’s left upper corner of the preview box, and click ‘Search’.
Below the search box you will see a list of all cameras in this server in the left column (or, when set up and available, there will be also the list of Pages and/or camera groups). The right column opposite to cameras will contain boxes which you can check to enable this function (see icon of the function in the row above the checkbox) for this camera/Page/group for this user profile.
Here is a list of icons shown just above the checkboxes and what function they represent:
‘Pin‘ is used when a camera is included into several groups or Pages that have their access rights settings but you need to make an exclusion for this camera and give it different access rights. In other words, it allows to ignore group access rights for this camera and prioritize its individual settings set in the line where it’s listed as an individual camera.
‘Eye‘ controls access rights to viewing cameras. If this checkbox is not ticked for a camera, all other checkboxes cannot be ticked for it.
‘Play‘ is for establishing rights to access the camera’s archive recordings. If this checkbox is not checked for this camera/group/page, the following option for deletion of recordings will not be available either.
‘Trash can‘ is used to set the rights to manually remove parts of the archive recordings.
‘PTZ‘ opens up the right for the user to control the camera’s PTZ functions.
‘Gear‘ allows this user profile holder to open and change settings for cameras and their chains.
‘Speaker‘ allows this profile user to access the sound stream(s) of this camera/group of cameras/Page.
Please note: these icons are shown even for cameras that don’t have such features (PTZ, sound, recording of archives), as this is not checked in this dialog.
Below you will see a list of Pages, groups of cameras and all cameras added in this server. The very first line is to establish rights to all “new” cameras: cameras that are not added yet but might be added in the future.
Further on, there is an “All” clickable text, pressing which will put a check into checkboxes in this function’s vertical row for all(!) cameras. Second pressing of the ‘All’ text button will untick this checkbox for all cameras and disallow this user profile to use it
Check the checkboxes for all cameras that this operator needs to have access to, and for the cameras’-related functions.
While the camera access rights is usually the most important part of the “User permissions editing” dialog, there are also several other useful settings that can be chosen for all cameras but not on a per camera basis:
Tick ‘Availability of modules View, View and Archive’ to select to which preview boxes made with the ‘Preview’ and ‘Preview and Archive’ modules this user profile will have access to (if some of the cameras use several ‘Preview’ and ‘Preview and Archive’ modules per camera chain).
Below it there is a list of options to access icons in the lower panel, and the list is wider than the Administrator’s:
- Add new camera (‘Plus’ icon)
- Select cameras in View mode (‘Window’ icon)
- Open interactive map of the site (eMap) (‘Map’ icon)
- Open Archive of recordings (‘Play’ icon)
- Open Settings (‘Gear’ icon)
- Delete the scheme (‘Cross’ icon)
- Open PTZ control (‘PTZ’ icon)
- Make screenshot (‘Camera’ icon)
- Quick turn on/off (Button Switcher) (‘Relay’ icon)
4.6.2. PTZ blocking
You can block PTZ for operators. To do this you need to go to Main Menu -> Remote Access -> Users
If you want to completely block PTZ usage of any camera, you can remove the tick from the check box next to the desired camera. Thus, we have completely blocked the use of PTZ of the selected camera for the specified user.

If you want to allow your operators to use PTZ of a camera, but you need to set some restrictions, you should use the Priority levels.
What does it mean?
Imagine a big factory where there are a lot of cameras. Most likely, this factory will be monitored on several levels of management, from security guards to CEOs. Priority levels will help the upstream user to block the downstream. So, the Administrator with a 10 priority level blocks downstream users from 1 to 9. Users with priority from 11 to 15, can block both the Administrator and downstream users, etc.
|
|
Starting with Xeoma 22.6.3 Starter and Lite editions allow to use Main menu – Remote access – “Users” dialog to change Administrator password, configure time zone and other interface settings (user profiles can not be created in these editions). |
4.7. Settings Restore (backup of settings and archives)
In Xeoma you can create a copy of your configuration (backup) via Main Menu – Install – Restore – Import/Export settings (not available in the trial mode of Xeoma).
You can create backup copies and restore Xeoma settings 1. automatically via Xeoma Client and 2. manually using Xeoma settings files from the settings folder.
1. Create backup copies and restore configuration automatically via Xeoma Client:
We recommend creating backups of Xeoma’s settings once in a while especially if there was a remote connection of our tech specialist to configure something is Xeoma. These backups should be stored in a safe place (e.g. on another PC or USB drive)
How to create a backup:
1. Run Xeoma Client, go to Main menu – Install – Restore – Export settings

2. Specify necessary path (or leave the default one) and file name, then press OK
3. After that you will see 2 files in .dat and .cache formats (e.g. settings.dat and settings.cache) in the folder
Where settings.dat is the main configuration file (cameras settings, modules chains etc.)and settings.cache is the “client” configuration file (window size, decoding settings etc.)
4. Backup files should be stored in a safe place e.g. on another PC or a USB flash drive.
If you need to restore the settings, you can do it via Main menu – Install – Restore – Import settings – specify path to the backup files and press OK

2. Create backup copies and restore configuration manually using settings files:
You can copy settings.dat file from Xeoma’s settings folder on server. This file contains configuration that can be restored.
Anytime you need to restore Xeoma settings manually, you can stop Xeoma (via console (Terminal) or uninstall from autostart via Xeoma Client – Main menu – Install – Uninstall (except for archive and settings), go to Xeoma’s settings folder and replace setting.dat file with the one you need. Launch Xeoma and you’ll see that settings were picked up.
Also, there are backup copies of settings that are stored in SettingsBackupDir folder in Xeoma’s settings folder on server according to the last saved date. These backups can be used to restore settings manually if you e.g. lost backup copies of settings or want to restore previous settings. You can do it this way:
1. Please make sure that Xeoma is not launched or installed to autostart (you can uninstall Xeoma via Main menu — Install — Uninstall — Uninstall (except for archive and settings)). Console commands to stop/start Xeoma can be checked here.
2. Go to SettingsBackupDir folder
3. Choose necessary settings file (according to the needed date e.g. settings_2020-12-29 12.07.04)
4. Rename the backup file to settings.dat, copy and move it to Xeoma’s settings folder replacing the current settings.dat file
5. Launch Xeoma, so settings will be picked up
Backup copies of settings in SettingsBackupDir folder are stored according to this schedule:
– Current day: backup copy of settings is stored after every change of settings you make.
– Previous day: backup copies of settings are left for every hour.
– From 2 to 10 days before that: only first and last copies are left.
Backup copies of settings older than that get deleted.
Short description of the options in Main menu – Install – Restore:

- Reset settings: this option in Xeoma resets all settings. License will be still active, as well as archive will be kept. This option will erase all configured cameras and Xeoma will start a simple search for local cameras as if the software is started for the 1st time.
- Save settings: this option allows you to save the current configuration in the backup folder “SettingsBackupDir”.
- Restore settings: this option allows you to restore settings from a recent backup (from the “SettingsBackupDir” folder). In Xeoma, a backup copy of the settings is created every time changes are made in the software configuration, and a backup can be saved to the “SettingsBackupDir” folder manually (“Save settings” option described above). Using the “Restore settings” option, you can restore settings from a backup (for example, the most recent settings).
- Export settings: this feature allows you to create a backup copy of the program settings and store it outside of Xeoma. We recommend you to create backup copies of Xeoma configuration regularly and store them in a safe place (for example, on a separate hard drive or USB flash drive).
- Import settings: by means of this option you can restore settings in Xeoma that were previously saved as a backup by exporting settings (the option “Export settings”).
|
|
If Xeoma server part for which you’d need to change the settings file manually is installed to autostart, you can stop the server part temporarily with the ‘-stopservice‘ command. After you’ve finished changes you can re-launch the server part with the ‘-startservice‘ command. |
If you want to transfer Xeoma with all settings from one server to another, follow these instructions.
4.8. The visualization of movement (motion tracking)
Xeoma supports visualization of movement and motion tracking. After activating this option all objects that are moving will be enframed and you will be able to see the “track” – green dots – the moving object has left in course of its movement.
To turn on/off the visualization of movement go to Layouts and choose there “Turn on the visualization of movement”/”Turn off the visualization of movement”.

4.9. Heatmap
Heatmap is one of the most efficient tools in video surveillance. With its help, you can get a quick glance at motion dynamics in camera’s field of view.
The way Xeoma’s heatmap works is somewhat different from how heat cameras work. The latter is all about an object’s temperature. “Warm” or “hot” objects are shown as an area in the warm color spectre (red hues), and the is colder the object the deepest blue color it is in camera image.
Xeoma uses similar “warm-cold” color gradation, but relies on the motion frequency in a certain area rather than temperature of it.
From theory to practice
As the heatmap is based on information from the Motion Detector, it’s only logical that the scheme requires a Motion Detector module. Thus, make sure that you have it in your scheme along with a Universal Camera and Preview and Archive. Set the Motion Detector up the way you need and make sure it passes image down along the scheme.
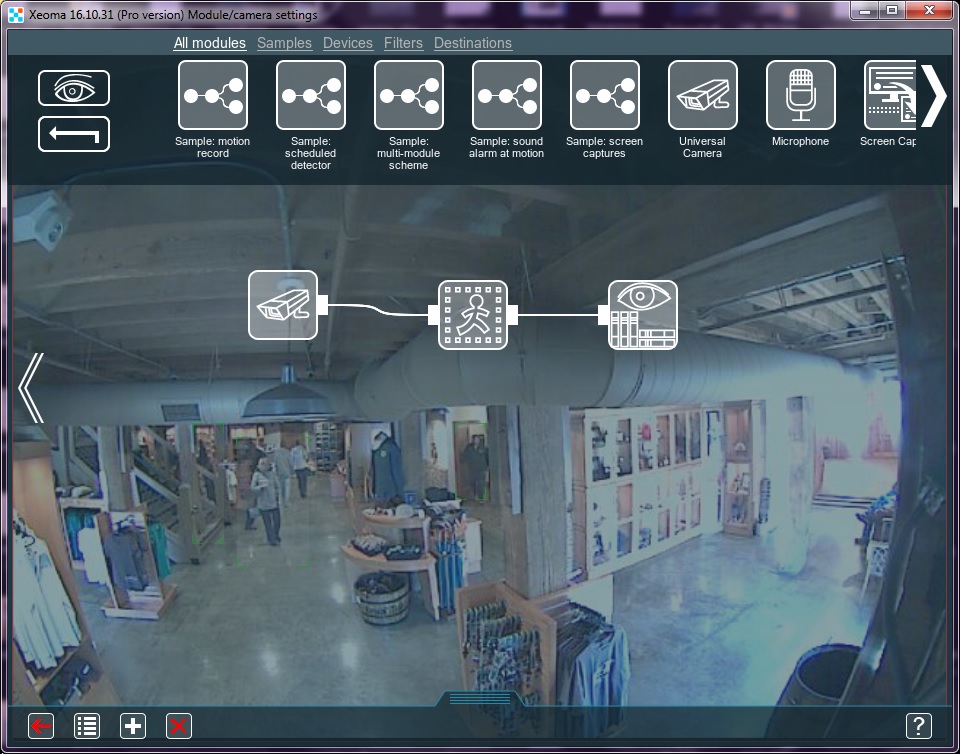
Go to the Archive Viewer (Play button in the lower panel or camera box corner). In Archive Viewer’s menu select the “Create heatmap”.
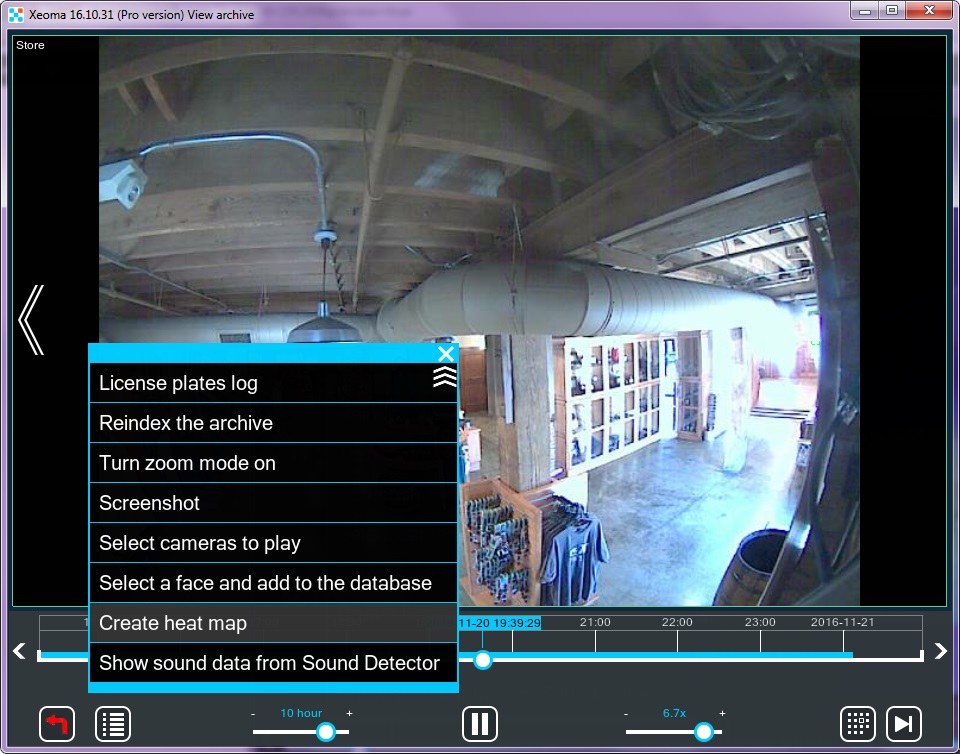
In the new prompt select a time range you need the heatmap for. It could be for example, a week’s time, 24 hours or 15 minutes. By default, all time that you have records for is selected. Attention! You must have at least 5-minutes worth of records in a certain archive for Xeoma to be able to create a heatmap for this archive for any of available period of time you select.
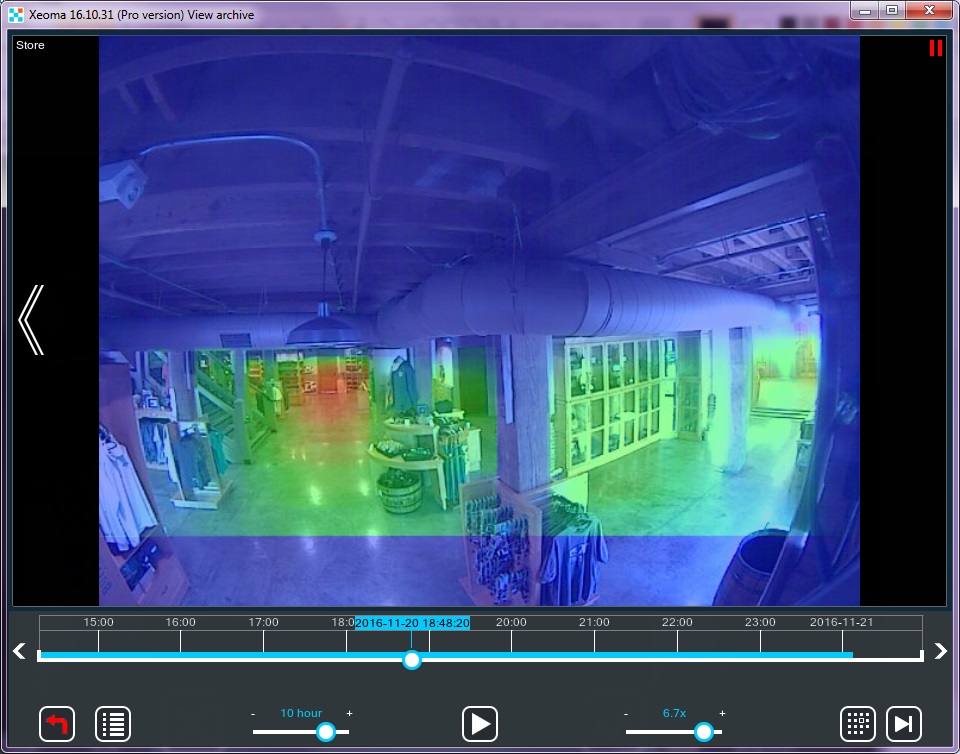
You can save the heatmap you got with the corresponding option in Archive Viewer’s menu.
4.10. Secure TLS Connection
Xeoma supports secure TLS connection between servers and clients. TLS stands for Transport Layer Security and it is a successor to SSL – Secure Sockets Layer.
The idea behind this is as follows: both the client and the server need to have a unique way to encrypt their data for every time they connect. This way, even if the session is intercepted by somebody, it can’t be decrypted, thus the information is safe. This is what makes TLS connection so secure. All of this hinges upon the notion of a digital certificate (or security certificate). The security certificate is usually created by the server and sent to the client during their first interaction. The client either confirms or rejects it – a procedure called handshaking. Then they proceed to encrypt and decrypt their data using the key without the risk of any third-party manipulations.
Thus, a TLS connection needs a valid security certificate. In its turn, every security certificate requires a signature, otherwise it can’t be used. Ideally, it should be signed by a third party trusted by both the server and the client. There are 2 ways a server can sign its certificate: by applying to an actual Certificate Authority (trusted third party) or by signing it themselves to create a self-signed certificate. This is what Xeoma uses.
First things first, we need to generate a security certificate on the server. The best software for that is OpenSSL: https://www.openssl.org/source/ However, it seems to provide stable operation only for Linux-based systems. The created certificates are valid on any system, though, so, if you are running Windows or Mac OS, you can either ask a Linux-using friend for help or use a virtual machine to get access to Linux. There are various commands you can use in the terminal to generate a certificate with this, but please make sure that the resulting files are named either PublicCertificate.pem and PrivateKey.pem or PublicCertificate.der and PrivateKey.der. The quickest way is to copy-paste this command:
openssl req -x509 -sha256 -new -days 3650 -newkey rsa:2048 -nodes -out PublicCertificate.pem -keyout PrivateKey.pem -subj “/C=Co/S=SN/L=Lo/O=Or/OU=OU/CN=CN”

Now you have both freshly-generated files in your OpenSSL directory:

The only thing left to do is to move them to Xeoma’s main directory, in Xeoma → Security → Certificate:

Put both PublicCertificate.pem and PrivateKey.pem in the Server folder (they will replace the files already inside). Please note that PrivateKey.pem is particularly important, no one should have access to it other than you. Otherwise, your security may be compromised. Now all the clients need to put the PublicCertificate.pem in the Client folder and the secure connection is guaranteed. If you need a single client to connect to several different servers via different certificates, you can put them all in the Client folder (under names PublicCertificate1.pem, PublicCertificate2.pem, etc., but make sure that the names coincide with those on the servers).
|
|
Xeoma understands several options of protected client-to-server connection: use the ‘-sslconnection [0/1/2]‘ for that where 0 is to connect to server ignoring certificates (done on Client); 1 is to accept only secure connections from clients (done on Server); and 2 is to auto-detect certificates (can be done on either Server or Client). |
4.11. Automated backup copy of recordings (in FTP)
One of the most efficient way to save the data is to have backups, preferably far away from the main server. This is where FTP upload comes to save the day.
The server, which is going to house your backup archive, needs an FTP utility installed. One of the most popular among them is FileZilla. It’s free, so you can download and install it easily.
So, how does one implement this in Xeoma? There is a module made specifically for that – “FTP Upload”. All you need to do is set it up correctly.

First, we need to type in the FTP server’s address and the port (the default one is 21, but you can specify a different one on the FTP server). If you want the transfer to be securely encrypted, CHECK the box SFTP (SSH File Transfer Protocol). Don’t forget to click the Test button! If something’s set up incorrectly, the message at the top will show you exactly what it is. If everything is OK, the message will say Test successful.
A backup archive doesn’t have to be quite as tidy as the main one. However, if we ever wish to actually navigate through it, it needs to be arranged in an understandable way. By far the easiest way to do so is to insert date and time into every filename. The macros are made with this in mind. All you need to do is put these symbols between two % (percent signs). The line under the input box shows exactly how the filenames will look. In our example the line %y-m-d h-i% is transformed into 2016-12-06 13-47. With this navigating the backup archive should be simple.
To make sure that we don’t miss anything, we can set the Prerecord for a few seconds and an Interval in saving images/videos. Finally, we need to choose the Type of saved data: JPEG, MJPEG, WEBM, AVI or WMV.
That’s it! The backup archive on the server with an FTP utility is ready and waiting.
4.12. Failover
Xeoma is video surveillance software of the new generation. Following the latest demands of contemporary art of video surveillance Xeoma now has support for Failover.
If one of main servers is down, a designated backup server will come in place of it automatically. When the malfunctioning main server is back up, work will be continued on it.
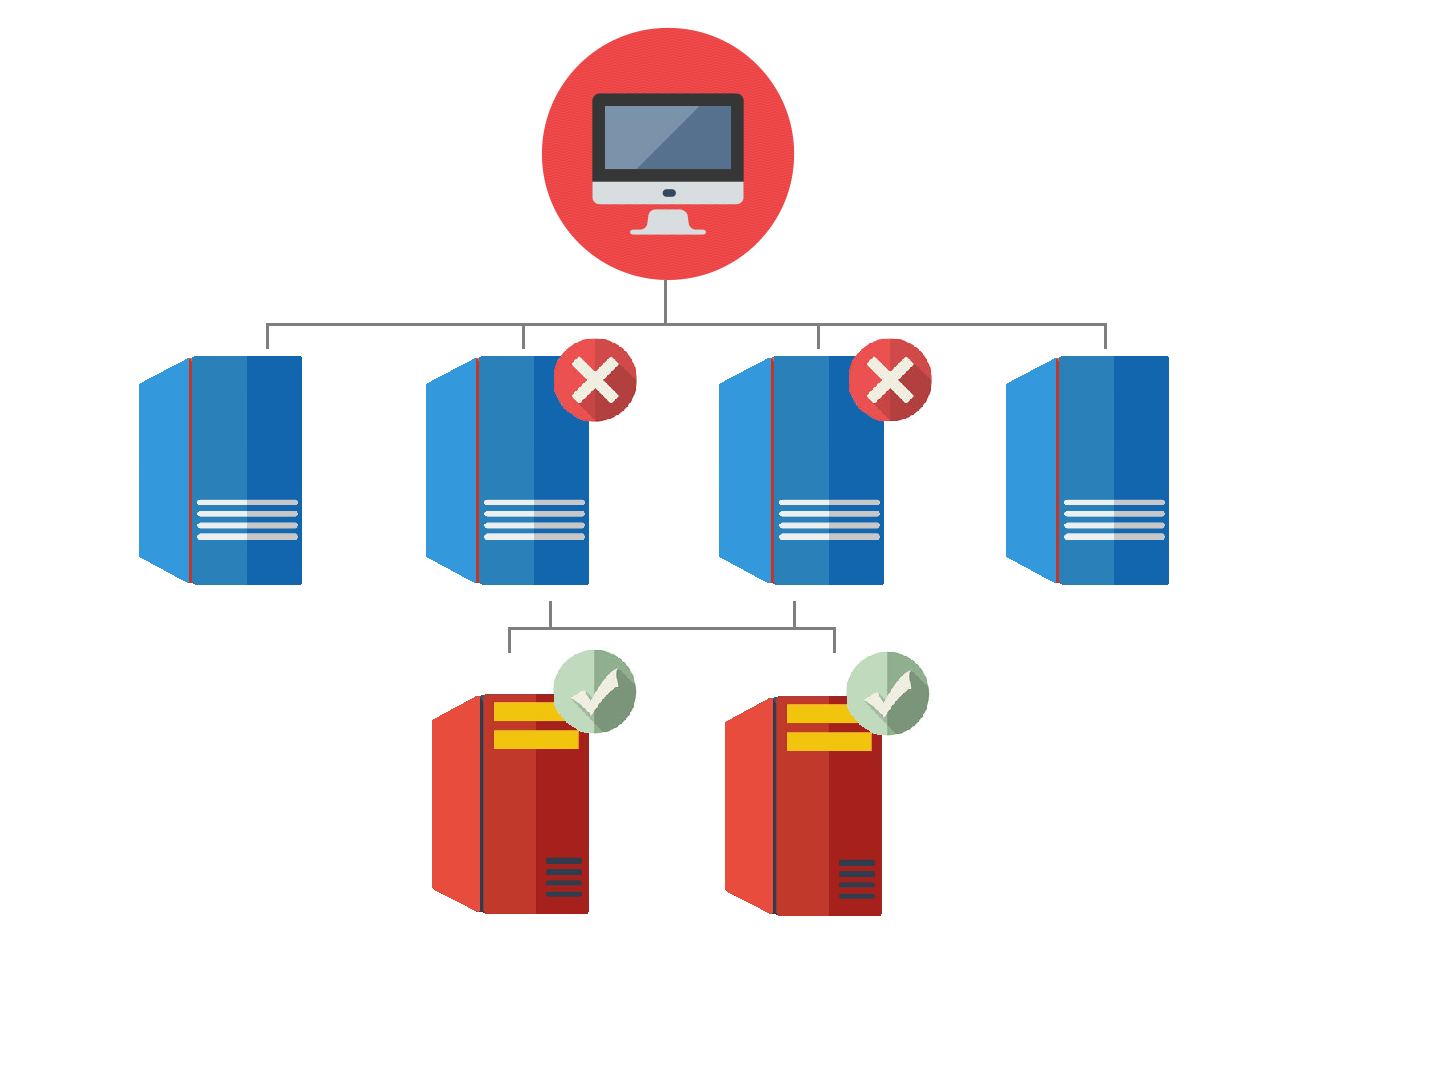
The feature is available for Xeoma Standard and Xeoma Pro editions.
On a Backup server go Main menu → Install → Backup server mode and indicate a list of Main servers. Now this Backup server will monitor all of the assigned Main servers and take over in case one of them fails.
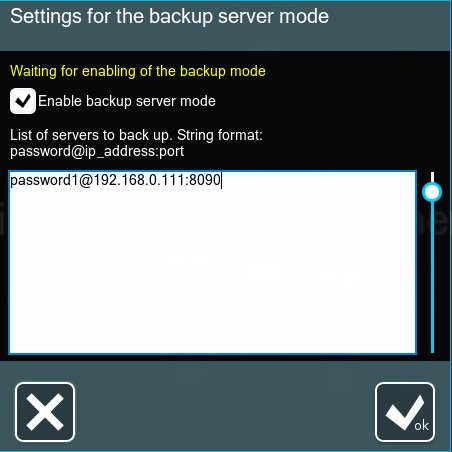
Attention! Backup servers require licenses of the same type as on corresponding Main servers they serve as Failover for.
4.13. Hardware acceleration
4.13.1. Server
If a single server needs to handle a lot of cameras (e.g. 50), powerful CPUs are required to process the live streams. However, graphics cards (GPUs) can take at least part of this load by employing hardware acceleration of decoding. In particular, modern Nvidia cards support CUDA (Compute Unified Device Architecture, for Windows and Linux), while Intel’s integrated GPUs support Quick Sync (Windows only). Xeoma allows to take advantage of either of these methods.
To enable this option, access the “Universal camera” settings and tick the corresponding box:
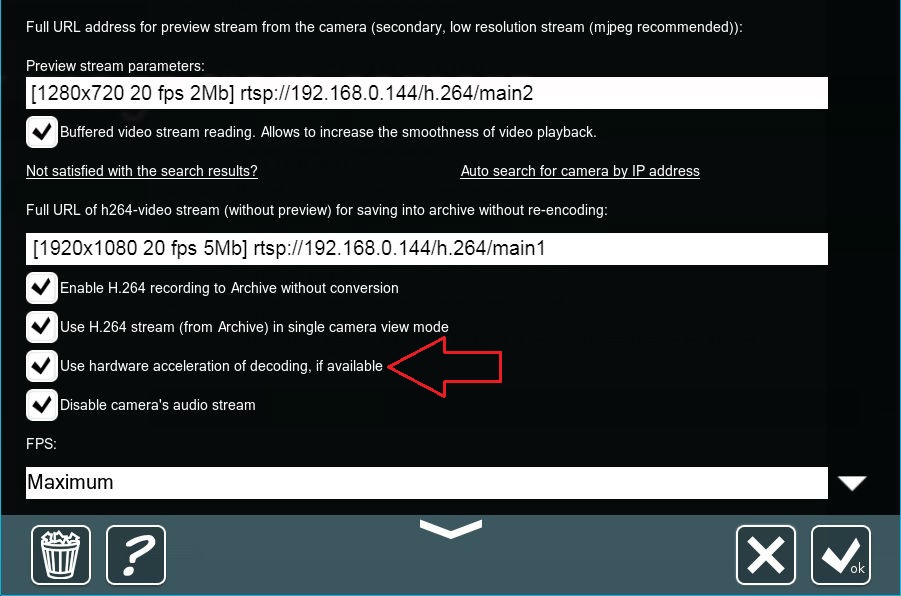
There are 2 conditions for hardware acceleration to work:
- the preview stream (the first URL in the module) needs to be of at least HD quality (720p or 1280×720) – otherwise, acceleration would be counter-productive and does not apply;
- the GPU itself should fit both the OS type and the camera stream type
Here is the breakdown for the second condition:
| OS | Stream | Minimal Architecture |
|---|---|---|
| Windows | H.264 | Fermi |
| H.265 | Pascal | |
| Linux | H.264 | Maxwell |
| H.265 | Pascal | |
| MacOS | H.264 | Maxwell |
| H.265 | Pascal |
The GPU’s power corresponds with the number of cameras it needs to work with. For example, GeForce GT 730 can handle 4-6 cameras, while GTX 1060 can process tens of cameras.
See more details on working with CUDA in this article.
4.13.2. Client
If the client machines have enough capacity to decode the streams, the server’s load can be reduced considerably. Hardware acceleration can be used in this situation as well – the server can be set to move the decoding to the client side (remote workstation). Go Layouts menu → Client decoding settings and choose the necessary options in the drop-down menus:
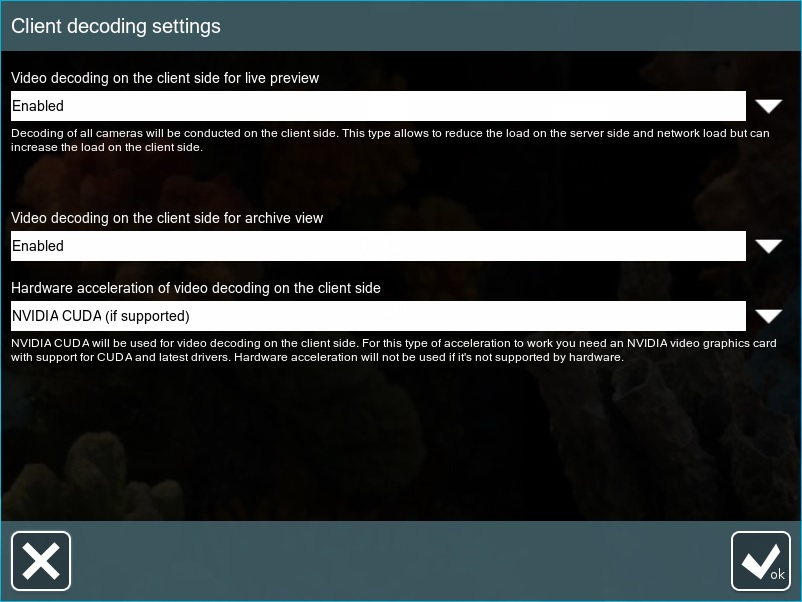
As of Xeoma version 23.12.7, more options are available for different types of the client’s OS depending on the graphics drivers. Here is the breakdown:
Windows:
- Intel Quick Sync
- NVIDIA CUDA
- DXVA2
- D3D11VA
- Vulkan
Linux:
- Intel Quick Sync
- NVIDIA CUDA
- VAAPI
- VDPAU
- Vulkan
Linux ARM:
- V4L2M2M
See more on this topic in the following article.
4.13.3. Modules
As of Xeoma version 22.3.16, some of the modules can take advantage of CUDA as well, the minimal requirement is the same for all of them on all OS types – Pascal. They are:
- Object Recgonizer
- Sports Tracking
- Cross-Line Detector
- Smoke Detector
Xeoma checks for your graphics card compatibility with these modules automatically and displays a check box titled “Use CUDA recognition” in the modules’ settings, if the card fits. When the box is checked, part of the load from this module’s operation is shared between the GPU and the CPU.
4.14. Integration with external devices
Xeoma video surveillance software supports integration with a wide range of external devices. Mostly it is done by sending and receiving http commands or via ONVIF.
4.14.1. Integration with external devices: HTTP request sender (e.g. barrier)
Easy integration with automation systems thanks to the module “HTTP request sender” that can send commands to external devices and sensors when triggered. Read more in the section about “HTTP request sender”
4.14.2. Integration with external devices: receiving commands (e.g. enabling recording by signal)
Easy integration with automation systems thanks to the “HTTP switcher”. This module will help with enabling or disabling recording when receiving a signal from an external sensor, as well as sending alarm messages to an authorized person. For more information, see the section about the “HTTP switcher”
4.14.3. Integration with external devices: overlay titles (for example, with cash machines)
Easy integration with automation systems thanks to the “HTTP marking” module will help you overlay information from external systems on the video stream and/or archive records. It can be used, for example, with cash machines to control cash transactions. Read more about the HTTP marking here
4.14.4. Integration with external devices using external databases
External databases may currently be needed for intellectual PRO modules (Automatic Number Plate Recognition, FaceID, face Recognition). For more information about integration with external databases, see the sections on these modules.
4.14.5. Integration with external devices using GPIO module
This module works with devices connected to the GPIO interface. The module can both respond to triggering of external sensors (use an input pin for this), and send a signal to trigger external devices (use an output pin for this). Find more information in this article.
4.14.6. Integration with external devices using RIF+ module
This module works with RIF+ automation devices. Various sensors can be connected to the device, and the module can receive their alarms. Find more information about Rif+ systems in this article.
4.14.7. Integration with external devices using Modbus controllers module
This module is designed for receiving commands from controllers that work through a Modbus protocol, and triggering reactions in Xeoma. This is a very popular type of controllers used in automation systems, smart homes, traffic lights equipment, etc. Find more information in this article.
4.14.8. Integration with external devices using Senstar PTZ tracking module
This module allows to combine your video surveillance system with a security system with Senstar sensors, and automatically turn the camera into the alarm zone. Find more information about the module in this article.
4.14.9. API Xeoma
API Xeoma will allow integrating the program with third-party software and systems.
4.14.10. Binding of external sensors to the signal inputs of the cameras
With the Camera-Embedded Detector you can send signals to your ONVIF camera for transmission to alarm inputs and outputs. The sensor is connected to the camera, it needs to be configured, this can be done through ONVIF. Only available in Xeoma PRO.
New feature: Notifications
Starting with Xeoma 23.12.7 there is a new feature in Xeoma called ‘Notifications’ that is different from ‘regular’ notifications.
The feature can be accessed from the Main menu (Main menu – Remote access – Notifications) or from a ‘Problems Detector’ module settings (with ‘Notification settings’ under the ‘Inform about the power outage’ checkbox).
What differs this option from the ‘Problems Detector’ module (which also can do notifications at detection of some system health issues like RAM or CPU running low) is that it is designed to alert at the most critical moment: when the Xeoma Server itself stops responding, for example due to a power outage. This makes ‘Notifications’ unique because no other feature can work when the equipment that it’s working on goes down. Formerly, a work around this was to have several Xeoma Servers monitor each other with the ‘Problems Detector’s’ ‘Check access to a network resource’ checkbox and the ‘Address of a network resource to check’ field – but that was of no use if all of them were in the same building that lost power or network connection. With ‘Notifications’ it’s easy – just put a tick in the ‘Show notification if the server has stopped working’ checkbox.
Another thing that makes ‘Notifications’ unlike any module of Xeoma is that it doesn’t require a destination notifications module! ‘Notifications’ sends push notifications to mobile devices with Xeoma app just like the ‘Mobile Notifications’ module does, but it doesn’t need the module in any of Xeoma’s chains! The only requirement is that you need to give Xeoma app permissions to display notifications, and have it connected to the Xeoma Server with ‘Notifications’ at least once. The app doesn’t have to be working all the time either, the notifications will be coming anyway.
Besides push notifications, ‘Notifications’ can save data about servers stopping/resuming working in their own log list that you can open with the ‘History’ tag at the bottom of the dialog. The ‘Automatic deletion of old notifications’ option, with choices ranging from 1 day to 100 days, will help to automatically remove entries that are too old and prevent the log from growing too long and heavy.
You can set a custom text of notification when the server is ‘lost’ (‘Message when the server is down’) and when it is back (‘Message when the server is active again’), and specify how frequently the server should be checked with the ‘Interval of inspections of the server activity’ option (available options being from 3 to 100 minutes).
But that’s not all! ‘Notifications’ can check if other network devices are available too! To do that, tick ‘Inform about power outages’ and enter addresses of such devices in ‘List of IP or MAC addresses to check availability’. This way your Xeoma will be able to additionally monitor availability of other Xeoma servers, routers, cameras, etc.
5.1. Work with proxy servers
You can make Xeoma work with a certain proxy server. Use the -proxy command while launching Xeoma via command line or Terminal, followed by the proxy server’s address. For example:

If you don’t need to use proxy server anymore, you can disable this option with the -proxyclear command.
5.2. Remote access options
Video surveillance systems often are required to offer an opportunity to view cameras, archive records, export records or manage settings of modules / chains not only from the computer or device where the Xeoma server part is running, but also from another device. This capability is called remote access, even if the “remote” device is located a few inches away from the server side – the physical distance between them does not matter, other factors are important which are discussed below.
Xeoma offers a variety of options to establish remote connection of various types and for various purposes:
a) client-server connection,
b) multi-server connection,
c) ‘Web server’+’Another Xeoma’ pair of modules,
d) remote view through web browser.
The diagram below will help to figure out in which situations it is better to apply a particular method:

Let’s get deeper into what these methods are for and how to use them.
|
|
Do not confuse remote client connection to the server (to view cameras, archives, manage settings of Xeoma), and connection of remote cameras to Xeoma server. This section will tell you about the former of the two. Read about the latter here. |
1) Client-Server connection.

As you can see from section “4.1. Client-server architecture”, Xeoma consists of a server part, which does all the processing of cameras, saving recordings, working with filter modules, etc., and a visual client part that is used to communicate with the server part (changing settings, viewing cameras, etc. records, exporting segments, etc.)
The “client-server” remote connection method is based on connecting the visual part (Xeoma mobile application or Xeoma desktop program) to the server part.
Used to: view all cameras, access (view and change) settings for cameras and other modules, view real-time and recorded footage.
|
|
Connection to a Xeoma Cloud account from a mobile app or desktop software is partly based on this method. Read about it in the Xeoma Cloud section. |
|
|
Various operator accounts are supported to be able to limit access to cameras or Xeoma features. See section 4.6 Operators and user access rights |
Instructions on connection with this method: see 5.2.1. Client-server remote connection
2) Multi-server (and multi-client) connection.

This is a variation of the client-server connection, when the client visual part connects to several Xeoma servers at once.
Used to: view cameras in real-time and archive recordings from several Xeomas at the same time.
Detailed instructions can be found in the Multi-server section.
One more variation of the client-server connection is a multi-client connection in which several client parts – mobile applications or desktop ones – are connected to the same server at the same time. It is often used to create video walls or multi-monitor systems, as well as to connect multiple operators with different access rights levels. See the Users section for information about crating accounts with different rights.
If there are simply a few clients that will view the cameras, read the detailed instructions for setting up a client-server connection below.
3) Browser view.

Sometimes you cannot or do not want to install and run the Xeoma client application on your remote device. In this case you can use the web browser page for viewing of cameras and archives, as well as some limited options for configuration.
Used to: view cameras connected to Xeoma live (and their recordings) in a browser, for example from unsupported mobile devices. Learn more about supported devices here
Instructions on connection with this method: see 5.4.1. Xeoma web server: Part 1. Remote camera viewing via browser
4) ‘Web Server’-‘Another Xeoma‘.


Strictly speaking, this method is not really a remote access per se, rather a method of transmitting a camera stream to a remote device (both devices in this bundle will be server parts, i.e. they will process the stream from the camera, apply filters or perform actions with it, etc.). However, this feature will be mentioned here for understanding the capabilities of the system.
It is used to: view the image of this particular camera on machine #1, while building other chains with this camera on the receiving machine (machine #2), for example, recording an archive on the receiving machine, and not on machine #1.
Example: you need to capture monitor screen of multiple computers in a computer lab and record video from them on the administrator’s computer. Example 2: a webcam (USB) is running on a PC or laptop, but you want to process it with filter modules and store records from it not on this device, but on another (for security reasons or to transfer the load to another, more powerful or less important PC).
Instruction for this method will be in section 5.4.3. Xeoma web server: Part 2. Recording an archive on another PC
5.2.1. Client-server remote connection
You can connect to a computer that your Xeoma is running on using Xeoma for computers or mobile devices.
An important question here is whether you will be connecting from the same local (“home”) network where the computer with the Xeoma server part is located (for example, from another room or from one of the offices on the same floor, etc.), or will you be connecting from outside (for example, from the other end of the city, from another city or country, etc.).
For convenience reasons, we will call the device with the server side (where all the work with cameras is done, and where we will be willing to connect to) machine # 1. The remote device from which we will connect will be called machine # 2). By the way, there can be several remote devices connecting to one server at once, and there can be a remote device connecting to several Xeoma servers simultaneously.
Having configured the Xeoma server side the way you need (by connecting cameras, configuring modules and chains, etc.), you might need to connect to it from another device to view cameras, archive recording, change settings, etc. Here is what you are advised to do:
|
|
Do not close or stop the server part to which you want to connect: the server part must be running in order to process cameras and accept incoming connections. |
|
|
Xeoma server part (on machine # 1) must be in Trial or one of the commercial modes. It is impossible to connect to the server in the Free version! |
Step 1. Get connection data
First get the connection data. To do this, on machine #1, go to the Main Menu (the leftmost icon “List”) – “Remote Access”, and then select “Connect to”.
In the dialog that opens, copy the specified password, as well as the internal (“private”) IP address specified there. This data is needed to connect from a remote device (machine #2), so send this data to machine #2. We recommend using copy-paste, rather than manual password input, in order to avoid mistakes.
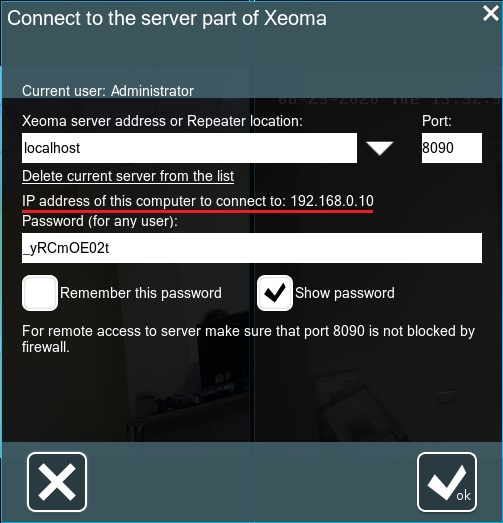
|
|
Console: if the server is shell-less, you can get to know the machine #1’s IP address with system commands like ipconf (for Windows), ifconf (an older command for Linux, Mac OS X and other Unix-based systems) or ip (a newer command for Linux, Mac OS X and other Unix-based systems). Search the Internet for more instructions.
Then, get Xeoma password with the -showpassword command and send this data to machine #2.
|

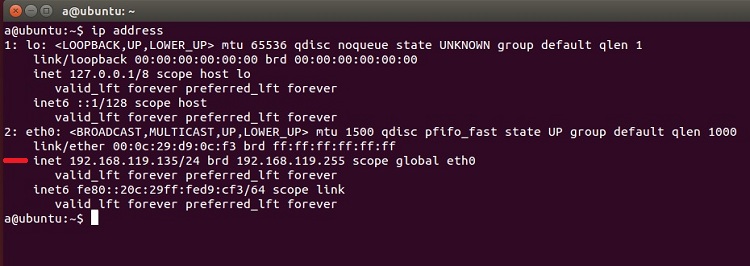

Step 2. Download Xeoma program or Xeoma app in machine #2
In machine #2 download Xeoma program from our website or Xeoma app for smartphones from App Store (for iPhone / iPad) or from Google Play (for Android-based devices). Launch the app or the program.
|
|
Console: since the concept of remote access implies that the machine #2 will have the graphical shell, see instructions for GUI. All actions will be done through it. |
|
|
The client part’s edition does not matter. Any edition can be used in the client to connect to the server part (which in its turn must be in either the Trial or one of the commercial editions). |
Step 3. Connection from machine #2
In machine #2 go to the Connection Dialogue (for Android devices and computers you can find it in Main Menu -> Remote access -> Connect to, for iOS devices you get straight to it when you launch Xeoma app).
Enter the machine #1’s IP address and Xeoma password in the Connection Dialog.
|
|
Machine #2 must be connected to the same network with the machine #1, for example, through WiFi. |
Starting from beta version 23.12.7, Xeoma has the ability to connect to the Server remotely through the Xeoma app on Android by generating a special QR code. It is possible to “put” into it a login from either the Administrator and an individual (any) user, as well as data for a P2P connection.
How to set (available only to Administrator)
On Server:
1. Go to Main Menu – Remote Access – Users;
2. Click “Connection by QR code” in the upper right corner of the dialog that opens for editing user rights;
3. In the window that opens, you can select:
— for which user the QR code will be generated (in our example, this is the Administrator)
— either it will be a one-time QR code or not (check the box “One-time QR code”)
— either this QR code will be intended for P2P connection (check the box “P2P connection”)
— the period during which the generated QR code will be valid, i.e. when scanning, it will give you the opportunity to connect to the Server (the slider under the line “validity period of QR code” – from 2 minutes to an unlimited period);
4. When everything described above is configured as you need, click on the “Create” button to the right of the QR code expiration date slider;
5. The QR code that appears can either be scanned via Xeoma on an Android device (more on this below), deleted, saved, or updated (=generated a new one) by clicking on the corresponding buttons in the open dialogue.

In Xeoma app on the Android device:
1. Open Main Menu – Remote Access – QR code scanner;
2. Using the camera that opens, scan the QR code you generated on the Server part;
3. In the window that opens with connection data, enter the password for the user selected when generating the QR code – as a result, you will gain access to the cameras.
For remote connection from a place that is outside of the machine #1’s home network, you need the machine #1 to have a external static IP address (known as an “public/fixed/external IP address”) – or a way to substitute it.
We’ll tell you about both cases: where you have a public IP address, and where you don’t have it and cannot get it.
Step 1. Get connection data
In machine #1 go to Main menu (a “List” icon on the left), select “Remote access”, and then go to “Connect to”.
Copy Xeoma password only(!) in the new dialog that will appear.
You have to know your external static (fixed) IP address by now. You’ll need these two pieces of information for connection so send it over to the remote device or computer (which we will call machine #2). We recommend to use copy-paste buffer exchange for input of passwords instead of manual input, to avoid spelling mistakes.
|
|
Console: if the server is shell-less, you can get to know the machine #2’s IP address with system commands like ipconf (for Windows), ifconf (an older command for Linux, Mac OS X and other Unix-based systems) or ip (a newer command for Linux, Mac OS X and other Unix-based systems). Search the Internet for more instructions.
Then, get Xeoma password with the -showpassword command and send this data to machine #2.
|
Step 2. Forward port 8090
In the machine #1’s router settings do the so called “port forwarding” for port 8090 that Xeoma uses for client-to-server connection.
Search the Internet for instructions on port forwarding for your router model. For example, the Portforward.com website has a good collection of guides.
|
|
Port 8090 is the default port for Xeoma’s client-server connection. If you have previously changed it to something different with the -serverport command you need to forward this new port. |
|
|
Console: Search the Internet for instructions on forwarding 8090 port through console/Terminal. |
Step 3. Download Xeoma program or Xeoma app in machine #2
In machine #2 download Xeoma program from our website or Xeoma app for smartphones from App Store (for iPhone / iPad) or from Google Play (for Android-based devices). Launch the app or the program.
|
|
Console: since the concept of remote access implies that the machine #2 will have the graphical shell, see instructions for GUI. All actions will be done through it. |

|
The client part’s edition does not matter. Any edition can be used in the client to connect to the server part (which in its turn must be in either the Trial or one of the commercial editions). |
Step 4. Connect from machine #2
In machine #2 go to the Connection Dialogue (for Android devices and computers you can find it in Main Menu -> Remote access -> Connect to, for iOS devices you get straight to it when you launch Xeoma app).
Enter the machine #1’s public IP address, Xeoma password and Xeoma port in the machine #2’s Connection Dialog (8090 by default or a custom one if you changed it).
Click OK / Connect and you’ll be connected.
Up to all remote access options
|
|
Starting from beta version 23.12.7, a simplified option for connecting to a Server with a static IP is available for Android – by scanning a QR code. You no longer have to enter your IP address manually! Read the instructions here. |
Option 1. P2P connection
Revolutionary free-of-charge method to connect from a remote client part to a server part of Xeoma within different networks – the P2P connection.
The P2P client-to-server connection is the new free alternative to having a public IP address on the server machine. Its work mechanism is simple: an intermediary STUN server is used to assign a unique address to the server part of Xeoma and thus connect the client part or parts to the server. This cloud P2P server is only used for this initial routing. Once the connection is established the server and client parts communicate directly. The P2P server doesn’t receive or transfer Xeoma settings, videos, streams, etc.
The P2P connection is available in Xeoma starting from Xeoma 22.11.25. for all supported operating systems and in all editions except for the Free edition. Works for multi-client and/or multi-server connections as well.

|
The only drawback is that, in rare cases, the P2P connection might not be available (for example, due to the network infrastructure limitations). If the P2P connection doesn’t work in your case, please use other methods mentioned below – for example, the paid Repeater service. |
Here are the steps to enable this type of connection:
Step 1. Turning on and getting a unique address on the machine №1 (the server machine)
While in machine№1 go to Xeoma’s Main menu – Remote access – P2P connection configuration. You will see more information about this free service in the newly opened “P2P connection configuration” window, followed by the tickbox for enabling P2P connection and getting a unique address for the server.
Tick the “Enable the P2P connection option” and wait a couple of seconds.
The “P2P address of this server” will have the unique address in the format “AAA-BBB-CCC”, an alternative to a public IP address for Xeoma’s client-to-server connection. Copy the address and send it to machine #2, the client part. The address is generated by Xeoma automatically, it is non-editable.

This window also offers an option to change the auto-generated P2P address in case the current P2P address has been compromised in any way. If you want to get a new address, please click the “Get a new P2P address for this server” text under the “P2P address of this server” field, and in a couple of seconds you will get a new address in the address field.
Step 2. Get Xeoma password from machine №1 as well
To connect to the machine #1 from a client part you will need the unique address from Step 1, and the Xeoma’s password of either Administrator or user profile (if one was created in Main menu – Remote access – Users).
The Xeoma Administrator password can be viewed only the server machine administrator (through Xeoma GUI: Main menu – Remote access – Connect to; or through console command -showpassword).
Step 3. Connection from machine №2
In machine #2 download Xeoma program from our website or Xeoma app for smartphones from App Store (for iPhone / iPad) or from Google Play (for Android-based devices). Launch the app or the program.
Then open the Connection Dialogue in machine #2 (for Android devices and computers you can find it in Main Menu -> Remote access -> Connect to, for iOS devices you get straight to it when you launch Xeoma app).
Enter the P2P address that you obtained in Step 1 as well as machine #1’s Xeoma password (of Administrator or user) from the Step 2. Click the OK/Connect button.
The client part will send a request to the intermediary P2P server, get the server part’s location and connect to it, after which the P2P is no longer participating in the communication between the two.
|
|
Coming soon: console commands for P2P connection. |
|
|
The P2P connection only works for Xeoma’s client-to-server connection. It does not work for view in a browser page or for any purposes outside of Xeoma. |
|
|
Starting from beta version 23.12.7, a simplified option for connecting to the Server via P2P is available for Android – by scanning a QR code. You no longer have to enter your P2P address manually! Read the instructions here. |
Option 2. Use Xeoma’s service Repeater
Repeater is a service purchased separately on a monthly/yearly basis and activated “over” Xeoma licenses in your server.
It serves as a substitute for a unique public IP address for Xeoma’s server part (only for Xeoma’s client-server connection and not for the whole computer unlike real fixed static IP address). After you activate the Repeater subscription on your server you will get a unique address that helps one Xeoma instance find another.
Step 1. Purchase Repeater subscription here.
Activate it in machine #1: go to Main menu Main menu (a “List” icon on the left), select “Remote access”, and then click “Repeater settings”. Go to “Activate”, enter your Repeater subscription serial number in the new dialog and click OK.
In the new dialog you will see the unique address and password that Xeoma Repeater assigned to this machine. You will need this data to connect, so send it to machine #2. We recommend using copy-paste, rather than manual password input, in order to avoid mistakes.
|
|
Console: there’s a console command -activateRetranslator for Repeater activation but you will still need GUI to copy the Repeater address and password to send it to machine #2.
|

Step 2. Download Xeoma program or Xeoma app in machine #2
In machine #2 download Xeoma program from our website or Xeoma app for smartphones from App Store (for iPhone / iPad) or from Google Play (for Android-based devices). Launch the app or the program.
|
|
Console: since the concept of remote access implies that the machine #2 will have the graphical shell, see instructions for GUI. All actions will be done through it. |
|
|
The client part’s edition does not matter. Any edition can be used in the client to connect to the server part (which in its turn must be in either the Trial or one of the commercial editions). |
Step 3. Connect from machine #2
In machine #2 go to the Connection Dialogue (for Android devices and computers you can find it in Main Menu -> Remote access -> Connect to, for iOS devices you get straight to it when you launch Xeoma app).
Enter the Repeater address and password from the server machine. Click OK / Connect and you’ll be connected.
|
|
Repeater does not support user profiles with limited access rights. It has only 1 user – Administrator. |
|
|
Repeater only works for Xeoma’s client-server connection. It does not work for view in a browser page. |
Option 3. Third-party dynDNS services to emulate a public IP address
Find free of paid dynDNS options in the Internet that will transform your private IP address (also known as the “dynamic internal IP address”) into a public IP address. Use such service to emulate a public IP address for machine #1.
Step 1. Get connection data
Use a dynDNS service to get an emulation of a public IP address. After that, get Xeoma connection data. To do this, on machine #1, go to the Main Menu (the leftmost icon “List”) – “Remote Access”, and then select “Connect to”.
In the dialog that opens, copy the Xeoma password. This data is needed to connect from a remote device (machine #2), so send this password and your “IP address” that you got from dynDNS service to machine #2. We recommend using copy-paste, rather than manual password input, in order to avoid mistakes.
|
|
Console: see instructions on how to work with the selected dynDNS service through console in the Internet.
Then, get Xeoma password with the -showpassword command and send this data to machine #2.
|
Step 2. Forward port 8090
In the machine #1’s router settings do port forward for port 8090 that Xeoma uses for client-to-server connection.
Search the Internet for instructions on port forwarding for your router model. For example, the Portforward.com website has a good collection of guides.
|
|
Port 8090 is the default port for Xeoma’s client-server connection. If you have previously changed it to something different with the -serverport command you need to forward this new port. |
|
|
Console: Search the Internet for instructions on forwarding 8090 port through console/Terminal. |
Step 3. Download Xeoma program or Xeoma app in machine #2
In machine #2 download Xeoma program from our website or Xeoma app for smartphones from App Store (for iPhone / iPad) or from Google Play (for Android-based devices). Launch the app or the program.
|
|
Console: since the concept of remote access implies that the machine #2 will have the graphical shell, see instructions for GUI. All actions will be done through it. |
|
|
The client part’s edition does not matter. Any edition can be used in the client to connect to the server part (which in its turn must be in either the Trial or one of the commercial editions). |
Step 4. Connect from machine #2
In machine #2 go to the Connection Dialogue (for Android devices and computers you can find it in Main Menu -> Remote access -> Connect to, for iOS devices you get straight to it when you launch Xeoma app).
Enter the machine #1’s public IP address emulation that you got from dynDNS, Xeoma password and Xeoma port in the Connection Dialogue (8090 by default or custom if you changed it).
Click OK / Connect and you’ll be connected.
Option 4. VPN tunnels
VPN is more famous nowadays for its use in web browsers to mask a user’s geographical location. However, video surveillance systems make other use of it: VPN tunnels can server as a kind of direct access to a remote device – which is exactly what we need for remote access from machine #2 to machine #1 that does not have a static fixed (public) IP address. The downside is that setup of VPN tunnels for this purpose is more complicated than its domestic “browser” use.
See guides on VPN setup in section 5.8. Connecting Xeoma via VPN.
5.3. Repeater service – access your computer everywhere even without a real Internet address
See also Repeater video
Repeater is a service similar to but more powerful than dynamic DNS. It gives you an opportunity to access your computer with Xeoma program even if it is not available from Internet, i.e. inside firewall, at private IP address space, at mobile network, or in some Asian countries where no real IP addresses are available.
With Repeater service enabled in Xeoma you can access your cameras, archive or settings even if your computer is not accessible from Internet.
All you need is to enable this service in Xeoma via Main Menu -> Remote access -> Repeater setup. You will get Repeater connection data that you will then be able to use to connect to this server from a client (specify this data in Connection dialog).

You don’t need Repeater if your server has a static fixed IP address or if Xeoma Cloud is used.
Troubleshooting:
If you have difficulties with repeater activation please try temporary turn off or uninstall your antivirus. Then activate repeater and turn on (or install) antivirus.
If you have low framerate when connected through Repeater, please check your network for bottlenecks. Increase bandwidth capacity on server or client side, or request higher Internet speed from your provider.
Also see: instruction on remote access using the Repeater service.
|
|
You can activate Repeater through console only if there is a graphical shell on this device (Xeoma’s client part will be launched automatically). Alternatively, if Repeater will be used on a server with no graphical shell, you can connect to it with a Xeoma client from another device in the same network, and activate Repeater through Main menu -> Remote access -> Repeater settings -> Subscription. |
5.4. Xeoma Web server module
You can also view Xeoma Web server video
Xeoma Web server module differs from most of the modules because of its multi-functional nature. For example, compared to the Scheduler module, that can only be used in one way – to turn the system on or off – the Web server module can be used in various ways to reach various goals.
Part 1. Remote view of cameras via browser
The most popular purpose of Xeoma Web server is to enable live view of a camera or cameras from almost any device with access to the Internet and webcam streaming, even on a non-supported operating system. After you connect this module to the camera, you will be able to view the camera remotely in a browser (for access from outside of local network, you will need to have static fixed IP address on the server).
Simply connect the Web server module to the camera in chain.

The same rules of module connection applies here: if you connect the Web Server after a filtering module like Motion Detector, the image will get to be displayed in a browser only when the module will let it through. As permanent access is usually required for browser view, you are advised to connect the Web Server straight to the camera.
Tip: if you’ll need to view archive recordings in a browser as well, please make sure that there is a Preview and Archive module connected, and that has recordings.
Enter its settings, where you will find the links (URLs) to access various streams – JPEG images, MJPEG video, Flash video with sound, web server general page to view all cameras that have a Web server module connected to them on this computer.
If authorization is required for web browser access, set the username and password here.
Please note that by default the links are for view from within the same network; that’s why they contain the localhost word. For remote view from outside of this network you need to replace ‘localhost’ with the computer’s real static fixed IP address. The links can be edited outside of Xeoma. Copy the link and paste it into a browser.

Tip: Pay attention to the name in the Path to access… boxes. Images from cameras in browser page follow in alphabetical order according to those names. For example, if one camera has “image1”, and another has “image 99”, first in web browser page will be the one with “image1”.
Attention! If you’re using direct saving to the archive in your Universal camera module, please note that Web Server gets and displays the preview stream only.
Attention! Not all browsers support live view of MJPEG streams.
If your browser doesn’t support MJPEG, you can either use another browser or use dynamically updated JPEG pictures instead of actual MJPEG videos.
An important question for remote access through web browser page is whether you will be connecting from the same local (“home”) network where the computer with the Xeoma server part is located (for example, from another room or from one of the offices on the same floor, etc.), or will you be connecting from outside (for example, from the other end of the city, from another city or country, etc.).
For convenience reasons, we will call the device with the server side (where all the work with cameras is done, and where we will be willing to connect to) machine #1.
The remote device from web browser on which we will connect will be called machine #2).
|
|
Do not close or stop the server part to which you want to connect: the server part must be running in order to process cameras and accept incoming connections. |
|
|
Xeoma server part (on machine # 1) must be in Trial or one of the commercial modes. It is impossible to connect to the server in the Free version! |
1. Connection within the same network.
After you have set up Xeoma as you want it (by connecting cameras, modules, setting up modules and chains, etc.), you need to connect a module Web Server to all chains that you would want to view in a web browser. Regular rules of modules connection apply (see more above).
After enough Web Server modules are connected, here’s what you need to do to enable remote access:
Step 1. Get connection data
Go into the settings of the WebServer modules and copy the link with which you can access the web interface that Xeoma has. You can notice that the general link (http://localhost:10090/) is the same for all WebServer modules in this computer.
It is also here that you can set restricted access to that web interface by setting up login and password.
The sample link has “localhost” instead of a real private (internal) IP address which you need to replace with the computer’s real private IP address. Here’s where you can view it:
You can check the computer’s private IP address in the Connection Dialog of Xeoma. To do this, on machine #1, go to the Main Menu (the leftmost icon “List”) – “Remote Access”, and then select “Connect to”.
In the dialog that opens, copy the internal (“private”) IP address specified there.
Input it into the web page link you copied from the WebServer settings.
Send the link to machine #2, along with the login and password information if you have set it in the WebServer settings. In this case, we recommend using copy-paste, rather than manual input, in order to avoid mistakes.
|
|
Console: you will need to add a WebServer module into the chain that you’d like to see remotely. To do that, you will need a visual part for it – thus you’d need to connect to the server part with a client in machine with a graphical interface. See section 5.2.1. Client-to-server remote access for guides. |
Step 2. Connect from machine #2
In machine #2 open the preferred web browser and insert the link from the machine #1′ Web Server (and access credentials if you set password and login manually). Hit the Enter keyboard button, the “Go” button or an Arrow button in your browser (depending on what your browser has) to open the web interface of Xeoma.
Read more about the web page interface here.
|
|
Machine #2 must be connected to the same network with the machine #1, for example, through WiFi. |
2. Connection from another network.
For remote connection from a place that is outside of the machine #1’s home network, you need the machine #1 to have a external static fixed IP address (known as an “public IP address”) – or a way to substitute it.
We’ll tell you about both cases: where you have a public IP address, and where you don’t have it and cannot get it.
Case 1. The server side DOES have a static fixed (“public”) IP address:
Step 1. Get connection data
Go into the settings of the WebServer modules and copy the link with which you can access the web interface that Xeoma has. You can notice that the general link (http://localhost:10090/) is the same for all Web Server modules in this computer.
It is also here that you can set restricted access to that web interface by setting up login and password.
The sample link has “localhost” instead of a real private (internal) IP address which you need to replace with the computer’s real public (static, external, fixed) IP address. You need to know it by this time. Contact your Internet provider for more information about your public IP address.
Input it into the web page link you copied from the WebServer settings.
Send the link to machine #2, along with the login and password information if you have set it in the WebServer settings. In this case, we recommend using copy-paste, rather than manual input, in order to avoid mistakes.
|
|
Console: you will need to add a WebServer module into the chain that you’d like to see remotely. To do that, you will need a visual part for it – thus you’d need to connect to the server part with a client in machine with a graphical interface. See section 5.2.1. Client-to-server remote access for guides. |
Step 2. Forward ports 10090 and/or 10091
In the machine #1’s router settings do the so called “port forwarding” for port 10090 and 10091 that Xeoma uses for remote access through web browser.
|
|
Starting with Xeoma 20.10.13 version was added the ability to specify and use separate ports for different “Web Server” modules even on the same server. |
Search the Internet for instructions on port forwarding for your router model. For example, the Portforward.com website has a good collection of guides.
|
|
Port 10090 is the default port for remote connection to Xeoma’s web interface. If you have previously changed it to something different you need to forward your new port. |
|
|
Console: Search the Internet for instructions on forwarding the 10090 port through console/Terminal. |
Step 3. Connection from machine #2
In machine #2 open the preferred web browser and insert the link from the machine #1′ Web Server (and access credentials if you set password and login manually). Hit the Enter keyboard button, the “Go” button or an Arrow button in your browser (depending on what your browser has) to open the web interface of Xeoma.
Read more about the web page interface here.
Up to all remote access options
Case 2. The server side does NOT have a static fixed (“public”) IP address (and cannot get one):
|
|
Unfortunately, the Repeater service does not work for remote access through web browser (it works only for client connection from Xeoma app or program). |
Option 1. Third-party dynDNS services to emulate a public IP address
Find free of paid dynDNS options in the Internet that will transform your private IP address (also known as the “dynamic internal IP address”) into a public IP address. Use such service to emulate a public IP address for machine #1.
After you have set up Xeoma as you want it (by connecting cameras, modules, setting up modules and chains, etc.), you need to connect a module Web Server to all chains that you would want to view in a web browser. Regular rules of modules connection apply (see more above).
After enough Web Server modules are connected, follow these steps to enable remote access:
Step 1. Get connection data
Go into the settings of the WebServer modules and copy the link with which you can access the web interface that Xeoma has. You can notice that the general link (http://localhost:10090/) is the same for all WebServer modules in this computer.
It is also here that you can set restricted access to that web interface by setting up login and password.
The sample link has “localhost” instead of a real IP address which you need to replace with the computer’s real public IP address that you got from dynDNS service.
Input the emulation of public IP address into the link you copied from the WebServer settings.
Send the link to machine #2, along with the login and password information if you have set it in the WebServer settings. In this case, we recommend using copy-paste, rather than manual input, in order to avoid mistakes.
Step 2. Forward ports 10090 and/or 10091
In the machine #1’s router settings do the so called “port forwarding” for port 10090 and 10091 that Xeoma uses for remote access through web browser.
|
|
Starting with Xeoma 20.10.13 version was added the ability to specify and use separate ports for different “Web Server” modules even on the same server. |
Search the Internet for instructions on port forwarding for your router model. For example, the Portforward.com website has a good collection of guides.
|
|
Port 10090 is the default port for remote connection to Xeoma’s web interface. If you have previously changed it to something different you need to forward your new port. |
|
|
Console: Search the Internet for instructions on forwarding the 10090 port through console/Terminal. |
Step 3. Connection from machine #2
In machine #2 open the preferred web browser and insert the link from the machine #1′ Web Server (and access credentials if you set password and login manually). Hit the Enter keyboard button, the “Go” button or an Arrow button in your browser (depending on what your browser has) to open the web interface of Xeoma.
Read more about the web page interface here.
Option 2. VPN tunnels
VPN is more famous nowadays for its use in web browsers to mask a user’s geographical location. However, video surveillance systems make other use of it: VPN tunnels can server as a kind of direct access to a remote device – which is exactly what we need for remote access from machine #2 to machine #1 that does not have a static fixed (public) IP address. The downside is that setup of VPN tunnels for this purpose is more complicated than its domestic “browser” use.
See guides on VPN setup in section 5.8. Connecting Xeoma via VPN.
After you have set VPN up follow these instructions, as if you were connecting within the same home network (this is what VPN is for).
Read more about the web page interface below.
*starting with Xeoma 23.3.22 version we optimized WebRTC performance with the Edge browser (Windows)
5.4.2 More about the web browser interface
Multi-camera web page. Using http://IP_address:10090/ (http://localhost:10090 for the local machine) you can access web server main page and view all cameras that have a Web server module connected in their modules chain in Xeoma.
Attention: if a camera is unavailable or stopped working for some reason, you’ll see a black box instead of the camera image in a browser.

In web browser you can view cameras live, their archive recordings, and control PTZ functions (if cameras have PTZ functions and they were detected in Xeoma). The PTZ control menu will appear in the Single Camera view mode of web interface (note that at least Pro license for 1 camera is required to enable PTZ in a browser).
You will see the following tabs in the web page: Camera View (the default landing page), Archive, Preferences, Framerate.
Camera view is the page to view multiple cameras you have Web Server module connected to in Xeoma (default landing page, also called Multi-Camera View page), or view of a single selected camera (also called Single Camera View page).
Archive is the page where you can view archive recordings for a camera. If you got to this page from the Multi-Camera view, you will need to select a camera to view archive for.
Preferences is a dropdown list with multiple options: various options to add cameras (see details here), activation and review in Mjpeg/WebRTC video mode.
Framerate is a dropdown slider that you can use to reduce the maximum refreshing speed (FPS) of all camera images in web page. This option is applied solely to the browser view and does not affect framerate in Xeoma server part. Framerate cannot be higher than that of a camera stream.
Single-Camera View. While in Multi-Camera View page, click on a selected camera image, and you’ll get to the Single-Camera View page of this camera. If you only have 1 camera, click on it to open it in the Single-Camera View mode, for larger view.
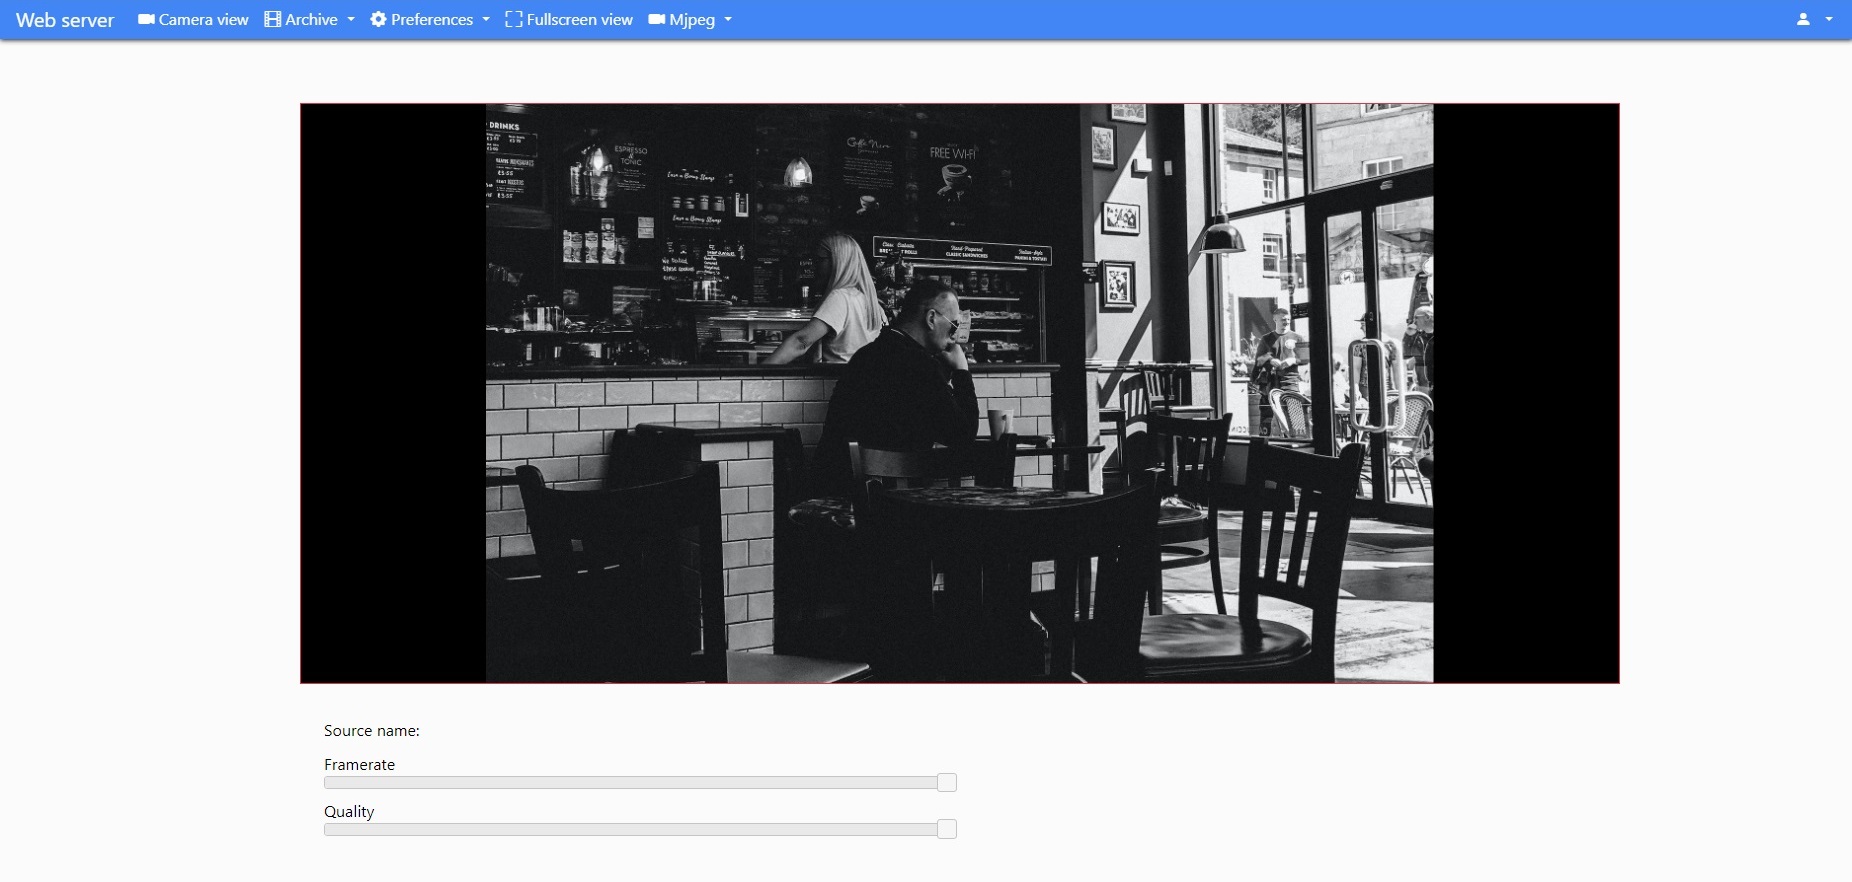
In the Single Camera View page’s top panel you’ll see the following tabs: Camera view, Archive, Preferences, Fullscreen view and MJPEG/WebRTC menu. The MJPEG/WebRTC menu allows you to choose video mode for the camera (“WebRTC” option allows streaming with sound and saves network traffic.
Framerate and image quality can be selected below the image (both parameters are applied solely to the browser view and do not affect framerate in Xeoma server part).
The “Preferences” tab has also the setting to configure the camera’s Motion Detector module if it’s connected in the modules chain. Almost all features from the client version are available:
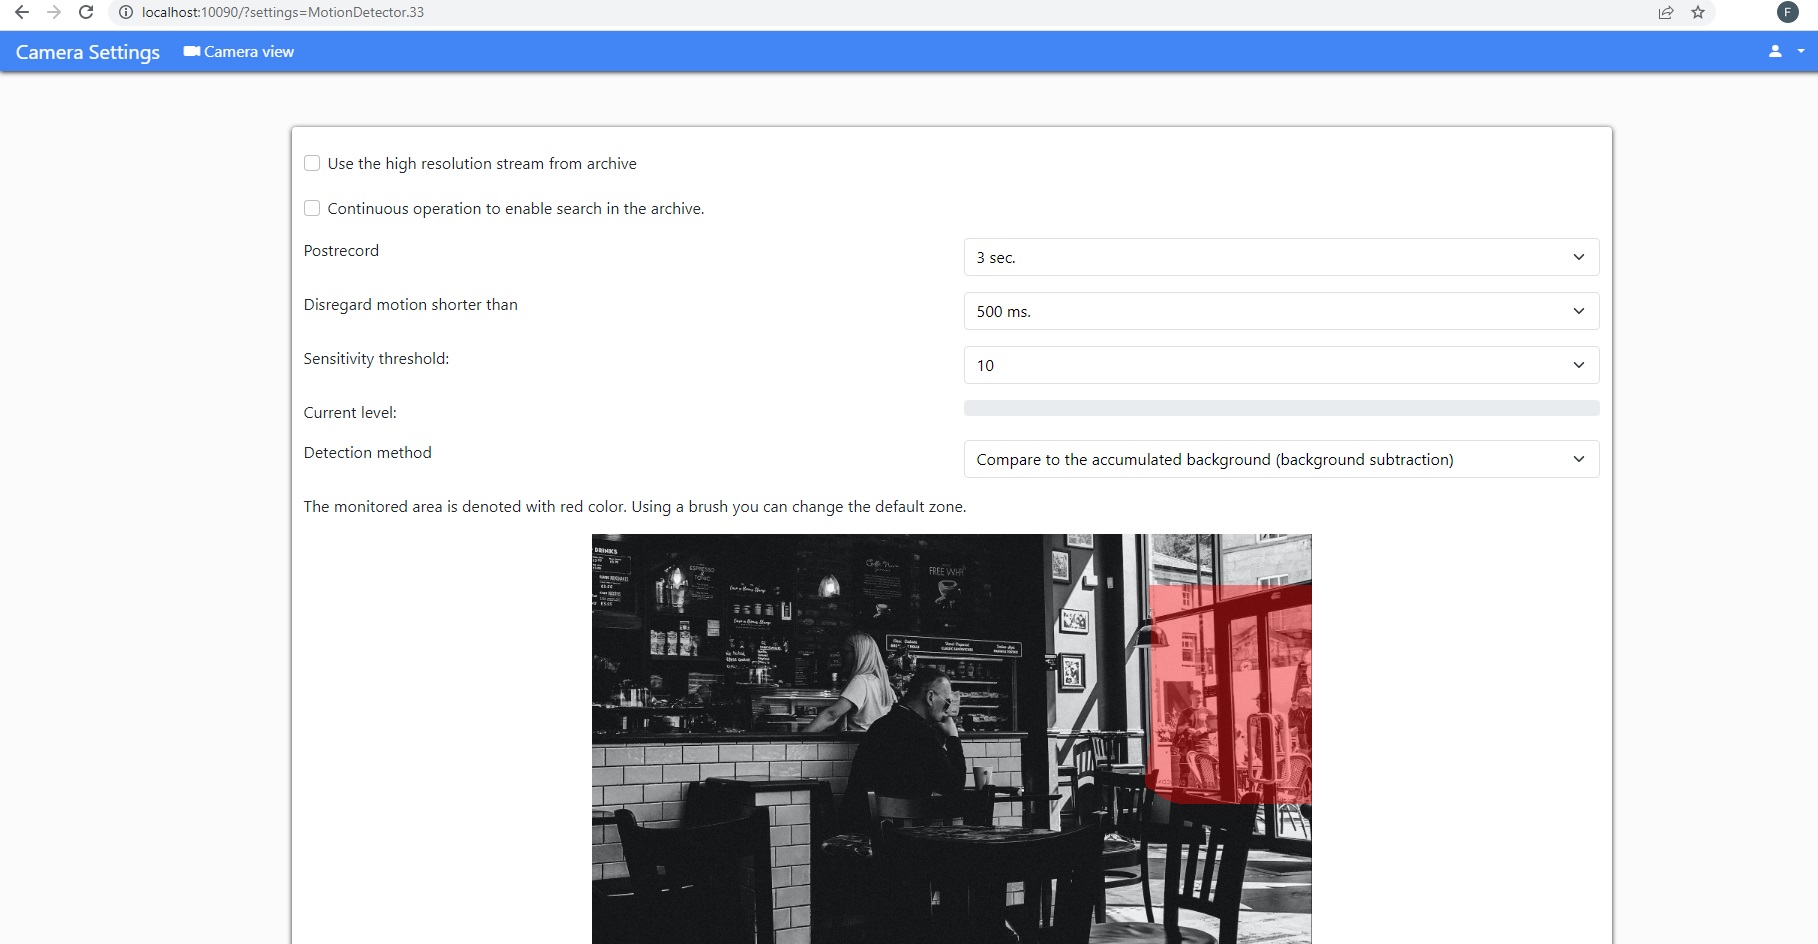
Archive. To view a camera’s recordings go to the Archive tab.
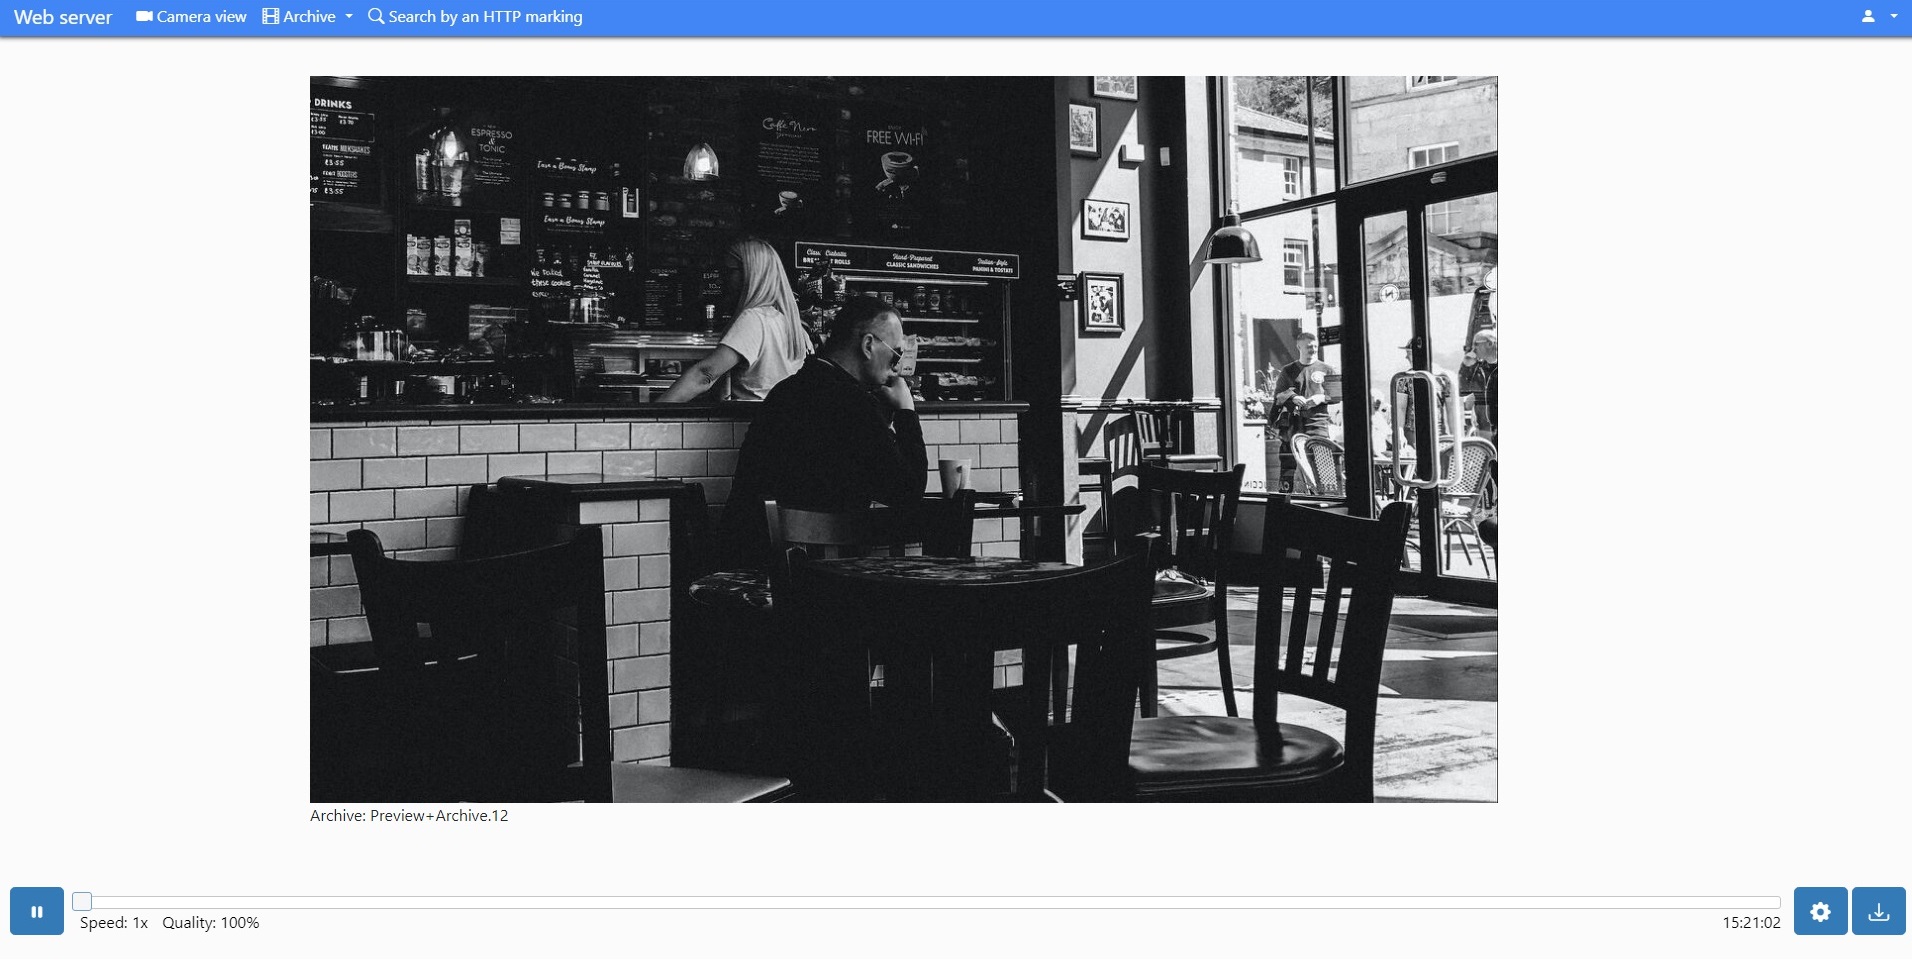
Here you will see a selected camera’s archive, and timeline where you can select a certain piece of archive with a slider or with the list of time and date.
You can change playback speed and reduce video quality to reduce network bandwidth load in the preferences (“gear” icon on the bottom panel). Again, this parameter is applied solely to the browser view and does not affect framerate in Xeoma server part.

Export. In the web page you can also download a piece of archive recordings onto this machine. In order to do that, click the Download button (“arrow” icon on the bottom panel), and select the needed video segment’s start and end date and time.
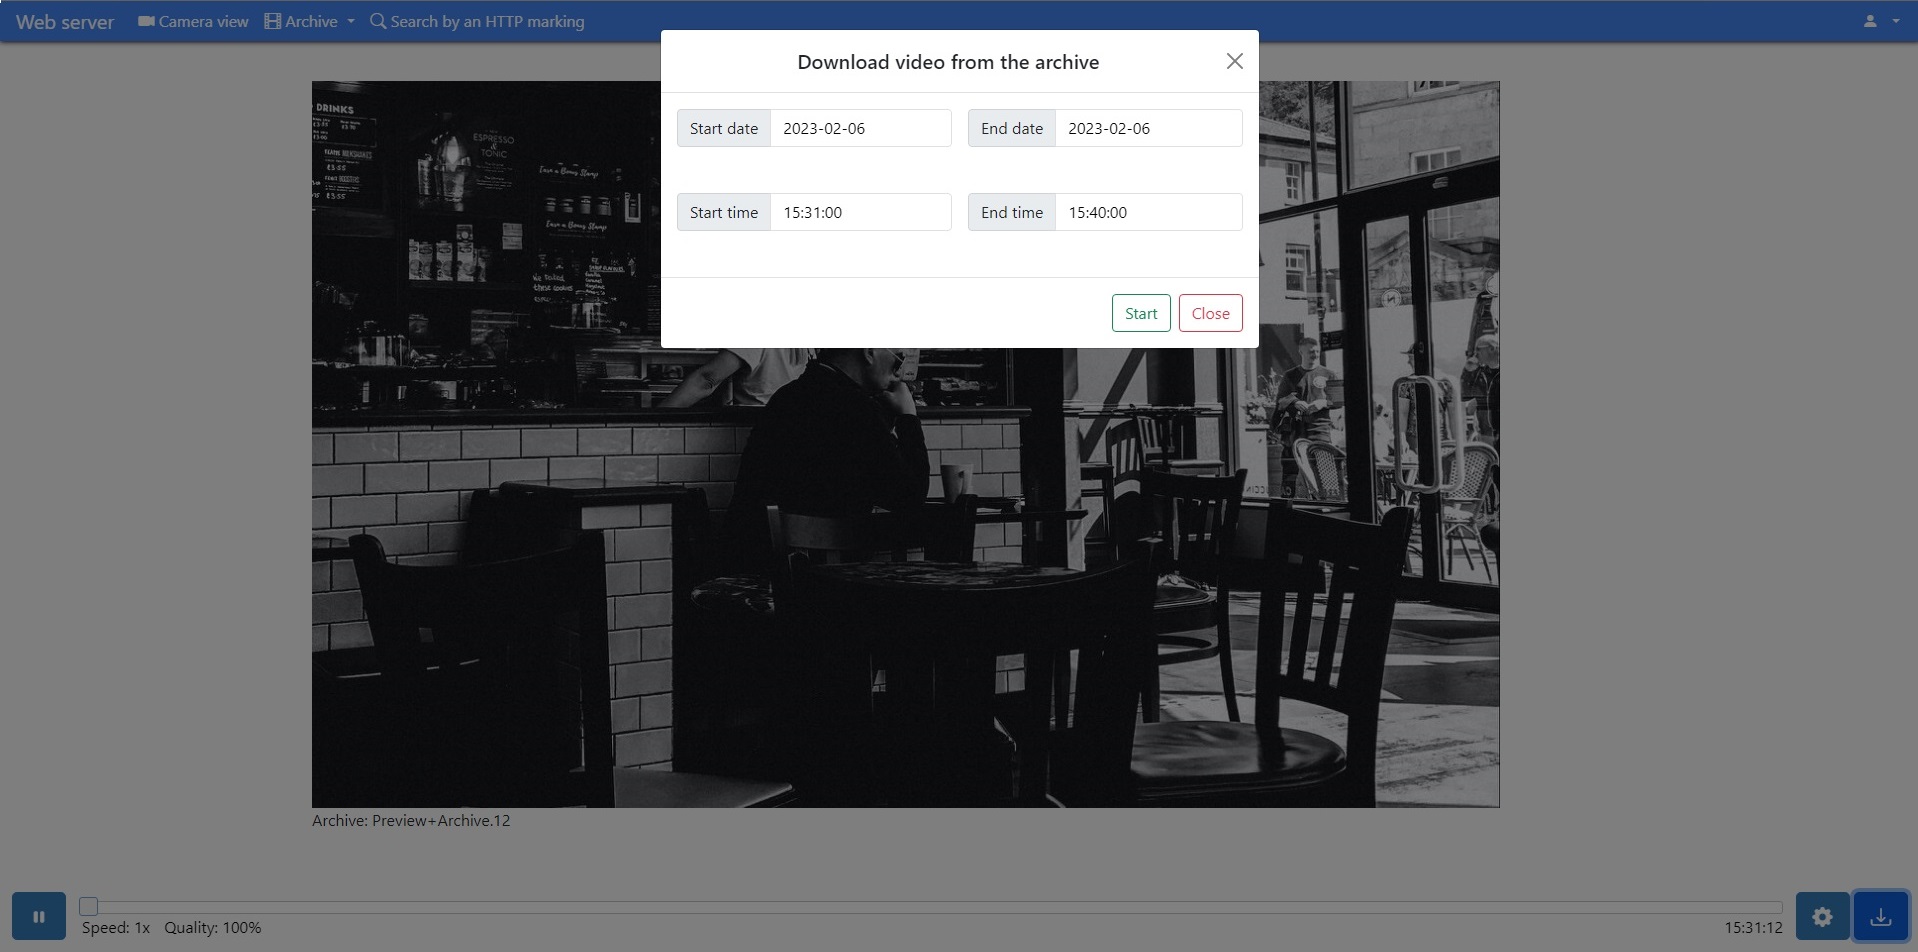
Adding cameras manually. IP cameras can be found and added through the web interface too. In order to do that, click the ‘Preferences’ button of the web portal’s upper panel – “Add source”. Use the opened interface to input cameras’ information (URLs, credentials). For several cameras, add them one by one.

Auto search for cameras. Alternatively, you can use the web interface’s auto search for cameras via Preferences menu – Search for cameras. Enter the camera’s information (IP address, port, credentials) and click “Start scanning”. You can also use multiple IP addresses or the IP addresses range (IP_address – IP_address).

Browser view of camera stream with sound.
Option 1: WebRTC (contemporary, Xeoma Pro only)

webRTC is the modern streaming-optimizied technology that enables live view with audio and even sometimes allows to use the browser’s capacity to take up some of the load from processing streams.
To do that, enable either the “WebRTC broadcasting with sound (transcoding on server side)” (for the server machine to take up the load from live view processing) or the “Transcoding on Xeoma side for webRTC broadcasting” option (for the load to be shifted to the browser when supported) in the Web Server module setting dialog (options are only available in Xeoma Pro).
Afterwards, when logged into your web interface you will have a choice of whether to view video feeds in MJPEG (default) or webRTC.
The choice is available for both multi-cameras view page, and for the single camera view page.


At the first launch you might see a warning that the live playback with sound is not allowed in the web browser settings. In that case you need to either move the cursor in the Volume slider to a value other than 0, or enable sound in the browser settings, for example:

The “WebRTC broadcasting with sound (transcoding on server side)” option is only available for the H264 streams. If H265/H265+ streams are used, you are recommended to switch to the “Transcoding on Xeoma side for webRTC broadcasting” option in the Web Server module setting dialog.


Option 2: Flash (outdated)
|
|
Adobe discontinued support for the Flash Player on December 31, 2020 which means that Flash might not be supported in modern versions of browsers. However, it might still be working in version of browsers released before that end-of-life date. |
To watch Flash video with sound via an Internet browser, tick the box and use the corresponding link (or go to Flash video broadcasting right from the web server general page):
+ Unlike client-to-server connection, browser view of cameras can be performed from any device with access to the Internet, including tablet, cell phones, even those with non-supported operating system.
– But then again, unlike client-to-server connection, browser view is not available if the computer with Xeoma and cameras does not have static fixed IP address.
How can I combine multiple servers in a browser?
You can combine cameras from multiple server when reviewing via browser using the following instruction:
Open Xeoma settings folder on the Main server – then go to the WebSourcesConfig folder – you’ll find WebSourcesConfig.txt file there
WebSourcesConfig.txt file can be edited using any text editor e.g. Notepad or Notepad++. If you open the file, you’ll find the instruction to work with it inside.
Specify IP addresses of other server that you’d like to combine in Multi-server module in a browser and save the .txt file. So after that whenever you open web interface you’ll see all cameras from all servers that you specified in the WebSourcesConfig.txt file.
Part 2. Saving footage to another computer
Web server module will be also of help if the objective is to save video surveillance footage to another computer, for example, to create backup footage on a central monitoring station.
In this case you will need to connect the Web server to the cameras. On another computer, where you need to store footage (in our example, that is the central monitoring station) you will need to use Another Xeoma instead of the camera module:
+ On both computers you will be able to store footage and work with camera.
– You might need an additional license (if total of modules in use on either of the computers is higher than 3).
Tip: you can use the combination of HTTP Upload to other Xeoma and HTTP Receiver to transfer not just video, but also sound and all meta data. See the HTTP upload to other Xeoma article for details.
Part 3. IP camera emulation
If you’d like to transform your web camera (USB camera) into an IP camera that will be accessible to other computers and Xeoma Cloud. In this case, you need to connect the Web server to the camera. Other computers will ‘see’ it as an IP camera.
For other ways to emulate a camera, please see the ‘How to use a video as a camera in Xeoma‘ article
Part 4. Having live broadcasting on your site
You can broadcast your camera to your site or blog. Embed the link from web server’s settings into your page’s code to put a weather radar or traffic demonstration on your site or blog without installing Xeoma client. Broadcasting dynamically updated images or video streams – up-to-date and high-quality snapshots and videos (weather radar emulation, useful traffic information) – will make it more attractive and useful to your site’s guests.
You can embed camera streams from Xeoma in one of the following ways:
a) Easier:
In the “Web Server” module settings dialog you can see a couple of direct links to JPEG and MJPEG streams from this camera:

Copy the needed link, replace “localhost” with the Xeoma server machine’s IP address and embed the resulting link into your website using a compatible player (e.g. iFrame).
See also: Xeoma’s webAPI
b) More up-to-date: webRTC streaming (available in Xeoma Pro only)
The advantage of this method is that it uses webRTC – a modern technology optimizied for streaming that allows to use the browser’s capacity to take up some of the load.
To do that, enable either the “WebRTC broadcasting with sound (transcoding on server side)” (only available in Xeoma Pro) or the “Transcoding on Xeoma side for webRTC broadcasting” option in the Web Server module setting dialog.
Then use the webRTC API (only available in Xeoma Pro) to embed the needed camera stream into your website.
c) Outdated: Flash broadcasting.
If ‘flv broadcasting (with sound)’ option is on in the Web Server module settings, you will also see a link to view Flash stream. Click the link and then click the camera image of camera you’d like to view in Flash (with sound).
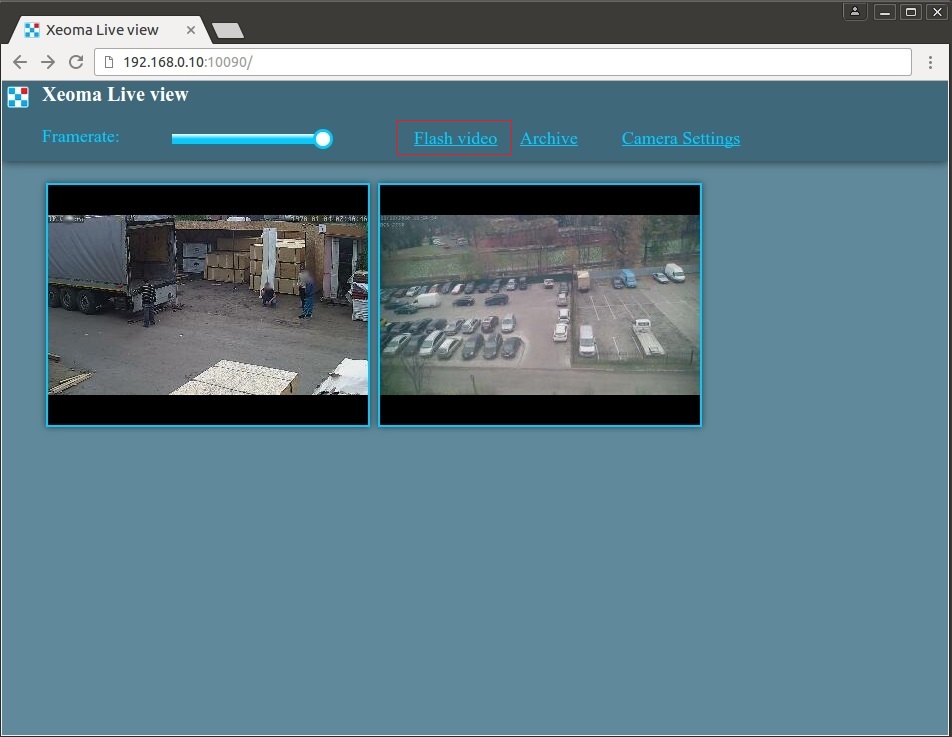
In the Flash view window you can use buttons as follows:
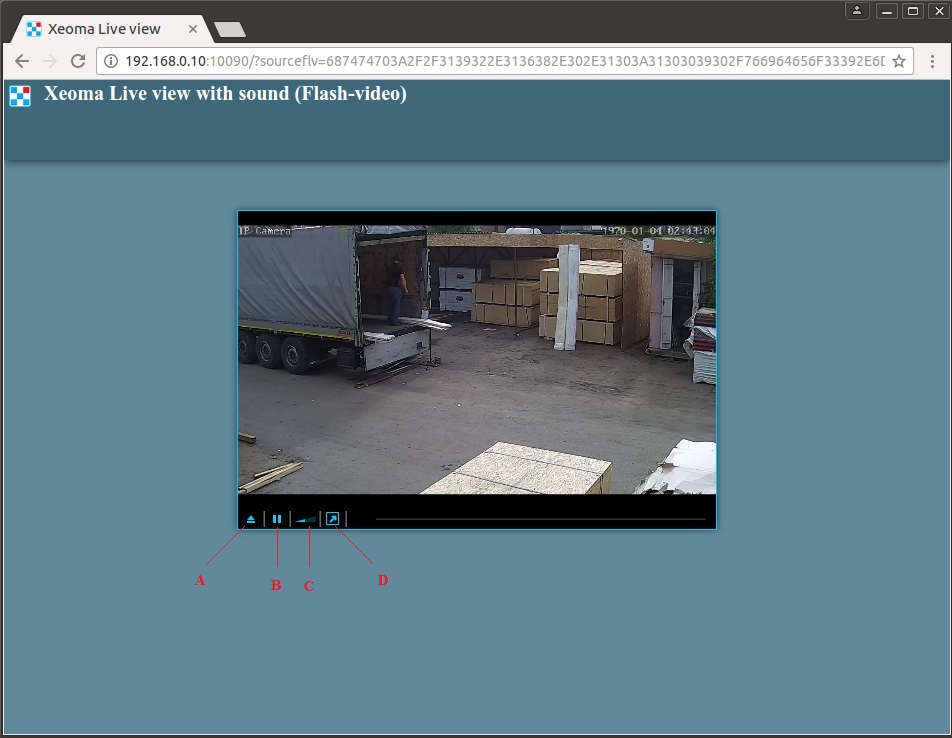
A – to select different stream resolution;
B – to start/pause playback;
C – to change sound volume;
D – to open stream in full screen.
Attention! Mozilla browser might ask to install Flash player to playback Flash streams.
Security for web browser connection
Currently, there are two ways you could use protected connection for browser view.
1. Manual, through Apache. See guide here
2. Embedded – available from version 23.3.22.
Starting with version 23.3.22, the “Enable secure https connection” option has been added to the “Web Server” module to allow connection encryption through the browser. Now a secure connection can be selected directly in the module settings, there is no need to configure via Apache), as before.
To do this, add the “Web Server” module to your chain, open the module settings (click on the module in the chain), click “Show detailed settings” at the bottom in the opened window, check the box “Enable secure https connection”.
WebServer API
You can control your web server using http-commands as well. Here are all of them:
http://IP:10090/video0.mjpg?resolution=1027×768&oneframe=0&waitTimeoutMs=1000&login=USERNAME&password=PASSWORD returns a real time video or a single frame in MJPEG
video0.mjpg is the “Path to access video stream” from the “Web Server” module
resolution is the resolution for the frame (not necessary)
oneframe is whether you need a video (0) or a single JPEG-frame (1)
waitTimeoutMs is the waiting time for the server’s response (usually between 100 and 1000)
login is the username (not necessary)
password is the password (not necessary)
http://IP:10090/image0.jpg?resolution=1024×768&login=USERNAME&password=PASSWORD returns a single frame in JPEG
image0.jpg is the “Path to access images” from the “Web Server” module
resolution is the resolution for the frame (not necessary)
login is the username (not necessary)
password is the password (not necessary)
http://IP:10090/?archive_minutes=&archive_date=2015-11-26&archive=Preview%2BArchive.9 returns a list of time codes for the specified date, format hh:mm:ss, each one on a new line
archive_date is the date, format year-month-day
archive is the ID of module “Preview and Archive” (“+” converts to “%2B”)
http://IP:10090/?archive_frame=&archive=Preview%2BArchive.9&archive_date=2015-11-26&archive_minute=13:19:18&archive_millis=2500&maxResolution=&scaleFactor=100 returns a single frame for the specified time and date in JSON (base64)
archive is the ID of module “Preview and Archive” (“+” converts to “%2B”)
archive_date is the date, format year-month-day
archive_minute is the second, format hh:mm:ss
archive_millis is the milliseconds (between 0 and 59999) that will be added to the seconds from the previous parameter
maxResolution is the frame’s resolution, format widthxheight
scaleFactor is the compaction scale (between 0 and 100, where 100 is the highest quality, less than 80 is not recommended)
http://IP:10090/?archive_start_export=&archive_id=Preview%2BArchive.24&start_date=2017-03-09&start_hour_minute=13:00:08&end_date=2017-03-09&end_hour_minute=13:02:18 exports the specified interval from the archive
archive_id is the name for that archive in the module “Preview and Archive”
start_date is the date for the beginning of the interval (format year-month-day)
start_hour_minute is the time for the beginning of the interval (format hh:mm:ss)
end_date is the date for the end of the interval (format year-month-day)
end_hour_minute is the time for the end of the interval (format hh:mm:ss)
http://IP:10090/?archive_get_export_file= downloads the file exported by the previous command
http://IP:10090/?login=LOGIN&password=PASSWORD&getsessionkey= quick authorization
login is the username
password is the password
http://IP:10090/?addchain=&cameraSettings=&cameraLogin=LOGIN&cameraPassword=PASSWORD&previewUrl=PREVIEWURL&archiveUrl=ARCHIVEURL&enableH264ArchiveId=false adds a camera
cameraLogin is the username for the camera
cameraPassword is the password for the camera
previewUrl is the preview stream’s URL
archiveUrl is the archive stream’s URL
enableH264ArchiveId is direct H.264 recording without conversion (true enabled, false disabled)
http://IP:10090/?addchain=&ftpReceiverSettings=&ftpReceiverServerAddress=ADDRESS&ftpReceiverServerPort=FTPPORT&ftpReceiverLogin=LOGIN&ftpReceiverPassword=PASSWORD adds “FTP Receiver”
ftpReceiverServerAddress is the address for the server
ftpReceiverServerPort is the FTP port
ftpReceiverServerLogin is the username
ftpReceiverServerPassword is the password
Now you can customize the web server pages! Learn how to do that below in Web server customization!
5.5. Web server customization for online view of cameras in Xeoma
Along with other rebranding opportunities, Xeoma offers you free customization of web server pages to make them look the way you want.
From version 17.8.31 and up you can customize Xeoma’s web server pages with the help of our free rebranding utility. No knowledge of HTML is required – you can easily change the pages’ colors, logo and name of the service.
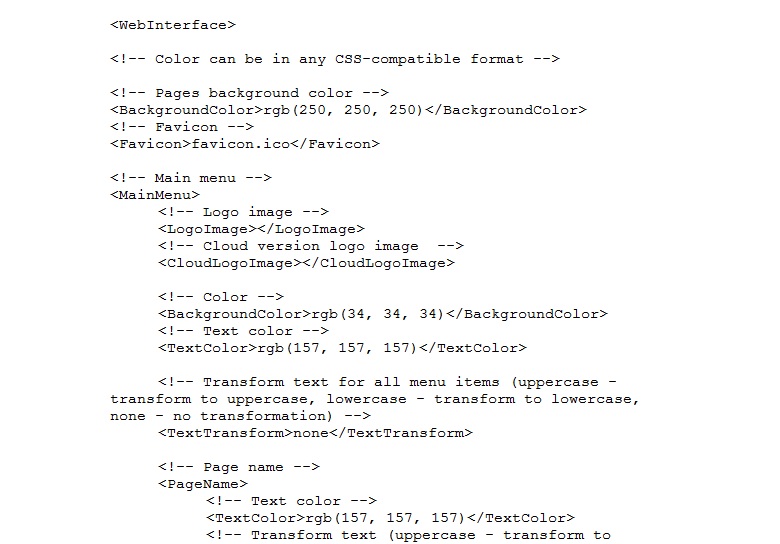
See more about the free rebranding utility
Outdated: starting with Xeoma 13.9.30 and up to version 17.8.31, customization of web pages was done by editing the html code with these steps:
Connect Web server module to the cameras you’d like to view in web server. Enter the Web server module settings and visit the pages in a browser that you’d like to customize. A XeomaWeb folder will appear in Xeoma directory. That’s where you will see the needed html pages. Place all resources you are going to use (icons, pictures, other pages) here.
To access the graphic files, you will need to use a path like img src=”?obj=PictureName.png”. Open and edit the needed html pages (even Notepad will do). You can also access other pages from the directory.
Full photo instruction on web server customization can be found in our Articles section.
5.6. Mobile video surveillance with Xeoma Android app
Basically, what remote video surveillance offers is the ability to check in several, perhaps even hundreds, locations so spread out geographically that it would be next to impossible to visit them with so little time loss otherwise.
 Xeoma Android app differs from desktop versions because due to Android regulations the app has to be installed before it can be launched. Apart from that, the app is almost an exact copy of desktop Xeoma. Just client part will be launched by default. The Android app will auto detect your cameras (including the built-in camera if it’s available) and connect them. You can use Xeoma in the regular editions – free, trial and commercial, enjoy automatic updates, connect cameras, etc.
Xeoma can be used as a client part or as cctv viewer to connect to Xeoma server on another device (desktop or mobile). Fill in the fields in Connection Dialog (Main Menu -> Remote Access -> Connect to) to connect to that machine and be able to view cameras live and recorded archives, apply changes to settings.
Or, with the app, your Android-based device can become a surveillance system itself. Connect the cameras, set events and reactions up, assign user rights and much more for your new mobile video security system.

Push notifications
With the “Window Popup (on Client)” module (Destination tab in Xeoma’s upper bar of modules) you can receive push notifications on your Android, for example when there is motion being detected in camera’s field of view (or face/license plate etc. is being recognized,). Unlike regular desktop versions of Xeoma, where this module simply deminimizes the minimized Xeoma client window, the Window Popup module on Android will, when triggered, make a notification sound, flash LED lights and show Xeoma icon on notification bar of your device.
You can view this notifications’ info and find out when motion was detected. Clicking on this notification will take you to Xeoma where you can view the motion event or take other necessary actions. The icon will be shown in the notification bar until you open Xeoma, so even if you were away at the time of detection, you will not miss it.
This module is also used to send push-notifications for Xeoma on Android upon the trigger. Starting from Xeoma 20.10.22 another module is used to send push-notifications – “Mobile notifications”.
Differences from the regular Xeoma version: there is no fullscreen mode in the Android application, because it is often not needed for mobile devices. Also, additional modules based on artificial intelligence and deep machine learning are not available for the Android version.
For the Android application installation is not required (because the application is downloaded from GooglePlay or our website, you can simply launch it and use it). You can’t change the archive storage path if the Android device is not cross-flashed and does not have this feature.
5.7. Application for iPhone/iPad


New Xeoma for iPhone and iPad is perfect for remote view of your cameras. It can be used as cctv viewer to connect to Xeoma Cloud or Xeoma server on your desktop or tablet, even with behind firewalls (with the help of Repeater service).
With this iOS client you can connect to your Xeoma to view camera’s live feeds and archived recordings, with sound, and ability to zoom the picture digitally in/out, from wherever you are!
Take it with you to vacation, business trip, to the place of work. Peek in when you have time at your babysitter or seniors or make sure those you care about are safe in hospital.
Connection instructions
1. Go to App Store and download Xeoma from there.
2. Once it’s downloaded, it will be launched and ask to install.
3. When it’s completed, a prompt will appear asking for connection data. These you can get from your Xeoma server or Xeoma Cloud subscription:

4. If the data is correct and the server part is available, you will be connected, and will be able to view your cameras and their archives.
5. You can go back to the connection dialog window to connect to another server. Click the connection button below.
That’s it! Now you can enjoy remote access to your Xeoma from anywhere at any time!
|
|
Starting from Xeoma 20.10.22 there’s a new module that allows to send push-notifications on iOS – “Mobile notifications” |
5.8. Connecting Xeoma via VPN
First of all, you need to understand whether you need a server or a client on your machine. If you want your computer to serve as a hub for other machines that would connect to it in order to view cameras, then it’s a server. If you simply want to connect to something else that holds the info on the cameras, then it’s a client.
In order to establish a functional server via VPN, you will need to configure it properly. You can do it by following these steps:
1. Download free OpenVPN software that corresponds with your OS from https://openvpn.net/index.php/open-source/downloads.html
2. Install it (checking ALL the parts) in C:\OpenVPN
3. Time to make a valid Certificate Authority (CA) file for your server. To do that, open the console:
1) Enter the folder by typing: cd C:\OpenVPN\easy-rsa
2) Run the configuring file by typing: init-config.bat
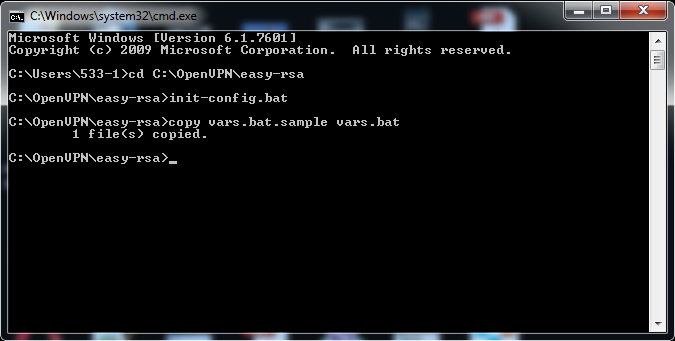
3) Go to C:\OpenVPN\easy-rsa and edit vars.bat (simple notepad will do). Within you will find:
set KEY_COUNTRY=US
set KEY_PROVINCE=CA
set KEY_CITY=SanFrancisco
set KEY_ORG=OpenVPN
set KEY_EMAIL=mail@host.domain
Edit these values to correspond with your country, province, city, organization and e-mail respectively.
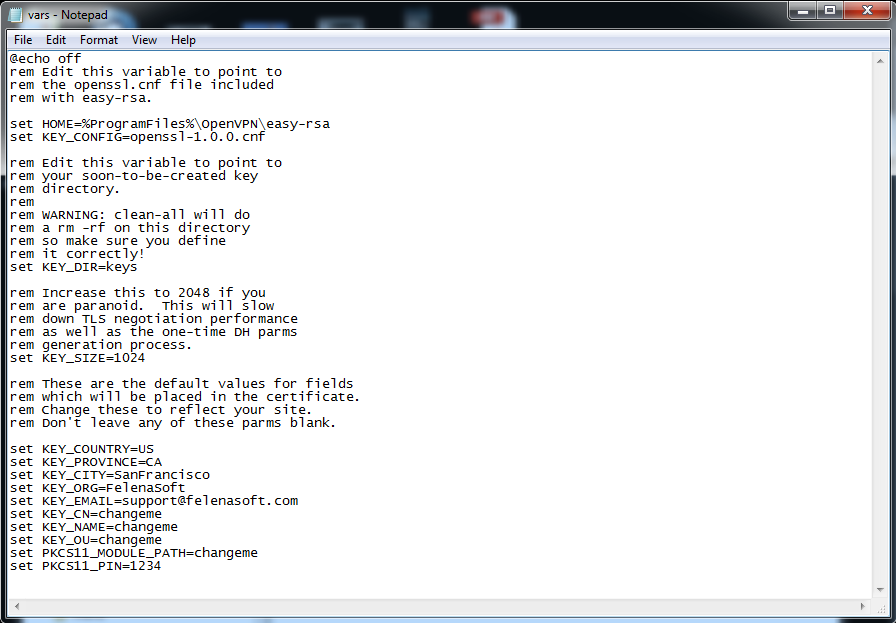
4) Run vars.bat by typing in the console: vars.bat
5) Now run 2 more files by typing:
clean-all.bat
build-ca.bat
6) Press ENTER for all the values, except Common Name, here type:
OpenVPN-CA
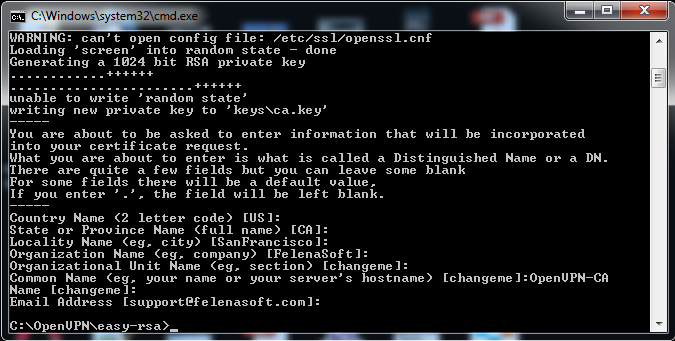
7) That’s it! Now you have generated a valid Certificate Authority file called ca.crt that you can find in C:\OpenVPN\easy-rsa\keys.
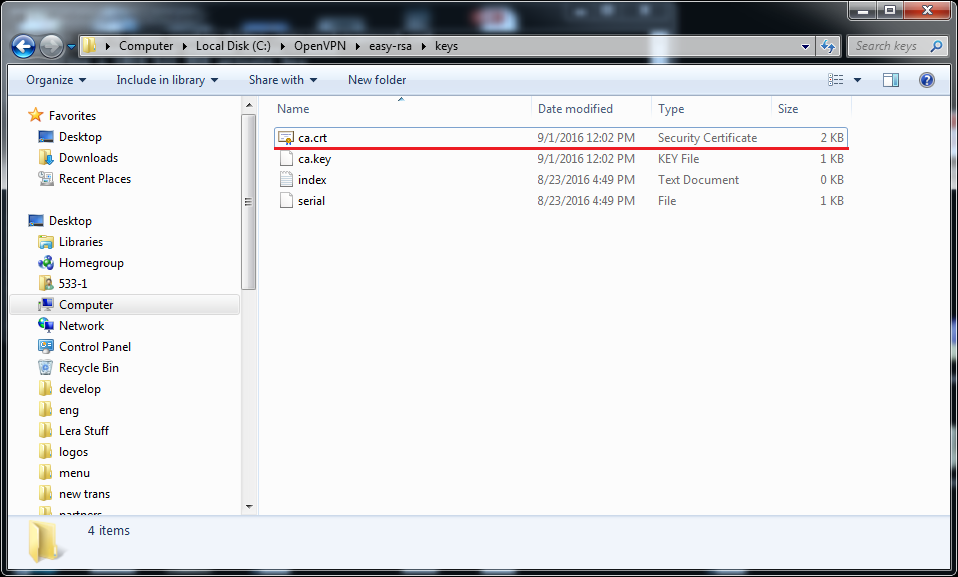
4. Time to make an actual certificate and a key for the server:
1) Type: build-key-server.bat server
2) Press ENTER for all the values, except Common Name, here type: server
3) The console will ask you: “Sign the certificate?” Type: y
4) The console will ask you: “1 out of 1 certificate requests certified, commit?” Type: y
5) That’s it! You have generated the files server.crt and server.key that you can find in C:\OpenVPN\easy-rsa\keys.
5. Time to set the Diffie-Hellman parameters (basically, the defense for your keys). Type: build-dh.bat
Now you have generated the file dh1024.pem that you can find in C:\OpenVPN\easy-rsa\keys.
6. Now copy the files ca.crt, server.crt, server.key and dh1024.pem in C:\OpenVPN\easy-rsa\keys and paste them in C:\OpenVPN\config. You will also need to create a file server.ovpn in this folder. Use the notepad for that and put this information in the file:
port 1194
proto tcp
dev tun
ca ca.crt
cert server.crt
key server.key
dh dh1024.pem
topology subnet
server 10.8.0.0 255.255.0.0
keepalive 10 120
cipher AES-128-CBC
persist-key
persist-tun
comp-lzo
verb 3
7. You can now set users for your server:
1) The users require logins and passwords in order to access your server. Add this information to the server.ovpn file (use the notepad):
# Path to the folder with config files
client-config-dir C:\\OpenVPN\\ccd
# Verification of the authentication data via verify.bat
auth-user-pass-verify C:\\OpenVPN\\verify.bat via-file
# When username and password are checked, don’t ask for the certificate
client-cert-not-required
# Username for further authentication
username-as-common-name
# Allow external scripts
script-security 2
2) Create the folder ccd in C:\OpenVPN, it is needed for the users’ configuration files.
3) Every user requires a separate file in this folder. The filenames should be ‹User_Login›.config (so every filename contains the login of the user). Within the file type the IP-address you want to give to that user like this:
ifconfig-push ‹IP_address› ‹Mask› (where ‹IP_address› is between 10.8.0.0 and 255.255.0.0 according to the server.ovpn file and ‹Mask› is 255.255.0.0)
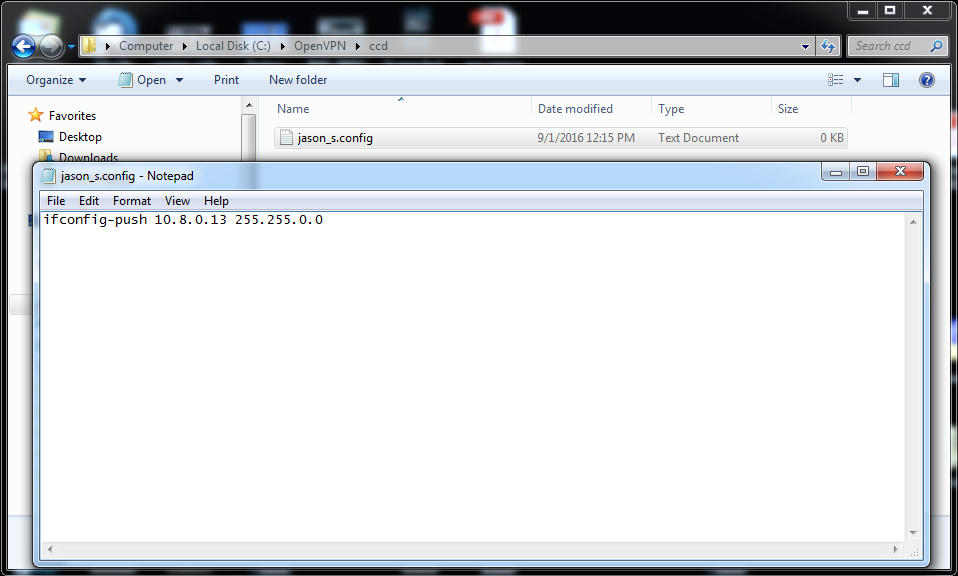
4) Create the file verify.bat in the folder C:\OpenVPN (use the notepad). This is going to be the file the server will use to check your users’ logins and passwords. Within the file just type the logins and passwords for your users separating them with a space.
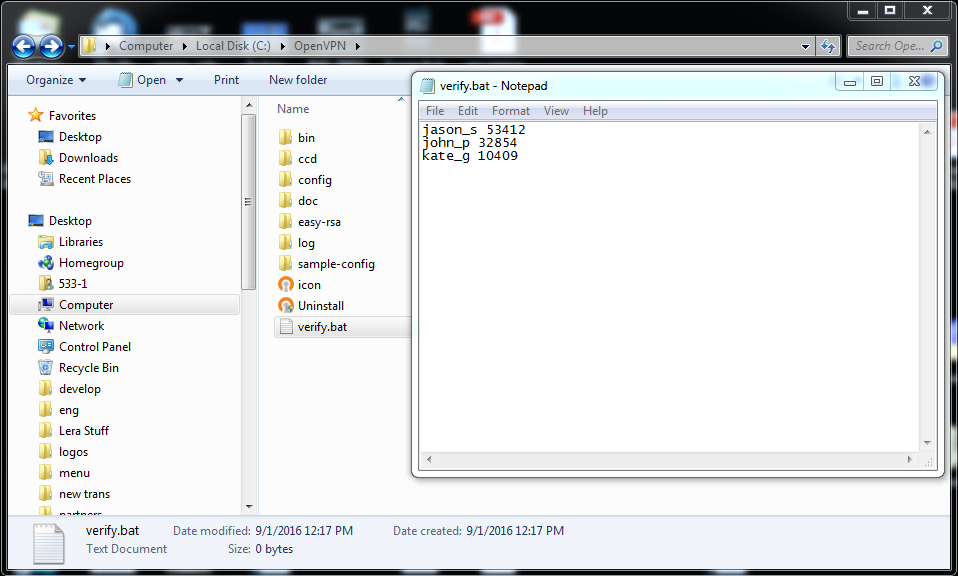
8. Finally, you are ready to launch the server. Click the OpenVPN GUI icon. Now your system tray (lower right corner of the screen) holds the OpenVPN GUI icon, right-click on it and choose Connect. Wait a few seconds and the icon will become green and display the IP-address of your server.
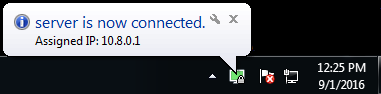
All set to go!
To configure a client connection properly, follow these steps:
1. Follow the steps 1 and 2 for the server instruction.
2. Follow this link: https://felenasoft.com/xeoma/downloads/cloud/cloud.ca.crt to download a valid certificate.
3. Follow this link: https://felenasoft.com/xeoma/downloads/cloud/client.ovpn to download a configuration file.
4. Now copy-paste both cloud.ca.crt and client.ovpn in C:\OpenVPN\config.
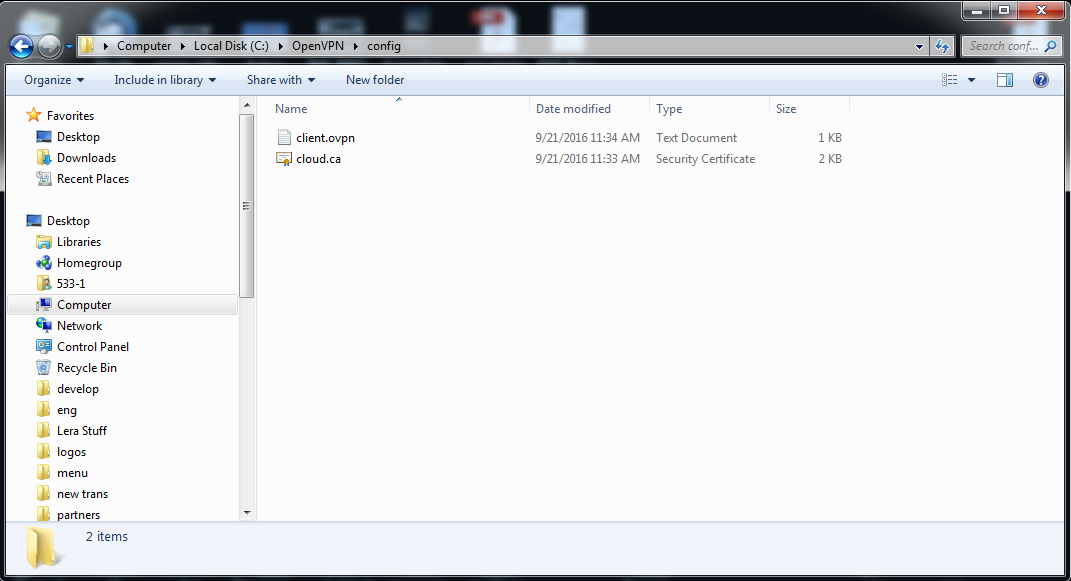
5. Within the same folder create authentication.txt. It should contain logins and passwords, each in its own line.
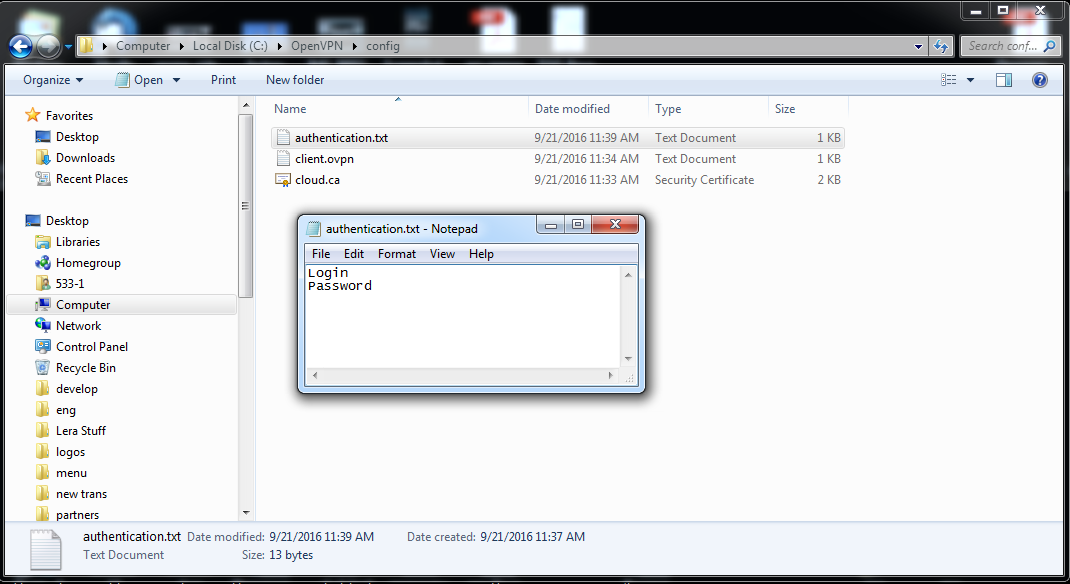
6. Now launch OpenVPN GUI and wait until its icon appears in the system tray. Right-click on it and choose Connect. Wait a few seconds and the icon will become green and display the assigned IP-address.
All done!
Now there is one last thing to make sure that you can view the cameras remotely. The cameras’ IP-addresses need to be forwarded. To do that, open the console (make sure that you use the Administrator):
1. Type in: netsh
2. Type in: interface
3. Type in: portproxy
4. You’ll need to choose a port for your camera. In this article we’ll use 12345 and camera’s IP 192.168.0.1 as an example. Keep in mind that you will need different ports for different cameras. Also, you will need the camera’s current port.
5. Type in: add v4tov4 listenport=12345 connectaddress=192.168.0.1 connectport=22 listenaddress=0.0.0.0 (all in one line)
This will forward the port 12345 to 192.168.0.1:22.
All set!
To configure a client connection properly, follow these steps:
1. Install OpenVPN using this command: sudo apt-get install openvpn
2. Follow this link: https://felenasoft.com/xeoma/downloads/cloud/cloud.ca.crt to download a valid certificate.
3. Follow this link: https://felenasoft.com/xeoma/downloads/cloud/client.conf to download a configuration file.
4. Now copy-paste both cloud.ca.crt and client.conf in /etc/openvpn/
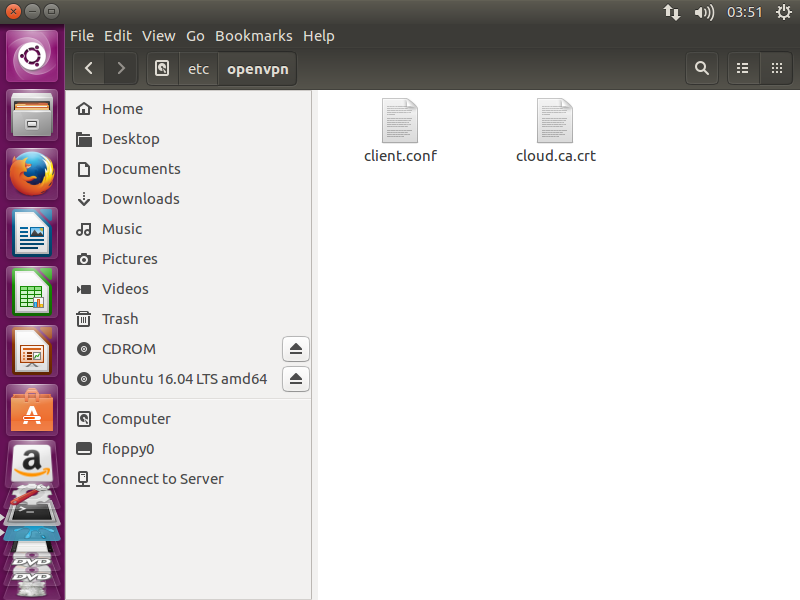
5. Within the same folder create authentication.txt. It should contain logins and passwords, each in its own line.
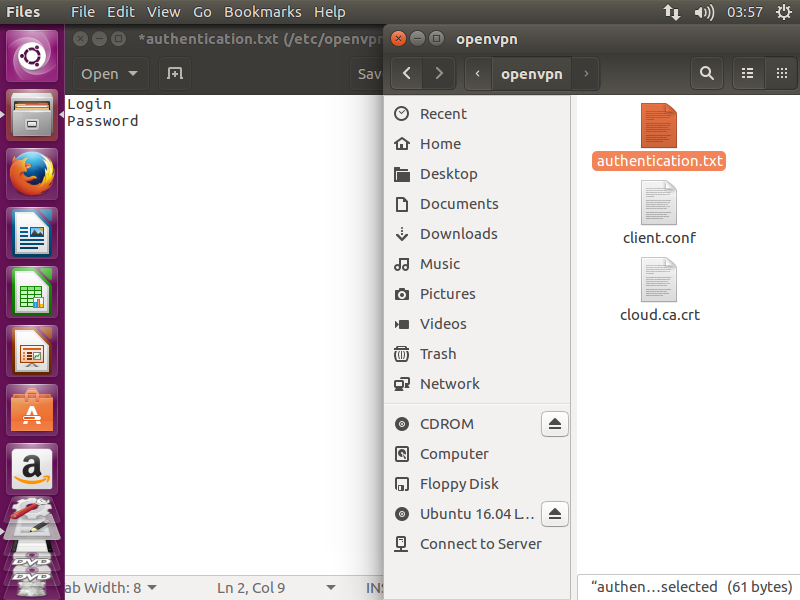
6. Now simply launch OpenVPN by typing: sudo openvpn /etc/openvpn/client.conf
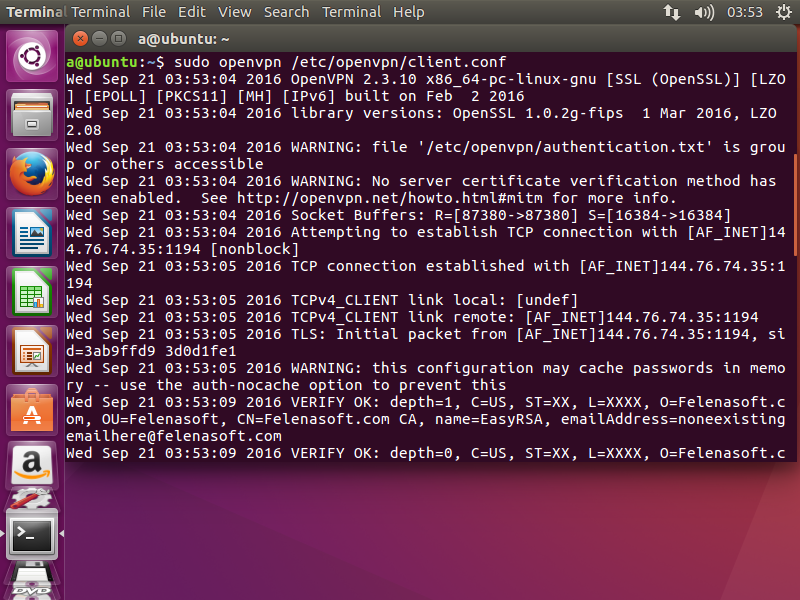
All done!
Now there is one last thing to make sure that you can view the cameras remotely. The cameras’ IP-addresses need to be forwarded.
1. Type in: iptables -t nat -A PREROUTING -p tcp -d 10.8.109.142 –dport 554 -j DNAT –to-destination 192.168.0.177:554 (here 10.8.109.142 with port 554 is the camera’s IP, which is substituted by 192.168.0.177:554)
2. Type in: iptables -t nat -A POSTROUTING -p tcp –dst 192.168.0.177 –dport 554 -j SNAT –to-source 10.8.109.142 (here 192.168.0.177 with port 554 is substituted back with 10.8.109.142)
All set!
6.1. Xeoma Pro Your Cloud – your own cloud service and pro surveillance system!
 See also Xeoma Pro video
Xeoma video surveillance software has proved to be an efficient, easy to handle, and flexible solution for both businesses and individuals that eager to use pro surveillance system.
Going beyond the borders of even such flexible software, Xeoma Pro now offers you an incredible opportunity to have your own cloud video surveillance server and offer it to your clients.
How it works:
– Download Xeoma for your operating system, run and set up Xeoma Pro Cloud.
– Buy Xeoma Pro licenses for as many cameras as you need.
– Activate Xeoma Pro licenses the way you activate Xeoma regular licenses. You will be able to add as many cameras to your cloud service as your Pro license allows for.
It’s your cloud service now, and you decide on the terms of offering it to your customers – whether it will be a ‘per month’, ‘per year’ or ‘lifetime’ subscription and how much it will cost, total disk space assigned to each camera, and so on.
And with our free rebranding tool you can provide this service of yours under the name of your choice!
XEOMA CLOUD is video surveillance as a service. It means that we have Xeoma running on our cloud server and you can connect your cameras there.
Why is it great?
The server will take up all load, maintainence and update, while you can connect to it at any time to view your cameras, their archives, download records of interest and use all the usual features of Xeoma you might need in the cloud!
You don’t need to buy or maintain expensive video surveillance equipment. Just a camera and Internet connection is what is required.
How Xeoma Cloud is better than other cloud services?
With a lot of cloud services nowadays, here’s why you should choose Xeoma Cloud:
Quick start
Minimum requirements to start working with Xeoma Cloud – just a camera and Internet connection. No special knowledge required. Easy connection with step-by-step instructions and videos.
Cost-efficient and trouble-free
No need to buy a sophisticated up-to-date computer. Forget about maintenance costs and huge electricity bills for servers running 24/7. Xeoma Cloud servers are set up by our team of experts and is overall cheaper and easier than regular on-site video surveillance!
Stable and secure work
Your footage is safe in Xeoma Cloud video surveillance system – only authorized users have access to cameras, both in real-time and archive. Even if the camera is vandalized, they will never get the footage.
Sophisticated features
Unlike other cloud surveillance services that offer only motion detector and record (at best), Xeoma Cloud offers almost all of its regular features, including PRO features: emap, object tracking and visualization, integration with cashier registers and home automation systems, privacy masking, synchronized view of multiple archives, and much more!
Flexible pricing and NO hidden fees
Different, flexible types of subscriptions with What-You-See-Is-What-You-Get conditions allow you to find the right one just for you.
No ads, no logo watermarks
even in the free version!
![]()
Every subscription has:
No advertisements or logo watermarks in camera live view or in archive.
Unlimited live and recorded view.
Unlimited download of videos.
Any image resolution.
Unlimited fps.
How to use Xeoma Cloud
4 easy steps:
1. Get a subscription.
2. After having purchased a subscription, a letter will arrive to your email with the connection data and password. You will need to enter these data into Xeoma Client.
3. Download Xeoma Client from the download page.
4. Run it and enter connection data from the letter into the Connection dialog.


Why is cloud-based video surveillance better than regular PC-based installation?
- saves you efforts, time and money
- great for locations where 24/7 running of server is not possible or desirable
- saves electricity
- no equipment except for cameras is needed
- perfect for cameras positioned in many locations
- your records are not subject to theft, safe on our cloud server
If you want to have cloud cctv running on your server use Xeoma Pro Your Cloud
Xeoma, Xeoma Pro, Xeoma Pro Your Cloud and Xeoma Cloud comparison table
Get to know how Xeoma Cloud will help your business!
Try Xeoma Cloud now for free! Just contact us and request 1 day of free access to Xeoma Cloud!
CONDITIONS & SUBSCRIPTIONS
| Xeoma Cloud subscription | Average time of storage* (1 camera, only motion) | Average time of storage* (maximum cameras, continuous recording) | Simultaneous viewers (via client / via web browser) |
|---|---|---|---|
| 1 camera (maximum 1 GB) | 5 days | 12 hours | 1 |
| up to 2 cameras (maximum 5 GB) | 24 days | 2 days | 2 |
| up to 4 cameras (maximum 50 GB) | 8 months | 6 days | 4 |
| up to 8 cameras (maximum 100 GB) | 16 months | 6 days | 8 |
| up to 16 cameras (maximum 200 GB) | 32 months | 6 days | 16 |
| up to 32 cameras (maximum 400 GB) | 64 months | 6 days | 32 |
| up to 64 cameras (maximum 800 GB) | 128 months | 6 days | 64 |
*Storage time is unlimited, it depends on camera specifications and storage space provided by the subscription.
Average storage time in the table is just an approximate calculation of how long video can be retained before overwriting starts if the camera has 0.3 Mpix resolution (640 x 480 px) with 1 frame in 2 seconds refresh rate.
You can calculate your average storage time based on this information, or ask us.
Overwriting will write newest entries over your oldest ones.
XEOMA CLOUD COMPARED TO OTHER CLOUD SERVICES
You think you have an economical and easy cloud service. Not unless you tried Xeoma. Other cloud services trick you into buying their seemingly economical subscriptions by adding hidden costs for nearly every feature you want to add or disable (like watermarks). Also, they set very strict restriction on what cameras you can or cannot connect while with Xeoma Cloud you can use cameras of any resolution and refresh speed.
| Possibilities | Xeoma Cloud | Traditional cloud services |
|---|---|---|
| No advertisements |  |
 |
| No watermarks | |
|
| Unlimited view time (online and archives) |
|
|
| Unlimited download of videos | |
|
| Camera of any resolution | |
|
| Any fps (frames per second rate) |
|
|
| Sophisticated features available | |
|
| Flexibility of subscription | |
|
| Clear conditions without extra fees | |
|
| Continuous OR motion-triggered recording | |
|
REQUIREMENTS AND CONDITIONS
The solution is ideal for cameras in single or multiple locations, such as shops, parking lots, schools and etc.!
- Easy start – connect in 1, 2, 3!
- There is no need to set up your own IT infrastructure;
- When the purchased storage limit is reached, loop recording will overwrite old videos with new ones;
- You can monitor how many subscription days are left;
- You can use all modules of the regular version of Xeoma – detectors, sms or email sending, ftp upload, etc.;
- Not available are only modules that cannot work in the cloud (screen capture, local USB cameras, local microphone, file reading, etc.)
- Camera requirements: JPEG, MJPEG, H264, H264+, H265+, H265 or MPEG-4 stream with static fixed IP address that you can view from the outside Internet (or, if the address is dynamic, you can use any free DDNS service), router port-forwarding of the 80 port of the camera (you can consult this resource to learn how to do it: http://portforward.com/english/routers/port_forwarding/routerindex.htm).
- Network requirements: depends on camera image resolutions and fps (for example, 2.2 Mbit Internet connection per 1 Full-HD camera with 2 fps, or 128 Kbit per 1 camera with 800×450 image resolution and 0.5 fps, besides the load of all other users in the network). Please pay attention that as the camera broadcasts the stream constantly, unlimited traffic Internet connection is preferred;
- You can extend your subscription as your business grows – buy more storage space or connect more cameras.
SPECIAL OFFER! Contact us and request the free Xeoma Cloud test period!
CONNECT YOUR CAMERAS IN 3 EASY STEPS
If the camera has external static fixed IP address:
1. Connect to Xeoma Cloud using received connection data.
2. Run the advanced search by IP/password in “+” menu in the panel below.
3. Your camera will be found and added automatically.
If the camera doesn’t have an external static public IP address:
Get dynDNS or other substitutes of a static public IP address for the camera. Search the Internet for instructions and free or paid dynDNS services.
If you can’t get a static public IP address or dynDNS address for camera
See this article for workarounds for cameras without static fixed IP addresses.
1. Connect to Xeoma Cloud using received connection data.
2. Add a new chain (“Add new camera” option in “+” menu in the panel below) but connect the “FTP receiver*” module instead of the camera module.
3. Set up your camera’s FTP upload to upload to Xeoma as described in this article. Please note that in “Server address” in camera’s settings you need to specify cloud.xeoma.com.*
*ATTENTION! If you’d like to use this method, make sure your camera supports FTP upload of pictures, before you buy Xeoma Cloud subscriptions. Contact us to request a free test period to try it.
If neither of the options works for your cameras, you are advised to have a Raspberry Pi or other simple and cheap micro computer ($50) on site where your cameras are, install regular Xeoma there and use the FTP Upload option to upload footage to Xeoma Cloud. See more about Raspberry Pi and FTP Upload.

6.3. Customizing Xeoma video surveillance software
This is a unique special offer for installers and resellers!
If you resell or plan to resell Xeoma video surveillance software, why not add some info about your company into it?
Customizing Xeoma is easy with our free of charge utility. This utility can be used for rebranding of Xeoma to have a different name, customizing it to have your company’s name, address, support business hours, links to your site, add splashscreen, change Xeoma’s icon, etc.
Seize this opportunity for rebranding Xeoma totally free! Thanks to customizing, Xeoma will not just be a program that is tailored for your customers’ needs but also reminds them about your company!
You can download the rebranding utility for customizing Xeoma here.
This is a Windows .exe file that will let you customize Xeoma for Windows, Linux, Android and Mac OSs. You are free to use any or all of the options.
Having troubles trying to make it work? Check out our new step-by-step guide on using the free rebranding utility in our Photo instructions section.
7.1. Uninstalling and Reinstalling the program
It is recommended to uninstall Xeoma using the program’s embedded tools, as described below. This method ensures a correct reinstallation with file retention or a complete removal of Xeoma files, if needed.
![]() This section describes the methods for uninstalling desktop versions of Xeoma. For Xeoma Pro Your Cloud administrators, see the Xeoma Pro Your Cloud Setup Guide.
This section describes the methods for uninstalling desktop versions of Xeoma. For Xeoma Pro Your Cloud administrators, see the Xeoma Pro Your Cloud Setup Guide.
For Xeoma mobile applications, see para. 7.1.4. Deleting the Xeoma Mobile Application.
7.1.1. Stopping the program
Sometimes it is necessary to stop Xeoma to perform certain actions (for example, to copy recordings into the Xeoma archive folder). The way of doing this depends on how Xeoma operates in your case, specifically whether the server part is installed as a service to autostart.
If the program is installed to autostart, you can stop it using the following methods:
– Via the console (recommended):
Drag the Xeoma executable file into the console or manually enter the path to this file in the console, add a space and enter the following command:
-stopservice
and press OK. The console will display the corresponding message.
An example of a complete command: C:\Users\a\Desktop\xeoma.exe -stopsevice
![]() You can start the Xeoma Server Part with the following command: -startservice
You can start the Xeoma Server Part with the following command: -startservice
– Via the program interface:
We recommend stopping Xeoma using the console command. However, if that’s not possible, you can use the program uninstallation method to do this as well, but it is a slightly more complex approach.
To stop Xeoma via its interface, go to the Main Menu and select “Install.” If Xeoma is installed on this computer, there should be an “Uninstall” option in that submenu — click on it, and you’ll be offered to “Unistall except for archive and settings”. This option removes Xeoma from autostart, preventing it from starting with the system, but it also retains files and camera recordings. We recommend selecting this option. Once selected, a system warning will appear — this action requires entering the system administrator password. Enter the administrator password and click OK.
If the program is not installed to autostart:
– via the program interface (recommended):
Close Xeoma, for example, by clicking on “Exit” in the Main Menu. Once Xeoma is closed, you can find and delete the Xeoma executable file on your computer.
– via the Linux Terminal:
Find the PID (Process ID) of the Xeoma process in top (or htop).
Then execute the kill command: Enter kill {Xeoma PID} and press Enter.
– via the Windows Task Manager:
Find Xeoma in the “Processes” tab, right-click on the corresponding entry, and select “End Task” from the context menu.
7.1.2. Reinstalling the program
If you need to reinstall the program — for example, to roll back to an older version of Xeoma or to install a temporary version provided by Xeoma team— follow the instructions from section 4.5.2. Downgrade to previous versions (desktop versions).
7.1.3. Complete program uninstallation
If you need to completely remove Xeoma from your PC, you can do so either via the program interface or via terminal/console/command prompt. It is crucial to determine whether your Xeoma is installed to autostart.
If Xeoma is installed to autostart (a more common case):
– Via the program interface:
Go to the Xeoma Main Menu and select “Install.” If Xeoma is installed on this computer, there should be an “Uninstall” option in this submenu — click on it, and you will be offered to select two options:
“Uninstall except for archive and settings” — removes Xeoma from autostart, preventing it from starting with the system and retains files and camera recordings (usually required during reinstallation or rollback to previous Xeoma versions — see section 4.5.2. Downgrade to previous versions (desktop versions))
“Uninstall ALL” — removes Xeoma from autostart and deletes all recordings and program settings.
Select this option to uninstall Xeoma and delete all its data.
A system warning will appear — this action requires entering the system administrator password. Enter the administrator password and click OK.
– Via the console:
On Linux or Windows machines: run the Command line/Terminal, drag the Xeoma executable file into the console or manually enter its path (on Linux machines type “sudo” before this). Then add SPACE and enter either
-install -removeexe (removes Xeoma from autostart, preventing it from starting with the system but retains files and camera recordings) or
-install -removeall (removes Xeoma from autostart and deletes all recordings and program settings. Select this option to uninstall Xeoma and delete all its data).
Examples of complete Windows commands:
C:\Users\a\Desktop\xeoma.exe -install -removeexe
C:\Users\a\Desktop\xeoma.exe -install -removeall
Examples of complete Linux commands:
sudo ./xeoma.app -install -removeexe
sudo ./xeoma.app -install -removeall
Once the prompt is completed, press Enter. Entering the system administrator password is required for this action.
If Xeoma is not installed to autostart:
– Via the Xeoma interface:
If you haven’t installed Xeoma, close Xeoma, for example, by selecting “Exit” in the program’s Main Menu. Once Xeoma is closed, you can find and delete the Xeoma executable file on your computer (usually in the downloads folder or in the folder where you unpacked the archive).
Using this tip, you can also find folders that contain settings and camera recordings on your computer. Find the Xeoma folders and delete them manually.
![]() To avoid searching for Xeoma folders and manually deleting them, try temporarily installing Xeoma and then using the automatic complete program uninstallation described at the beginning of section 7.1.3.
To avoid searching for Xeoma folders and manually deleting them, try temporarily installing Xeoma and then using the automatic complete program uninstallation described at the beginning of section 7.1.3.
– Via the console:
The recommended steps here are the same as for the removal via the interface option: you need to stop Xeoma and manually delete Xeoma folders and files. To find where Xeoma files are located, you can use system search or refer to the information on this page.
You can stop the non-installed Xeoma via the program interface or, in a slightly more complex way, via the console. On Linux or Windows machines: run the Command line/Terminal, drag the Xeoma executable file into the console or manually enter its path (on Linux machines type “sudo” before this). Then add SPACE, enter
-install -removeexe
and press Enter. Entering the system administrator password is required for this action.
An example of a complete Windows command:
C:\Users\a\Desktop\xeoma.exe -install -removeexe
An example of a complete Linux command:
sudo ./xeoma.app -install -removeexe
![]() To avoid searching for Xeoma folders and manually deleting them, try temporarily installing Xeoma and then using the automatic complete program uninstallation described at the beginning of section 7.1.3.
To avoid searching for Xeoma folders and manually deleting them, try temporarily installing Xeoma and then using the automatic complete program uninstallation described at the beginning of section 7.1.3.
7.1.4. Deleting the Xeoma Mobile Application
Deleting the Xeoma mobile application for iOS or Android is done similarly to deleting other applications on your device. Specific actions may slightly vary depending on the operating system version, but we’ll provide a few examples of how to delete Xeoma from your mobile device.
For Android: Find the Android Xeoma application on your device’s home screen. Tap and hold the application icon until the trash bin icon appears. Drag and drop the Xeoma application icon onto the trash bin icon. This action will delete the application.
Alternatively, find the Xeoma mobile application for Android on your device’s home screen, tap and hold it until a dialog box with several options appears. Tap the “Delete” option in this box. Then a delete confirmation message will appear. Confirm the app removal by tapping the corresponding button, and the application will be deleted. Note that deleting the full Android Xeoma application (Client and Server) will remove all the application files (camera recordings, settings, etc.) as well.
For iOS: Find the Xeoma mobile application for iOS on your device’s home screen. Tap and hold the application icon until a dialog box with several options appears. Tap the “Delete” option in this box. Then a delete confirmation message will appear. Confirm the app removal by tapping the corresponding button, and the application will be deleted. Alternatively, if you continue holding the press on the application icon after the dialog box appears, a “-” sign will appear on the application icon. Pressing it will display the “Delete” confirmation message as well.
![]() You can find information on how to delete applications from your device on the Internet.
You can find information on how to delete applications from your device on the Internet.
7.2. Tips how to reduce CPU usage, memory load and required disc space
CPU usage will be significantly lower if you use MJPEG stream for view and storing to the archive (or just viewing). Learn how to reduce CPU load in this article.
RAM usage can be great if Prerecord option is used in “Preview and Archive”. If the load is too high for the machine, turn the option off.
HDD space: storage capacity depends on many factors in the field of the view, but remember that required disc space can be reduced by setting up motion and day detectors, or with scheduled recording. Another option is to use Saving to File module to save videos with other codecs (for example, highly compressive H.264) – this way videos won’t take so much space but will not be played with the built-in player of Xeoma either. Or, if yours are rtsp (H264) cameras, you can use direct saving to archive without re-encoding.
Typical applications. Scenarios.
Xeoma for CCTV operator 
|
Aim of video surveillance for CCTV operator: to make live monitoring easier for surveillance officers despite natural challenges like distraction, fatigue and loss of concentration in proportion to time and amount of cameras to monitor. Solutions from Xeoma: –User profiles with ability to restrict/allow access to certain cameras, archives and functions. Create specific user profile and let the CCTV operator know his/her password to connect to Xeoma server. Managing large amounts of cameras: Enabling CCTV operator to work with other tasks while monitoring. Recommended products – Xeoma or Xeoma Pro when needed. |
Xeoma for security administrator
|
Aim of video surveillance system for security administrator: to create a video surveillance system flawlessly running without human supervision. Recommended products – Xeoma Standard or Xeoma Pro |
CCTV For Home
|
Aim of CCTV for home: to protect your house and the front yard from strangers’ intrusion. Solutions from Xeoma: Motion Detector module allows you to detect moving objects and start recording. ‘Loitering Detector’ to detect if someone’s in a suspicious proximity of your territory for some time. ‘Cross-Line Detector’ will detect if a delivery person, postman, etc. has gone to restricted areas, not just to the door. Sending Email module will inform you about emergencies by email. Web Server will let you broadcast the images from your cameras to a website. This gives you the opportunity to share the image with your family or friends. Recommended products for CCTV for home – Xeoma Starter, Xeoma Lite, Xeoma Standard (or Xeoma Pro if needed) Read also: Video surveillance for home usage or for small systems |
Office security with Xeoma
|
Aim: to provide security of the whole territory. Solution from Xeoma: Motion Detector in combination with Scheduler will alert you if there is movement during off hours. Face Detector module will automatically find a face. ANPR will recognize vehicle licens eplates from white and black lists. E-map shows all your cameras on your floor plan. In case of emergency allows to see cameras’ exact position on the territory and send help immediately. Aim: to control employees’ attendance and productivity. Solution from Xeoma: The Motion Detector’s ‘Detect only absence of motion’ option will help fight idling.The Face Recognition or ‘Crowd Detector’ modules will be triggered if the are more people in camera’s sight than expected. Visitors Counter module allows you to count employees entering and leaving the office. If your cameras can Pan Tilt and Zoom, then PTZ Tracking will automatically follow a moving object. Recommended products – Xeoma Standard or Xeoma Pro |
Retail store security with Xeoma video surveillance
|
Aim of retail store security: to reveal frauds, to solve claims, to control shortage in the cash. Solution from Xeoma: HTTP Marking allows you to synchronize Xeoma with a cash register and control till slips. Aim of retail store security: to control store traffic. Solution from Xeoma: Visitors Counter module allows to count people entering and leaving the store. All the received data will be sent to CVS file where you can analyze it. Aim of retail store security: to prevent breaking in through a window. Solution from Xeoma: Sound Detector will start working if a loud sound detected (the sound of breaking window or the sound of security alarm). Aim of retail store security: to prevent stealing surveillance records in case of robbery. Solution from Xeoma: Xeoma Cloud or Xeoma Pro Your Cloud will safely keep your records on cloud. You don’t even need to put a computer at a store, the only thing you need is a camera. And even if the camera is stolen – your records are still safe and available for you at any time. Recommended products – Xeoma, Xeoma Pro, Xeoma Cloud. |
School security with Xeoma
|
Aim: to control students’ activity in a computer class, to provide school security. Solution from Xeoma: Screen Capture module will let you see what is happening on computer screens. Recommended products – Xeoma, Xeoma Pro. 20% discount for Xeoma licenses for educational institutions. |
Hospital security with Xeoma
|
Aim: to control medical staff, to monitor patients’ condition, to provide hospital security. Solution from Xeoma: Sound Detector will indicate whenever there is a beeping from hospital facility (which might indicate something goes wrong with patient’s condition) or a scream for help. Visitors Counter module can tell how frequent the hospital staff comes to the patient’s room, it helps to check if the patient is being treated right and that he’s not left without proper attention. Age Recognition Additional module can help react only to elderly skipping younger staff. Recommended products – Xeoma Pro. |
Airport security with Xeoma
|
Aim: to control forgotten and unattended items, to provide airport security. Solution from Xeoma: Detector of Abandoned Objects: will detect an item left unattended for some time. Drones Detection Additional module will detect UAVs and notified authorized personnel with notification modules. Recommended products – Xeoma Pro. Also watch our videos: Drone detection and Airport security |
Typical video surveillance goals and how to do that in Xeoma
Cameras, sources, view
• Use video source that is not a camera (Screen Capture, File Reading, etc.) – add a default scheme through the “+” menu in the lower panel, remove the Universal camera module, and replace it with the needed module from the upper panel
* Fisheye Dewarping – Fisheye Dewarping module
* Turn on one camera if another is down – Relay Switcher module
• Embed cameras into your site – Web Server module
* View cameras in browser – Web Server module
• Add date and time overlay to preview and archive – Marking module
* Add custom text overlay to preview and archive – Marking module
• Add GPS overlay to preview and archive – Marking module
* Change font size for Xeoma’s marking overlay – option in Marking module’s settings
• Change font size for camera’s own date/time overlay – check settings in camera’s web admin page (outside of Xeoma)
* Change font size for camera’s name on Main Screen – option in Layouts -> Window settings
* Control of camera’s pan, tilt, zoom functions, in Xeoma interface – PTZ control in lower panel or on camera’s preview box. See also
• Control of camera’s pan, tilt, zoom functions, in browser view – PTZ control in Single Camera view mode (PRO license required)
* Connection of camera’s PTZ – Universal Camera module settings
• Quick addition of a pre-set chain with optimum settings – Ready-to-use chains in the upper module panel
• Simultaneous view of cameras from several servers (network clustering) – Main menu -> Remote access -> Multi-server mode
• Emulate MJPEG IP camera – Web Server
* Emulate H264 IP camera – RTSP Broadcasting module (PRO) or webRTC streaming option in Web Server (PRO)
* Screen capture in Live View – ‘Screenshot’ option in Main menu or ‘Screenshot’ button in the lower panel
• Screen capture in archive – ‘Screenshot’ option in archive viewer‘s menu
* Periodic automatic screen captures – Screen capture module
* Use JPEG image or MJPEG video as a video source – File reading module
• Use video stream broadcast by other Xeomas as a video source – Another Xeoma module
• Use video sent through FTP server as a video source – FTP Receiver module
* Ghosting of videos or still images – see troubleshooting of image distortions
• Change cameras order – drag camera’s preview box to the desired place
* Put camera in a large slot surrounded by smaller camera slots – option in the ‘Layouts’ menu in the lower panel
• Pop Xeoma window up when triggered – Pop-up Window module, and “Mobile notifications” for iOS and Android (starting from version 20.10.22)
• Grouping of cameras – Device List in Main menu
Activation, registration, licenses
• Activate renewals for Xeoma/Xeoma Pro licenses (extend the free updates period) – Main menu -> Registration -> Activate (corresponding renewal key required)
* Activate Repeater – Main menu -> Remote access -> Repeater setup -> Subscription (Repeater subscription required)
• Activate renewals for Xeoma Lite – Xeoma Lite doesn’t support that feature
* View information about your activated licenses – Main menu -> Information -> Active licenses or Main menu -> Information -> About
* Activate Xeoma/Xeoma Starter/Xeoma Standard/Xeoma Lite/Xeoma Pro license (switching to the commercial version, registration) – Main menu -> Registration -> Activate (corresponding license required)
• Switch into the trial mode – option in Main menu -> Registration
* Check if newer version of Xeoma is available – Main menu -> Information -> Check for updates
• Update Xeoma to a newer release version – Main menu -> Information -> Check for updates
* Update Xeoma to a newer beta version – ‘Update to beta versions’ option in Main menu -> Information -> Check for updates
• Activate licenses for Xeoma Starter – Main menu – Registration- Activate (make sure that version 20.10.13 or newer is used)
• Activate licenses for Xeoma Cloud – no need to activate it, you get access when you purchase subscriptions
Archive, motion detector
* Import from camera’s memory card (SD card synchronization) – Download from SD card option in the Preview and Archive module (for ONVIF cameras, PRO edition)
* Restricted areas trespassing – Motion Detector module or Cross-Line Detector module or Object Recognition module (if tresspassing object is important too)
• Simultaneous view of several archives at once – the ‘Play’ button in the lower panel (PRO edition)
• Motion visualization on preview – Visualization settings menu in Layouts menu in the lower panel
* Motion visualization in archive – Visualization settings menu in Layouts menu in the lower panel (PRO edition)
• Motion track visualization – Visualization settings menu in Layouts menu in the lower panel (PRO edition)
* Motion detection – Motion Detector module
• Detection of lack of motion – the ‘Detect only the absence of movement’ in Motion Detector module or Detector of Abandoned Objects module
* Clouds and shadows false alarms elimination – ‘Compare to the accumulated background’ detection method in Motion Detector module
• False alarms elimination – ‘Sensitivity threshold’, ‘Object size’, ‘Disregard motion shorter than’ options and detected area in Motion Detector module
• Quick turning on/off of recording or any filter or destination modules remotely (e.g. automatically by automation systems or manually in browser) – HTTP Switcher module
* Quick turning on/off of recording or any other modules from Xeoma’s interface – Button Switcher module
• Quick turning on/off of cameras from Xeoma’s interface – ‘Turn cameras on/off’ option in the Main Menu
* Quick turning on/off of all modules from Xeoma’s interface – tick/untick modules in the popup left panel of the Quick settings screen
• Recording only in daytime – Day Detector
* Recording only in night time – Scheduler module
• Recording at specific time, date – Scheduler module
• Record two or more cameras into 1 archive – Unitor module
* Change image resolution for both preview and all following modules – Image Resize module
• Change image resolution only for archives – option in Preview and Archive module settings
* Save videos to archive with lower quality or lower fps to save space – option in Preview and Archive module settings
* Image zoom in archive viewer – Turn zoom on/off in the archive viewer menu (PRO)
• Download videos from the archive viewer – ‘Export’ option in the archive viewer menu
• Save videos in the format of choice – Save to File module
* View archive records – ‘Play’ button in the top right corner of camera’s preview box (Preview and Archive module is required)
• Search by date, time in the archive viewer – use the archive viewer’s timescale and calendar button
Features and modules
• Remove a module from a scheme – Recycle bin in the module’s settings; click on white wire connecting two modules; drag the module back to the top module panel
* Add a module to a scheme – drag the module from the top module panel into the needed place in the scheme; click on the module in the top module panel
• Automated detection and recognition of faces – Face Recognition module or Face ID for double authorization
* Interactive map of objects – eMap option in ‘Layouts’ menu
• Cashier register/POS synchronization with IP cameras – HTTP Marking module
* Crowd detection – Crowd Detector module or Face Recognition module or Visitors Counter module
• Cross-line detection and alarms – Cross-Line Detector module or Visitor Counter module in combination with needed notifications modules
* Blurring (masking) image areas facing private property – Privacy Masking module
• Following moving objects (tracking) – PTZ Tracking module in combination with Motion Detector
* Staff monitoring – Motion Detector, Face Recognition, Screen Capture, Microphone modules
• Loud noises detection (e.g. glass break, gunshot, explosion) – Sound Detector in combination with Microphone or Universal Camera modules (or, if specific noise type is important – Sound Events Detector (Additional))
* Distinguishing object types, reaction to a specific object – Object Recognition (Additional)
• Wrong direction detection – Cross-line Detector module
* Save logs about problems, errors and program events – ‘Record found problems to the log file’ option in the Problems Detector module
• Reports of people count entering or leaving – ‘Save data in CSV report’ in Visitor Counter module
• Create user profiles (operators) – ‘Users’ menu in Main menu -> Remote access
* Restrict access to certain cameras/functions for certain operators – ‘Users’ menu in Main menu -> Remote access
• Change administrator password/remote access password – ‘Users’ menu in Main menu -> Remote access
* Lost administrator password or password for remote access – console command -showpassword
• Remote access to a remote Xeoma server – Main menu -> Remote access -> Connect to
* Connection to a remote server that has no external IP address – Repeater
• Upload JPEGs and videos to an FTP server – FTP Upload module
* Send http requests to other devices – HTTP Request Sender
• Parental control – Screen capture module
* Broadcast video or audio stream to other Xeomas – HTTP Upload module
• Use LDAP authorization data in Xeoma – LDAP settings
* Change language – ‘Language’ option in the Main menu
• Protect access to Xeoma server with a password (on the same computer) – Tick the “Use this password…” option in the Installation dialog and untick “Remember this password” in the Connection Dialog
* Scale interface (for example, for mobile displays) – option in Layouts -> Window settings
• Xeoma Cloud: Connection of cameras that don’t have static fixed IP address – FTP Receiver module
Notifications, reactions
* Ring alarm when triggered – Sound Alarm module
* Email notification about emergency – Email Sending in combination with Motion Detector, Sound Detector, Problems Detector, etc.
• SMS (text message) notification about emergency – SMS Sending in combination with Motion Detector, Sound Detector, Problems Detector, etc.
* Get notification if cameras are down, ‘freeze’ – Problems Detector + Email/SMS Sending
• Get notification if cameras are tampered, obscured – Problems Detector + Email/SMS Sending
* Get notification if disk space is running out – Problems Detector + Email/SMS Sending
• Get notification if RAM is running out – Problems Detector + Email/SMS Sending
* Get notification if processor load is too high – Problems Detector + Email/SMS Sending
• Get notification if modem/router/Internet is down – Problems Detector + Email/SMS Sending
* Get notification about emergency restarts of Xeoma – Problems Detector + Email/SMS Sending
• Get notification about database problems – Problems Detector + Email/SMS Sending
Easy start guide even for newbies
When you launch Xeoma for the first time, this is what you’ll see:

You can click a couple of times on an empty space to skip all the messages and start working. If your cameras are within the same local network-
– Hold on! How do I know whether they are or aren’t?
Local network is the one created by your router. Basically, any device within its reach is part of that network. So, if the cameras are not particularly far from that router, you can safely assume they are in the local network. The easiest way to check is to access the router’s admin page in a browser: it should contain a list of all connected devices. Note the IP addresses for those devices – they should look something like this 192.168.0.5, 192.168.0.3. These are local IP addresses, so you can’t use them outside.
Adding these cameras is simple: “+” → Simple search for local cameras:

Soon enough you’ll see the cameras:

A simple system, isn’t it? You may see this message during the search:

The information needed here should be mentioned in the cam’s manual (if it’s standard admin/admin, then you won’t even need to input anything yourself – Xeoma will use these credentials automatically).
Now, if the cameras are in different networks, then they’ll need static fixed IP addresses. You can get those from your Internet provider (they’ll instruct you on how to use it as well). When the camera has the static public IP, you can add it in Xeoma by going “+” → Search by IP/password. You’ll see this window:

You should know the username and password, the IP is the one your Internet provider gave you, the port is typically 80. Sometimes cameras can have unusual ports, you can check the admin page to make sure. The right page should look something like this:

Once the cameras are added, you can consider this machine your server. You can take a look at the settings by pressing the gear button. As you can see, Xeoma uses a simple system of chains. This is the standard chain of modules Xeoma creates for every camera:

It works in 2 ways simultaneously:
- during the right time (the one set in the “Scheduler”) the “Motion Detector” switches on and stores all the motion in the “Preview and Archive”;
- if something happens with either the camera or the server, the “Problems Detector” informs the “Sending Email” module, which will notify you about the issue.
Your surveillance system is pretty much ready, you just need to spend a bit of time setting up the “Motion Detector” and “Sending Email”.
If you’d like to check your server from a different device (e.g. your Android or iPhone), you can connect to it remotely. Any of these devices will be your client. This a simple system called “client-server architecture”. Just download Xeoma app for them and go Main menu → Remote access → Connect to. You’ll see this window:

You’ll need to put your server’s IP in the first bar. If both the server and the client are in the same network, the server’s local IP (192.168.x.x) will be sufficient. You can learn your server’s IP by checking this same window on the server – it will show you the exact IP in the IP address of this computer to connect to. If not, the server will need either a static fixed IP or an activated Repeater (an easy to use solution for that problem).
There is one more step left to make your system independent. In case your server reboots, you want Xeoma to launch automatically, so that you don’t lose any footage. This is easy to set up by going Main menu → Install → Install and CHECK the box Autorun the server part of Xeoma as service.
Installing Xeoma video surveillance software for Linux without graphical shell (for example Raspberry Pi on ARM) (via Terminal)
If your Linux is a server version or if you want to do the same through a console, run the Terminal and execute
wget https://felenasoft.com/xeoma/downloads/latest/linux/xeoma_linux64.tgz (for 64 bit systems)
or
wget https://felenasoft.com/xeoma/downloads/latest/linux/xeoma_linux.tgz (for 32 bit Linuxes).
Unpack the archive with the tar command.

After unpacking is done, you will get the xeoma.app file. Run it to start Xeoma (both server and client parts at once). When you access the file, the short help will be displayed with commands that can be used.

|
|
Starting from the version Xeoma 22.11.25, a new feature to specify console command that will be added to the autostart script after installation has been added for console commands when installing Xeoma. For example, if you conduct -install -coreauto -serverport 8888, -serverport 8888 command will be added to the autostart script automatically. Previously, additional commands were not combined with the installation commands and they had to be specified manually in the autostart script. |
Running xeoma.app will only be good if your Linux has a graphical shell. The client part – the visual part – will then be displayed:

Otherwise, you can just run the server part without displaying the visual part (the client part):

You can change language via console, install and uninstall the program, run it and activate it.

To setup other features (for example, add and configure cameras, add user profiles, change password and set it for local access, etc.) you will need to connect to this server part from a client. The machine with the client part must have graphical shell. This can even be your Android smart phone.
As you see, Xeoma video surveillance software for Linux is as easy to handle as Xeoma for other operating systems. Moreover, you can save not just nerves and time but also money with Xeoma on Ubuntu or other Linux distros.
Console commands
When you access Xeoma in a Terminal, you’ll get these regular commands displayed:
Usage: Xeoma.app [-command] [-argument]
Commands:
| Command | Description |
| -help | show this help |
| -core | run server only |
| -client [password@address:port] | run client only. Can be used without parameter, also password and port can be empty. For example: -client 192.168.0.1 |
| -lls | run License Server |
| -install [-argument] | works with argument only |
| -install -allmanual | install Server and client with manual start |
| -install -allauto | install Server and client with auto start |
| -install -coreauto | install Server (autoStart) and client (manualStart) |
| -install -hiddenmode | install Server (autoStart) hidden mode used |
| -install -cloudauto | install Cloud with auto start |
| -install -removeall | remove all, include Archive and config files |
| -install -removeexe | remove program, leave Archive and config files |
| -install -licauto | install License Server with auto start |
| -installdir [DirPath] | set install directory. ATTENTION! Path to dir must be in UTF-8 encoding!** |
| -stopservice | stop Xeoma service (if installed) |
| -startservice | start Xeoma service (if installed) |
| -restartservice | restart Xeoma service (if installed) |
| -activateOnline [Serial] | online activation (if activation of several Serial numbers is required, separate them with a comma (no spaces) OR enframe Serials with single quotes and separate them with ‘;’. For example: -activateOnline Serial1,Serial2) |
| -licenseServer [LicenseServer] | license server for online activation. For example: 192.168.0.1:8090 |
| -activateRequest [Serial] | offline activation (if activation of several Serial numbers is required, separate them with a comma (no spaces) OR enframe Serials with single quotes and separate them with ‘;’.) |
| -activateResponse [Activation] | offline activation |
| -showpassword | show current password and set enable network access |
| -startdelay [seconds] | delay before starting in seconds |
| -log | enable log for server events |
| -lang [Language] | for English: en, for Russian: ru, etc. |
| -clientIndex [ClientID] | client ID can contain only letters and numbers (no spaces, maximum 16 characters) |
| -individualsettings | store personal settings individually for each client |
| -cloud | start Cloud server with auto restart on crashes |
| -noguard | use this parameter with -cloud to run Cloud without restart guard |
| -sampleconfig | use this parameter with -cloud to generate sample config in Cloud mode |
| -nohup | ignore the HUP (hangup) signal |
| -noscan | disable camera scanning |
| -noscanptzandaudio | disable scanning for ptz and audio url |
| -proxy [ProxyServerURL] | set proxy server address* |
| -proxyclear | remove stored proxy server address* |
| -noarchivedb | disable archive database (search in archive will be not available) |
| -activateRetranslator [Serial] | online activation of Repeater (if activation of several Serial numbers is required, separate them with a comma (no spaces) OR enframe Serials with single quotes and separate them with ‘;’. For example: -activateRetranslator ‘Serial1;Serial2’) |
| -noautoupdate | forced restriction of auto updates for the server part |
| -serverport [PortNumber] | set server port* |
| -setpassword [Password] | set server password |
| -savepassword [1/0] | allow password saving on client side |
| -reindexingArchive | reindex archive and exit |
| -nolog | disable log for server events |
| -fullscreen | run Xeoma in fullscreen mode |
| -sslconnection [0/1/2] | if 0 on the client – connect to server ignoring certificates; if 1 on the server – accept only secure connections from clients (to do that, generate and place the certificates into the Server and Client folders. See Xeoma folder > Security > Certificate > Readme.txt for details); if 2 on server or client – auto-detect certificates |
| -arducam | enable using ArduCAM |
| -compressdb | compress archive database |
| -uselocaltime | use local time instead of UTC |
| -webaddr [WebAddr] | change all addresses to specified |
| -enableconwithoutpass [UserName] | enable connection without password within one minute |
| -archivecache [DirPath] | path to cache directory (on RAM-disk or fast HDD) for speedup archive writing** |
| -connectioninfoport [PortNumber] | set port for License Server (see -lls), default is 4200 |
| -programdir [DirPath] | set directory to unpack Xeoma’s files for the first launch** |
| -disableDownloads | allows you to remove the Update option from the menu |
| -nosearchservers | make Xeoma opt out of searching for any Xeoma servers in the network to connect to |
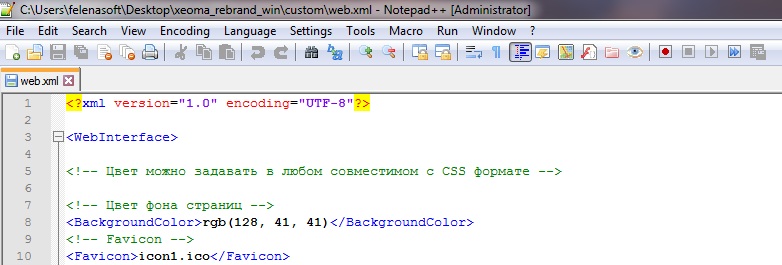


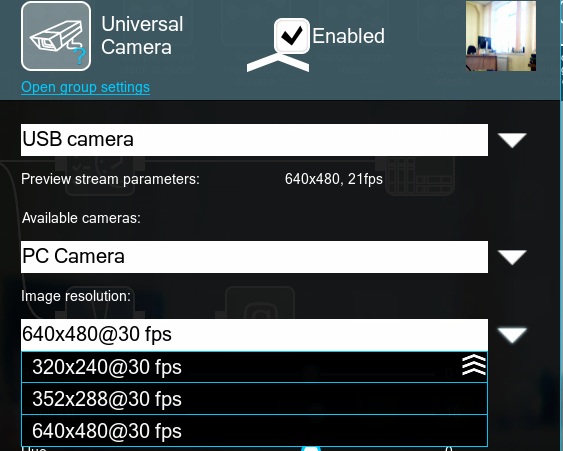
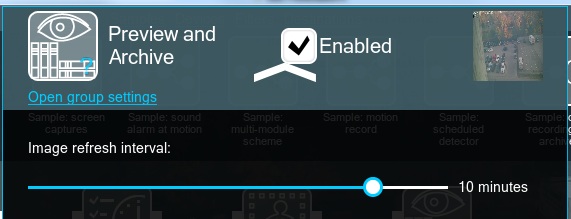
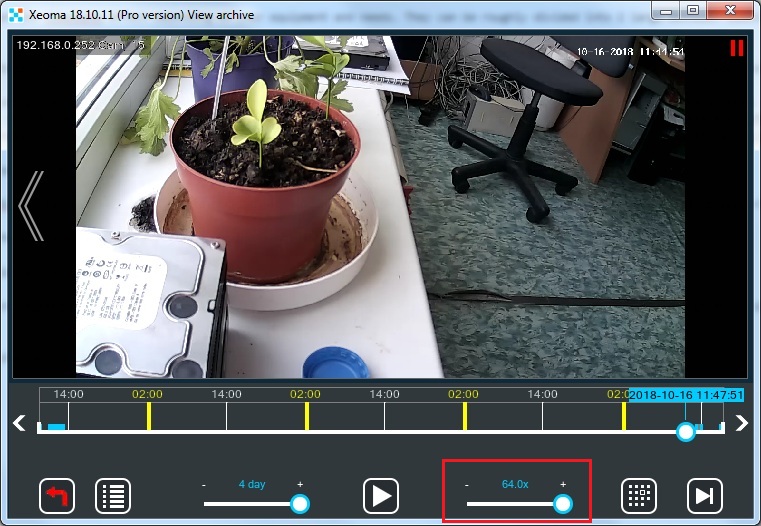

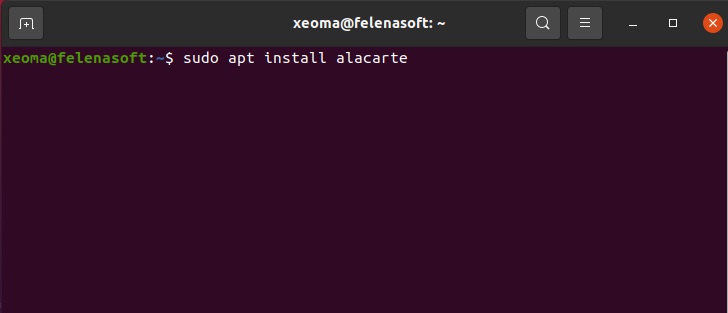
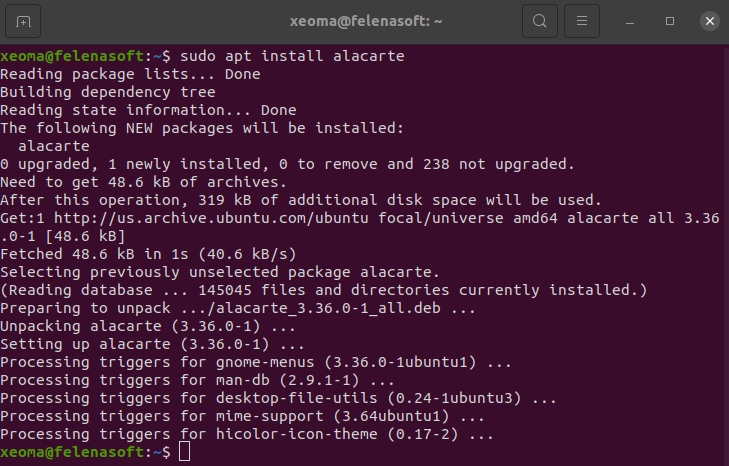
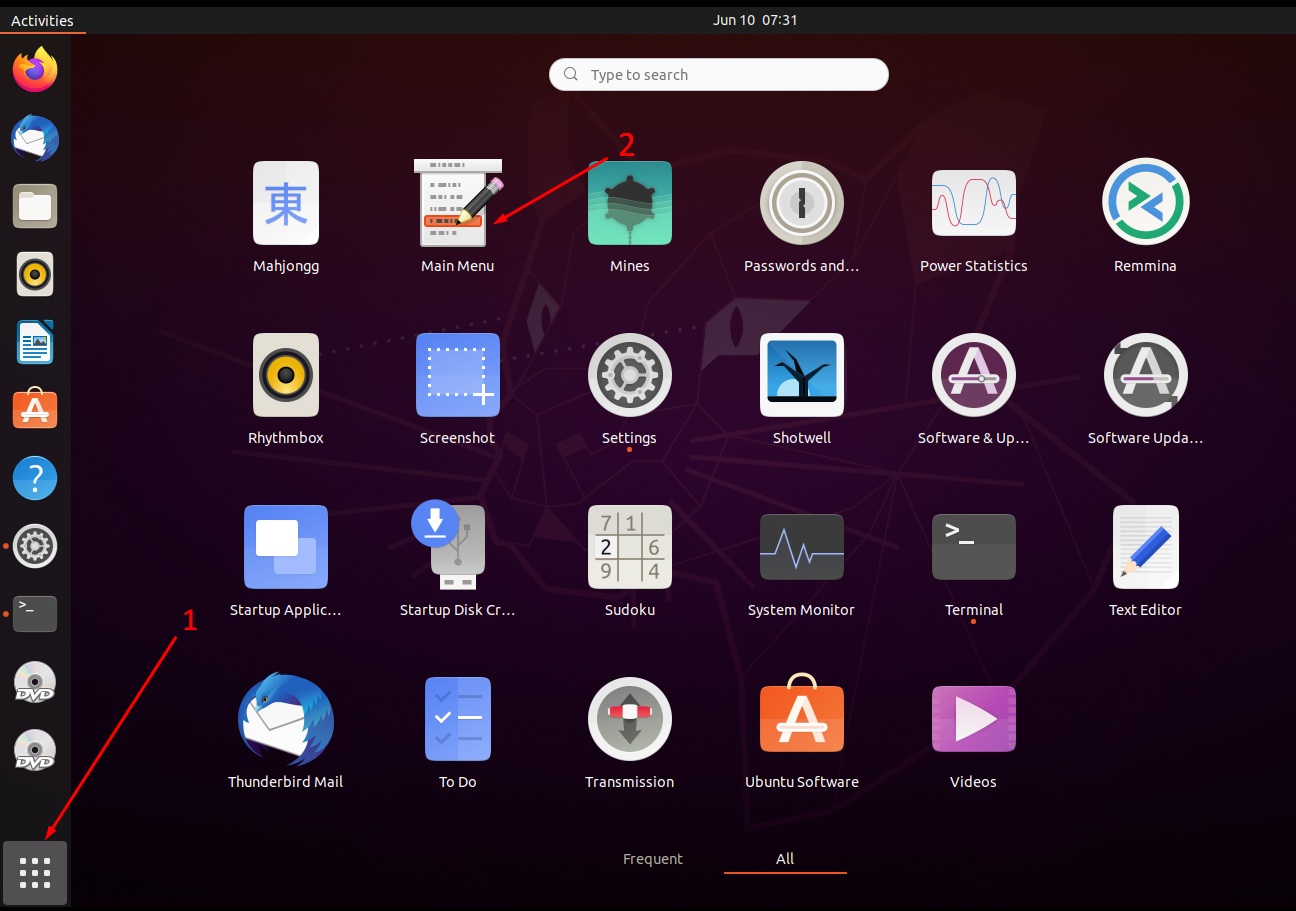
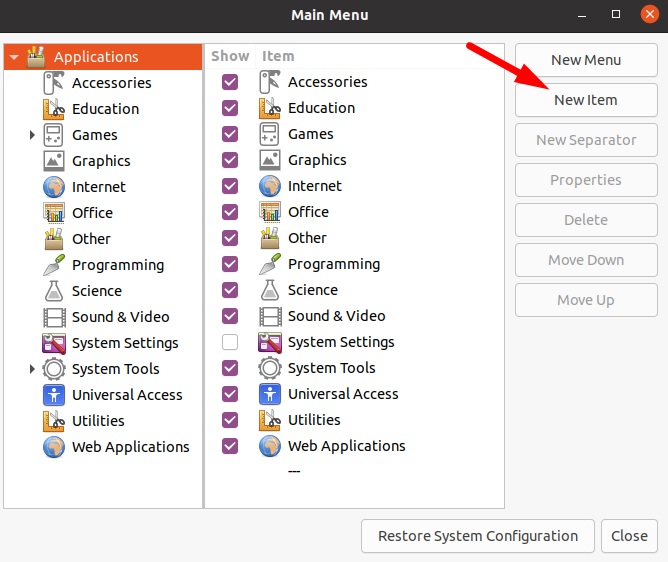
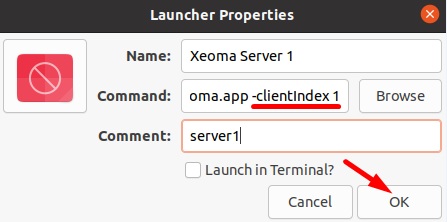
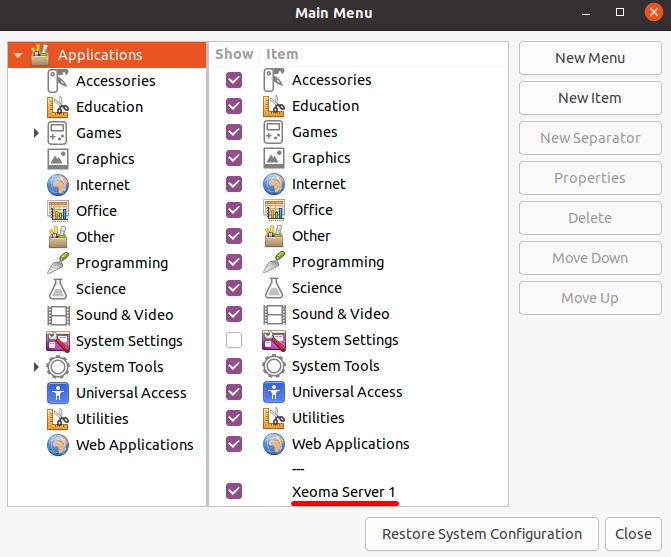
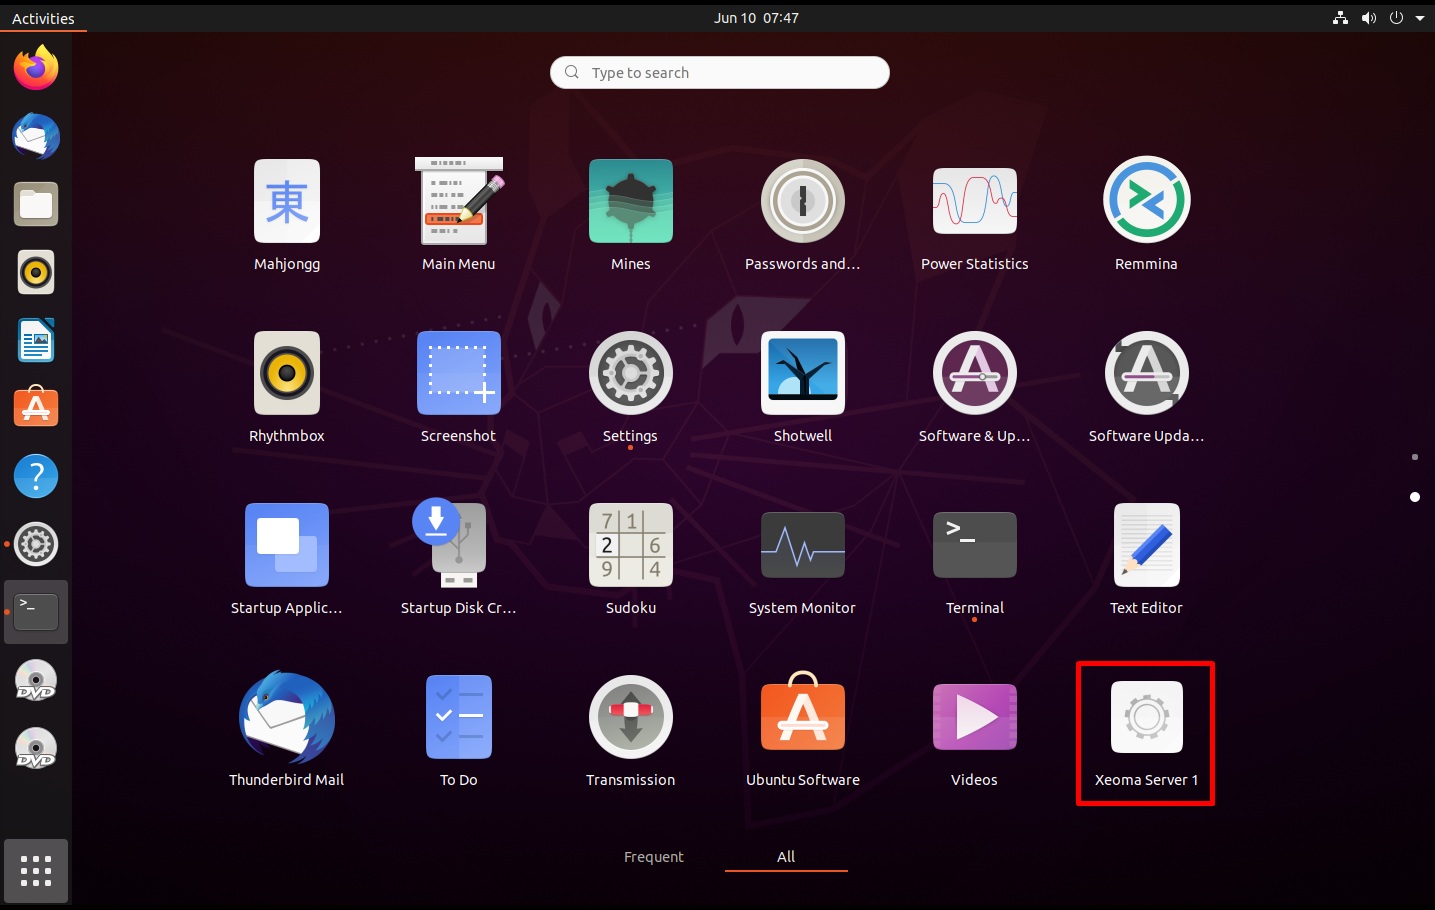
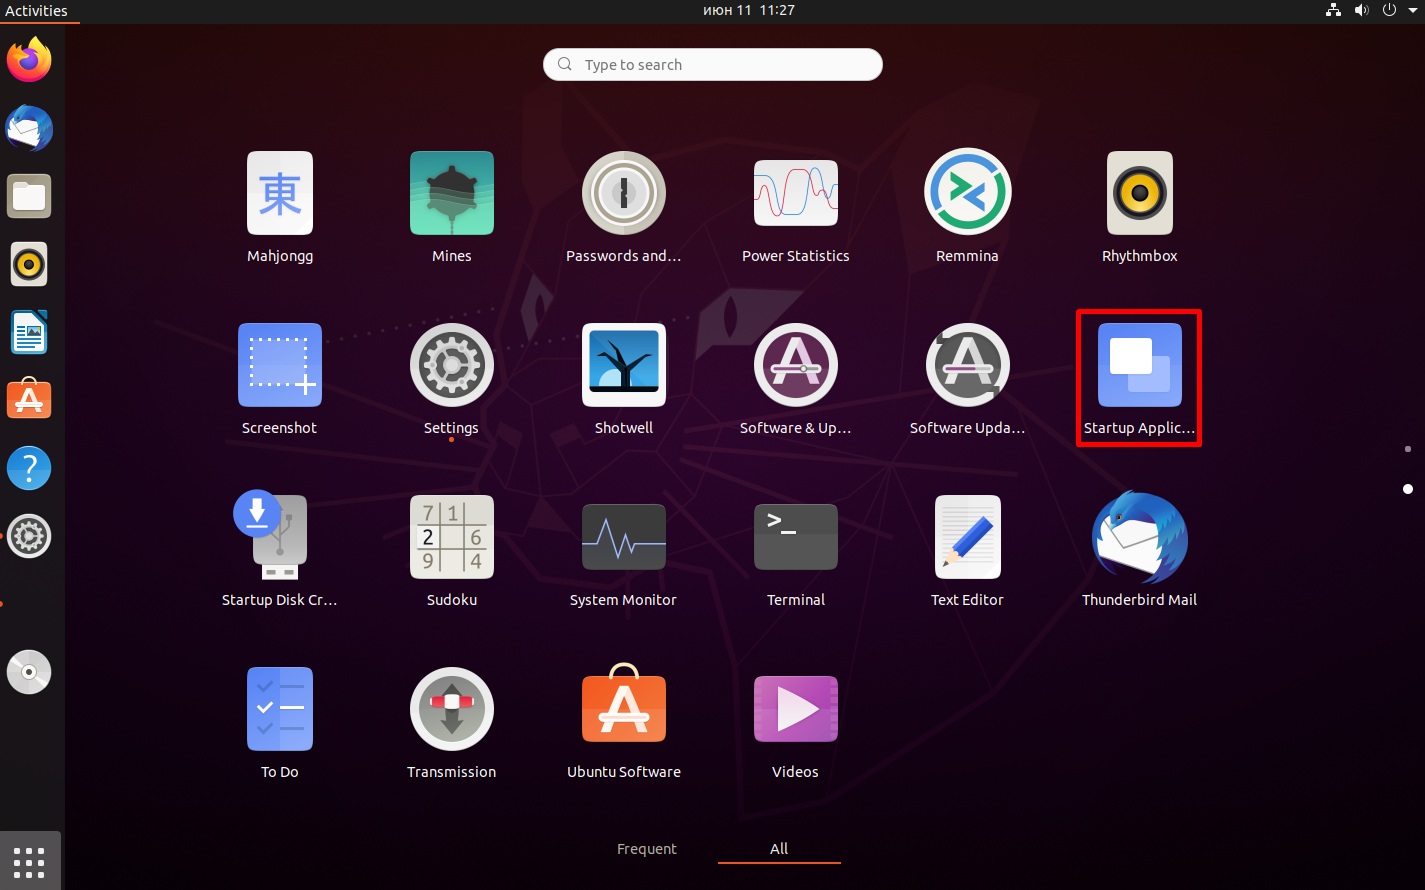
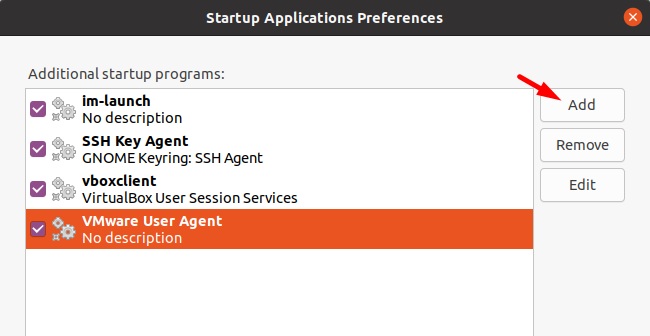
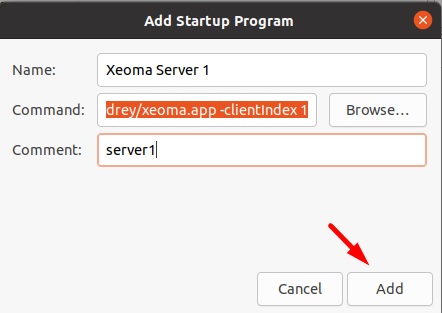
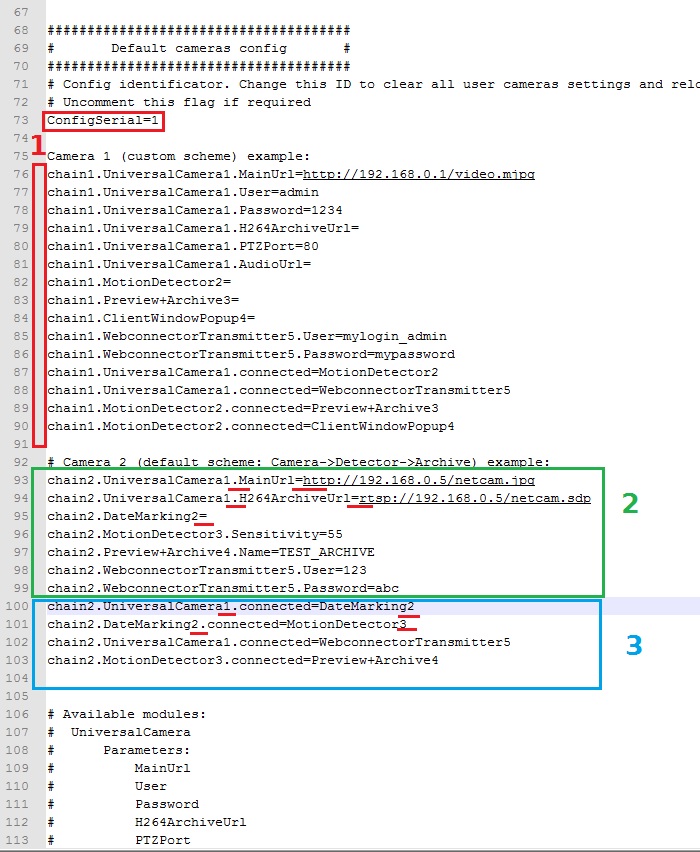